|
-
Let's start the lesson.
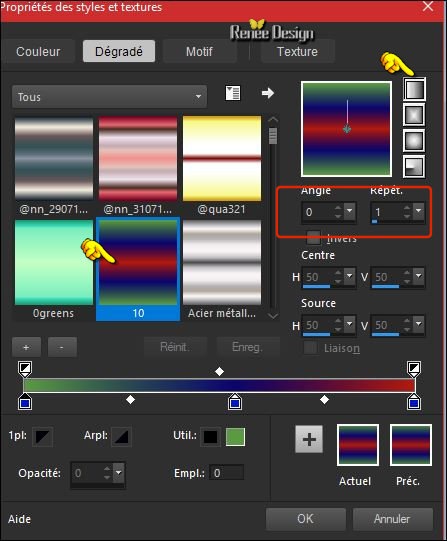
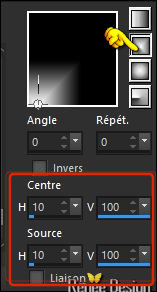
- Preparation : Color Palette:Set your Foreground color to Gradient and select : ‘’10’’ –Prepare a foreground-linear gradient configured like this.-Set your Background color to #ffffff
1.
Open the image Gothique_23 –Window - Duplicate (or shift+D) - Close the original and proceed on the copy -Promote Background Layer = Raster 1
2. Selections –load/save selection –load selection from disc and select my selection:‘’Gothique_24_1’’
3.
Layers- New Raster Layer
4.
Activate Flood Fill Tool and fill the selection with the gradient
Selections- Deselect All
5.
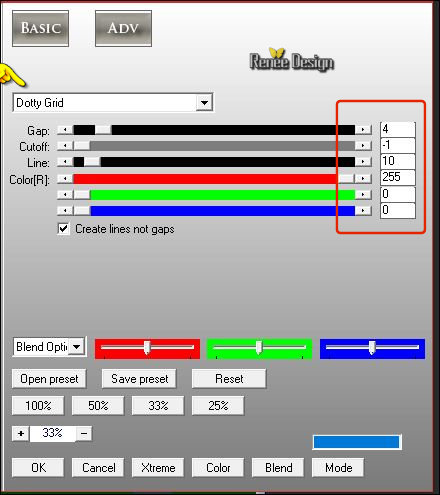
Effects – Plugins - AP[Lines]
Silverling use the settings below
6.
Layers- Duplicate
–
Image - Mirror - Mirror Horizontal (Image - Mirror in older versions of PSP)
7.
Layers- Merge- Merge- Down
8.
Effects- 3 D Effects- Drop Shadow with these settings 0/0/100/10 black
9.
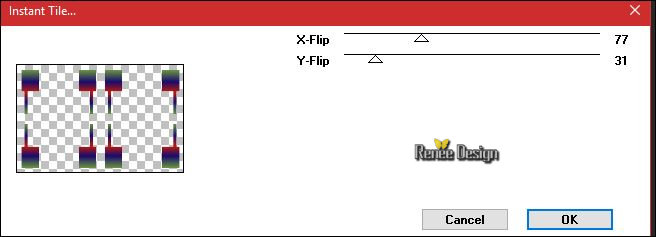
Effects –Plugins – VM Toolbox- Instant
Tiles use the settings below
10.
Effects- Plugins - Taodies –What are you
20/20
11. Effects
– User Defined Filter - Emboss 3 using the default settings
12. Effects
– Plugins - Simple - Blintz
13. Effects
– Plugins -Simple - 4 Way average
14. Effects- 3 D Effects- Drop Shadow with these settings 1/2/100/2 Color #c21b00
15.
Layers-Properties-Set the Blend Mode to " Hard Light "
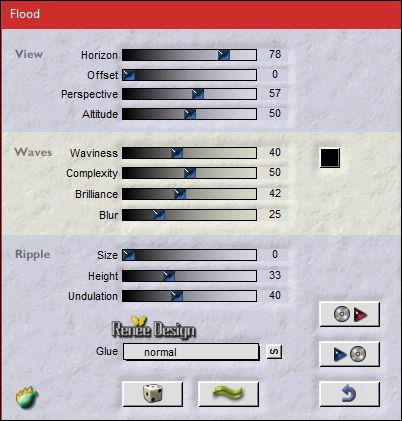
16. Open your tube ‘’ image 1’’
- Edit - Copy- Activate your work -Edit - Paste as a new layer
- Do not move , it is in the right place
- In the Layer Palette- Make Raster 2 active
17. Layers- Duplicate
- Layers- Arrange- Bring to Top
18. Effects
–Plugins– Flaming Pear – Flexify2 use the settings below
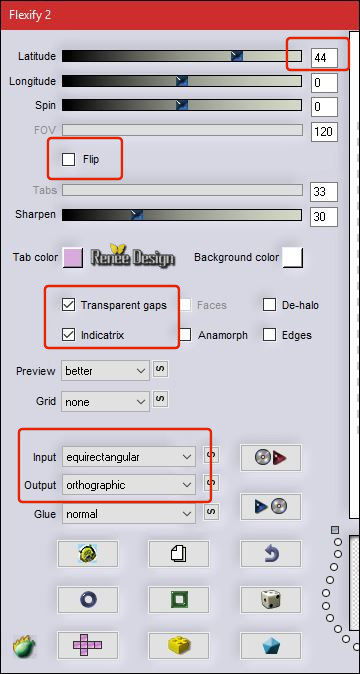
19.
Layers-Properties-Set the Blend Mode to " Overlay "
20. Effects- 3 D Effects- Drop Shadow with these settings - 2/2/100 /1 Color
#642a03
21. Layers- Duplicate
- Image - Mirror - Mirror vertical ( Image - Flip in older versions of PSP)
22. Effects
–Plugins-Unlimited – Toadies - Ommadawn 5/16/234/17
In the Layer Palette- Make Raster 1 active
23. Layers- New Raster Layer
24. Activate Flood Fill Tool and fill the layer with the background color #ffffff
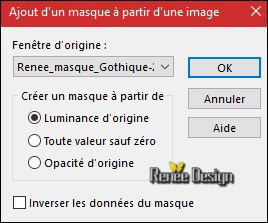
-Open the mask ‘’Renee_masque-Gothique-23 and Soniamask_0310 in your Psp
25. Layers- New Mask Layer-From Image and select mask
''Renee_masque_Gothqiue_24''
- Layers- Merge- Merge Group
- On the same layer
26. Layers- New Mask Layer-From Image and select mask 'Soniamask_0310''
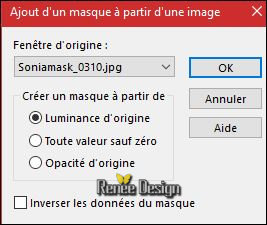
- Layers- Merge- Merge Group
27. Open your tube ‘’ Renee_tube_sanctuarium.pspimage’’
- Image
Resize to 75 %
- Edit - Copy- Activate your work -Edit - Paste as a new layer
28. Effects- Image Effects- Offset with these settings: H = - 167 and V = -
41
29. Layers- Arrange-Move Up ( above Raster 2)
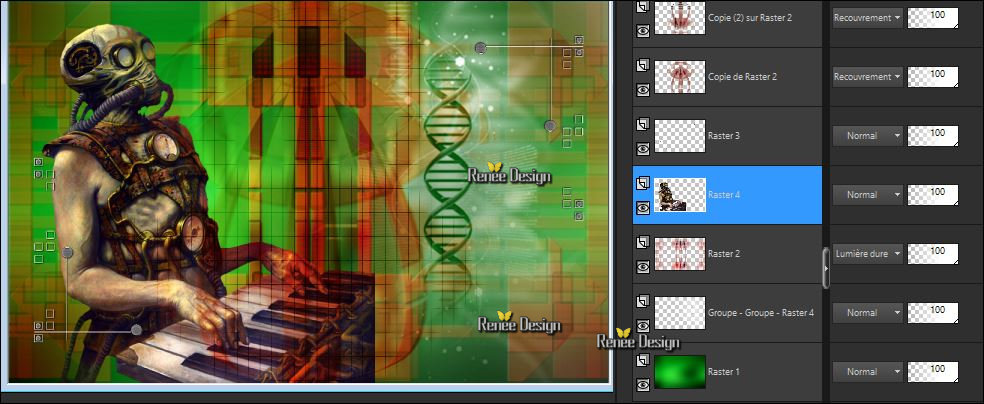
You should have this result
- Activate the top layer in the layer palette
- Color Palette:Set your Foreground color to #ffffff -Set your Background color to #000000
-
Prepare a foreground/background-rectangular gradient configured like this
30. Layers- New Raster Layer
31. Activate Flood Fill Tool and fill the layer with the gradient
32.
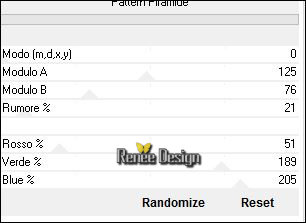
Effects –Plugins- Unlimited - Italian Editors Generatore- Pattern
Piramide using the default settings
33.
Effects – Plugins -Transparency – Eliminate
black
34.
Layers-Properties-Set the Blend Mode to " Overlay "
35.
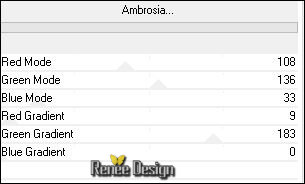
Effects –Plugins - Filter Factory Gallery M –Ambrosia
using the default settings
36.
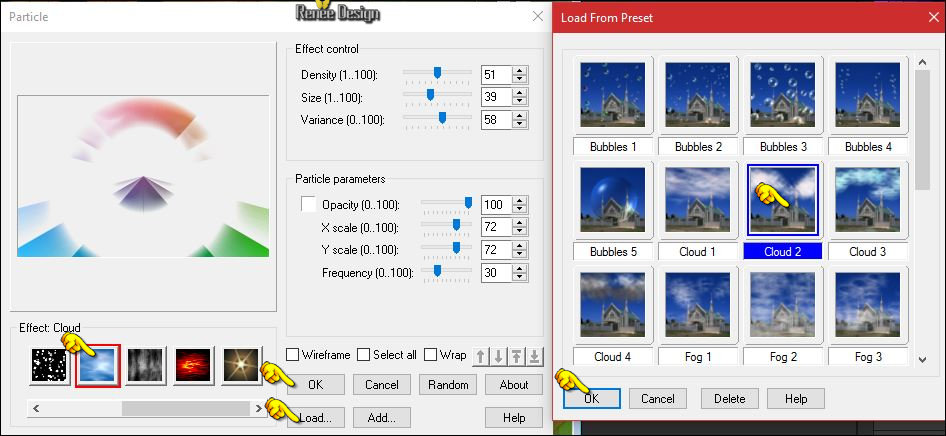
Effects – Plugins – Ulead effects – Particle / Effect
Cloud /Click Load >> Cloud 2 ok /ok
37. Open the tube ‘’image_2’’
- Edit - Copy- Activate your work -Edit - Paste as a new layer
- Activate your Move Tool (M)-move to the right side
38. Effects
–Plugins – Flaming Pear – Flood use the settings below
39. Layers- Duplicate
40. Layers-Properties-Set the Blend Mode to " Dodge " Change the opacity of this layer to 57%
- Color Palette:Set your Foreground color to #ffffff
41. Activate the Brush image ‘’Goth_24’’ in your Psp
- File- Export Custom Brush (Give it a name)
42. Layers- New Raster Layer
43. Activate Brush Tool and select my brush (B) >>>Goth_24 with these settings

- Stamp your brush in the right place by using your foreground color #ffffff (see example)
44.
Layers-Properties-Set the Blend Mode to " Overlay "- Change the opacity of this layer to
51%.
45. Image - Add borders-Symmetric checked: 1 pixel #065e66
46. Image - Add borders-Symmetric checked: 15 pixels #ffffff
47. Image - Add borders-Symmetric checked: 1 pixel #065e66
48. Image - Add borders-Symmetric checked: 40 pixels #ffffff
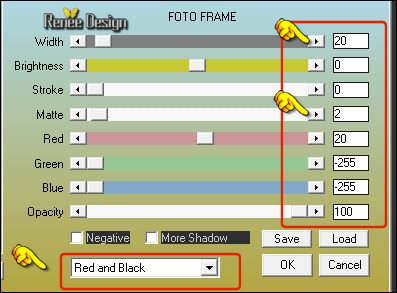
49. Effects
–Plugins –AAA Frame - Foto Frame use the settings below
50. Image - Add borders-Symmetric checked: 1 Pixel black
51. Open the tube ‘’l titre ’"- Edit - Copy- Activate your work -Edit - Paste as a new layer- Or write your own text .
Save as JPG
I hope you enjoyed this lesson
Renée
This lesson was written by Renée 24/04/2017
Edited and Update
2017
*
Any resemblance with an existing lesson is a coincidence
* Do not forget to thank the people who work with us and for us I have appointed the tubeurs and translators
Thanks Renée
*
| 

 Translations


 If a plugin supplied appears with this icon it must necessarily be imported into Unlimited *

 All rights reserved