|
Let's start the lesson.
-
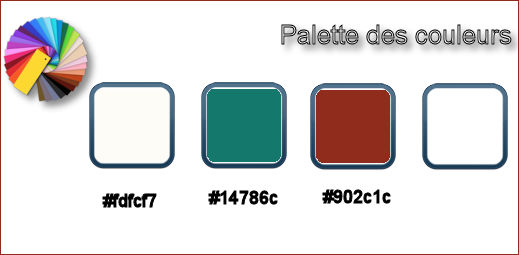
Color-palette:Set your foreground color to color #fdfcf7 -Set your background color to color:#14786c
1.
File-Open a new transparent image 1005 x 665 pixels
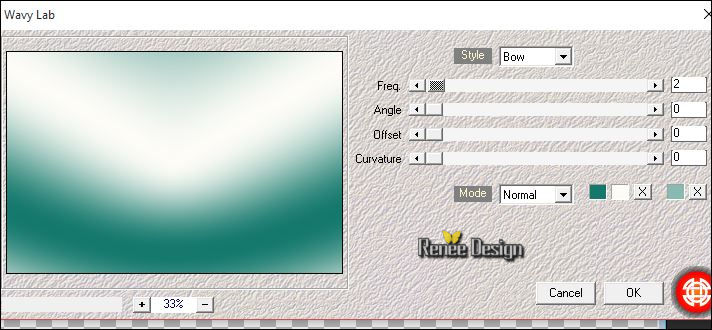
2. Effects- Plugins – Medhi – Wavy Lab use settings below
3.
Selections –load/save selection –load selection from disc and choose my selection:‘’gothique_19_1’’
4.
Layers- New Raster Layer
5. Activate Flood Fill Tool and fill the selection with the foregroundcolor
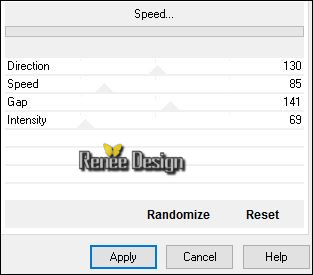
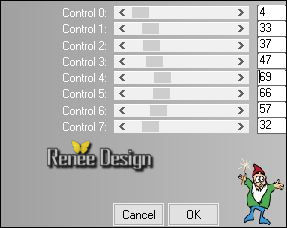
6. Effects- Plugins – VM
Natural-Speed..use settings below
Selections- Deselect All
7.Effects- Plugins
Toadies –What are you 57/57
8. Effects- Edge Effects- Enhance
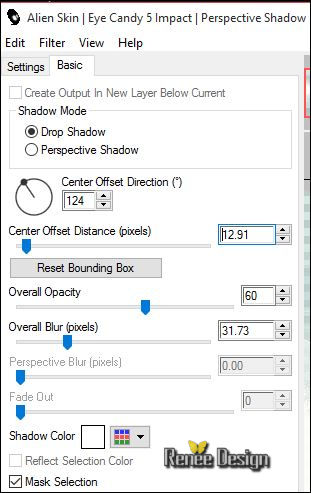
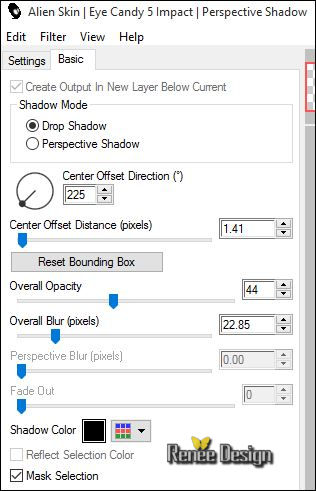
9. Effects- Plugins –Eyecandy 5 Impact – Perspective
shadow use settings below
- Color-palette:Set your foreground color to color #902c1c
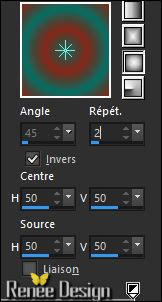
- Color Palette:Set your foreground to gradient 'Foreground-background' -Sunburst -configured like this.
10. Layers- New Raster Layer
11. Activate Flood Fill Tool and fill the layer with the gradient
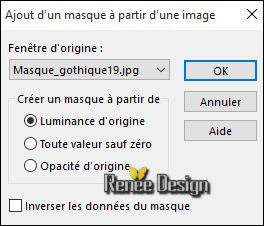
12. Layers- New Mask layer from Image and choose Mask: ‘’masque
_gothique19’’
-Layers- Merge- Merge Group
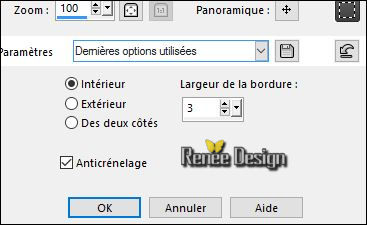
13. Layer Palette - Double click on this Layer and set the Blend Mode to "Hard Light "
14.
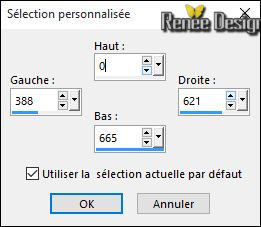
Activate Selection Tool -Rectangle -Custom Selection (S) with these settings
15. Layers- New Raster Layer
16. Activate Flood Fill Tool and fill the selection with the gradient
17. Adjust- Blur- Gaussian Blur -Radius: 65
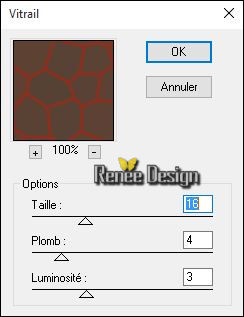
18. Effects- Plugins –Texture – Vitrail use settings below
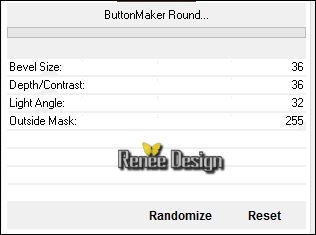
19.
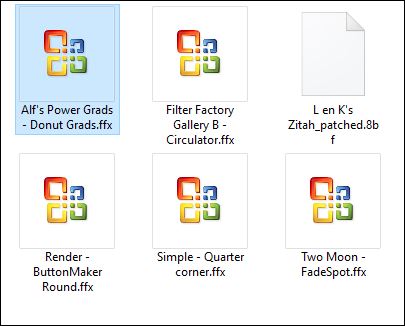
Effects –Plugins-Unlimited – Render- ButtonMaker
Round..use settings below
Selections- Deselect All
20. Layers- Merge- Merge Down
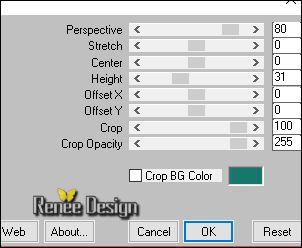
21.Effects- Plugins -Mura’s Meister - Perspective
Tilling use settings below
22. Layers- Duplicate
- Layer Palette - Double click on this Layer and set the Blend Mode to "Normal "
Layer Palette look like this now
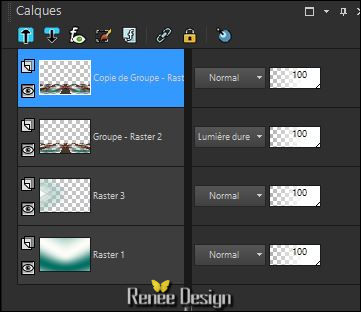
23. Layers- Merge- Merge Down
- Layer Palette - Double click on this Layer and set the Blend Mode to "Normal "
24. Layers- Arrange- Move Down
Your work and Layer Palette look like this now

25. Effects- 3 D Effects- Drop Shadow with these settings: Backgroundcolor

26. Layers- New Raster Layer
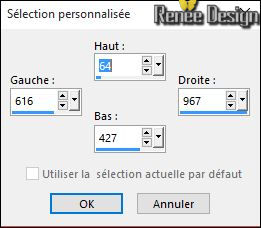
27.
Activate Selection Tool -Rectangle -Custom Selection (S) with these settings
28. Activate Flood Fill Tool and fill the selection with the foregroundcolor
29.
Selections- Modify-Contract 3 pixels
DELETE

30. Layers- New Raster Layer
31. Activate Flood Fill Tool and fill the selection with the backgroundcolor
32. In the Layer-Palette: Double click on this Layer and set the Blend Mode to "Screen "
33. Effects- Plugins – L & K’s – Zitah use settings below
Selections- Deselect All
34. Effects- Plugins -EyeCandy5 Impact – Perspective
shadow use settings below
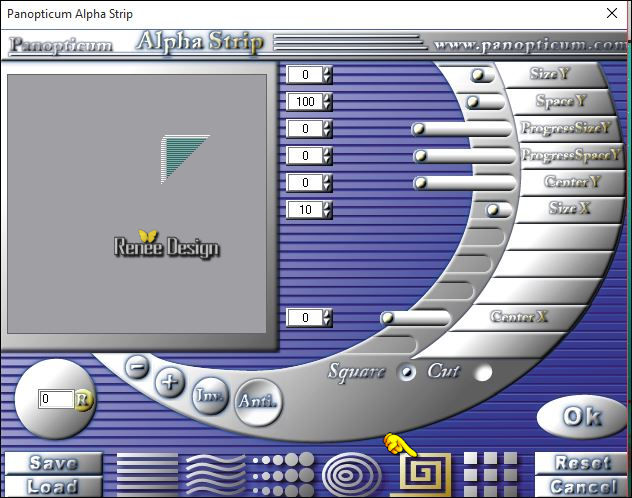
35. Effects
-Plugins – Panopticum – Alpha Strip use settings below
36. Effects- Edge Effects- Enhance More
- Activate the top of the layer palette
37. Open the tube ‘’ Gothique_19_image1’’
- Edit/ Copy-Edit - Paste as new layer on your working image
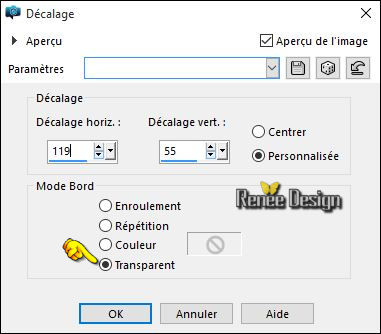
38. Effects- Image Effects- Offset with these settings
39. In the Layer-Palette: Double click on this Layer and set the Blend Mode to "Multiply"
40. Activate Magic Wand and select the large circle / like this
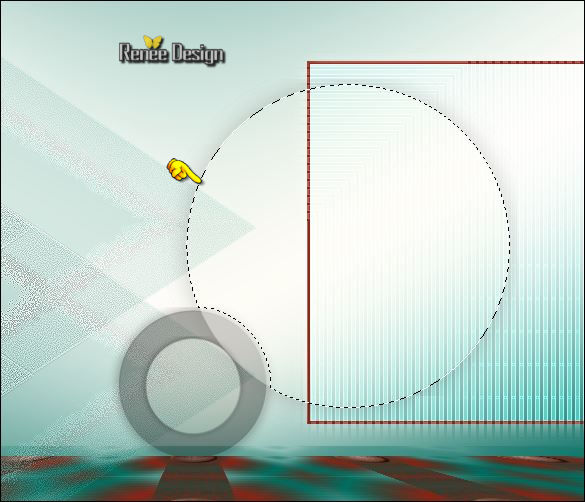
41.
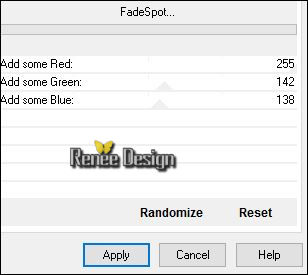
Effects –Plugins- Unlimited - Two Moon- FadeSpot..use settings below .
Selections- Deselect All
Layer palette – Make Raster 3 active
42. Effects
–Plugins- Unlimited- Simple - Quarter corner- default
- Activate the top of the layer palette
43. Open the tube ‘’ Gothique_19_image_4 »
- Edit/ Copy-Edit - Paste as new layer on your working image
- Place with your Move Tool -move around the large circle
44. Layers- Arrange- Move Down
Activate the top of the layer palette
45. Open the tube’’ Renee_tube_shattered.pspimage’’
- Image
-Resize to 65 %
- Edit/ Copy-Edit - Paste as new layer on your working image
-Activate your Move Tool (M) move to the right side as shown in the example below
46. Layers- Arrange- Move Down
- Activate the top of the layer palette
- Color-palette:Set your foreground color to color #fdfcf7 -Set your background color to color:#902c1c
47. Layers- New Raster Layer
48. Activate Flood Fill Tool and fill the layer with the foregroundcolor
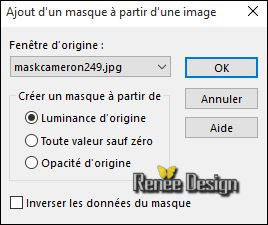
49. Layers- New Mask layer from Image and choose Mask:‘’maskcameron249.jpg’’
- Layers- Merge- Merge Group
50.
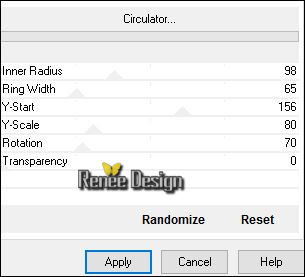
Effects –Plugins- Unlimited - Filter Factory Gallery B-
Circulator..use settings below
51. Layer Palette - Double click on this Layer and set the Blend Mode to "Soft Light "
52. Layers- Arrange- Move 2 x down
- Activate the top of the layer palette
53. Layers- New Raster Layer
54.Selections –load/save selection –load selection from disc and choose my selection:‘’gothique_19_2’’
55. Activate Flood Fill Tool and fill the selection with the backgroundcolor #902c1c (zoom in if necessary )
Selections- Deselect All
56. Open the tube ‘’cadre.png »
- Edit/ Copy-Edit - Paste as new layer on your working image
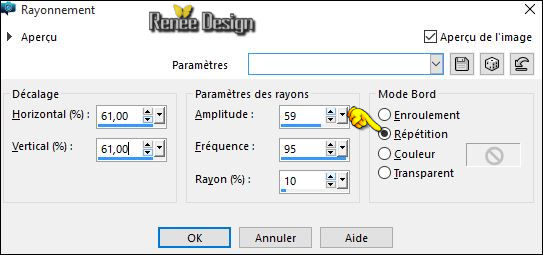
57.Effects- Image Effects- Offset with these settings H = -275 and V = 126-transparent
58.Effects- Distortion Effects- Spiky Halo use settings below
59. In the Layer-Palette: Double click on this Layer and set the Blend Mode to "Multiply"
60. Open the tube ‘’ Renee_tube_Gloom.pspimage’’
- Image
Resize to 60%
- Edit/ Copy-Edit - Paste as new layer on your working image and move to the left
- In the Layer-Palette: Double click on this Layer and set the Blend Mode to "Luminance Legacy "
61. Layers- New Raster Layer
62.
Effects –Plugins-Unlimited - Alf's Power Grads-Donut
Grads..use settings below
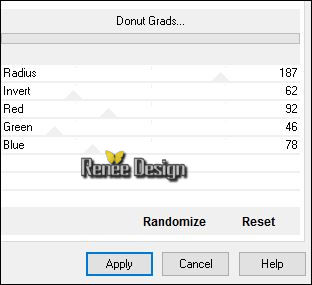
63. Layer Palette - Double click on this Layer and set the Blend Mode to "Hard Light "
64. Activate the Magic Wand / click in the empty part of the center
-
Selections- Invert
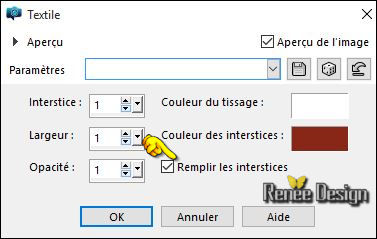
65. Effects
– Texture Effects- Weave use settings below –color #ffffff and #902c1c
66.
Selections- Invert
67.
Selections-Modify-Select Selection Borders with these settings-In side
68. Layers- New Raster Layer
69. Activate Flood Fill Tool and fill the layer with the foregroundcolor
70. Effects- 3 D Effects- Inner Bevel use settings below

71. Layers- Merge- Merge Down
-
Set the layer opacity of this layer to 72%
-Selections- Deselect All
72.
Effects –Plugins- EyeCandy 5 Impact – Blacklight–tab Settings/User settings choose my Preset
“Gothique_19_Blackligt”
73.Open the tube’’Gothique_19_image2.png’’
- Image
Resize to 60%
- Edit/ Copy-Edit - Paste as new layer on your working image
-Activate your Move Tool (M) move to the bottom left corner
74.Open the tube ‘’ Gothique_19_image3.png’’
- Edit/ Copy-Edit - Paste as new layer on your working image
-Activate your Move Tool (M) move against the left bottom edge
73. Image - Add borders-Symmetric checked: 1 pixel color #902c1c
74. Image - Add borders-Symmetric checked: 50 pixels color #ffffff
75. Activate the Magic Wand and select the border of 50 pixels
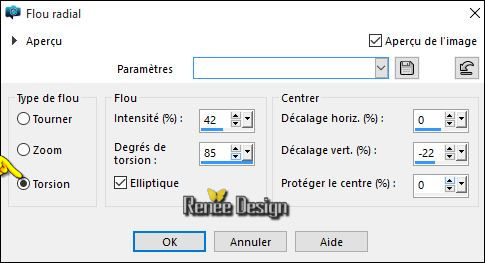
76. Adjust- Blur- Radial Blur use settings below
77.
Selections- Invert
78. Effects- 3 D Effects- Drop Shadow with these settings: 5/5/65/18 black
- Repeat: Drop Shadow with these settings- negative: - 5/-5
Selections- Deselect All
79.Open the tube ‘’gothique_19_titre -Edit/ Copy-Edit - Paste as new layer on your working image and move -Ore write your own text
80 . Layers- Merge- Merge All
Save as JPEG
I hope you enjoyed this lesson
Renée
This lesson was written by Renée 14/08/2016
Edited and Update
2016
*
Any resemblance with an existing lesson is a coincidence
*
Do not forget to thank the people who work with us and for us I have appointed the tubeurs and translators
Thanks Renée
| 
 Translations


 All rights reserved