|
Let's start the lesson
Gothique 40
- Preparation
-Material Properties: Set your Foreground color to color #060b0f=color 1 – Set your Background color to color #dbe7e3=2

1. File: Open a Transparent Image in this size : 1000
x 700 PX
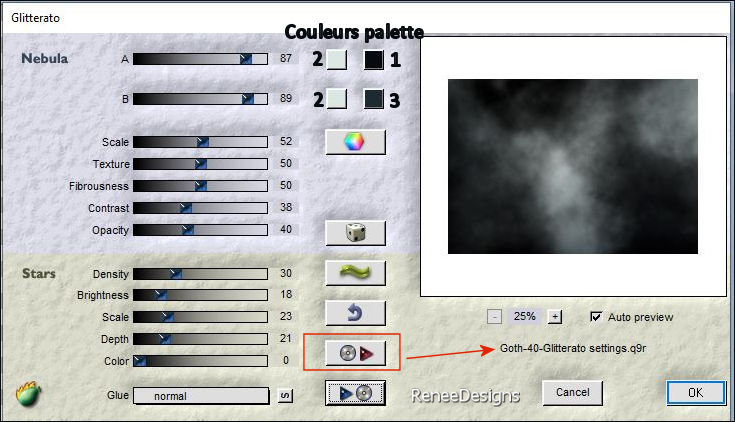
2. Effects- Plugins – Flaming Pear – Gliterrato (activation code 81421037)-
Preset Goth-40-Glitterato settings
(
click on the red triangle and find my file-Preset Goth-40-Glitterato settings-
(Included in the material) click OK
3. Layers- New Raster Layer
4. Properties Foreground- Set your Foreground color to color #ffffff=4
Flood Fill Tool  –
Fill the layer with the Foreground color #ffffff=4 –
Fill the layer with the Foreground color #ffffff=4
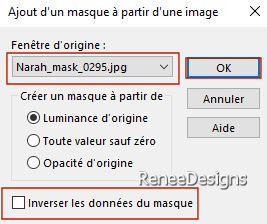
5. Layers- New Mask Layer-From Image and select Mask ’’Narah_mask_0467’’
- Layers – Duplicate
- Layers- Merge- Merge Group
6. Adjust- Blur- Gaussian Blur- Radius 15%
7. Layers-Properties-Set the Blend Mode to " Hard Light " -Reduce the opacity of this layer to 75%
8. Open the Tube ‘’ Renee-Tubes-Goth-40-
Image1’’ -Edit - Copy- Activate your work -Edit - Paste as a new layer
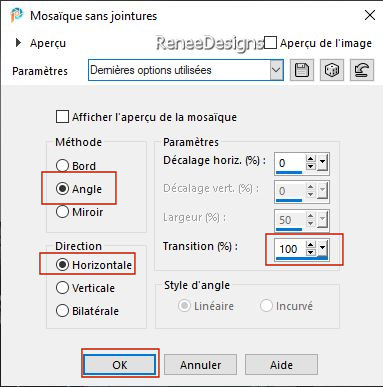
9. Effects – Image Effects
– Seamless Tiling use the settings below
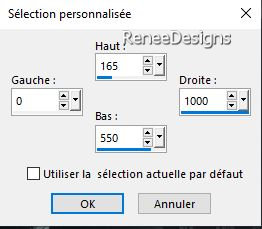
10. Activate Selection Tool -Custom Selection (S) -Rectangle use the settings below 
11. Selections – Invert

12. Selections – Invert
13. Adjust- Blur- Gaussian Blur- Radius 25%

14. Layers- Duplicate
In the Layer Palette- activate the layer underneath (Raster 2)
15. Effects – Plugins– Simple – Pizza Slice mirror
- Repeat-Effects – Plugins– Simple – Pizza Slice mirror
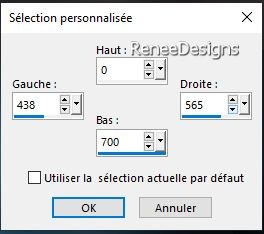
16. Activate Selection Tool -Custom Selection (S) -Rectangle use the settings below


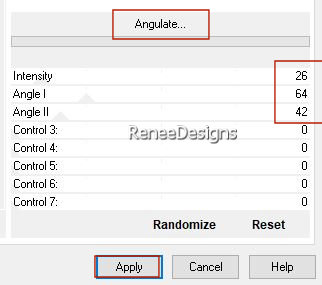
17. Effects- Plugins - Filters in Unlimited 2.0 – FunHouse - Angulate..use the settings below.
18. Effects – Edge Effects – Edge Enhance
19. Effects – 3 D-Effects –Drop Shadow with these settings: 21 / 0 / 60 /25 Color white
- Activate the top of the layer-palette
20. Layers- New Raster Layer
21. Selections –load/save selection –load selection from disc and select my selection: ‘’Gothique-40-1’’
22. Properties Foreground- Set your Foreground color to color #060b0f=1
Flood Fill Tool
 –
Fill the selection with the Foreground color #060b0f=1 –
Fill the selection with the Foreground color #060b0f=1

23. Open the Tube ''Renee-Tubes-Goth-40-
Image-0'' -Edit - Copy- Activate your work -Edit - Paste as a new layer
-Do not move, it is in the right place
24. Effects- Plugins - Filters in Unlimited 2.0 – Funhouse – Loom
141/82 -the rest remains at zero
25. Effects- Plugins
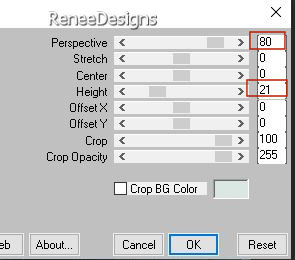
– Mura’s Meister- Perspective Tiling use the settings below
26. Layers – Duplicate
27. Effects – Reflection Effects – Rotating Mirror use the settings below
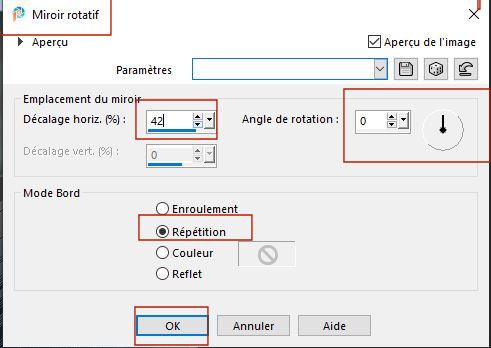
28. Effects – Reflection Effects – Rotating Mirror use the settings below
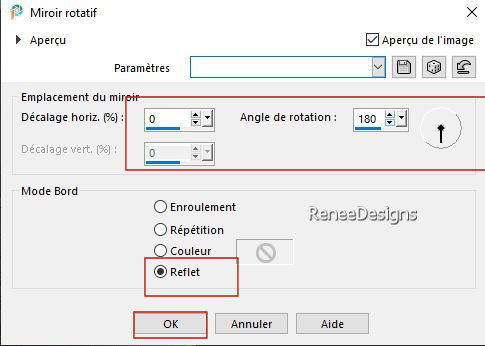
29. Layers- Merge- Merge Down
30.Open the Tube
‘’Renee-Tubes-Goth-40- Image2’’
- Image- Resize
50%
- Edit - Copy- Activate your work -Edit - Paste as a new layer
- Place this tube in the middle(see finished image )
31. Effects- Plugins – FM Tile Tools- Saturation Emboss using the default settings
- Your work and Layer Palette look like this now-You should have this result
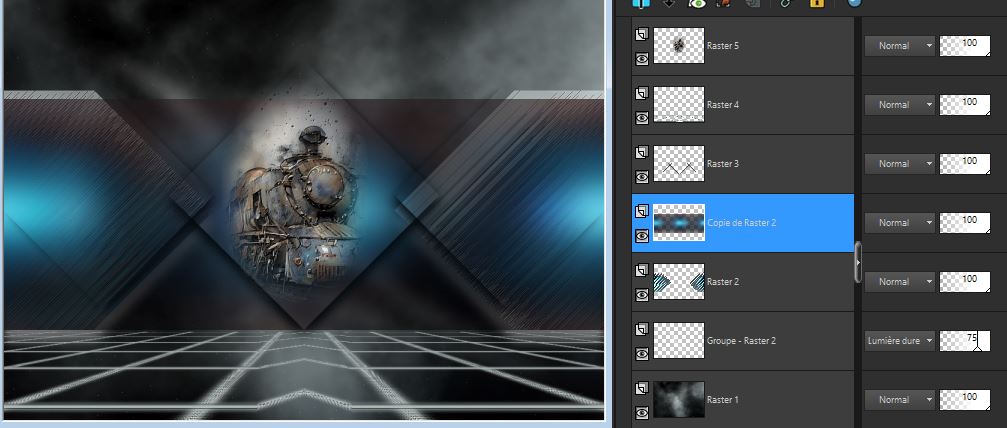
-In the Layer Palette-activate Copy of
Raster 2
32. Effects – Plugins – AAA Frame - Foto Frame use the settings below
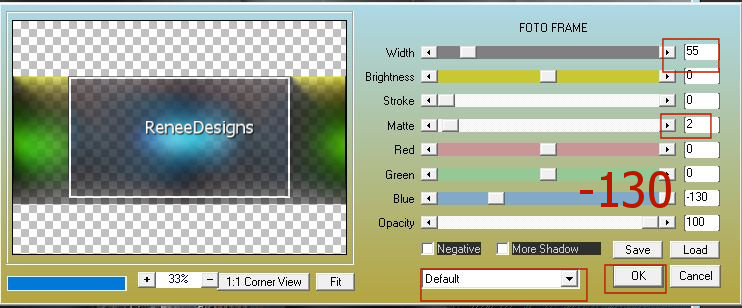
- Activate the top of the layer-palette
33. Layers- New Raster Layer
34. Selections –load/save selection –load selection from disc and select my selection: ‘’Gothique-40-2’’
35. Flood Fill Tool
 -Fill the selection with the Background color
#dbe7e3= 2 -Fill the selection with the Background color
#dbe7e3= 2

36. Adjust- Blur- Gaussian Blur- Radius 5%
37. Layers- New Raster Layer
38. Selections –load/save selection –load selection from disc and select my selection: ‘’Gotique-40-3’
39. Properties Foreground- Set your Foreground color to color #ffffff=4
Flood Fill Tool
 –
Fill the selection with the Foreground color #ffffff=4 –
Fill the selection with the Foreground color #ffffff=4

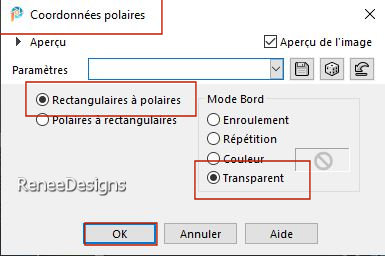
40. Effects - Distortion Effects - Polar coördinates- Rectangular to polar-Transparent
41. Layers Properties -Reduce the Opacity of this layer to 55%
(reposition the locomotive in the centre)
42. Layers- New Raster Layer
43. Selections –load/save selection –load selection from disc and select my selection: ‘’Gothique-40-4’’
44. Properties Foreground- Set your Foreground color to color #060b0f=1
Flood Fill Tool
 –
Fill the selection with the Foreground color #060b0f=1 –
Fill the selection with the Foreground color #060b0f=1

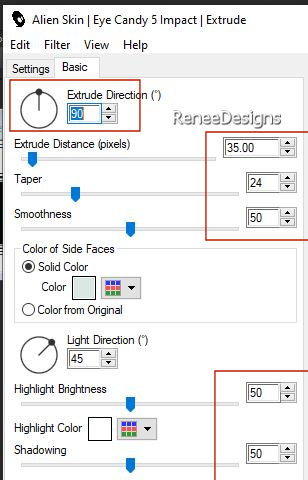
45. Effects- Plugins - Alien Skin EyeCandy 5 - Impact – Extrude use the settings below
Color #dbe7e3= 2 and Color #ffffff=4
46. Repeat-Selections –load/save selection –load selection from disc and select my selection: ‘’Gothique-40-4’’
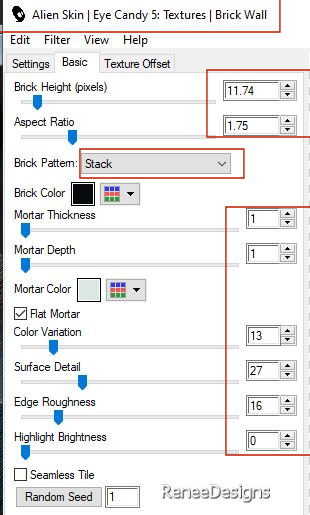
47. Effects- Plugins - Alien Skin EyeCandy 5 – Textures – Brick Wall use the settings below
Color #060b0f= 1 and Color #dbe7e3= 2

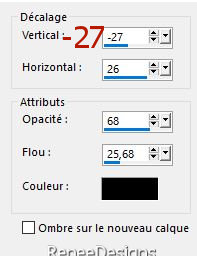
48. Effects – 3 D-Effects –Drop Shadow with these settings: 0/0/ 68 / 28,64 Color Black
49. Open the Tube ‘’ Renee-Tubes-Goth-40-6.’’
- Image - Resize
50 %
- Edit - Copy- Activate your work -Edit - Paste as a new layer
- Move the tube in the right place
50. Effects – 3 D-Effects –Drop Shadow with these settings- Color Black
-Activate the top of the layer-palette=Raster
1
51. Layers – Duplicate
52. Effects- Plugins - Filters in Unlimited 2.0 – VM Stylize - Marble
Madness with these settings: 9/22/105/255
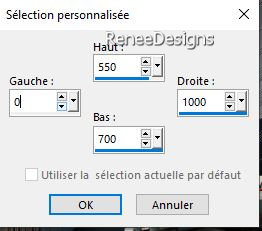
53. Activate Selection Tool -Custom Selection (S) -Rectangle use the settings below


54. Layers-Properties-Set the Blend Mode to " Overlay " -Reduce the opacity of this layer to 42%
- Activate the top of the layer-palette
55. Open the Tube ‘’Renee-Tubes-Goth-40- Image3.’’ -Edit - Copy- Activate your work -Edit - Paste as a new layer
-Move to the left
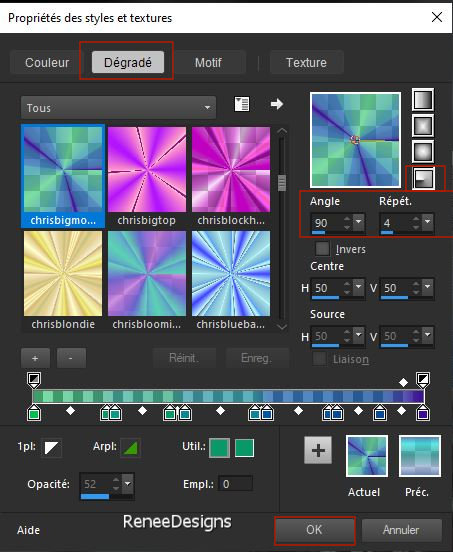
Properties Foreground - Change Foreground material into gradient and select ‘’chrisbigmomma’’ -Put your Foreground on the radial gradient configured like this
56. Layers- New Raster Layer
57. Selections –load/save selection –load selection from disc and select my selection: ‘’Gothique-40-5’’
58. Flood Fill Tool
 –
Fill the selection with the gradient –
Fill the selection with the gradient

59. Adjust- Blur- Gaussian Blur- Radius 15%
60. Effects- Distortion Effects–
Wind -Strength 100% -Wind Direction From Left
- Repeat: Effects- Distortion Effects– Wind -Strength 100% -Wind Direction From Left
61. Layers-Properties-Set the Blend Mode to " Hard Light " -Reduce the Opacity of this layer to 59%
Or Layers-Properties-Set the Blend Mode to " Overlay " -Reduce the Opacity of this layer to 93% of your choice
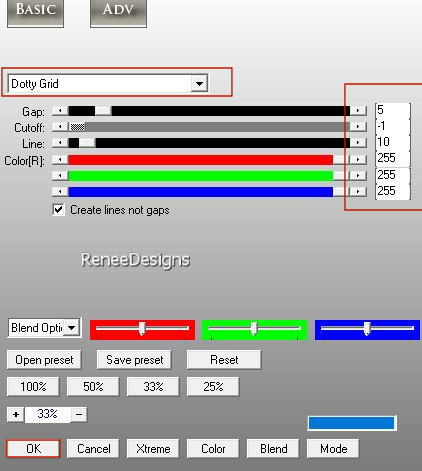
62. Effects -Plugins- AP[Lines] Lines – Silverlining use the settings below
63. Open the Tube ‘’ Renee-Tubes-Goth-40-9.’’
- Image - Resize
68 %
- Edit - Copy- Activate your work -Edit - Paste as a new layer
-Place to your liking
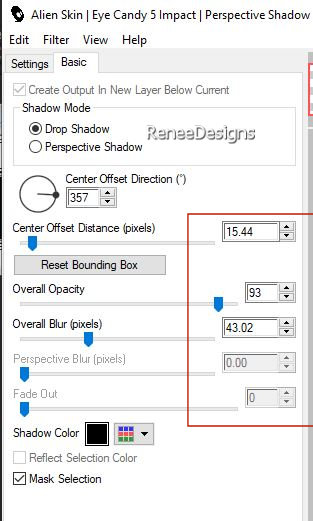
64. Effects- Plugins - Alien Skin EyeCandy 5 - Impact - Perspective
Shadow use the settings below
65. Text tool-Write the title -Renée chose the font ‘’ AlteSchwabacher-Shadow’’-Included in the material) or choose your own font
-
Renée chose these colours- Foreground color #ffffff=4 – Background color #dbe7e3= 2

66. Image - Add borders-Symmetric checked: 2 Pixels - Color #060b0f=1
- Image - Add borders-Symmetric checked: 25 Pixels -Color #ffffff=4
- Image - Add borders-Symmetric checked: 2 Pixels -Color #dbe7e3= 2
- Image - Add borders-Symmetric checked: 1 Pixel -Color #060b0f=1
- Image - Add borders-Symmetric checked: 2 Pixels -Color #dbe7e3= 2
- Image - Add borders-Symmetric checked: 25 Pixels - Color #ffffff=4
- Image - Add borders-Symmetric checked: 1 Pixel -Color #060b0f=1
67. Selections-
Select All
68. Selections – Modify-Contract - 40 Pixels
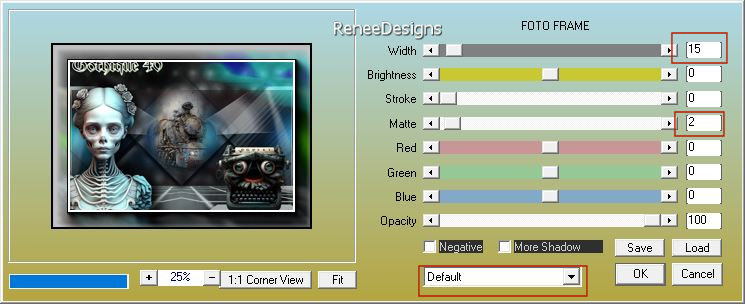
69. Effects – Plugins – AAA Frame Foto Frame use the settings below
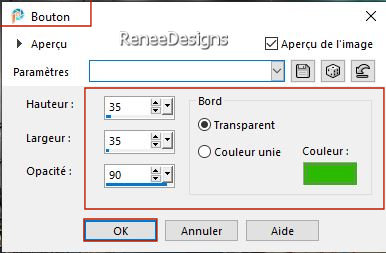
70. Effects – 3D- Effects–
Buttonize -use the settings below -Color #2dba00

71. Image - Resize - 1005 Pixels width-Resize all Layers checked
72. Paste the author's watermark on your work and your own watermark
73. Layers- Merge- Merge All ( flatten)
Save as JPG
I hope you enjoyed this lesson
Renée
This lesson was written by Renée 18/06/2023
Edited and Update
in 2023
*
*
Any resemblance with an existing lesson is a coincidence* Do not forget to thank the people who work with us and for us -I have appointed the tubeurs and translators
Thanks
|

 Translations


