|
Let's start the lesson
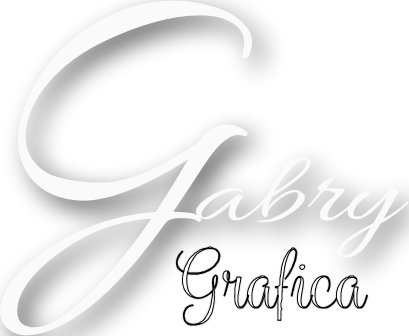
GABRY-
Grafica
You can find these tubes here

- Preparation
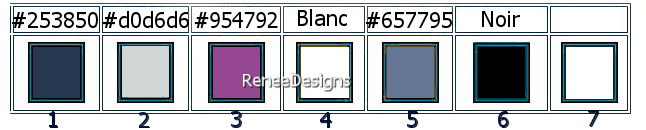
-Material Properties: Set your foreground color to color #253850=color 1 – Set your background color to color #d0d6d6= 2
1. Open the Background Image ‘’Fond-Gabry’’ –
Promote Background Layer =Raster 1
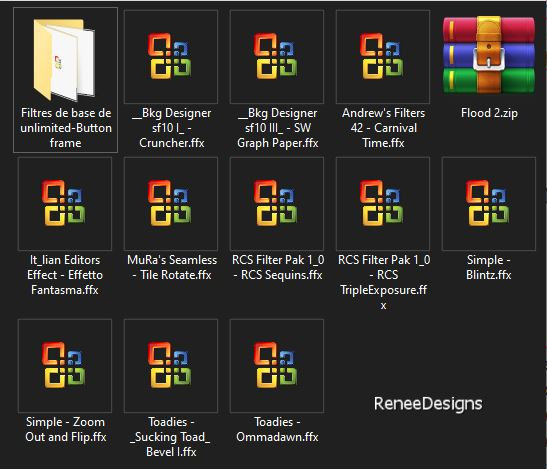
2. Effects- Plugins - Filters in Unlimited 2.0 - Simple - Zoom Out and
Flip
3. Effects- Plugins - Filters in Unlimited 2.0 - Simple - Blintz
4. Effects- Plugins - Filters in Unlimited 2.0 - RCS Filter Pak 1.0 -
RCS -TripleExposure : 255
5. Repeat - Effects- Plugins - Filters in Unlimited 2.0 - RCS Filter Pak 1.0 -
RCS -TripleExposure : 255
6. Image - Mirror - Mirror Horizontal (Image - Mirror in older versions of PSP)
7. Effects- Plugins - Filters in Unlimited 2.0 - RCS Filter Pak 1.0 -
RCS - RCS Sequins
9. Adjust- Sharpness-Sharpen More
10. Layers- New Raster Layer
11. Selections –load/save selection –load selection from disc and select my selection: ‘’Gabry1’’
12. Flood Fill Tool – Fill the selection with the background color #d0d6d6= 2
13. Selections - Invert
On the same layer do not add a new layer
14. Flood Fill Tool
 -
Fill the selection with the foreground color #253850=color 1 -
Fill the selection with the foreground color #253850=color 1
15. Selections –load/save selection –load selection from disc and select my selection: ‘’Gabry2’’ (it will cancel the previous one)
16. Effects – 3D-Effects- Drop Shadow with these settings: 0 /0/ 50/35 Color black

17. Effects - Plugins- Filters in Unlimited 2.0 - Toadies - *Sucking
Toad* Bevel I..with these settings: 255/130/65
18. Layers-Properties-Change the Blend Mode to " Overlay " – Reduce the opacity of this layer to 57%
19. Effects – Plugins– Toadies – What are you 13/13 (
or in unlimited depending on your filter )
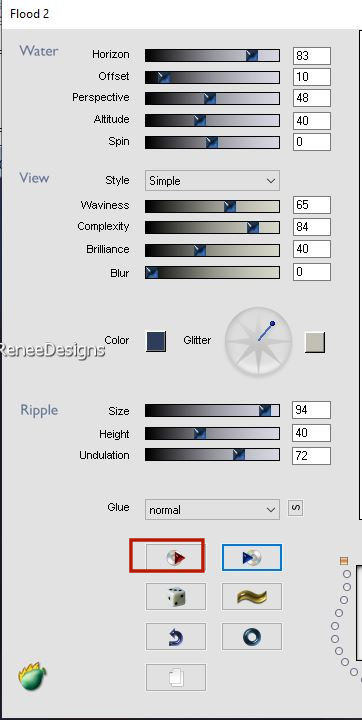
20. Effects - Plugins- Flaming Pear – Flood 2 –
click on the red arrow and select my file - Preset ‘’Gabry Flood
settings" Click on the preset and effect will apply
(This filter is included with the material, unzip it and put it in your filter folder, you will then see the filter in Flaming Pear)
Or manual settings as shown in the example below
21. Activate Raster 1 in the Layers palette
-Repeat the filter Flaming Pear - Flood 2 with the same settings
- Your work and Layer Palette look like this now

22. Layers- Merge- Merge Visible (Rename this raster layer 1)
23. Layers - Duplicate
24. Adjust-Blur-Gaussian Blur -Radius 65
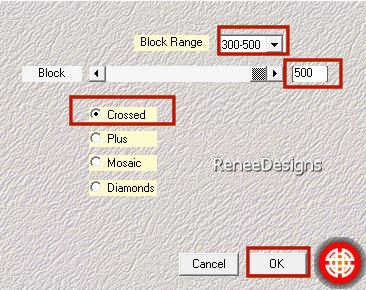
25. Effects- Plugins – Medhi – Sorting Tiles use the settings below
26. Effects- Plugins - Filters Unlimited 2.0 -&<Bkg Designer sf10 I>
- Cruncher using the default settings: 20/20
27. Effects – Edge Effects– Enhance
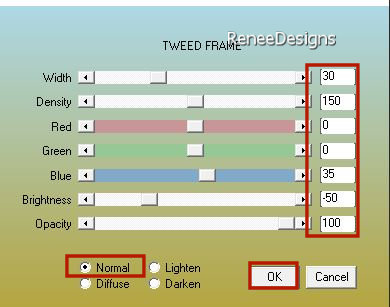
28. Effects- Plugins – AAA Filters – Tweed Frame use the settings below
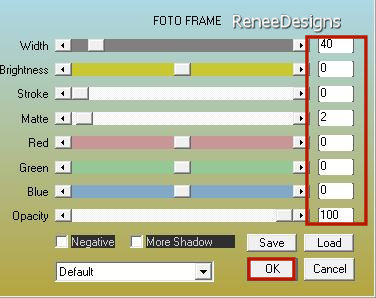
29. Effects- Plugins – AAA Frame – Foto Frame use the settings below
30. Image - Resize to 85% - Resize all layers NOT checked
31. Effects- Plugins - Filters in Unlimited 2.0 -&<Bkg Designer sf10 I>
- Cruncher using the default settings: 20/20
32. Objects – Align – Top
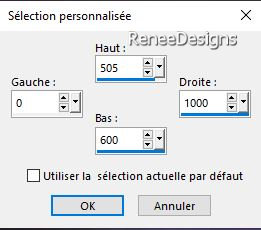
33. Activate Selection Tool -Custom Selection (S) -Rectangle with these settings 
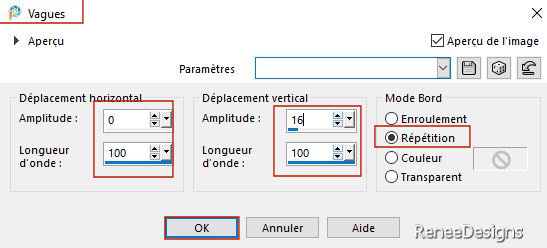
34. Effects– Distortion Effects– Wave use the settings below

35. Selections -
Promoted selection to layer
36. Effects – 3D-Effects-Drop Shadow with these settings: 0/0/50/35 Color white
37. Effects- Plugins - Filters in Unlimited 2.0 –Toadies -Ommadawn..with these settings: 9/13/255/8
38. Layers-Properties-Change the Blend Mode to " Dodge"
39. Layers – Duplicate
40. Layers- Merge- Merge Down
- Activate the bottom of the layer palette =Raster 1
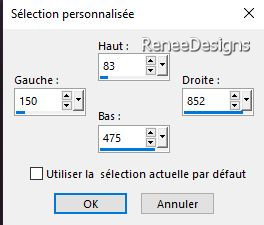
41. Activate Selection Tool -Custom Selection (S) -Rectangle with these settings
42. Selections –
Promoted selection to layer
43. Layers- Arrange- Bring to Top
KEEP SELECTION
44. Effects- Plugins - Filters in Unlimited 2.0-
MuRa's Seamless - Tile Rotate...using the default settings: 2/2/180
45. Effects- Plugins -[I.C.NET Software]- Filters in Unlimited 2.0 -
Buttons & Frames - Mirrored Frame : 70
46. Effects- Plugins – VM Toolbox – Seamless Tile with these settings: 255/16/16/255/0
47.
Effects – 3D-Effects- Drop Shadow with these settings: 0/0/60/32 Color black
48.
Effects– Distortion Effects– Wave use the settings below
49. Effects- Plugins - Filters in Unlimited 2.0 - &<Bkg Designer sf10
III>- SW Graph Paper
50.
Layers-Properties-Reduce the Opacity of this layer to 59%
- To replace the top of the layer-palette
51. Open the tube ''Gabry-nom'' - paste it as a new layer and place it on the left side.
Take the tube Gabry-nom 2, paste it as a new layer and place it under the first name Gabry
Look at the example, you may need to make corrections when the lesson is almost finished. .
(or write your title with fonts attached)
52. Effects – 3D-Effects-Drop Shadow with these settings: 10/10/75/2 Color black
53. Layers- New Raster Layer
54. Selections –load/save selection –load selection from disc and select my selection: ‘’Gabry3’’
55. Color Palette-Set your foreground color to color #954792= color 3
Flood Fill Tool
–
Opacity 100 % -
Fill the selection with the foreground color #954792= color 3
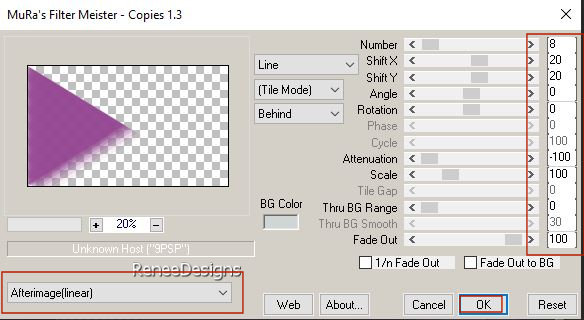
56. Effects- Plugins – Mura’s Meister – Copies use the settings below
57. Layers-Properties-Leave the Blend Mode to " Screen" – Reduce the Opacity of this layer to 71%
58. Effects – Edge Effects– Enhance
59. Layers- New Raster Layer
60. Selections –load/save selection –load selection from disc and select my selection: ‘’Gabry4’’
61. Color Palette-Set your foreground color to color #ffffff=color 4
Flood Fill Tool – Fill the selection with the foreground color #ffffff=color 4
62.
Effects- Plugins - Filters Unlimited 2.0- It@lian
Editors Effect - Effetto Fantasma 13/0
- Repeat this filter -using the same settings
63. Effects – Edge Effects– Enhance
64. Layers-Properties-Change the Blend Mode to "Overlay "
65. Image - Mirror - Mirror Horizontal (Image - Mirror in older versions of PSP)
66. Layers- New Raster Layer
67. Selections –load/save selection –load selection from disc and select my selection: ‘’Gabry5’’
68. Color Palette-Set your foreground color to color #657795=color 5
Flood Fill Tool - Opacity at 40% –
Fill the selection with the foreground color #657795=color 5
69. Effects- Plugins - Filters in Unlimited 2.0 - Andrew's Filters 42 -
Carnival Time...using the default settings
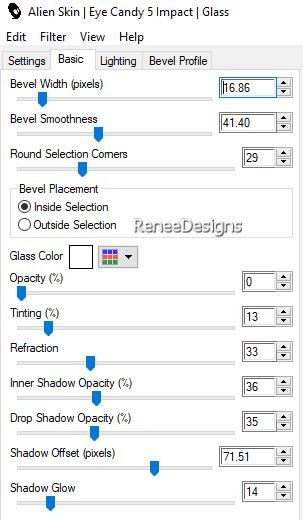
70. Effects- Plugins - Alien Skin EyeCandy 5 - Impact – Glass use the settings below
71. Open the Tube ’’ gabry-image 1’’ -Edit - Copy- Activate your work -Edit - Paste as a new layer
72. Pick Tool: (K) on your keyboard -Enter these parameters on the toolbar
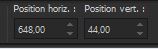 648 / 44
- Press ( M ) to close the Pick Tool
73. Open one of the tubes from Gabry -Edit - Copy- Activate your work -Edit - Paste as a new layer
Resize if necessary
- Move to the right place and give a drop shadow of your own choice
-Renée used this tube ''Gabry-woman 925''
-She reduced the tube to 68%
Renée took this shadow:
Effects- Plugins-Alien Skin-Eye Candy 5 -Impact-Perspective Shadow -Tab-Settings-User Settings-and select my file -Preset ''Gabry-perspective''
74. Layers- Merge- Merge Visible
75.Image - Add borders-Symmetric checked: 1 Pixel –color #954792= color 3
-Image - Add borders-Symmetric checked: 20 Pixels –Color #ffffff=color 4
-Image - Add borders-Symmetric checked: 1 Pixel – color #253850=color 1
76. Selections –
Select All
77.Image - Add borders-Symmetric checked: 40 Pixels –color #d0d6d6= color 2
78. Selections – Invert
79. Effects- Plugins -[I.C.NET Software]- Filters Unlimited 2.0 -
Buttons & Frames - 3D Glass Frame 1 using the default settings : 50/128
- Paste the author's watermark on your work and your own watermark.
80. Layers- Merge- Merge All (flatten)
81.Image - Resize to 90 % - Resize all layers checked
Save as JPG
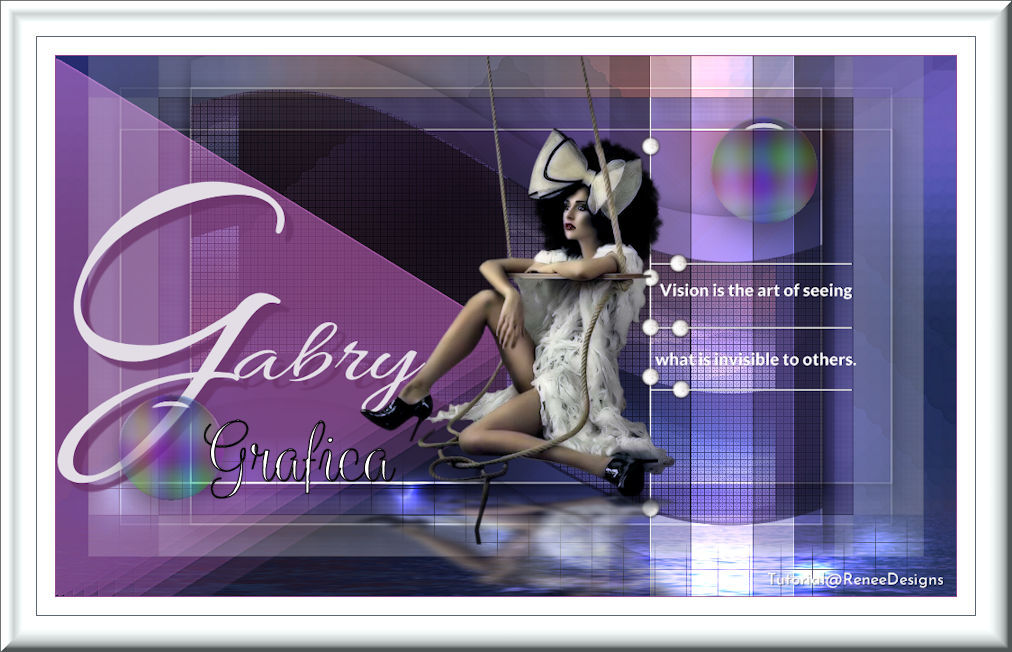
I hope you enjoyed this lesson
Renée
This lesson was written by Renée 27/08/2022
Edited and Update
in 2022
*
Toute ressemblance avec une leçon existante est une pure
coïncidence
*
Any resemblance with an existing lesson is a coincidence
*
Do not forget to thank the people who work with us and for us
-I have appointed the tubeurs and translators
Thanks
|
 Translations