|
Let's start the lesson
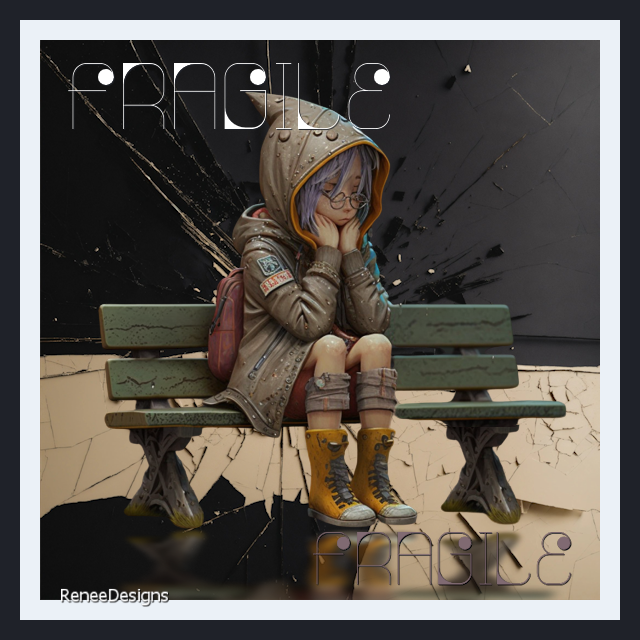
FRAGILE
Preparation
-Material Properties: Set your Foreground color to color #ebf1f7=color 1 – Set your Background color to color #77asba= 2

-
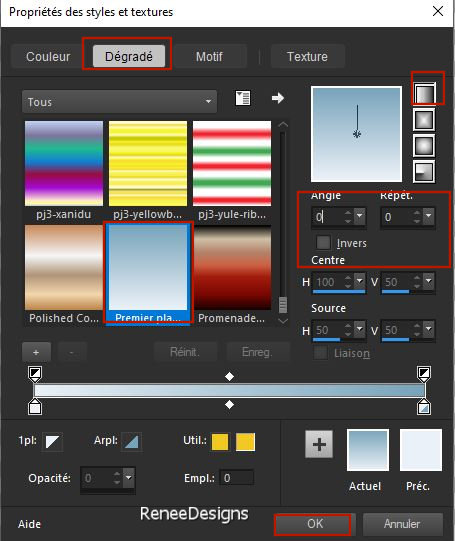
Replace your Foreground color with a Foreground/Background linear gradient configured like this
1.
File-Open a New Transparent Image in this size
: 1100 x 650 Pixels
2. Flood Fill Tool
 –
Fill the layer with the Gradient –
Fill the layer with the Gradient
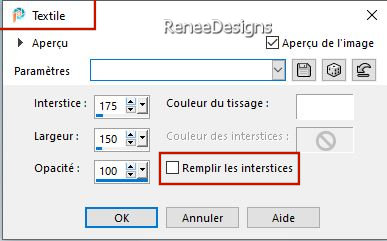
3.Effects- Texture Effects- Weave use the settings below
4. Effects- Edge Effects- Enhance More
5.Selections –load/save selection –load selection from disc and select my selection: ‘’Fragile-1’’
6. Selections- Promote selection to layer
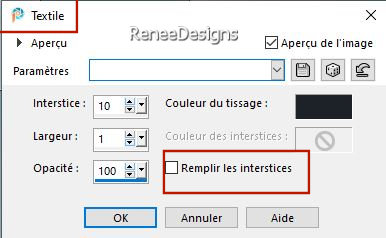
7.Effects- Texture Effects- Weave use the settings below – Color #1f2229= 3

8. Effects- 3D- Effects- Drop Shadow with these settings: 1/1/55/22 Color #1f2229= 3
- Activate the bottom of the Layer Palette (Raster 1)
9.Selections –load/save selection –load selection from disc and select my selection: ‘’Fragile-2’’
10. Selections- Promote selection to layer
11. Layers-Arrange-Bring to Top

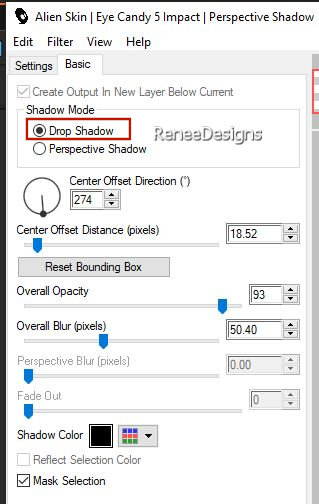
12. Effects - Pugins - Alien Skin EyeCandy 5 – Impact- Perspective
Shadow use the settings below

13. Layers – Duplicate
14. Image - Mirror - Mirror Horizontal (Image - Mirror in older versions of PSP)
15. Layers- Merge- Merge Down
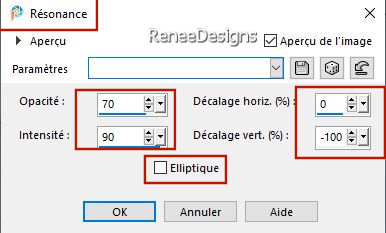
16. Effects- Reflection Effects -Feedback use the settings below
17. Effects- Distortion Effects-Wave use the settings below
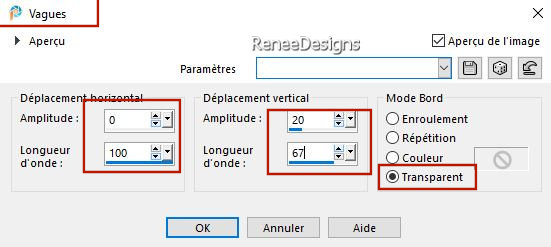
18. Layers-Properties-Set the Blend Mode to " Multiply " -Reduce the opacity of this layer to 73%
19. Effects - Plugins - Filters in Unlimited 2.0 – Penta com- Color Dot
using the default settings
- Activate the bottom of the Layer Palette (Raster 1)
20. Layers– Duplicate
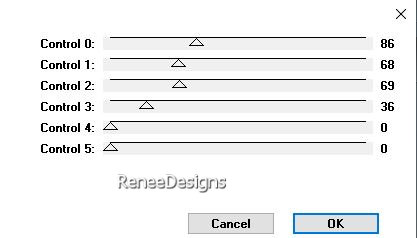
21. Effects – Plugins – L & K’s – Trouble use the settings below
22. Effects - Plugins - Filters in Unlimited 2.0 – Toadies – Weaver using the default settings
23. Effects – Plugins – Mura’s Meister – Perspective Tiling use the settings below
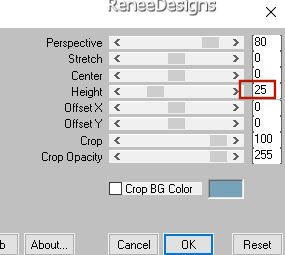
- Repeat: Effects – Plugins – Mura’s Meister – Perspective Tiling with the same settings
24. Activate your Magic Wand –
Tolerance 0 and Feather 55
Click in the empty area at the top - Delete on the keyboard 7 to 8 times

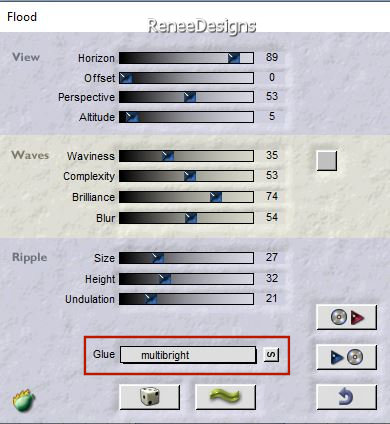
25. Effects – Plugins – Flaming Pear – Flood – click the red arrow and select the file- Preset-Renee-Fragile-Flood (Attention
- Glue- Multibright)
Settings see example below
-
Activate the Top of the Layer Palette
- Material Properties: Set your Foreground color to color #ebf1f7=color 1 – Set your Background color to color #1f2229= 3
26. Layers- New Raster Layer
27.Selections –load/save selection –load selection from disc and select my selection: ‘’Fragile-3’’
28. Flood Fill Tool
 –
Fill the selection with the Foreground color #ebf1f7=color 1 –
Fill the selection with the Foreground color #ebf1f7=color 1
29. Selections - Modify-
Contract by 2 Pixels
30. Flood Fill Tool –
Fill the selection with the Background color #1f2229= 3
31. Selections - Modify- Contract by 2 Pixels


32. Layers- New Raster Layer
33.Selections –load/save selection –load selection from disc and select my selection: ‘’Fragile-4’’
34. Flood Fill Tool
 –Fill the selection with the Foreground color #ebf1f7=color 1 –Fill the selection with the Foreground color #ebf1f7=color 1

35. Layers-Merge- Merge- Down
36. Effects- Image Effects- Seamless Tiling use the settings below
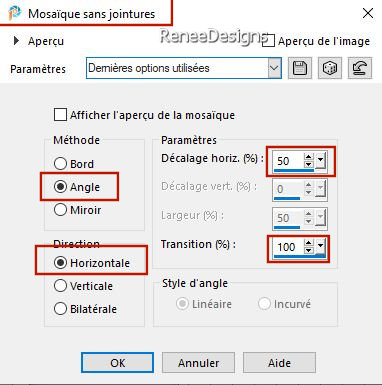
37. Effects- Geometric Effects-Spherize use the settings below
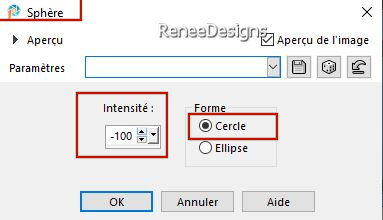
38. Effects – Reflection Effects – Rotating Mirror using the default settings
39.Selections –load/save selection –load selection from disc and select my selection: ‘’Fragile-5’’


40. Effects- 3D- Effects- Drop Shadow with these settings: 1/1/100/1 Color Black
41.Open the tube ‘’Fragile-Image-1’’ - Edit - Copy- Activate your work -Edit - Paste as new layer
42. Pick Tool: (K) on your keyboard -Enter these parameters on the toolbar
 43
/ 104 43
/ 104
Press ( M ) to close the tool
43. Open the tube ‘’Renee-TUBES-Janvier-2024-32.’’
- Image - Resize
-40 %
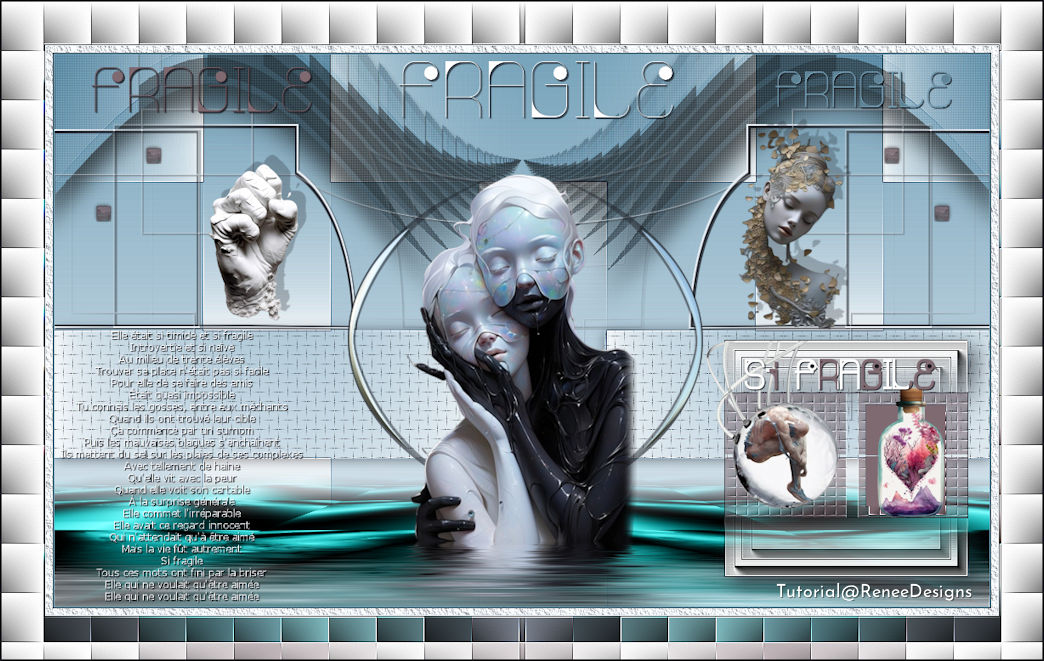
- Edit - Copy- Activate your work -Edit - Paste as new layer and move it in the right place ( see finished image)
44. Effects- 3D- Effects- Drop Shadow with these settings: – 11/
10/28/1 Color Black
45. Open the tube
‘’Fragile-Image-2’’
- Image - Resize
-40 %
- Edit - Copy- Activate your work -Edit - Paste as new layer and move it in the right place ( see finished image)
46. Effects- 3D- Effects- Drop Shadow with these settings: – 11/
10/28/1 Color Black
47. Open the tube ‘’Fragile-Image-3’’ - Edit - Copy- Activate your work -Edit - Paste as new layer
- Place at the top of the work (Objects-Align-Top)
(The font used is attached)
48. Effects- 3D- Effects- Drop Shadow with these settings: 1/1/100/1 Color Black
49. Layers- New Raster Layer
50.Selections –load/save selection –load selection from disc and select my selection: ‘’Fragile-6’’
51. Flood Fill Tool–
Fill the selection with the Background color #1f2229= 3 (2 clicks)
52. Effects - Plugins - Alien Skin EyeCandy 5 – Impact – Chrome-Preset :
Outside Blurry using the default settings

53. Open the tube ‘’Renee-TUBES-Janvier-2024-27.’’
- Activate layer
‘’Pour-fragile''of the tube
- Edit - Copy- Activate your work -Edit - Paste as new layer
54. Pick Tool: (K) on your keyboard -Enter these parameters on the toolbar
 415
/ 141 415
/ 141
Press ( M ) to close the tool
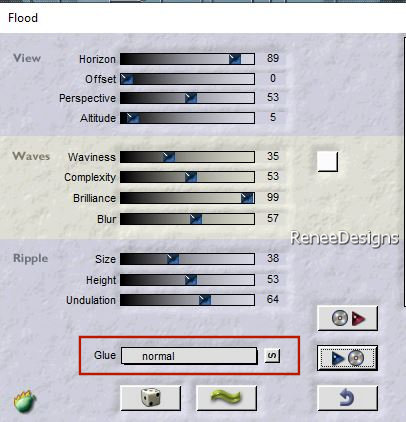
55. Effects – Plugins – Flaming Pear – Flood – click the red arrow and select the file- Preset :
‘’Flood-Fragile ‘’
56. Open the tube ‘’Texte- Fragile’Edit - Copy- Activate your work -Edit - Paste as new layer
Place at bottom left (see finished image)
57. Layers- New Raster Layer
58.Selections –load/save selection –load selection from disc and select my selection: ‘’Fragile-7’’
59. Material Properties: Set your Foreground color to color #ffffff=5
Flood Fill Tool
 –Fill the selection with the Foreground color #ffffff=5 –Fill the selection with the Foreground color #ffffff=5
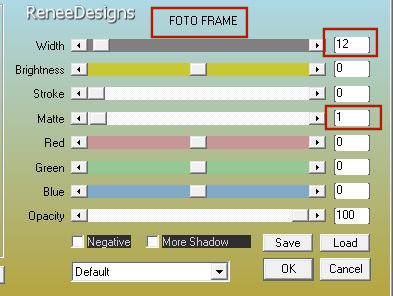
60. Effects – Plugins – AAA Frame - Foto Frame use the settings below
61. Selections - Modify –
Contract by 20 Pixels
62. Effects – Plugins – AAA Frame - Foto Frame with the same settings

63.Effects- 3D- Effects- Drop Shadow with these settings: 10 /10 / 68 /32 Color Black
64. Effects – Edge Effects - Enhance More
Material Properties: Set your Foreground color to color #1f2229= 3 – Set your Background color to color #806a72= 4
65. Layers- New Raster Layer
66.Selections –load/save selection –load selection from disc and select my selection: ‘’Fragile-8’’
67. Flood Fill Tool
 –
Fill the selection with the Foreground color #1f2229= 3 –
Fill the selection with the Foreground color #1f2229= 3
68. Selections – Modify –
Contract-1 Pixel

69. Flood Fill Tool
 –
Opacity 50 %- Fill the selection with the Background color #806a72= 4 –
Opacity 50 %- Fill the selection with the Background color #806a72= 4
Selection remains activated
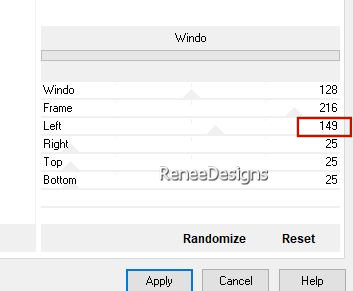
70. Effects - Plugins - Filters in Unlimited 2.0 – Mock – Windo use the settings below
71.Selections –load/save selection –load selection from disc and select my selection: ‘’Fragile-9’’

72. Flood Fill Tool
 –
Opacity 50% - Fill the selection with the Background color#806a72= 4 –
Opacity 50% - Fill the selection with the Background color#806a72= 4
73. Effects - Plugins - Filters in Unlimited 2.0 - Toadies -Picasso's
Another Word... 24/39/126
74. Effects - Edge Effects - Enhance More

75. Open these two tubes ‘’ Fragile Image 4 and Fragile Image 5 ‘’ -Edit - Copy- Activate your work -Edit - Paste as new layer and move it in the right place ( see finished image)
76. Effects- 3D- Effects- Drop Shadow with these settings: -10 /13/75/55 Color #b4c8e6
Open the tube ‘’texte Si Fragile
-Paste as new layer/ Or write your own text
77. Image - Add Borders-Symmetric checked: 1 Pixel -Color #77a3ba= 2
- Image - Add Borders-Symmetric checked: 10 Pixels -Color #ebf1f7=1
- Image - Add Borders-Symmetric checked: 1 Pixel -Color #1f2229= 3
- Material Properties: Set your Foreground color to color #ebf1f7=color 1 – Set your Background color to color #806a72= 4
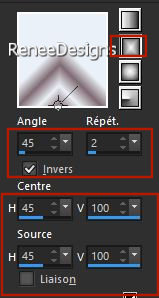
- Properties Foreground- Replace your Foreground color with a Foreground/Background Rectangle Gradient configured like this
78. Selections –
Select All
79. Image - Add Borders-Symmetric checked: 50 Pixels -Color #ffffff=5
80. Selections - Invert
DO NOT ADD A NEW LAYER
81. Flood Fill Tool
 –
Fill the selection with the Gradient –
Fill the selection with the Gradient
82. Effects - Plugins - Filters in Unlimited 2.0 - Toadies -Picasso's
Another Word...using the default settings
83. Effects – Reflection Effects – Rotating Mirror using the default settings
84. Effects – Edge Effects - Enhance More
85. Selections – Invert
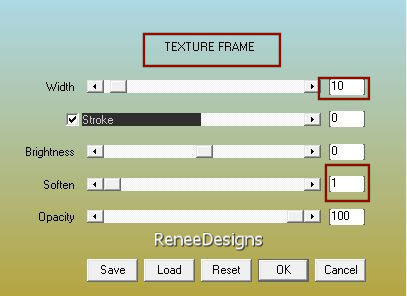
86. Effects – Plugins– AAA Frame – Textures Frame use the settings below

87. Image - Add Borders-Symmetric checked: 2 Pixels -Color #1f2229= 3
88. Image - Resize - to 85% - Resize all layers- Checked
90. Paste the author's watermark on your work and your own watermark
Save as JPG
I hope you enjoyed this lesson
Renée
This lesson was written by Renée
08/12/2023
Edited and Update
in 2023
*
*
Any resemblance with an existing lesson is a coincidence
* Do not forget to thank the people who work with us and for us -
I have appointed the tubeurs and translators
Thanks
|
 Translations


