|
Fire on the city
-
Let's start the lesson.
1. File - New - Transparent - New Image 955 x 625 pixels
2.
Material Properties: Foreground color: #ab1517 Background color:#1d0b09
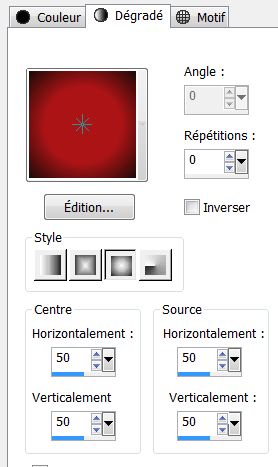
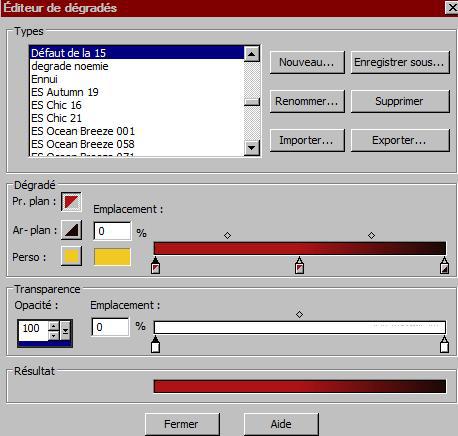
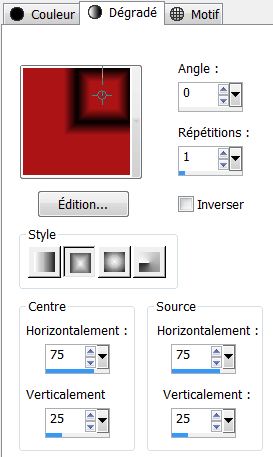
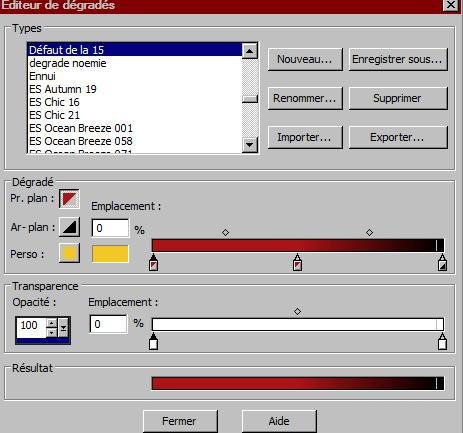
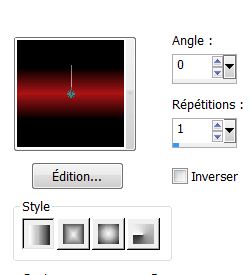
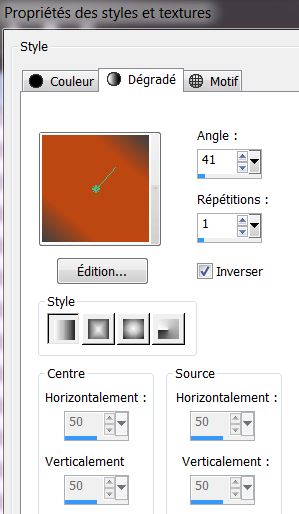
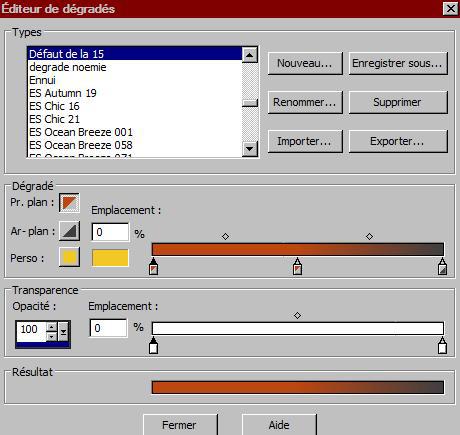
3. Put your foreground on the foreground/background sunburst gradient with settings below
4. Layers - New Raster layer
5.
Flood Fill tool : fill the layer with color black #000000
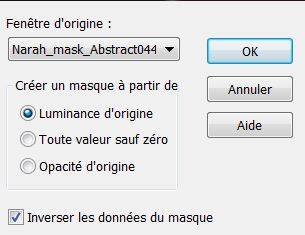
6. Layers-New Mask Layer From Image and choose Mask:
''Narah_mask_Abstract044'
7. Layers- Merge -Merge Group
8. Layer Palette :Double click on this Layer and set the Blend Mode to "Luminance-Legacy"
9. Layers - New Raster layer
10.Selections - load/save selection - load selection from disk and choose my selection:''renee feu sur la ville_1''
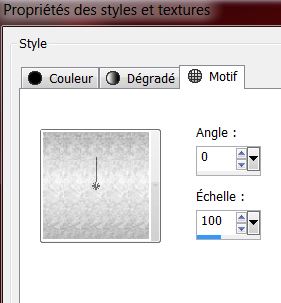
11. Open your pattern in your PSP with these settings
12. Flood Fill tool : fill the selection with your pattern( 1 x klick )
13. Selections- Deselect All
14. Effects- Edge Effects-Enhance
15. Layers - New Raster layer
16. Selections - load/save selection - load selection from disk and choose my selection: ''renee feu sur la ville _2''
17. Flood Fill tool : fill the selection with your pattern
18. Selections- Deselect All
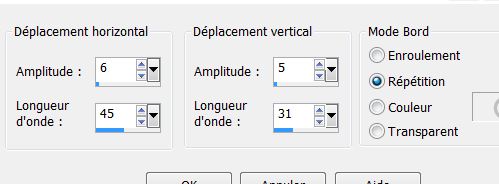
19. Effects-Distortion Effects-Wave use settings below
20. Layer Palette :Double click on this Layer and set the Blend Mode to "Overlay"
21. Effects - 3D Effects - Drop shadow with these settings: 5/5/32/15 black
22. Effects-Plugins Toadies /Black shadow Default
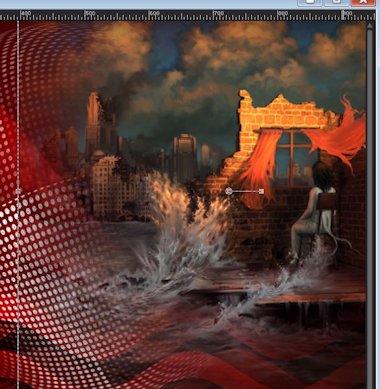
23. Open the tube ''renee_feu sur la ville_2'' Edit/copy-Edit/paste as a new Layer / With your move tool place it in the right place like this (400)
24. Layers - New Raster layer
25.
Activate Brush Tool and select my file in the list ''renee_flamme_feu sur le ville '' with these settings

26. Stamp 2x with the red color on the right side

27.Open the tube ''feu sur la ville' ' Edit - Copy-Edit - Paste as new layer on your working area and move to the left
28. Layer Palette - Double click on this Layer and set the layer opacity of this layer to 63%
29. Adjust-Sharpness -Sharpen More
30. Layers- Merge- Merge Visible
31.Edit-Copy!!!!!
*****
Put your work aside we need it soon again
Second part
32. File - New - Transparent - New Image 955 x 625 pixels
33. Material Properties: Foreground color: #ab1517.Background color: #000000
34.
Put your foreground on the foreground/background rectangular gradient with settings below
35. Activate Flood Fill Tool and fill the layer with the gradient
36.Adjust-Blur-Gaussian Blur : Radius: 55
37.Effects-Plugins Unlimited ICNET.Filters -Lens Effects- Broken glass/ 203
38. Effects- Edge Effects-Enhance
39. Effects-Plugins Unlimited ICNET.Filters - Lens Effects /Magnifying Glass
46/168/64
40. Effects-Plugins Toadies - What are you 21/21
41. Effects- Edge Effects-Enhance More
42. Set your Foreground color to color black.
Set your Background color to color red
43.Put your foreground on the foreground/background linear gradient with settings below
44.
Layers - New Raster layer
45.Activate Flood Fill Tool and fill the layer with the gradient
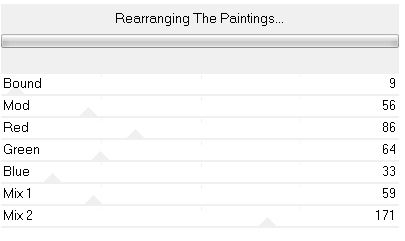
46. Effects-Plugins Unlimited 2.0 - Plugin AB 06- Rearranging the paintings
47. Effects-Plugins Transparency - Eliminate
black
48. Effects-Plugins EyeCandy 5 /Impact - perpsective in tab Settings/User Settings and choose my
preset ''renee_feu sur la ville''
49. Layer Palette -Double click on this Layer and set the Blend Mode to "Hard Light "
50.Layers-Duplicate
51.
Layers- Merge-Merge -Down
52. Effects-Plugins Simple - Top bottom Wrap
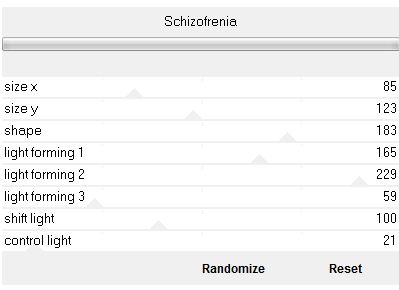
53. Effects-Plugins Tronds Filters II- Schizofrenia
54. Layer palette: activate raster 1
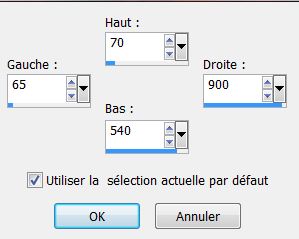
55.Selection Tool ( S ) Custom selection use settings below
56.Promote selection to layer
57.
Edit - Paste into Selection (Image is still in your PSP memory)
58. Selections- Deselect All
59. Layers- Arrange-Move up
60. Effects- 3D Effects - Drop shadow use settings below

61. Repeat: Effects- 3D Effects - Drop shadow -15/-22
62. Effects-Image Effects-Offset H= 0 and V = -50 /
Transparent
63. Layers - New Raster layer
64. Selections - load/save selection - load selection from disk and choose my selection:''renee_feu sur la
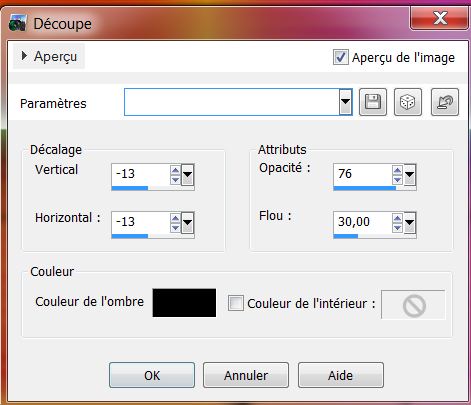
ville_0''
65. Activate Flood Fill Tool and fill the selection with color white
66. Layer Palette :Double click on this Layer and set the Blend Mode to "Overlay"
67.Selections- Deselect All
68. Layers- Merge- Merge Visible
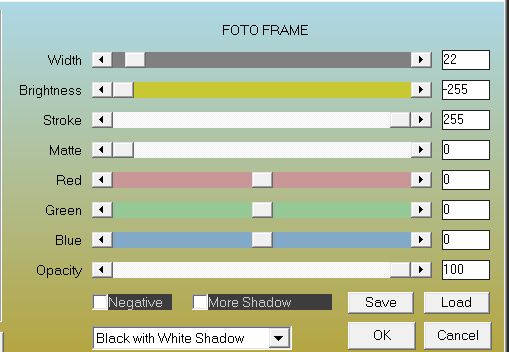
69. Effects-Plugins AAA Frame - Foto frame
70. Put your work aside we need it soon again
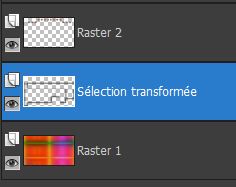
*****************
71. File - New - Transparent - New Image 950 x 550 pixels
72. Material Properties: Foreground color: #bc4712 Background color: #404040
73.Put your foreground on the foreground/background linear gradient with settings below
74. Activate Flood Fill Tool and fill the layer with the gradient
75.Selections-Select All
76.Layers - New Raster layer
77.Open the image-''feu_SUR_LA_VILLE'' - Edit/Copy-Edit paste into selection
78. Selections- Deselect All
79. Layer Palette -Double click on this Layer and set the Blend Mode to "Hard Light " Opacity to 69%
80. Layers- Merge-Merge -Down
81. Selections - load/save selection - load selection from disk and choose my selection:''renee_feu_sur _la_ville_3''
82. Selections-Promote selection to layer
83. Effects - 3D Effects - Drop shadow: 0/0/75/25 black
84. Effects - 3D Effects -Cutout use settings below
85. Selections-Deselect All
86. Layers - New Raster layer
87. Selections - load/save selection - load selection from disk and choose my selection: ''renee_feu sur la ville_4''
Flood Fill Tool: fill the selection with the gradient
88. Selections- Deselect All
89. Effects- Plugins
EyeCandy5-Impact - Black light -in tab Settings/User Settings and choose my preset ''renee_feu sur
la ville_light''
90. Effects-Edge Effects-Enhance
-Your Layer Palette look like this now:
91. Layer Palette: activate the layer underneath ( sélection transformée).
92. Selections - load/save selection - load selection from disk and choose my selection: ''renee_feu sur la
ville_5'
93. Selections-Promote selection to layer
94. Selections- Deselect All
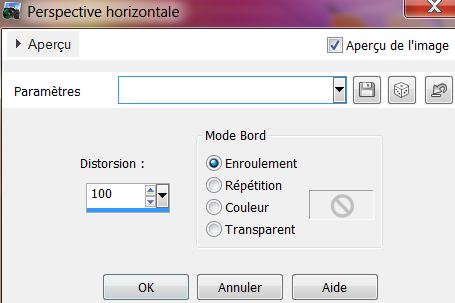
95. Effects- Geometric Effects-Perspective Horizontal use settings below
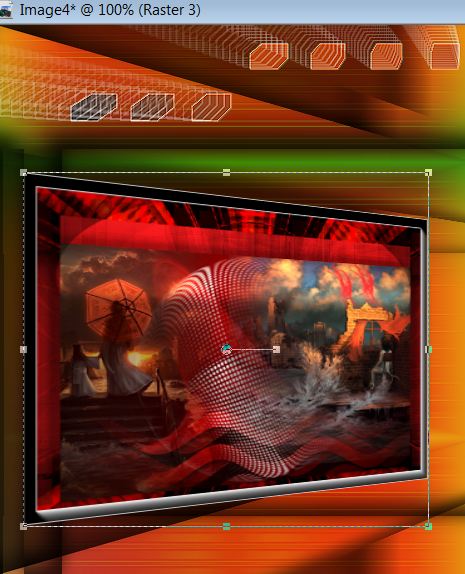
96. Activate the top of the layer-Palette
97. Activate your minimized image
98. Image Resize 55%
99. Edit - Copy- Edit - Paste as new layer
100. Effects- Plugins
Andromeda -Perspective - Side Walls-It open close
101. Activate your Pick Tool(K ) and place like this
102. Open the tube ''renee_feu sur la ville_main ''Edit - Copy- Edit - Paste as new layer and move .Layer Palette :Double click on this Layer and set the Blend Mode to "Screen "
103.Open the tube ''DarkNight 16-07 tubed byA PSP Devil''
.Image Resize 62% Edit - Copy- Edit - Paste as new layer and move
104. Image - add borders-Symmetric checked 2 pixels color white
105. Image - add borders-Symmetric checked 20 pixels color black
106. Image - add borders-Symmetric checked 20 pixels color white
107 Open the tube « titre »Edit - Copy- Edit - Paste as new layer and move
I hope you enjoyed this lesson
This lesson was written by Renée the 23-03-2013
* |
 Feu sur la ville

 Translations