|
Let's start the lesson
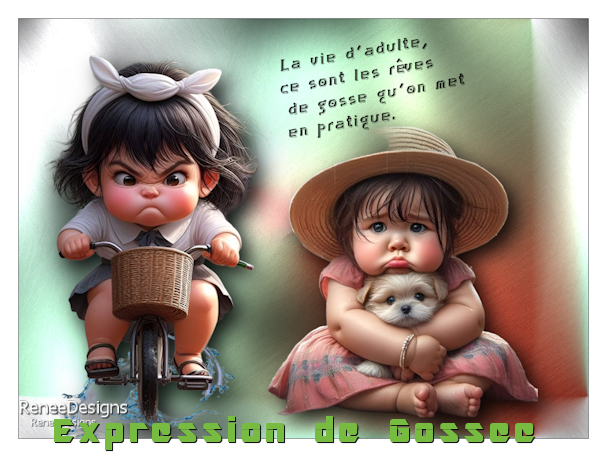
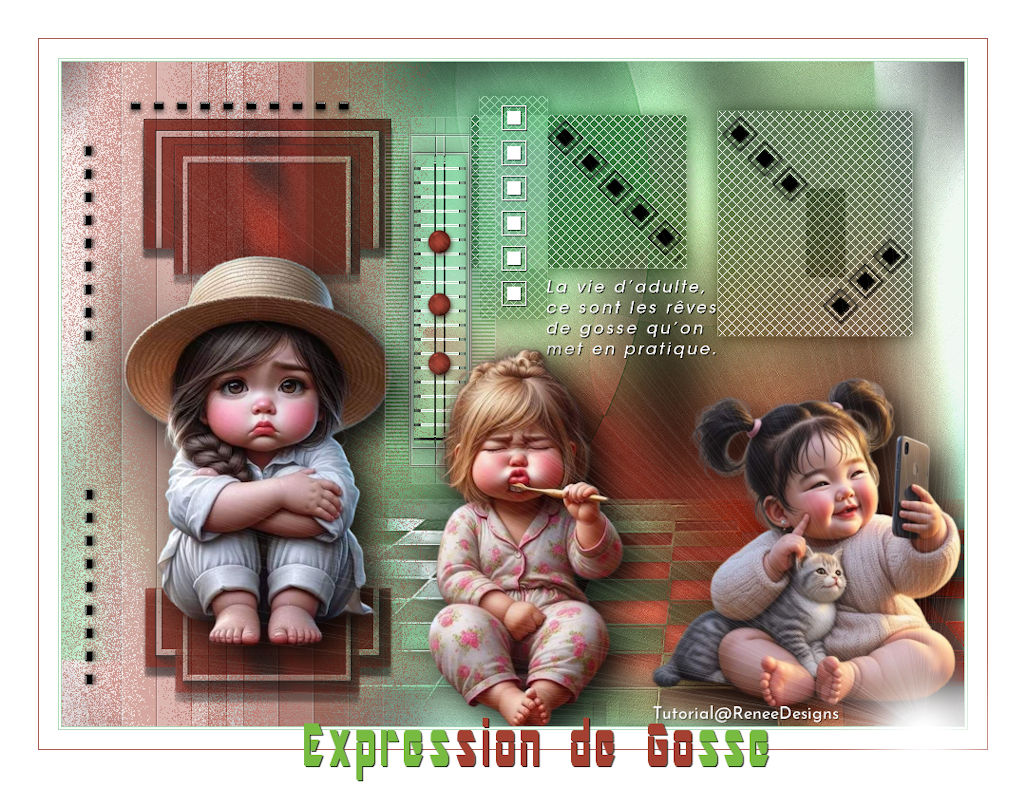
Expression de gosse/Facial expressions in children
Preparation
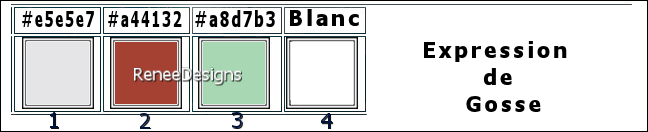
-Material Properties: Set your Foreground color to color
#e5e5e7=color 1 – Set your Background color to color
#a44132=2
2
1.
File-Open a New Transparent Image in this size : 950 x 700 Pixels -
Raster 1
2.
Effects- Plugins – Medhi - Wavy Lab 1 use the settings
below
3.
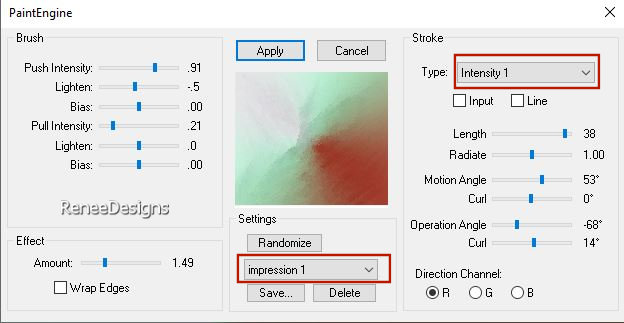
Effects- Plugins – Fantastic machine – Pain
Engine use the settings below
4.
Effects- Edge Effects- Enhance
5.
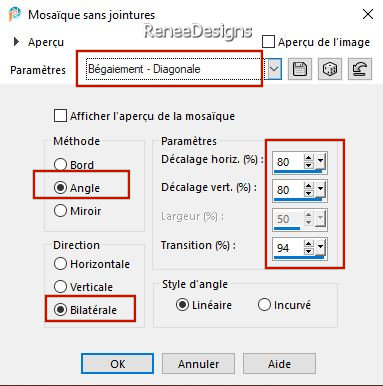
Effects- Image Effects- Seamless Tiling use the settings
below
6.
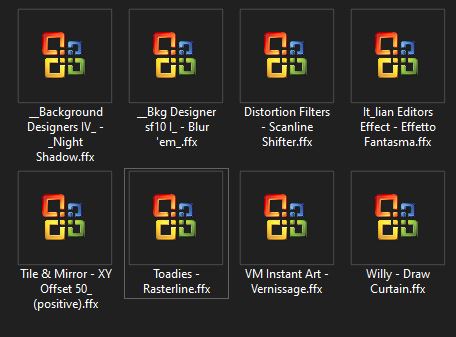
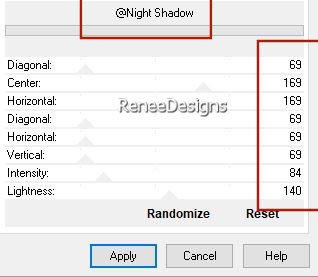
Effects- Plugins - Filters in Unlimited 2.0 -
&<Background Designers IV> - @Night Shadow use
the settings below
7.
Layers- New Raster Layer
8.
Selections –load/save selection –load selection from
disc and select my selection: ‘’Expression-de-gosse
1’’
9.
Activate Flood Fill Tool
 –
Fill the selection with the Background color = 2 –
Fill the selection with the Background color = 2

10.
Effects- Plugins - Filters in Unlimited 2.0 - &<Bkg
Designer sf10 I> - Blur 'em!...: 70/12
11.
Layers- New Raster Layer
12.
Repeat !!! Selections –load/save selection –load
selection from disc and select my
selection:
‘’Expression-de-gosse 1’’
13.
Activate Flood Fill Tool
–
Fill the selection with the Foreground color = 1
14.
Effects- Plugins – Toadies – What are you : 20/20
-
Repeat : Effects- Plugins – Toadies – What are you
: 20/20
15.
Layers- Duplicate
16.
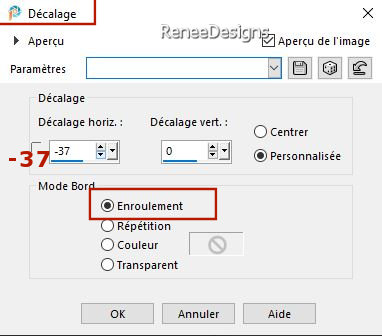
Effects- Image Effects- Offset use the settings below
17.
Layers-Properties-Set the Blend Mode to " Overlay "
18.
Layers- Merge- Merge - Down
19.
Effects- Edge Effects- Enhance More
20.
Layers-Properties-Set the Blend Mode to "Normal" -Reduce
the opacity of this layer to 44%
21.
Layers- New Raster Layer
22.
Selections –load/save selection –load selection from
disc and select my selection:
‘’Expression-de-gosse 2’’
23.
Effects- Plugins - Filters in Unlimited 2.0 –
Willy – Draw Curtain...with these settings: 214/ 130 /80
24.
Adjust- Blur-Gaussian Blur-Radius 10 %
25.
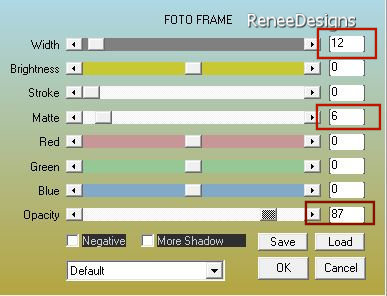
Effects- Plugins – AAA Frame - Foto Frame use the
settings below
26.
Effects- Plugins - Alien Skin EyeCandy 5 –
Impact – Perspective Shadow use the settings below

27.
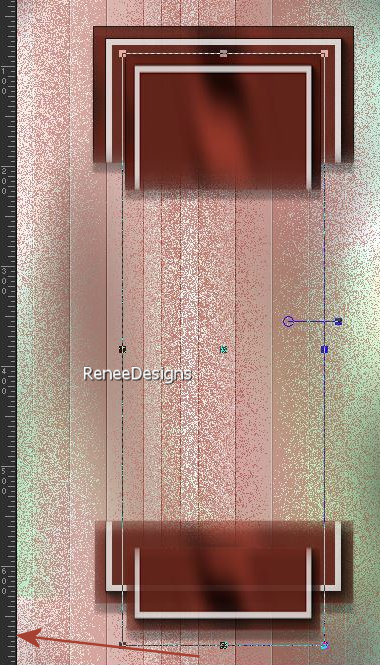
Layers- Duplicate
28.
Image - Resize 75 %- Resize all layers not
checked
29.
Pick Tool: (K) on your keyboard -Enter these parameters
on the Toolbar
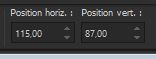 115 / 87
Press
( M ) to close the Tool
-
Pick Tool: (K) on your keyboard -Mode Scale- Pull down
like this (670Px)
-
Press ( M ) to close the Tool
30.
Layers- Merge- Merge Down
31.
Layers-Properties-Set the Blend Mode to " Multiplikation"
-Reduce the opacity of this layer to 63%
32.
Effects- Plugins - FM Tile Tools - Saturation
Emboss using the default settings
33.
Activate the Tube ‘’Renee-TUBES-Expression-de-gosse-17.’’(
Dossier Tubes Gosse or choose another tube to suit your
taste)
-
Image - Resize 60 %.
-
Edit - Copy- Activate your work -Edit - Paste as new
layer and move (see finished image)
34.
Effects- Plugins - Alien Skin EyeCandy 5 –
Impact – Perspective Shadow – Preset : Drop Shadow
Blurry
-
Activate the bottom of the layer palette=Raster 1
35.
Layers- Duplicate
36.
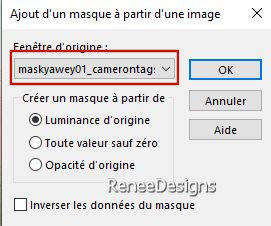
Layers- New Mask Layer-From Image and select Mask
‘’ maskyawey01_camerontags’’
-
Layers- Merge- Merge Group
37.
Effects- 3D- Effects- Drop Shadow with these settings: 1/1/60/25
Color Black
38.
Pick Tool: (K) on your keyboard -Enter these parameters
on the Toolbar
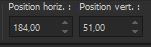 184/ 51
Press
( M ) to close the Tool
39.
Effects- Plugins - FM Tile Tools - Saturation
Emboss using the default settings
-
Material Properties: Set your Foreground color to color
#ffffff=color 4 – Set your Background color to color
#a8d7b3= 3
-
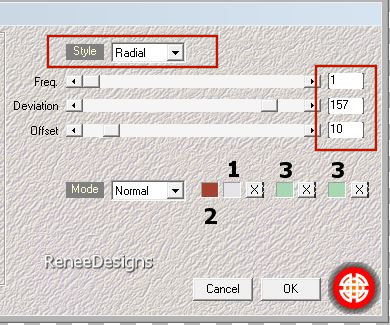
Replace your Foreground color with a Foreground/Background
Radial gradient configured like this

-
Activate the bottom of the layer palette=Raster 1
40.
Layers- New Raster Layer
41.
Activate Flood Fill Tool
–
Fill the layer with the Gradient
42.
Effects- Plugins - Filters in Unlimited 2.0 -
ICNET-Filters - Tile & Mirror - XY Offset 50% (positive)
43.
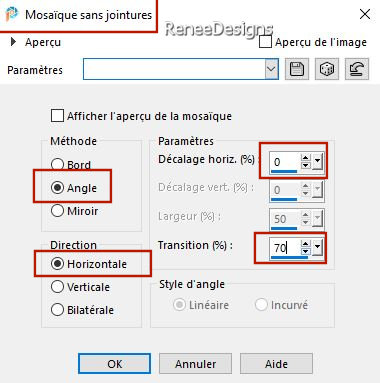
Effects- Image Effects- Seamless Tiling use the settings
below
44.
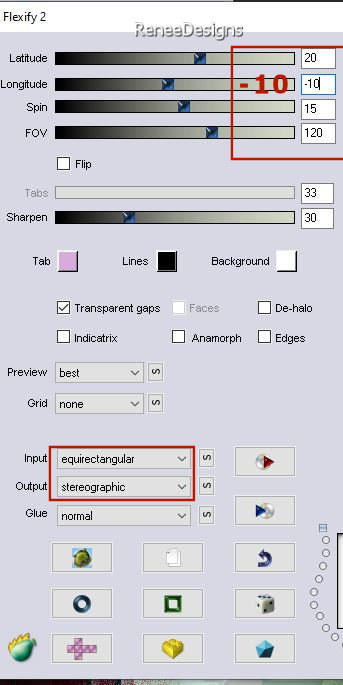
Effects- Plugins – Flaming Pear – Flexify 2 use the
settings below
45.
Image - Resize 73. %- Resize all layers not
checked
46.
Pick Tool: (K) on your keyboard -Enter these parameters
on the Toolbar
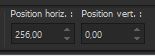 256
/ 0 256
/ 0
47.
Effects- Edge Effects- Enhance More
48.
Layers-Properties-Set the Blend Mode to "Multiplikation"
-
Activate the top of the layer palette
49.
Open the Tube ‘’Expression-de-gosse-Image 1’’ -Edit -
Copy- Activate your work -Edit - Paste as new layer
50.
Pick Tool: (K) on your keyboard -Enter these parameters
on the Toolbar
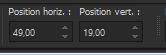 49
/19 49
/19
51.
Layers- New Raster Layer
52.
Effects- Plugins – Medhi - Wavy Lab 1 use the settings
below
53.
Effects- Plugins – Simple – Pizza Slice Mirror
54.
Effects- Plugins – Simple – Blintz
55.
Image - Mirror - Mirror Horizontal (Image - Mirror in
older versions of PSP)
56.
Effects- Plugins – Simple – Blintz
57.
Effects- Plugins - Filters in Unlimited 2.0 - It@lian
Editors Effect - Effetto Fantasma: 0/255
58.
Effects- Edge Effects- Enhance
59.
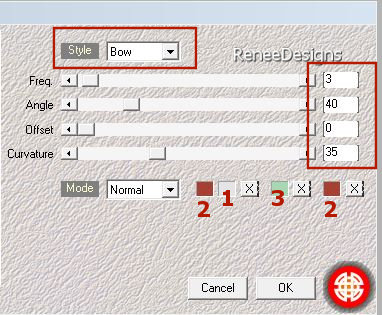
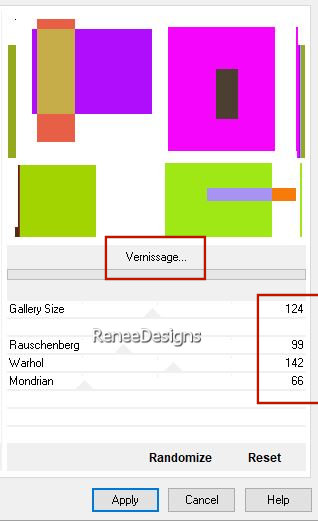
Effects- Plugins - Filters in Unlimited 2.0 – VM
Instant Art – Vernissage use the settings below (be
sure to take it from Unlimited)
60.
Effects- Plugins - Transparency - Eliminate
White
if problem
effect is in psp image in tube folder
61. Image - Resize
60 %- Resize all layers not checked
62.
Selections –load/save selection –load selection from
disc and select my selection:
‘’Expression-de-gosse 3’’

63.
Pick Tool: (K) on your keyboard -Enter these parameters
on the Toolbar
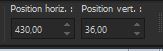 430
/ 36 430
/ 36
64.
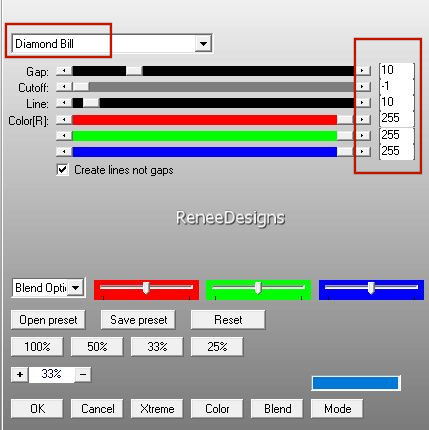
Effects- Plugins - AP[Lines] Lines –
Silverlining use the settings below
65.
Layers-Properties-Set the Blend Mode to "Luminance
Legacy"
66.
Effects- 3D- Effects- Drop Shadow with these settings:
1-1-60-25 Color Black
67.
Layers- New Raster Layer
68.
Selections –load/save selection –load selection from
disc and select my selection:
‘’Expression-de-gosse 4’’
-Material Properties-Set your Foreground color to color
#e5e5e7=color 1 –Set your Background color to
color #ffffff=4
69.
Activate Flood Fill Tool
–
Fill the Selection with the Foreground color =1
70.
Effects- Plugins - Filters in Unlimited 2.0 - It@lian
Editors Effect - Effetto Fantasma: 8/8
71.
Effects- Plugins - Filters in Unlimited 2.0 - It@lian
Editors Effect - Effetto Fantasma: 7/7
-
Material Properties-Set your Foreground color to color #ffffff=color
4 –Set your Background color to color
#a8d7b3= 3
72.
Effects- Plugins - Filters in Unlimited 2.0 -
Distortion Filters - Scanline Shifter : 49/23
73.
Effects - Edge Effects - Enhance More
On
the same layer
74.
Selections –load/save selection –load selection from
disc and select my selection:
‘’Expression-de-gosse 5’’
75.
Effects- Plugins - Filters in Unlimited 2.0 –
Toadies - Rasterline... using the defaul settings
76.
Effects - Edge Effects - Enhance More
77.
Effects- 3D- Effects- Drop Shadow with these settings: 3/ -2 /65 / 40
Color Black
78.
Effects- Plugins – AAA Frame – Foto frame use the
settings below

79. Selections- Promote
Selection to Layer
80.
Image - Mirror - Mirror Horizontal (Image - Mirror in
older versions of PSP)
81.
Pick Tool: (K) on your keyboard -Enter these parameters
on the Toolbar
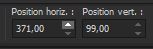 371 / 99
82.
Layers- Merge- Merge - Down
83.
Open the Tube ‘’ Expression-de-gosse-Image 2 -Edit -
Copy- Activate your work -Edit - Paste as new layer
84.
Pick Tool: (K) on your keyboard -Enter these parameters
on the Toolbar -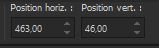 463 / 46
85.
Open the Tube ‘’Expression-de-gosse-Image 3’’ -Edit - Copy- Activate
your work -Edit - Paste as new layer
and
move it in the right place( see finished image)
86.
Open the Tube ''Expresion-de-gosse-texte'' -Edit - Copy-
Activate your work -Edit - Paste as new layer and move
87.
Select a tube (from the " tubes Gosser" folder or choose
another tube to your taste)- Paste as a new layer
-
Resize if necessary- Drop shadow of your choice
88.
Image - Add Borders-Symmetric checked: Pixel –
Color 1
Image
- Add Borders-Symmetric checked: 1 Pixel – Color 3
Image
- Add Borders-Symmetric checked: 2 Pixels– Color 4
Image
- Add Borders-Symmetric checked: 1 Pixel – Color 3
Image
- Add Borders-Symmetric checked: 20 Pixels – Color 4
Image
- Add Borders-Symmetric checked: 1 Pixel – Color 2
Image
- Add Borders-Symmetric checked: 40 Pixels – Color 4
89.
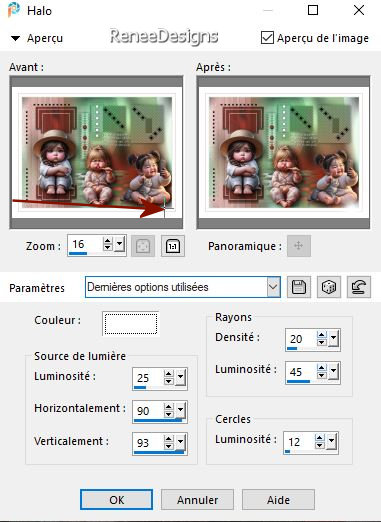
Effects- Illumination Effects-Sunburst and select my
file – Preset
‘’Halo-expression-de-goose’’
Place the preset in the presets folder of psp
Or put in
the settings manually (vous
you can modify by moving the cross according to the
choice and placement of your tube tube)
90.
Font attached if you want to write the title or paste
mine
91.
Paste the author's watermark on your work and your own
watermark
92.
Layers- Merge- Merge All ( flatten)
96.
Image - Resize - to 95% - Resize all layers checked
Save as JPG
I hope you enjoyed this
lesson
Renée
This lesson was written by Renée 11/03/2024
Edited and Update
11/03/2024
*
*
Any resemblance with an existing lesson is a coincidence
* Do not forget to thank the people who work with us and
for us - I have appointed the tubeurs and translators
Thanks
|
 Translations