|
Let's start the lesson.
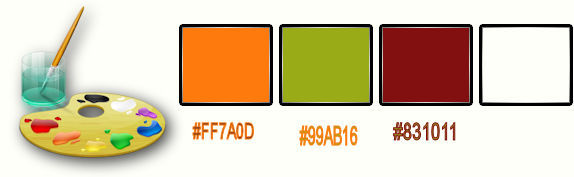
- Material Properties:Set your foreground color to:
#FF7A0D - Set your background color to:#99AB16
1. Open the background image ‘’eden_fond’’- Window - Duplicate (or shift+D) - Close the original and proceed on the copy -Promote Background Layer =Raster 1
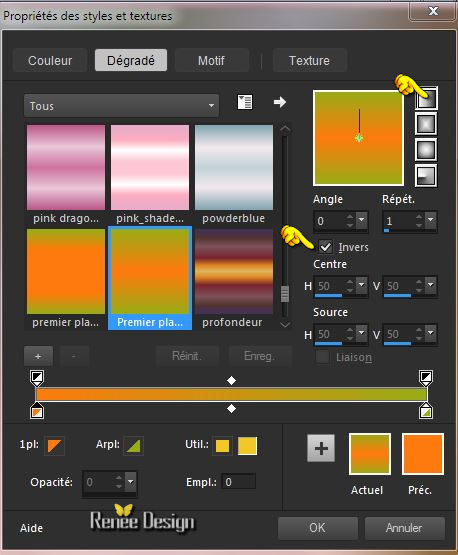
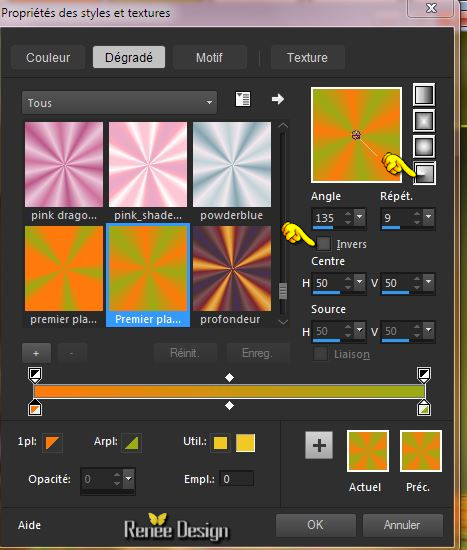
- Properties Foreground: Prepare a Linear Gradient as configured like this.
2. Layers- New Raster layer
3.
Selections –load/save selection –load selection from disc and choose: ‘’eden_1 »
4. Activate Flood Fill Tool and fill the selection with the gradient
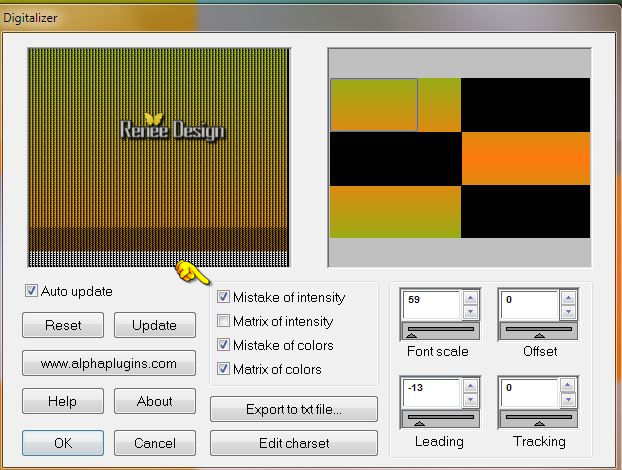
5. Effects- Plugins – Panopticum – Digitalizer with these settings
Selections- Deselect All
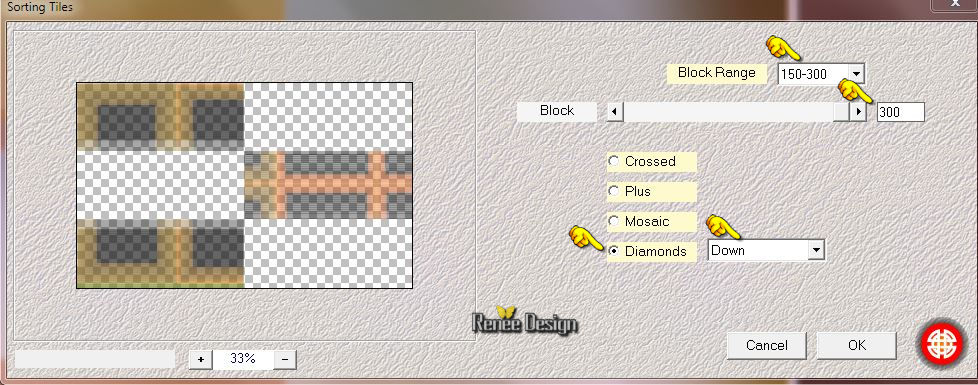
6. Effects- Plugins – Medhi – Sorting Tiles with these settings
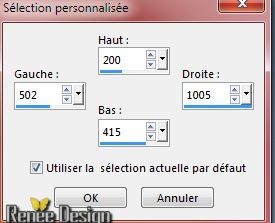
7.
Selection Tool ( S ) Custom selection use settings below
8. Edit - Cut !!!-Edit - Paste as new layer on your working image
Selections- Deselect All
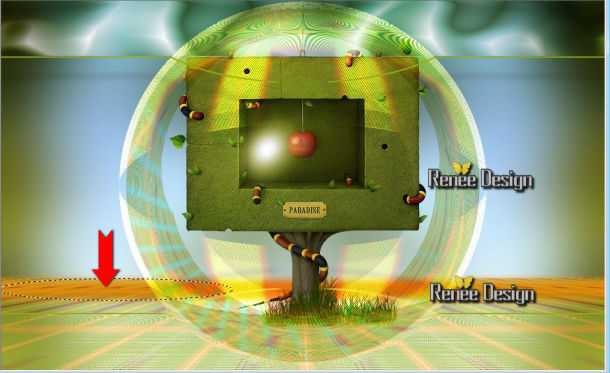
- With the move tool, move it in the bottom left corner
9. Layers- Duplicate
- Image
–Mirror
- Layers- Merge- Merge- Down
- Layer-Palette- Make Raster 2 active
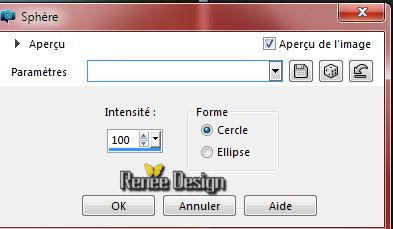
10. Effects- Geometric Effects– Circle –Transparent
11. Layers- Duplicate – Image Mirror
- Layers- Merge- Merge- Down
12.
Layer Palette - Double click on this Layer and set the Blend Mode to " Dodge "
-Layer-Palette- Make Raster 3 active
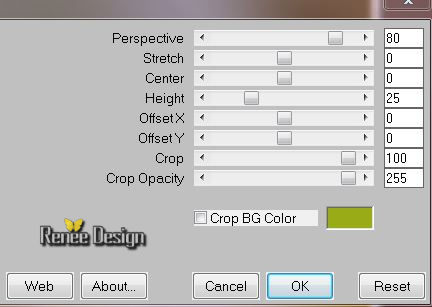
13.Effects- Plugins – Mura’s Meister –Perspective
Tilling with these settings
- Activate the bottom of the layer-Palette=Raster 1
14. Activate the tube ‘’ Renee_tube_paradis .pspimage’’
15. Image
Resize 65%
- Edit/copy- Edit/ paste as new layer on your working image
16.
Pick Tool (K) mode scale - Use the arrow keys on the keyboard click a little to the left 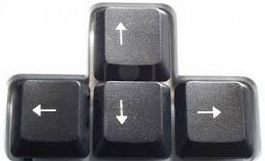
Layer Palette look like this now-You should have this result
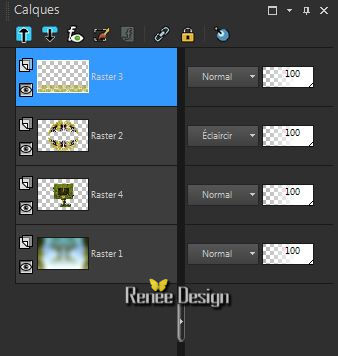
- Layer-Palette- Make Raster 3 active
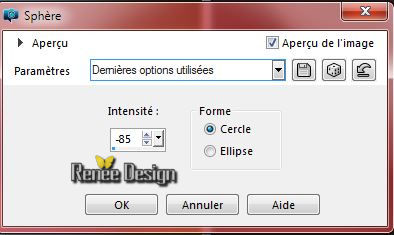
17.Effects- Geometric Effects-Spherize-Circle
18. Layers- Duplicate
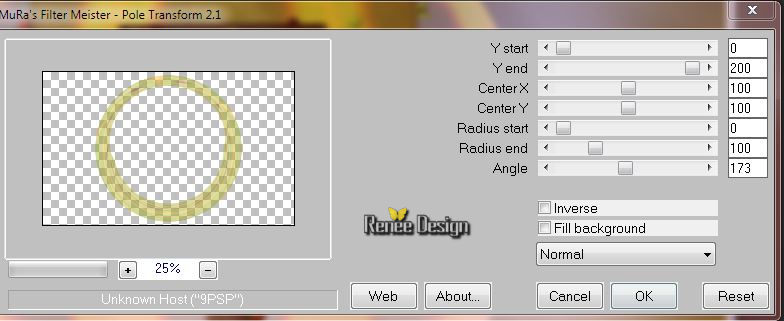
19.Effects- Plugins – Mura’s Meister –Pole
Transformation with these settings
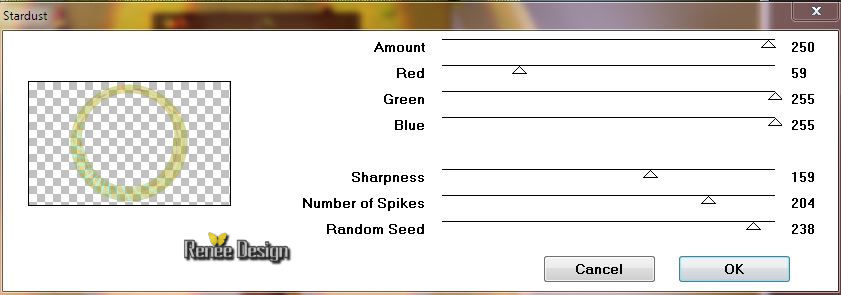
20. Effects- Plugins – VM Natural –Stardust met these settings
- In the layer-Palette-Make Raster 3( =top layer )active-Double click on this layer and set the Blendmode to"Multiply "
- Stay on top
21.Layers- New Raster layer
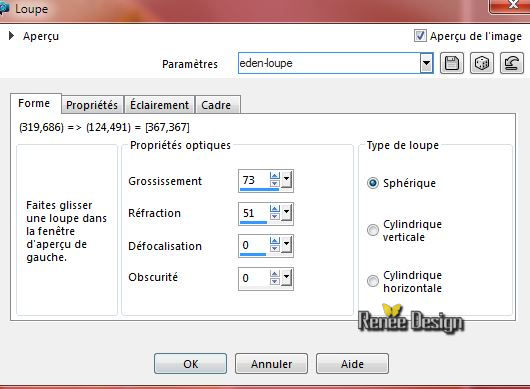
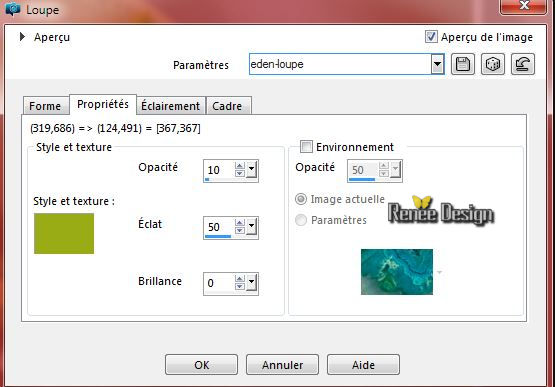
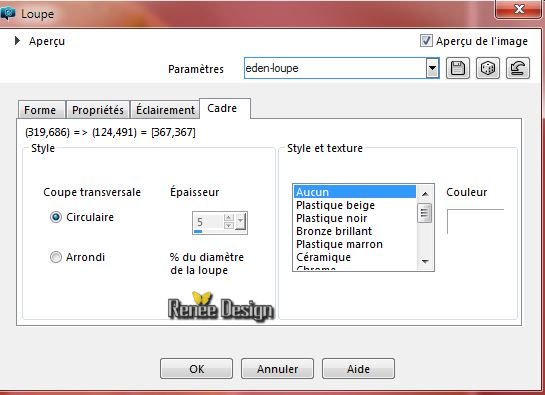
22. Effects-Artistic Effects-Magnifying Lens and select my preset ‘’
Preset_MagnifyingLens_eden-loupe » » Or manual settings as shown in the example below
-Activate the bottom of the layer palette=Raster 1
23. Layers- New Raster layer
24.
Selections –load/save selection –load selection from disc and choose:‘’eden_2’’
-Properties foreground -Put your foreground color to #fe7a0d
25. Activate Flood Fill Tool and fill the selection with the foregroundcolor
Selections- Deselect All
-Activate the top of the layer-Palette
Layer Palette look like this now-You should have this result

26. Layers- New Raster layer
27.
Selections –load/save selection –load selection from disc and choose:’’eden_3 »
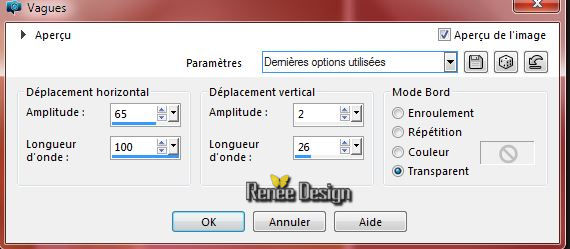
28. Activate Flood Fill Tool and fill the selection with the backgroundcolor
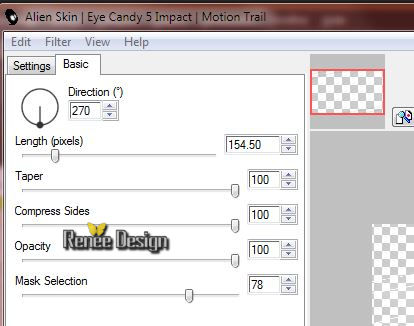
29. Layers- Duplicate – Image Mirror
30. Layers- Merge- Merge- Down
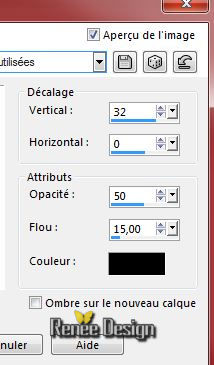
31. Effects - 3D-Effects -Drop shadow with these settings
32.
Effects- Geometric Effects- Spherize -Circle
33. Layers- Duplicate – Image Flip
34. Effects- Distortion Effects- Wind -Winddirection -From Right 50%
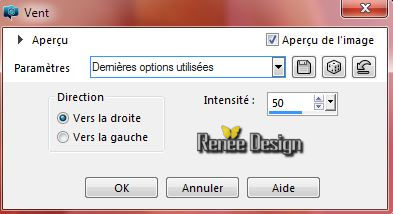
35. Repeat: Effects- Distortion Effects- Wind -Winddirection -From Left 50%
36. Layers- New Raster layer
Properties foreground: Prepare a Radial Gradient as configured like this.
37. Activate Flood Fill Tool and fill the layer with the gradient
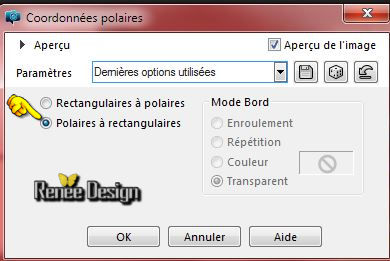
38.
Effects- Distortions Effects-Polar Coordinates-Polar to Rectangular
39. Activate your Pick Tool (K) -choose my preset « Preset_Pick_eden”
Or manual settings as shown in the example below

40. Double click on this Layer and set the Blend Mode to "Hard Licht "
-Foreground color:
Set your foreground color to #ffffff
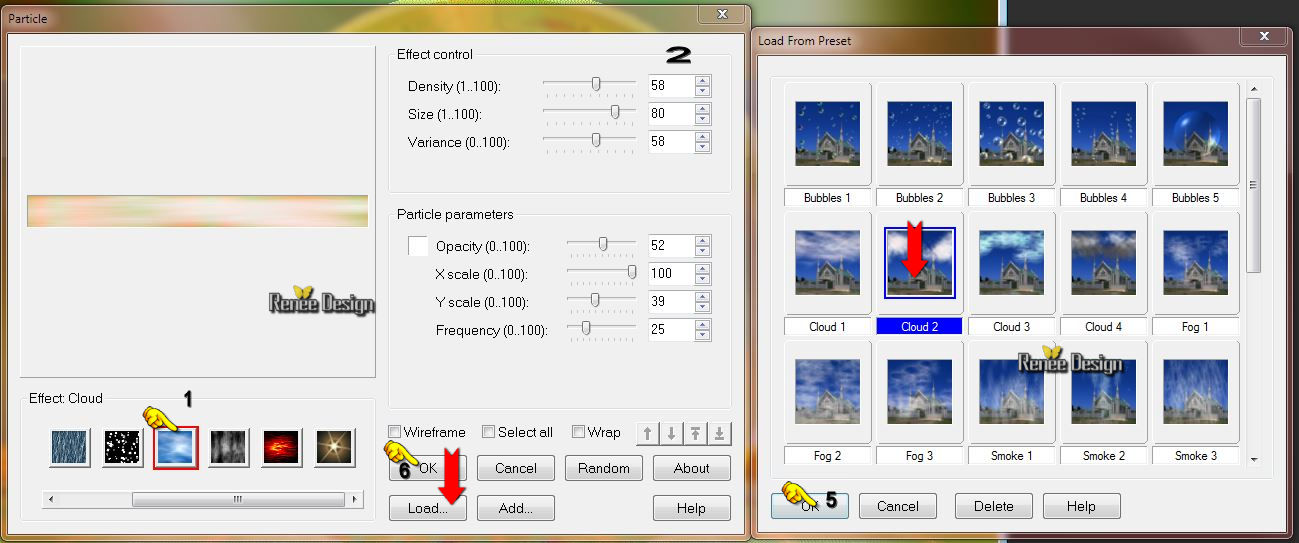
41. Effects- Plugins - Ulead Effect - Particl**Attention for this filter **
1 - First: click on the icon = effects Cloud
2. - Click on load >>
3. the second window will open and choose Cloud 2
4.
control the settings in the first window and click
5. Ok
6. OK
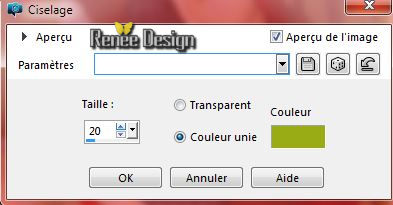
42.Effects- Plugins –Redfield – Jama 2000 with these settings (the effect can result in a slightly different effect )

43. Double click on this Layer and set the Blend Mode to "Luminance-Legacy "
-
Layer palette – Make raster 6 active
44. Selection Tool (S) –Mode Ellipse – Draw a selection as shown below
45.
Selections- Promote selection to layer
46. Layers-Arrange- Bring to Top
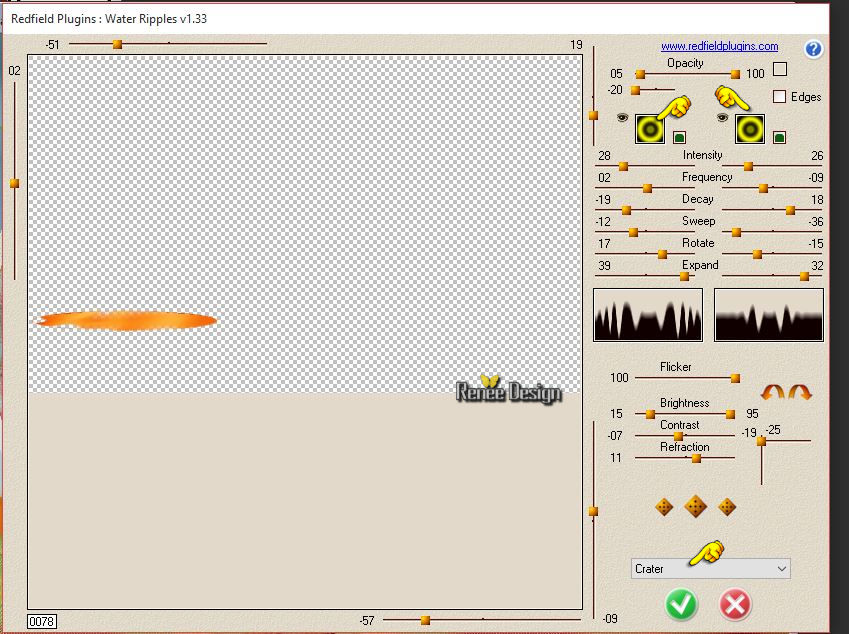
47.
Effects- Plugins – Redfield - Water
Riples with these settings
48. Effects- Edge Effects- Enhance More
49. Effects - 3D-Effects -Drop shadow with these settings 1/1/68/0 black
Selections- Deselect All
50. Double click on this layer and set the Blendmode to "Multiply"
51.
Activate the tube ‘’
Elements_deco_tuto_Renee_Eden’’
- Make Raster 1 and Raster 2 active of the tube
- Edit/copy- Edit/ paste as new layer on your working image
- Activate your Pick Tool (K) place it in the right place as shown in the example below
- In the layer palette: make "promoted selection" layer active
52. Layers- Duplicate
53. Image
Free Rotate 90 ° Direction Left
54. Effects- Distortion Effects- Wind -Winddirection -From Right 100%
55. Image
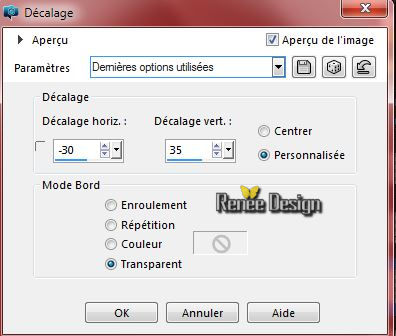
Free Rotate 90° Direction Right
56. Effects- Image Effects- Offset with these settings
57. Effects- Plugins - L and K’s – Djin 192/121
58. Double click on this Layer and set the Blend Mode to "Hard Licht "
Activate the top of the layer-Palette
59. Layers- New Raster layer
60.
Selections –load/save selection –load selection from disc and choose:‘’
eden_4’’
61. Activate Flood Fill Tool and fill the selection with the foreground color #ffffff
Selections- Deselect All
62. Effects- Distortion Effects- Wave with these settings
63. Effects- Plugins – EyeCandy 5 Impact –Motion Trail -tab Settings/User settings choose my preset:
‘’eden_motion_trail »
64.
Layer Palette - Double click on this Layer and set the Blend Mode to " Dodge "
65. Activate the tube ‘’ Renee_tube_famille_rouge.pspimage’’
- Activate layer ‘’tuto_eden’’of the tube
- Edit/copy- Edit/ paste as new layer on your working image
- With the move tool, move it in the bottom right corner
66. Effects- Plugins – Graphic Plus – Cross shadow using the default settings
67.Layers- Arrange- Move Down
- Activate the top of the layer palette
68. Activate the tube/brush _renee_eden’’
-File- Export Custom Brush (Give it a name) ‘’eden’’
69. Layers- New Raster layer
-Properties Foreground: foreground color to color:#ff7a0d
70. Activate the brush tool and choose the brush: ’’eden"with these settings

-
-Stamp your brush (see example) by using your foreground color #ff7a0d
71.
Effects - 3D Effects - Drop shadow with the same settings
72.
Activate the tube ‘’
Elements_deco_tuto_Renee_Eden.pspimage’’
- Activate raster 3 of the tube
- Edit/copy- Edit/ paste as new layer on your working image
-
With the Move Tool -move to the left
73. Layers -Merge-Merge Visible
74. Layers- New Raster layer
Properties foreground: : put your foreground color to #ffffff
75.
Selections –load/save selection –load selection from disc and choose:‘’
eden_5’
76. Activate Flood Fill Tool and fill the selection with the foreground color#ffffff (click 2 times in the selection )
Selections- Deselect All
77.
Activate the tube ’ ‘
Elements_deco_tuto_Renee_Eden’’
- Make Raster 4 and Raster 5 active
- Edit/copy- Edit/ paste as new layer on your working image
- Move in the right place (see complete image)
78.Layers- New Raster layer
79.
Selections –load/save selection –load selection from disc and choose: ‘’eden_6 »
80. Activate Flood Fill Tool and fill the selection with the foreground color#ffffff
Selections- Deselect All
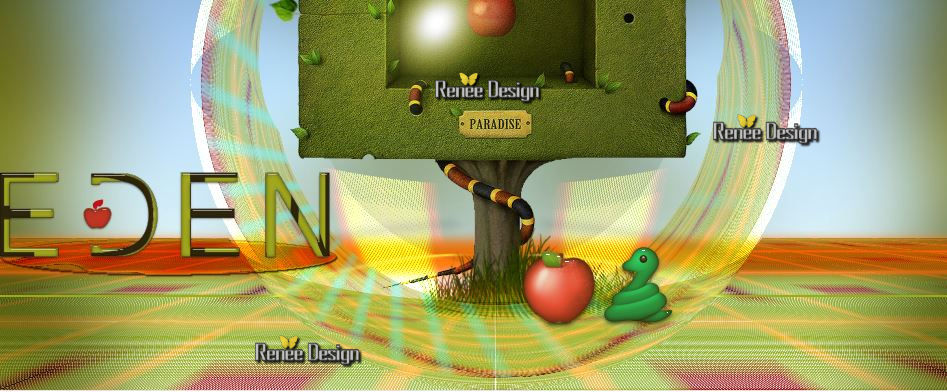
Your work look like this now-You should have this result(If necessary, move the snake a little )
81.
Layers – Merge – Merge all (Flatten).
82. Image - Add borders-Symmetric checked:de 2 pixels #99ab16
83. Image - Add borders-Symmetric checked:de 20 pixels #ffffff
84. Image - Add borders-Symmetric checked:1pixel #831011
85. Image - Add borders-Symmetric checked:45 pixels #ffffff
86. Image - Add borders-Symmetric checked:1pixel #831011
87. Image - Add borders-Symmetric checked:de 10 pixels #ffffff
88.
Activate your Magic wand - select the border of 45 pixels
89. Effects- 3 D Effects- Chisel with these settings-Background color
-
Selections- Deselect All
90. Activate the tube « attache ‘’ –-Edit/copy- Edit/ paste as new layer on your working image-(do not move it is in the right place)
91. Activate the tube ‘’citation_eden_pomme ‘’
- Edit/copy- Edit/ paste as new layer on your working image
- With the move tool, move it in the upper left corner
92.
Layers – Merge – Merge all (Flatten).
Save as JPG
I hope you enjoyed this lesson
Renée
This lesson was written by Renée 07/09/2015
edited and update
le 2015
*
Any resemblance with an existing lesson is merely a coincidence *
* Don't forget to thank the people who work for us and with us.
I named the tubeurs - Testers and the translators.
Thanks Renée.
| 

 Translations


 When you see this logo the filter is imported in Unlimited

 All rights reserved