|
Before you start -
Escaped from my book
1.Open the background image ''fond_Echappé_ de_mon_ livre'' Promote background Layer = Raster 1
2.
Layers - New raster layer
3.
Selections- Select All
4.
Open the tube ''lindsay-Pearce'' Edit/Copy-Edit Paste into selection
5.Selections- Deselect All
6.
Effects- Image Effects- Seamless Tiling with these settings
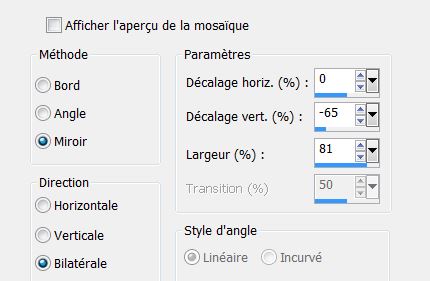
7.
Effects- Image Effects- Seamless Tiling with these settings
8.
Effects- Distortion Effects- Spiky Halo use settings below
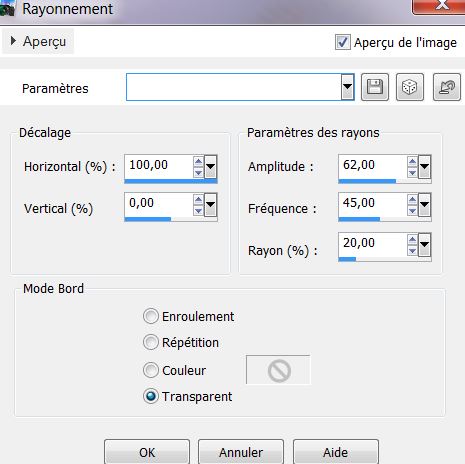
9.
Effects- Edge Effects- Enhance
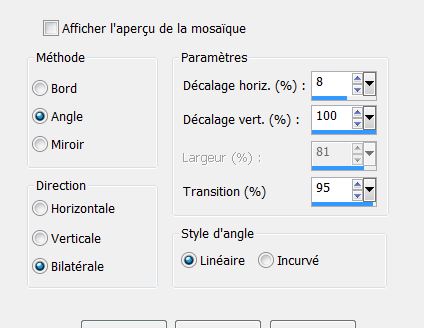
10.
Effects- Plugins - Sybia- Spyrozag
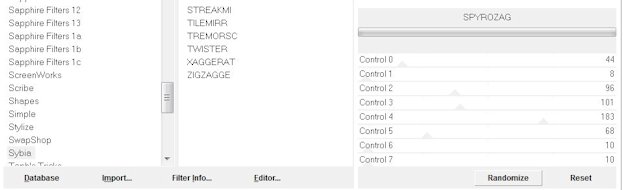
11.
Effects- Plugins - FM Tile Tools - Blend Emboss default
12.
Layers- Duplicate
13.
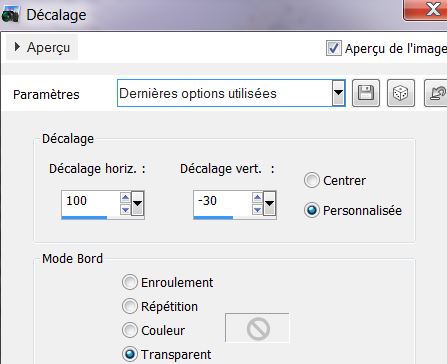
Effects- Image Effects- Offset with these settings
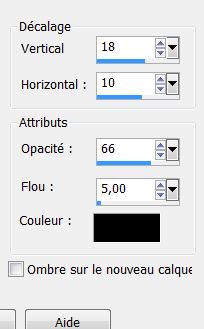
14.Effects - 3D Effects - Drop shadow: 0/0/85/42 black
15.
Layer Palette -Double click on this Layer and set the Blend Mode to "Hard Light " Reduce the opacity of this layer to: 81%
16.
Layers - New raster layer
17.
Activate Flood Fill Tool and fill the layer with color: #b1b99f
18.
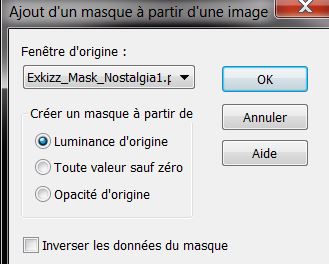
Layers-New Mask Layer From Image and choose Mask: '' masque''Exkizz_Mask_nostalgia1''
19.
Layers- Merge- Merge- Group
20. Effects- Edge Effects- Enhance-More
21.
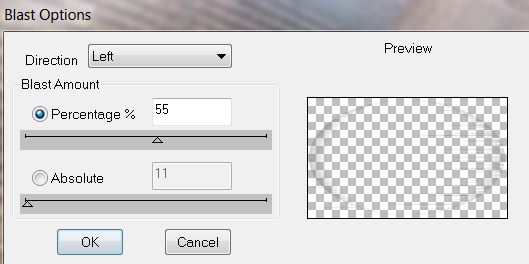
Effects- Plugins - DBS Flux – Blast
22.
Effects- Plugins FM Tile TOOLS - Metallic Emboss default
23.
Effects- Plugins Unlimited – Distorsion Filters –
Splash 175
24.
Layers- Duplicate- Layers- Merge- Merge Down
25.
Layers - New raster layer /Activate Flood Fill Tool and fill the layer with color white
26.
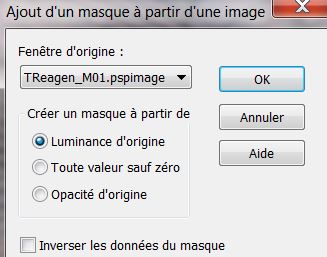
Layers-New Mask Layer From Image and choose Mask: ''Treagen_M01''
27.
Layers- Merge- Merge- Group
28. Layers- Duplicate
- Your Layer Palette look like this now:
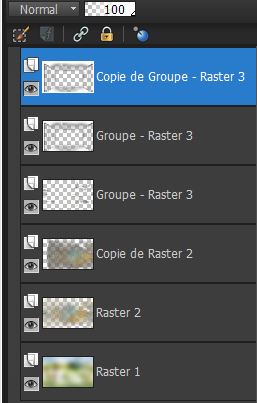
29.Layer-Palette: activate - Copy of Group-Raster 3
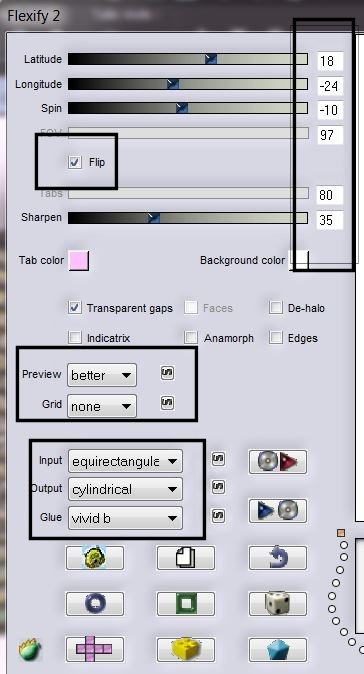
30.Effects- Plugins - Flaming Pear Flexify2 with these settings
31.
Effects- Plugins – Color Rave - Atmospherizer1.1
32.
Open the tube ''renee_image1_de_mon_livre'' Edit/copy-Edit paste as a new layer on your working area
33.
With your move tool(M) place it in the right place
34.
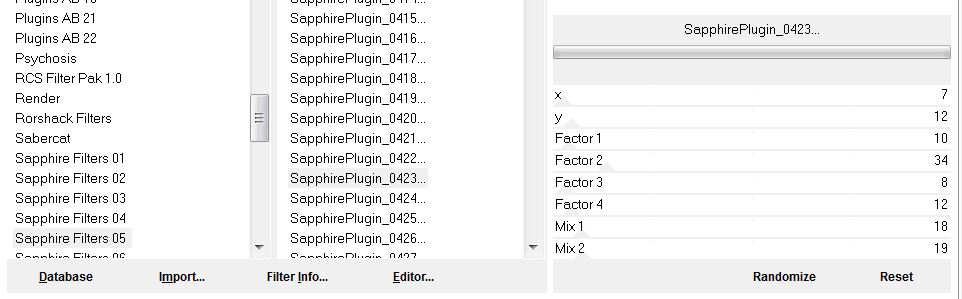
Effects- Plugins Unlimited -Sapphire 05- SapphirePlugin _0423
35.
Layer Palette -Double click on this Layer and set the Blend Mode to "Hard Light " Reduce the opacity of this layer to: 63%
36. Open the tube ''image_sol'' Edit/copy-Edit paste as a new layer on your working area and move
37.
Open the tube ''calguismisted30012012''. Edit/copy-Edit paste as a new layer on your working area and move
37. Open the tube ''nb_np_frame4'' activate raster 2 of the tube:/ Edit/copy-Edit paste as a new layer on your working area and move
38.
Open the tube ''np_nb_plant7'' activate raster 3 of the
tube /Edit/copy-Edit paste as a new layer on your working area and move
39.
Open the tube ''image_livre'' /Edit/copy-Edit paste as a new layer on your working area and move
40.
Open the tube ''renee_pages_livres_ecrites''
/Edit/copy-Edit paste as a new layer on your working area and move
41.
Open the tube ''Betsie 31-2013'' / Image Resize 65%
Edit/copy-Edit paste as a new layer on your working area and move
42.With the clone brush (C)/How do we proceed:Open the tool – size not larger than 55
Make your shape using this tool .
Place the brush on the spot you want to create (see print screen) and push on your right mouse button
Go to the spot where you want to apply your shape and push your left mouse button to apply
.Your example has to be simular on mine

43. Open the tube ''image_bouteille''-Edit/copy-Edit paste as a new layer on your working area and move
44.
Open the tube ''renee_bulles_mon_livre''/activate
raster 2 of the tube -Layer Palette -Double click on this Layer and set the Blend Mode to "Hard Light " Reduce the opacity of this layer to: 75% - Edit/copy-Edit paste as a new layer on your working area and move
45. Open the tube ''renee_cadre'' Edit/copy-Edit paste as a new layer on your working area and move
46. Open the tube ''Zinha_wonderlandSet-6-10-10''
activate the girl . Edit/copy-Edit paste as a new layer on your working area and move
47. Open the tube ''personnage_d6_L '' Image Resize 85%
Edit/copy-Edit paste as a new layer on your working area and move/ Resize all Layers not checked
48.
Open the tube ''image_ étagère'' Edit/copy-Edit paste as a new layer on your working area and move
49. Layers- Merge- Merge Visible
50. Image - Add borders-Symmetric checked: 2 pixels black
51. Image - Add borders-Symmetric checked: 50 pixels white
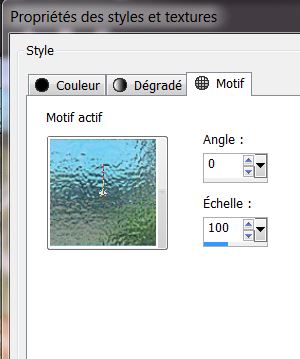
52. Properties Foreground : Open the Pattern -textur ''007_glass '' in psp
53. With the magic wand select the white border of 50 pixels
54. Layers - New raster layer - Activate Flood fill tool and fill the selection with the pattern
55. Adjust- Blur- Gaussian Blur : Radius 35
56. Selections- Selections Invert
57.
Effcts- 3D Effects- Drop Shadow with these settings
58. Repeat -Drop Shadow -Vertical-18
59. Selections- Deselect All
60.Open the tube ''image_reverbere '' Edit/copy-Edit paste as a new layer on your working area and move
61. Open the tube "text" Edit/copy-Edit paste as a new layer on your working area and move/ Ore write your own text
62. Image - Add borders-Symmetric checked: 3 pixels black
Save as JPG
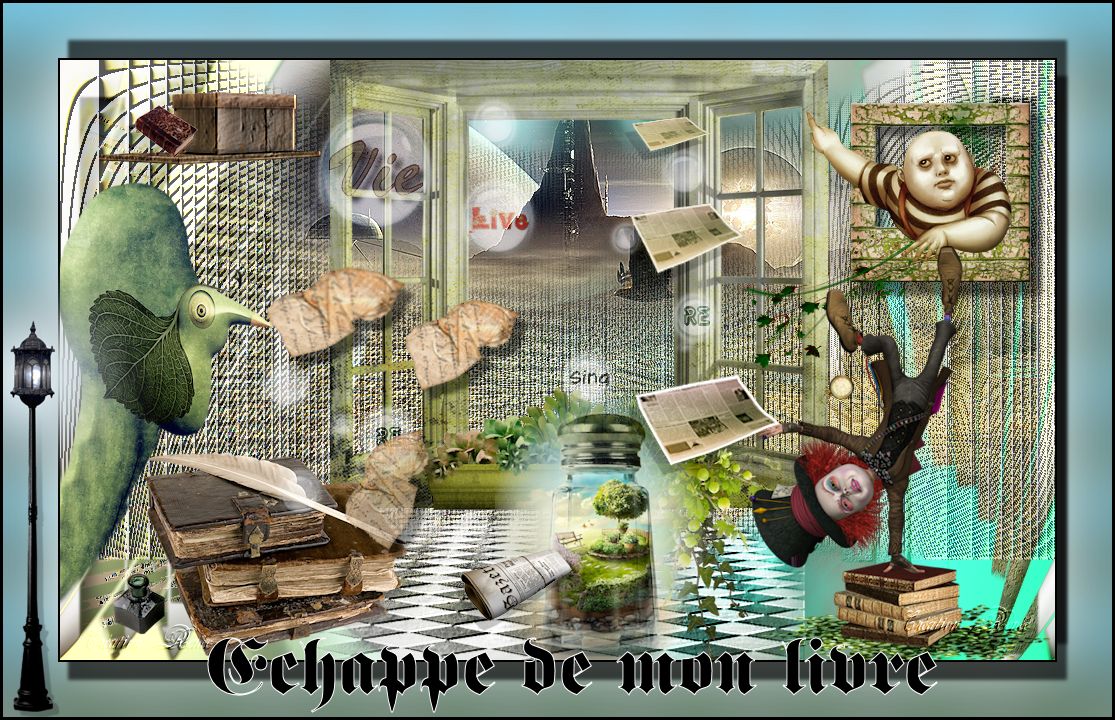
I hope you enjoyed this lesson
This lesson was written by Renée 20/04/2013

|


 Translations