|
Attention
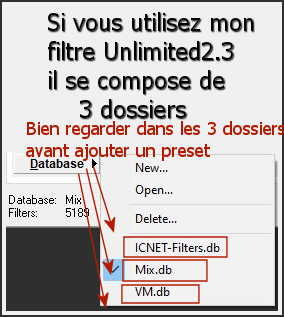
Before you start using this filter Frisluft-Amiga Rulez, I would like to recommend the following.(the latest Windows updates often modify dlls)
I advise you to replace the dlls in Windows you find them and how to proceed
Here
Restart your computer - Open your PSP and start the tutorial - otherwise the PSP might close.
If it does not work with this filter, there is an image in the folder
Let's start the lesson
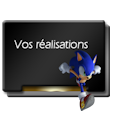
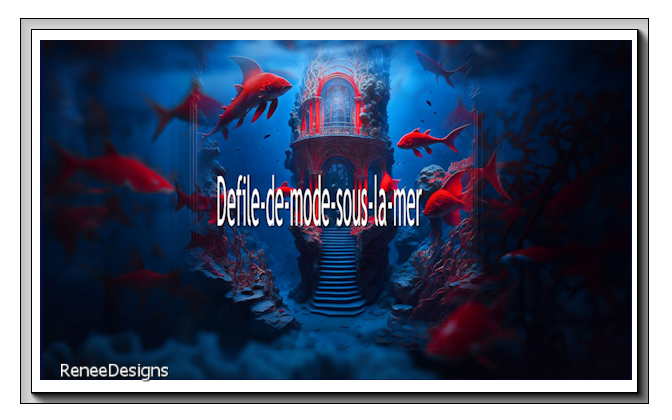
Défilé de mode sous la mer / Fashion show
under the sea
-Preparation
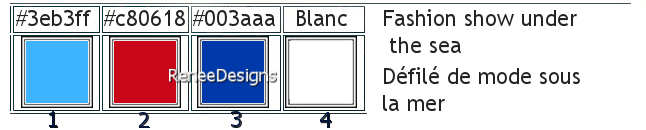
-Material Properties: Set your Foreground color to color #3eb3ff=color 1 – Set your Background color to color #c80618= 2
1.Open the Background-Image ‘’ Fond-Défilé-de-mode-sous-la-mer’’- Promote Background Layer = Raster 1
2.
Open the Tube ’’texte’’ - Edit - Copy- Activate your work -Edit - Paste as new layer
-Do not move
3.
Layers – Duplicate
Rename this layer ''TITRE '' and hide the visibility of this layer for the moment
- In the Layer Palette- activate Raster 2
4.
Effects - Plugins - Mura’s Meister – Copies use the settings below

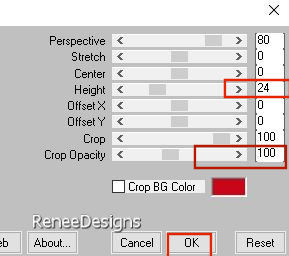
5.
Effects - Plugins - Mura’s Meister - Perspective
Tiling use the settings below
- In the Layer Palette- activate Raster 1
6.
Layers – Duplicate
7.
Layers- Arrange- Bring to Top
8.
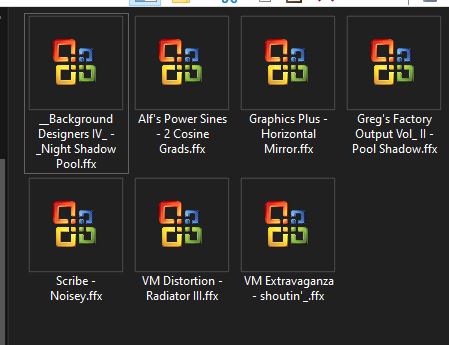
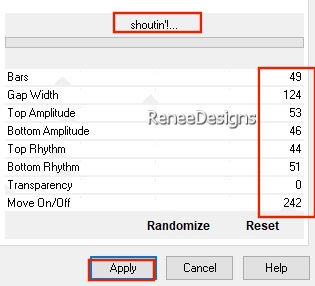
Effects -Plugins - Filters in Unlimited 2.0 - VM
Extravaganza - shoutin'!..use the settings below.
You can't see anything yet, that's normal.
9.
Effects–3D- Effects- Drop Shadow with these settings: 0/0/100/25 Color Black
10.
Selections –load/save selection –load selection from disc and select my selection:‘’Mode-sous-la-mer-1’’
11.
Effects - Plugins- Filters in Unlimited 2.0 -
Greg's Factory Output Vol. II - Pool Shadow use the settings below


12.
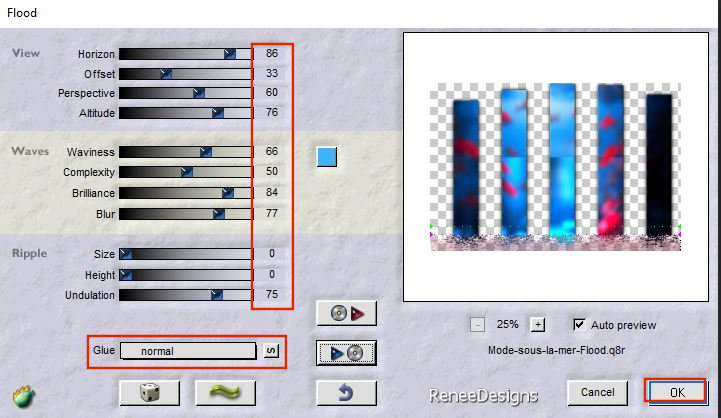
Effects -Plugins – Flaming Pear Flood -click on the red triangle search the preset- Preset :
Mode-sous-la-mer-Flood (of manually see screen )
13.
Effects – Edge Effects –Enhance
14.
Layers-Properties-Set the Blend Mode to " Screen"
15.
Layers – Duplicate
16.
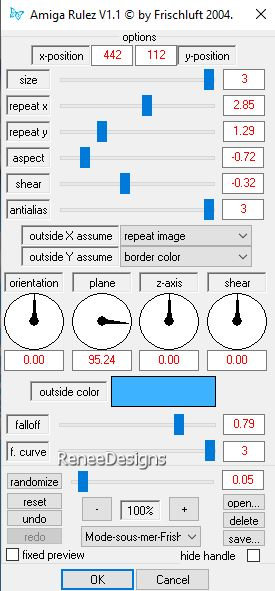
Effects – Plugins - Frischlutf - Amiga Rulez use the settings below -Color #3eb3ff= 1
-Warning: this filter may close your Psp (save your work)
17.
Selections –load/save selection –load selection from disc and select my selection:‘’Mode-sous-la-mer-2’’

18.
Press the "K" on the keyboard (Select)- Scale mode - Take the middle node from the bottom and push it up- to 300 PX
If you have a problem with this filter
- Delete the Copy layer 2 of Raster 1 in the Layers palette
-Open the Tube ‘’Mode-sous-la-mer-Image-2’’ Edit - Copy- Activate your work -Edit - Paste as new layer
- and move it up to the border
19.
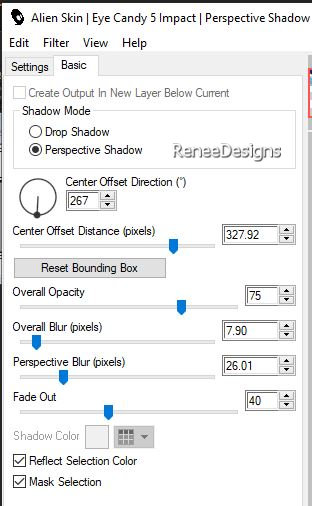
Effects- Plugins - Alien Skin EyeCandy 5 –
Impact –Perspective Shadow-Tab- Settings- User Settings and select my file -Preset :’’ mode sous la mer-shadow ’’
of manually see screen
20.
Layers-Properties-Set the Blend Mode to "Hard Light " -Reduce the Opacity of this layer to 71%
21.
Effects - Plugins - Filters in Unlimited 2.0 -
Graphics Plus - Horizontal Mirror using the default settings
22.Layers – Duplicate
23.
Effects - Plugins - Filters in Unlimited 2.0- VM
Distortion - Radiator III... with these settings: 7/23/22/8
24.
Layers-Properties-Set the Blend Mode to "Overlay" -Reduce the Opacity of this layer to 38%
25.
Effects – Edge Effects– Enhance
26.
Selections –load/save selection –load selection from disc and select my selection:‘’Mode-sous-la-mer-3’’
27.
Layers- New Mask Layer -From Image and select Mask :
’’masque-sous-mer’’

-Layers - Duplicate twice
-
Layers- Merge- Merge Group
28.Open the Tube
‘’Mode-sous-la-mer-Image-1’’ -Edit - Copy- Activate your work -Edit - Paste as new layer
29.
Pick Tool: (K) on your keyboard -Enter these parameters on the toolbar
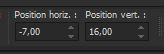 -7
/ 16 -7
/ 16
Press ( M ) to close the Pick Tool
-
Material properties: Keep foreground color at color #3eb3ff=1 -Set background color at #003aaa=3
-Properties Foreground- Prepare a Foreground/Background Sunburst Gradient configured like this
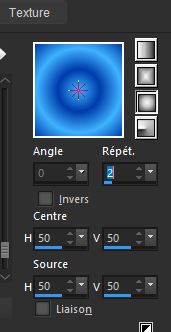
30.
Layers- New Raster Layer
31.
Flood Fill Tool
 –
Fill the layer with the Gradient –
Fill the layer with the Gradient
32.
Effects - Plugins- Filters in Unlimited 2.0 –
Scribe – Noisey : 54
33.
Effects - Plugins- Filters in Unlimited 2.0 -Alf's
Power Sines- 2 Cosine Grads...using the default settings
34. Layers-Properties-Set the Blend Mode to "Overlay" -Reduce the Opacity of this layer to 48%
35.
Adjust-One Step Photo Fix –(2 times)
36.
Open the Tube ‘’Mode-sous-la-mer-102’’
-
Image -Resize 50%
-
Edit - Copy- Activate your work -Edit - Paste as new layer
37.
Pick Tool: (K) on your keyboard -Enter these parameters on the toolbar
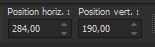 284/ 190
Press ( M ) to close the Pick Tool
38.
Effects – Plugins – FM Tile Tools – Blend Emboss
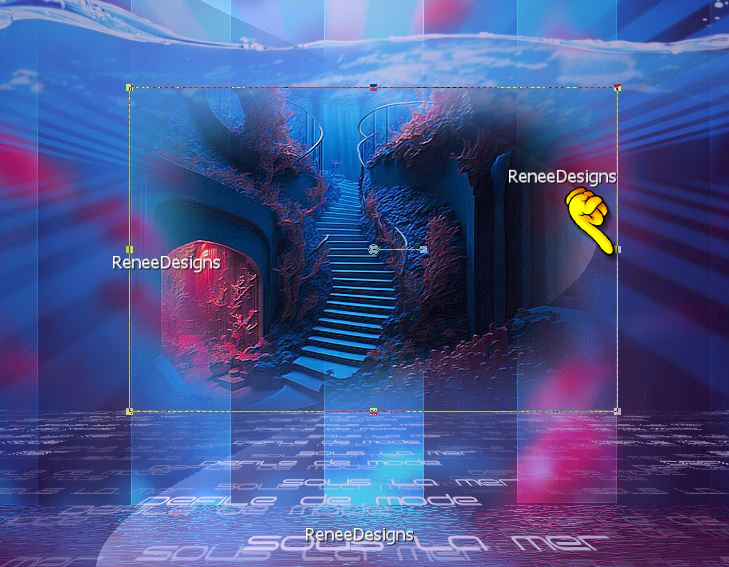
using the default settings
39.Selection tool (k) -Scale mode - Pull a little to the right, to the left and also to the bottom that it fits-(as shown in the example below)
40.
Layers – Duplicate
41.
Objects – Align- Bottom
42.
Layers- Arrange- Move Down
- Activate the top of the layer palette
-
Color Palette -Set your Foreground color to color #c80618=2
43.
Layers- New Raster Layer
44.
Flood Fill Tool
–
Opacity 50% –
Fill the layer with the Foreground color #c80618=2
45.
Layers- New Mask Layer -From Image and select Mask : ’’Narah_mask_0579’’

-
Layers- Merge- Merge Group
46.
Image - Resize by 55% - Uncheck - Resize all layers
-
Move the tube to the top right
47.
Effects –Edge Effects – Enhance
48.
Effects–3D- Effects- Drop Shadow with these settings: 2/2/80/1 Color Black
49. Layers – Duplicate
50.
Layers- Merge - Merge Down
51.
Open the Tube ‘’ Mode-sous-la-mer-104’’ (or another of your choice)
-Image - Resize by 55 %
-Edit - Copy- Activate your work -Edit - Paste as new layer
-Pick Tool: (K) on your keyboard -Enter these parameters on the toolbar
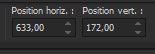 633
/ 172 633
/ 172
If you choose another tube - adapt its dimensions to fit in the bottom right-hand corner.
52.
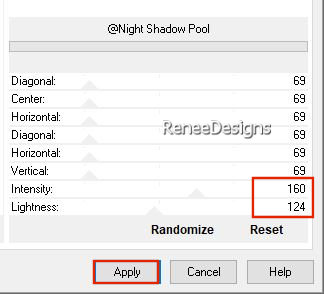
Effects - Plugins- Filters in Unlimited 2.0 -
&<Background Designers IV>@Night Shadow Pool use the settings below
53.
Layers- Arrange- Move Down
- Activate the top of the layer palette
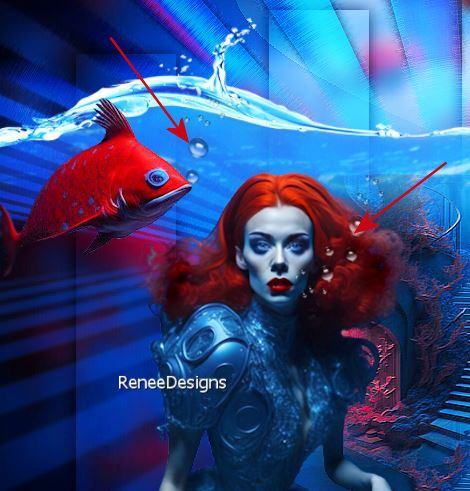
54. Open the Tube ‘’Mode-sous-la-mer-poisson2 ‘’and
‘’Mode-sous-la-mer-poisson1’’ (or others of your choice)
-Edit - Copy- Activate your work -Edit - Paste as new layer
- Place to your liking
55.
Select a character Tube /Resize if necessary and place at bottom left
56.
Open the Tube ‘’ Renee-mode sous la mer - Tubes
bulles’’
-
Select bubbles to your liking and place them on the mouth of the woman's tube and the big fish see capture
57.
Activate and open the layer named ''TITRE''
58.
Layers- Arrange- Bring to Top
-
Place the title to your liking ( Blend mode for Renée on "Overlay ")
59.Effects–3D- Effects- Drop Shadow with the same settings:
60.
Image - Add Borders-Symmetric checked: 10 pixels -Color White
Image - Add Borders-Symmetric checked: 2 Pixels -Color #c80618= 2
Image - Add Borders-Symmetric checked: 20 pixels -Color White
Image - Add Borders-Symmetric checked:2 Pixels -Color #003aaa=3
Image - Add Borders-Symmetric checked: 40 pixels -Color White
61.Paste the author's watermark on your work and your own watermark
62.
Layers- Merge- Merge Visible
63.
Image - Resize - to 88% - Resize all layers- Checked
64.
Open the Tube ‘’Renee-mode sous la mer-Tubes-Cadre’’ - Edit - Copy- Activate your work -Edit - Paste as new layer-Do not move
65.
Layers- Merge- Merge All ( flatten)
Save as JPG
I hope you enjoyed this lesson
Renée
This lesson was written by Renée
26/08/2023
Edited and Update
in 2023
*
Any resemblance with an existing lesson is a coincidence
* Do not forget to thank the people who work with us and for us
-I have appointed the tubeurs and translators
Thanks
*
|

 Translations