|
Before you start
*
Open PSP.
Open your material
Open / tubes duplicate and close originals.
Open then Minimize the mask in PSP
Put filters in their proper folders.
Brushes and other tools in their respective folders.
To import presets Eye candy Double-click the file it will automatically install *
*
For older versions of PSP
may be that you are having trouble opening the tubes
Just click OK and the tube can be used.
Thanks Renée
*-*-*
Let's start the lesson.
1. Material of the foreground - select my file in the list ''agolden_ivy'' gradient / Background color = #b71118
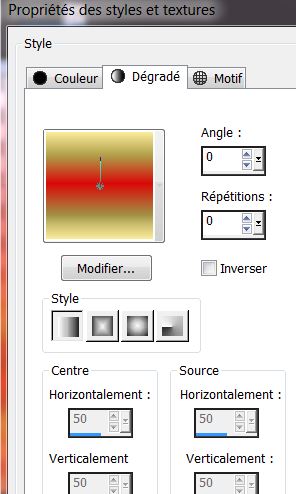
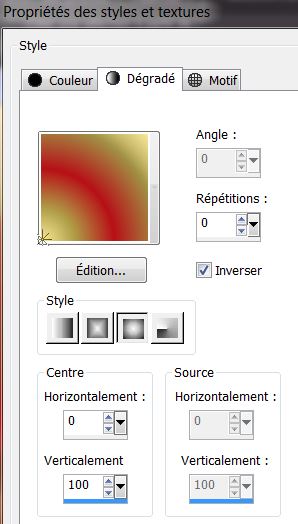
2. Prepare a linear gradient configured like this.
3. File - New - New Image 980 x 620 pixels-Tranparent
4. Flood Fill Tool: fill the layer with the gradient
5. Layers- Duplicate
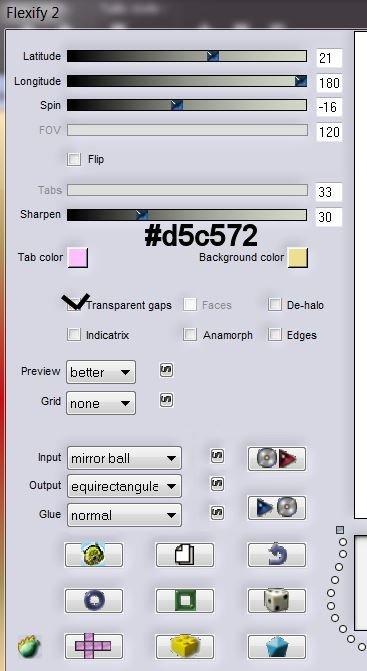
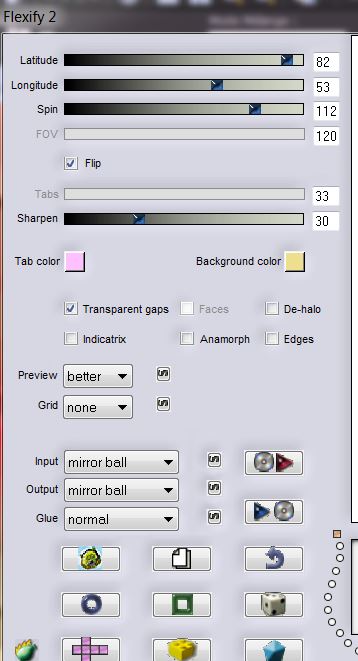
6. Effects -Plugins - Flaming Pear - Flexify 2 use settings below
7. Layer Palette -Double click on this layer and set the Blendmode to "Color-Legacy"
8. Layers- New raster layer
9. Activate Flood Fill Tool and fill the layer with color#d4150e
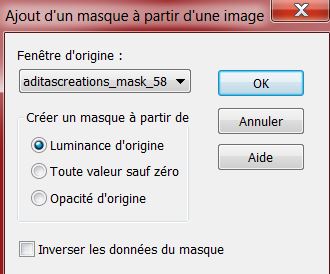
10.Layers-New Mask Layer From Image and choose Mask ''aditascreations_mask_58''
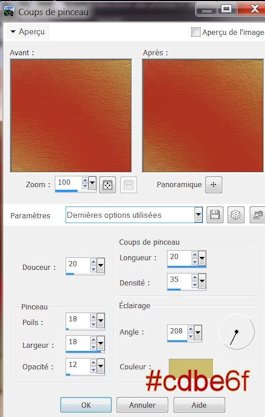
11. Layers- Merge -Merge Group
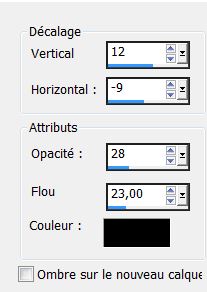
12. Effects- 3D Effects-Drop Shadow use settings below
13.Effects– Plugins – FM Tile Tools - Blend Emboss /
Default
14. Activate tube ''image_daewonii_cube'' Edit-Copy-Edit Paste as a new layer.
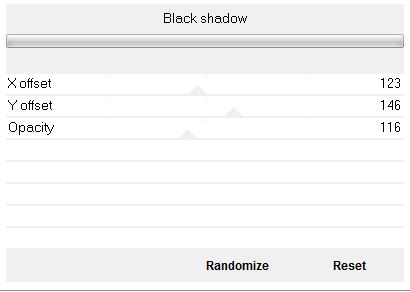
15. Effects-Plugins – Unlimited 2.0 - Toadies – Black
Shadow
16. Layer Palette -Double click on this layer and set the Blendmode to "Luminance-Legacy "
17. Image Mirror
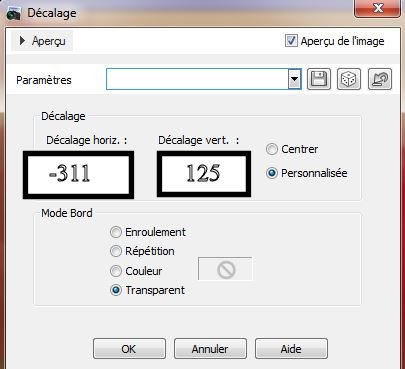
18. Effects- Image Effects- Offset use settings below
19. Layers- Duplicate- Image Flip
20.Activate tube ''automn_reflections_by_daewoniii'' Edit/copy-Edit paste as a new layer.
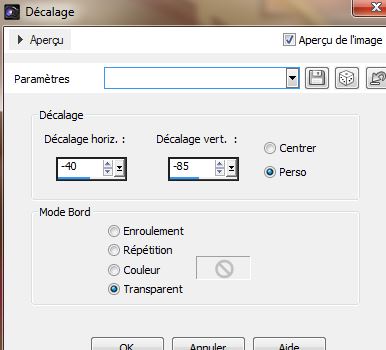
21. Effects- Image Effects-Offset use settings below
22. Change the foreground linear gradient / Prepare a Sunburst Gradient as configured
23. Layers- New raster layer
24. Selections - load/save selection - load selection from disk and select my file ''DAEWONIII_1'' / Activate Flood Fill Tool and fill selection with the sunburst gradient
Keep Selected
25.Adjust-Blur- Gaussian Blur: Radius:52%
26. Selections- Modify-Contract:20 pixels
27. Effects-Art Media Effects-Brush Strokes use settings below
Keep Selected
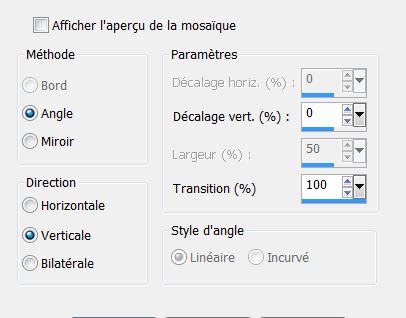
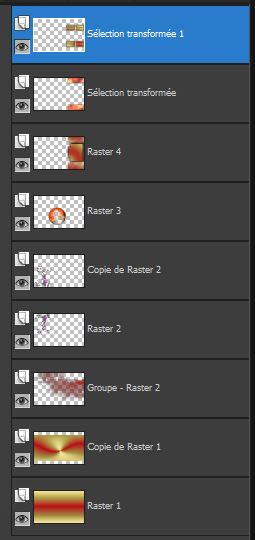
28.
Effects-Image Effects-Seamless Tiling use the settings below
29. Effects-Plugins -Eye Candy 5- Impact - Perpsective shadow -
tab Settings/User Settings and choose my Preset ''DAEWONIII_persp_1''
30. Selections- Deselect All
You should have this result:
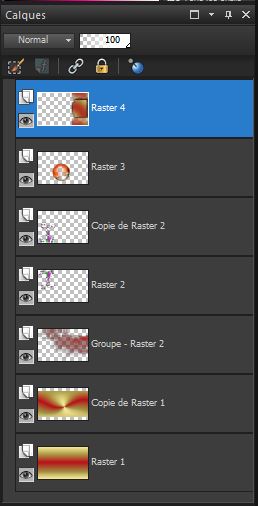
31. Layer Palette-stay on the top layer (raster 4)
32.Selections - load/save selection - load selection from disk and select my file ''DAEWONIII_2''
33.Selections-Promote selection to layer
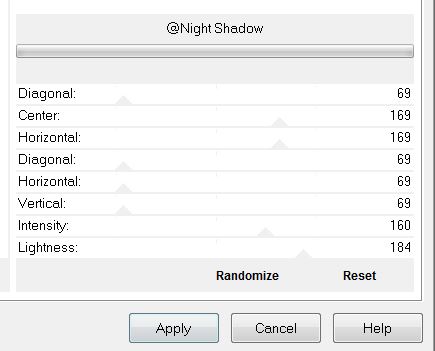
34. Effects -Plugins - Unlimited2.0 - &<Background
DesignersIV> @ Night Shadow
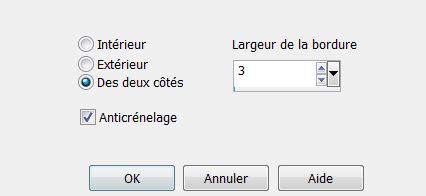
35. Selections - Modify - select selection borders use settings below/Bote sides
36. Activate Flood Fill Tool and fill selection with the sunburst gradient
37.Selections-Promote selection to layer
38. Selections- Deselect All
39. Effects-Plugins- Simple -Zoom out and flip
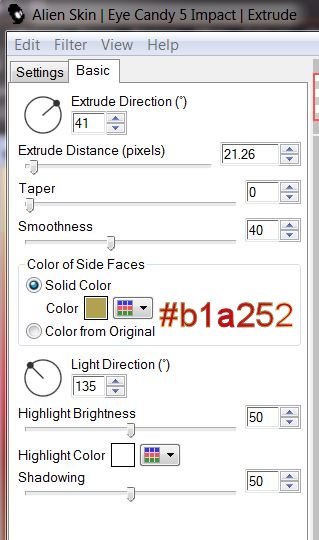
40. Effects -Plugins EyeCandy 5-Impact -Extrude In the Basic use settings below
41. Activate Pick Tool ( K ) place it in the right place like this
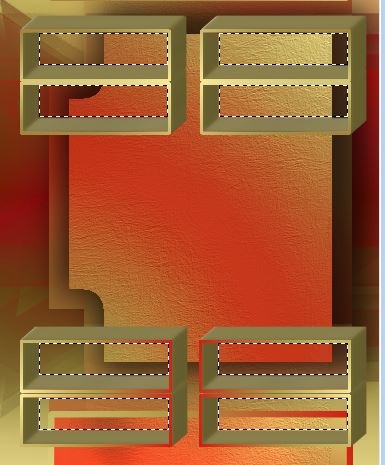
42.With your magic wand - Select inside like this
43.Activate Flood Fill Tool and fill selection with the sunburst gradient (Do not add new layer)
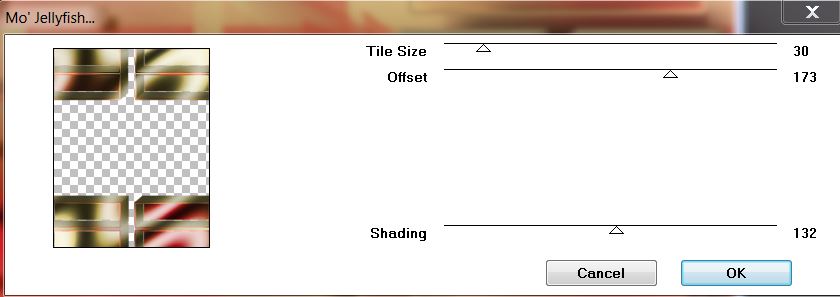
44. Effects– Plugins - Unlimited2.0 -Tramage –
Mo'Jellysfish
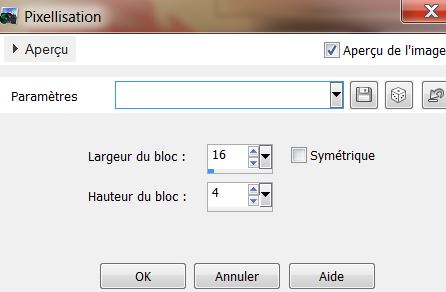
45. Effects- Distortion Effects- Pixelate use settings below
46. Selections- Deselect All
47. Layer Palette -double click on this layer and set the Blendmode to "Hard Light"
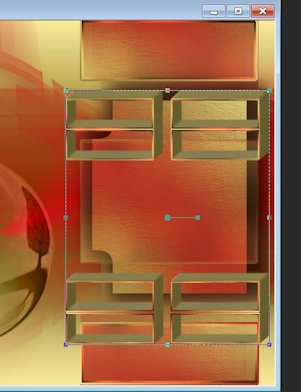
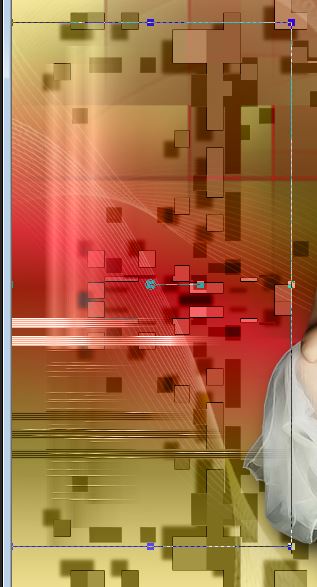
This is what you have now:
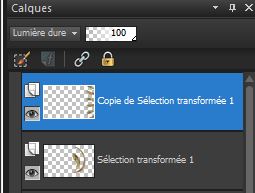
48. Layers- Duplicate
49. Activate the layer underneath ( sélection transformée 1)
50.Effects-Plugins - Flaming Pear - Flexify 2 (checked Flip)
51. Activate the top of the layer-palette (copie de la
sélection transformée 1)
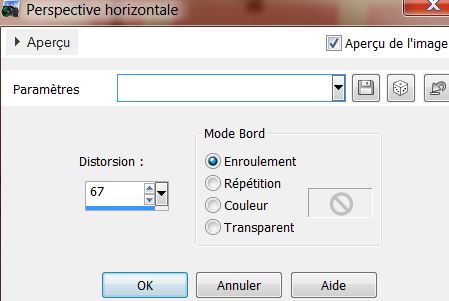
52.Effects- Geometric Effects-Perspective Horizontal use settings below
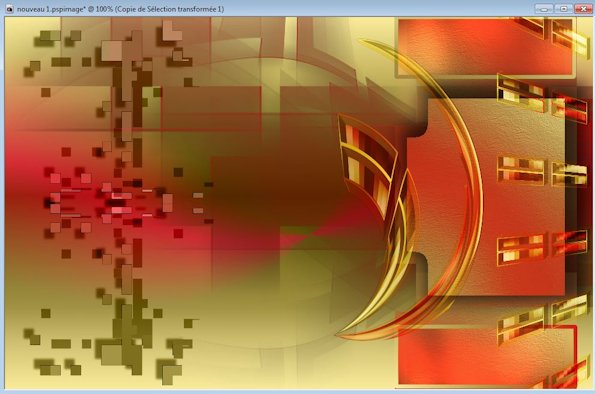
These are the top two layers in the layers palette
And your work look like this now
53 .Activate the top of the layer-palette
54. Activate tube ''effet_sinedots'' Edit/copy-Edit paste as a new layer. Do not move !!
55. Activate tube ''dani'' Edit/copy-Edit paste as a new layer./ - Image Resize to 85%/ Resize all Layers not checked
56 .With your move tool move to the left side

57. Effects-Plugins Eye Candy 5- Impact – Preset /Drop
shadow blury
58. Activate tube
''DAEWONIII_image_1'' Edit/copy-Edit paste as a new layer.With your move tool move to the left /Layer Palette: change your Blend Mode to "Luminance-Legacy "
59
All is in place?
60. Layers-Merge-Merge Visible
61. Image - Add borders symmetric checked: 3 pixels color #b71118
62. Image - Add borders symmetric checked: 50 pixels color #ffffff
63 .Image - Add borders symmetric checked: 3 pixels color #b71118
64. Click with your magic wand into the border of the 50 pixels
65. Layers- New raster layer/Activate Flood Fill Tool and fill selection with the sunburst gradient
66.Attention Material Properties:
67.
Foreground to gradient : ''agolden_ivy'' / Background color =
#b71118/Prepare a Sunburst Gradient as configured as in point 22 /Activate Flood Fill Tool and fill selection with the sunburst gradient like this 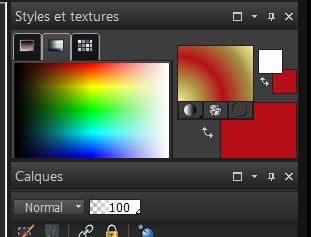
68.
Effects- Plugins - Unlimited 2.0 – @<Background Designers
IV/ @ Random Smelter
Or take this filter: Effects-Plugins @<Background Designers/
plasma bkg maker
Your Layer Palette look like this now: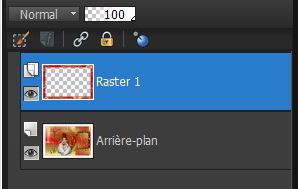
69.With your magic wand click inside the empty a part of the layer( Raster 1)
70.Effects- 3D Effects- Drop Shadow: 0/0/50/36 color black
71. Selections- Deselect All
72. Activate tube text :Edit - Copy - Edit - Paste as new layer. Write your own text
73.Layers - Merge - Merge all layers
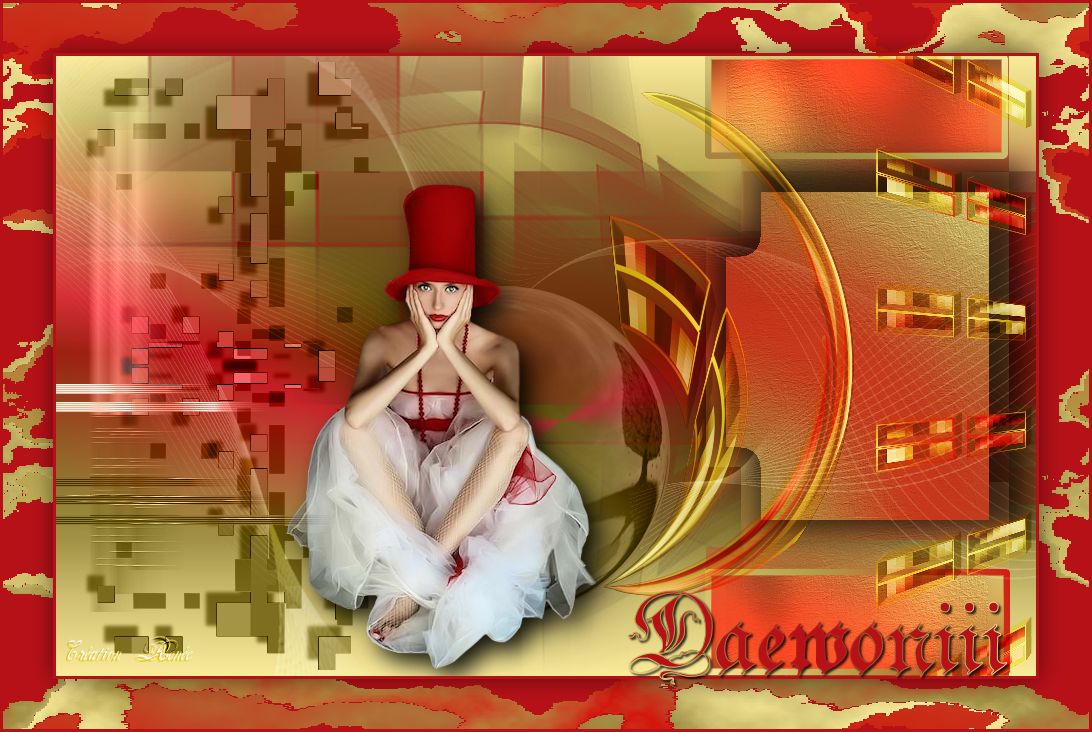
I hope you enjoyed this lesson
- This lesson was written by Renée the : 12/05/2013

|


 Translations