|
Let's start the lesson
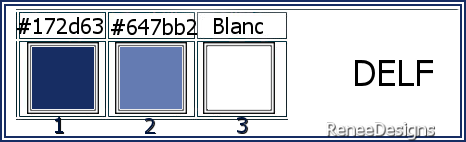
DELF
-
Preparation
-Material Properties: Set your Foreground color to color #172d63=color 1 – Set your Background color to color #647bb2= 2
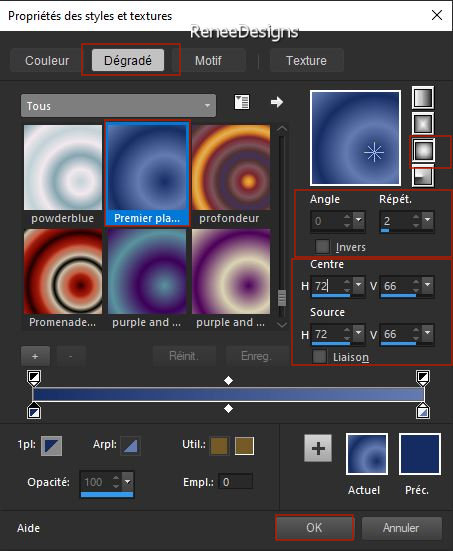
- Properties Foreground- Prepare a Foreground/Background Sunburst Gradient configured like this
1.File: Open a Transparent Image in this size : 1100
x 700 PX
2. Flood Fill Tool
 –
Fill the layer with the Gradient –
Fill the layer with the Gradient
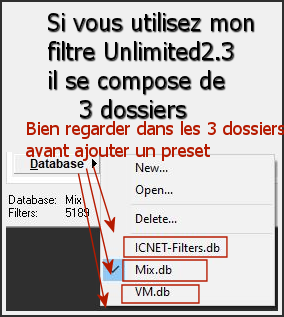
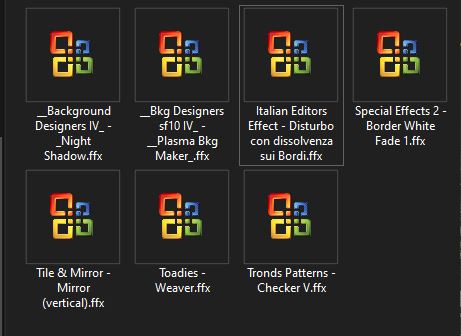
3. Effects - Plugins - Filters in Unlimited 2.0 - ICNET-Filters- Tile
& Mirror – Mirror Vertical
4. Layers - Duplicate
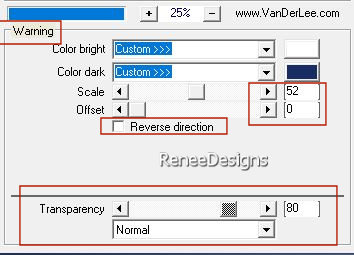
5. Effects - Plugins – Vanderlee- Unplugged X – Warning-use the settings below-Color #ffffff and#172d63= 1
6. Adjust-Blur- Radial Blur use the settings below

- Layers-Properties-Lower the Opacity to 69%
-Properties Foreground –
Change the foreground color to white
- Prepare a Foreground/Background Sunburst Gradient with the same settings
7. Layers- New Raster Layer
8. Selections –load/save selection –load selection from disc and select my selection: ‘’Delf-1’’
9. Flood Fill Tool
–
Fill the selection with the gradient (2 clicks)
10. Effects – 3D-Effects –
Drop Settings with these settings: 5/-5/75/25 Color Black
11. Effects - Plugins - Filters in Unlimited 2.0- Tronds Patterns-
Checker V : 23

12. Layers-Properties-Set the Blend Mode to " Luminance "
13. Pick Tool: (K) on your keyboard -Enter these parameters on the toolbar
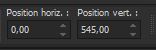 0/
545 0/
545
- Press ( M ) to close the Pick Tool
14. Selections- Select All – Selection Float- Selection Defloat
15. Effects – Plugins – Mura’s Meister – Perspective Tiling using the default settings
16. Effects –Plugins – FM Tile Tools – Blend Emboss using the default settings
17. Layers – Duplicate
18. Layers-Properties-Set the Blend Mode to " Luminance "
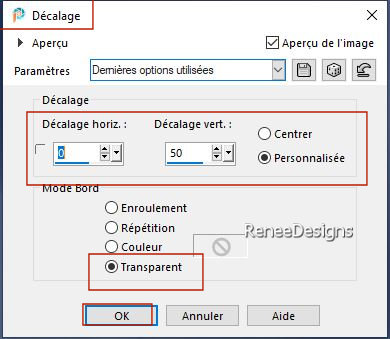
19. Effects – Image Effects
– Offset use the settings below
20. Layers- Merge- Merge Down
21. Effects - Plugins - Filters in Unlimited 2.0-&<Background Designers
IV>-@Night Shadow using the default settings
22. Layers- New Raster Layer
23. Selections –load/save selection –load selection from disc and select my selection: ‘’Delf-2’’
24. Flood Fill Tool
–
Fill the selection with #ffffff=3 (2 clicks)
25. Layers- New Raster Layer
26. Selections –load/save selection –load selection from disc and select my selection: ‘’Delf-3’’
27.Open the Tube ‘’Renee-Tubes-Delf-3’’ -Edit - Copy- Activate your work -Edit - Paste Into Selection
28. Adjust- Blur- Gaussian Blur- Radius 15%
29. Effects - Plugins - Filters in Unlimited 2.0 - ICNET-Filters-
Special Effects 2 - Border White Fade 1 using the default settings
30. One more time this tube ‘’ ’Renee-Tubes-Delf-3’’-Edit - Copy- Activate your work -Edit - Paste as a new layer (the tube still in memory)
31. Image - Resize 52% - Resize all Layers not checked
32. Objects – Align-
Right
33. Selections –load/save selection –load selection from disc and select my selection: ‘’Delf-4’’
34.Selections - Invert

35. Selections –load/save selection –load selection from disc and select my selection: ‘’Delf-5’’ (it cancels the previous one)
36. Layers- New Raster Layer
37. Flood Fill Tool –
Fill the selection with #ffffff=3
38. Effects - Plugins - Filters in Unlimited 2.0 – Toadies – Weaver using the default settings
39. Effects - lugins – Toadies – What are you with these settings: 10/10
40. Effects – Edge Effects – Enhance More
41. Effects - Edge Effects –
Enhance
42. Layers- Arrange- Move Down
- Activate the top of the Layer Palette
43.Open the Tube ‘’Renee-Cadre-Delf’’ -Edit - Copy- Activate your work -Edit - Paste as a new layer
44. Pick Tool: (K) on your keyboard -Enter these parameters on the toolbar
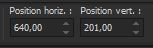 640/ 201
- Press ( M ) to close the Pick Tool
45. Activate the Magic Wand /Feather and Tolerance 0 - Select inside frame
46. Open the Tube ‘’Renee-Tubes-Delf-8’’ -Edit - Copy- Activate your work -Edit - Paste Into Selection
47. Layers – Duplicate
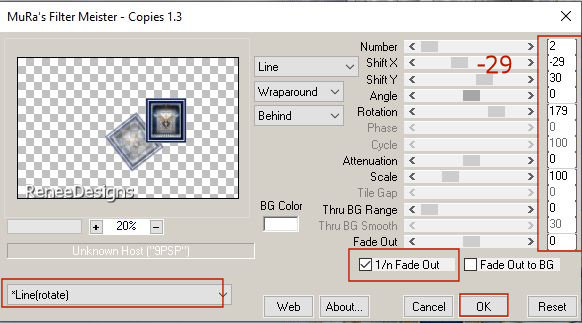
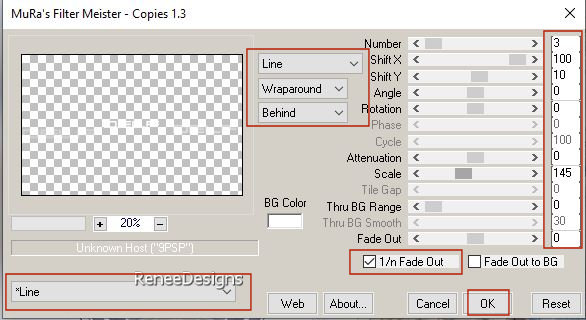
48. Effects – Plugins – Mura’s Meister – Copies use the settings below
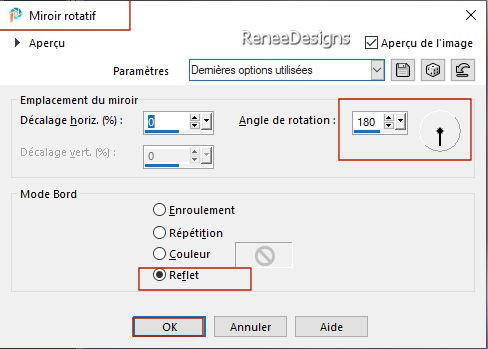
49.Effects – Reflection Effects – Rotating Mirror use the settings below
50. Layers- New Raster Layer
51. Selections –load/save selection –load selection from disc and select my selection: ‘’Delf-6’’
52.Properties Foreground-set your Foreground color to color #172d63=1
Flood Fill Tool
–
Fill the selection with color #172d63=1(2 clicks)
53. Text Tool- Renée chose the font ‘’ 911porschav3’’ use the settings below (Included in the material) or choose your own font
Properties Background-set your Background color to color #ffffff=3
Write
DELF

- Convert to Raster Layer
54. Objects -Align –
Center in Canvas
If the above does not work, do the following
Pick Tool: (K) on your keyboard -Enter these parameters on the toolbar
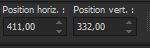 411/332
55. Effects – Plugins – Mura’s Meister – Copies use the settings below
56. Effects – 3D-Effects –
Drop Shadow with these settings: 1/1/100/2 Color #172d63=1
- Pick Tool: (K) on your keyboard -Enter these parameters on the toolbar
 9/26 9/26
57. Layers– Duplicate
58. Image - Resize 52%- Resize all Layers not checked
59. Pick Tool: (K) on your keyboard -Enter these parameters on the toolbar
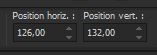 126/ 132
-Press ( M ) to close the Pick Tool
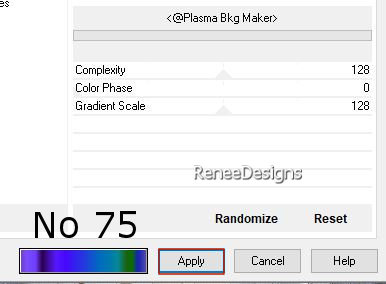
60. Effects - Plugins - Filters in Unlimited 2.0 - &<Bkg Designers sf10
IV>-<@Plasma Bkg Maker>
choose no. 75 (choose according to your colors )
61. Effects– Distortion Effects- Wind-Wind direction from Right-Wind strenght 35%

62. Layers- New Raster Layer
63. Set your Foreground Color to color #ffffff=3
Flood Fill Tool
–
Opacity 50% –
Fill the layer with color #ffffff=3
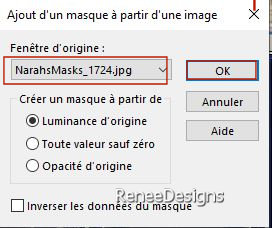
64. Layers- New Mask Layer -From Image and select Mask’’NarahsMasks_1724’’
- Layers- Merge- Merge Group
65. Effects –Edge Effects– Enhance More
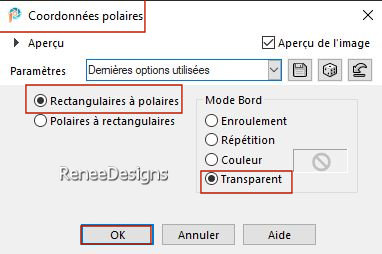
66. Effects– Distortion Effects-Polar coördinates- Rectangular to polar-Transparent
67. Layers-Properties-Set the Blend Mode to "Dodge "
68. Effects – 3D-Effects – Drop Shadow with the same settings: ( 1/1/100/2 #172d63=1)
69. Layers- New Raster Layer
70. Selections –load/save selection –load selection from disc and select my selection: ‘’Delf-7’’
71. Flood Fill Tool
–
Opacity 80 %–
Fill the selection with color #ffffff=3
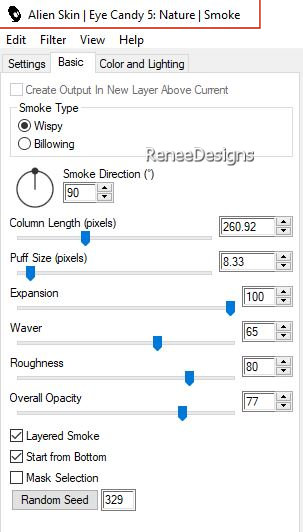
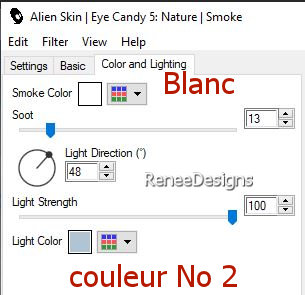
72. Effects - Plugins - Alien Skin EyeCandy 5- Nature – Smoke –Tab-Settings- User Settings and select my file –Preset :’’Delf-Smoke
-or with the following settings
73. Open the Tube ‘’ Groupe-Oiseaux .png’’ -Edit - Copy- Activate your work -Edit - Paste as a new layer
-Place to your liking
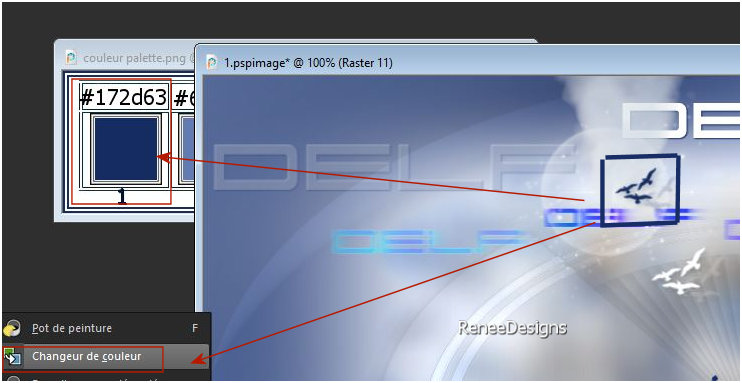
Option : select some birds and apply a color with the color change tool
-Renée chose color 1
74. Layers- New Raster Layer
75. Selections –load/save selection –load selection from disc and select my selection: ‘’Delf-8’’
76. Flood Fill Tool
–
Opacity 100% –
Fill the selection with color #ffffff=3
77. Effects - Plugins - Filters in Unlimited 2.0 - Italian Editors
Effect- Disturbo con dissolvenza sui Bordi with these settings: 255 / 36
78. Open the Tube ‘’Delf-Texte’’ -Edit - Copy- Activate your work -Edit - Paste as a new layer
- Move to the left
79. Layers-Properties-Set the Blend Mode to "Overlay " – Reduce the Opacity of this layer to 42%
80. Open one of Renée's tubes, or a tube of your own - add it as a new layer on your work/ resize it if necessary/ place it as you like
Drop Shadow to your own choice
Renée chose ‘’ Renee-Tubes-Delf-13’’
- Image Resize
75%
- Edit - Copy- Activate your work -Edit - Paste as a new layer and move
81. Effects - Plugins - Alien Skin EyeCandy 5 – Impact--Tab-Settings- User Settings and select my file – Preset :’’Delf-Shadow’’
82. Layers Merge- Merge Visible
83. Image – Ajouter des
bordures de 5 Pixels -Color white
84. Image – Ajouter des
bordures de 5 Pixels - Color #172d63=1
EDIT COPY!!!!
85. Activate the Tube ‘’Delf-Cadre-
final in your Psp
86. With the Magic Wand - Select inside frame
EDIT
-Paste into selection – Image is in memory
87. Image - Resize - 1005 Pixels width-Resize all Layers checked
88. Paste the author's watermark on your work and your own watermark
- Layers- Merge- Merge All ( flatten)
Save as JPG
I hope you enjoyed this lesson
Renée
This lesson was written by Renée
15/07/2023
Edited and Update
in 2023
*
*
Any resemblance with an existing lesson is a coincidence
* Do not forget to thank the people who work with us and for us -I have appointed the tubeurs and translators
Thanks
|
 Translations