|
Let's begin
1.
Open a transparent image of 1120 x 840 pixels
2.
Material Properties: Forgroundcolor to : #ffffff and the backgroundcolor to : #21201e
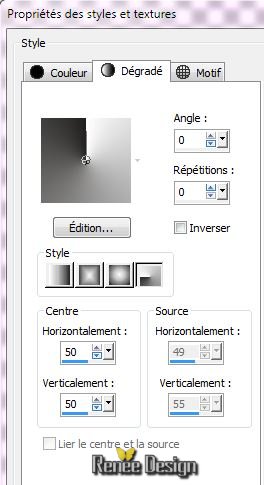
3.
Prepare a radial gradient configured like this
3. Food Fill Tool: configured like this

Flood Fill Tool: Fill the layer with the gradient
4.
Effects - Plugins FM Tile Tools - Collage linear

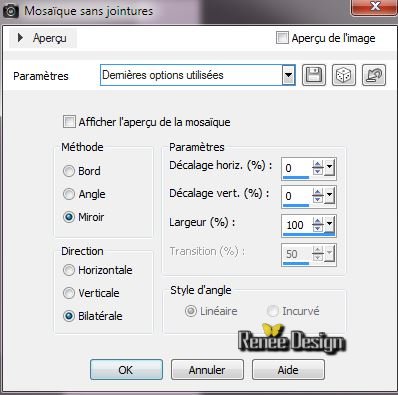
5.
Layers-Duplicate / Effects - Image Effects-Seamless Tilling with the following settings
6.
Effects- Edge Effects-Enhance More
7.
Layers-New raster layer
8.
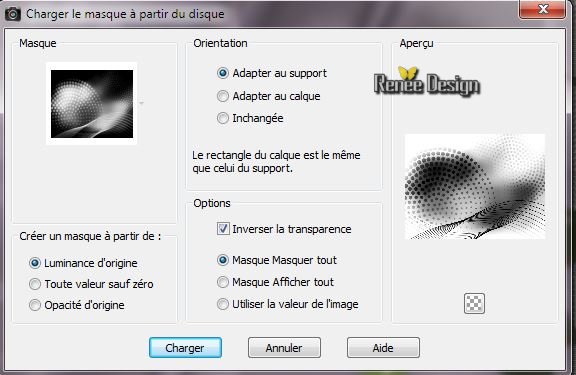
Selections –load/save selection –load selection from disc and choose: ''hi_tech1'' Flood Fill Tool: Fill the selection with this color: #75c600
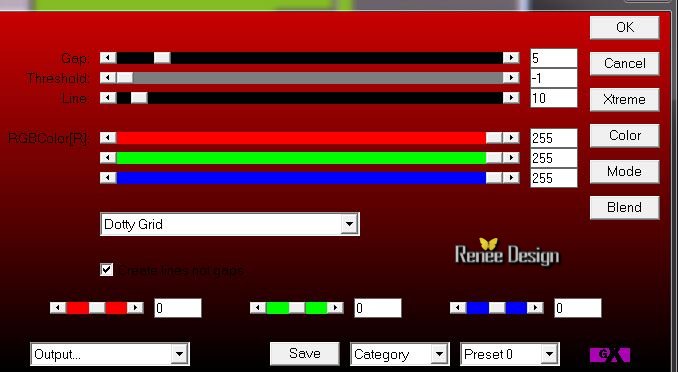
9. Effects -
Plugins AP01(Innovation) Line Silverling
10.
Selection - modify- Select-Selection Borders with the following settings
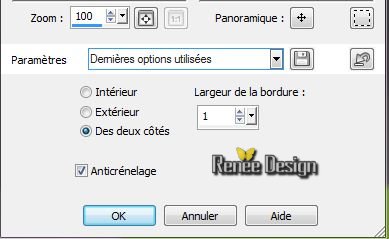
Flood Fill Tool: Fill the selection with white
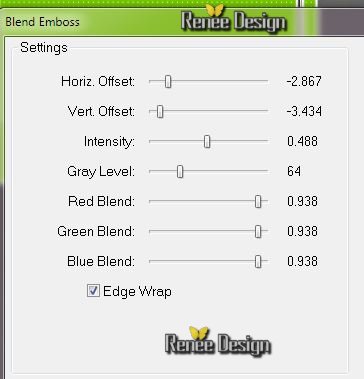
11.
Effects- Plugins FM tile tools Blend emboss with the following settings
12.
Selection - Select none
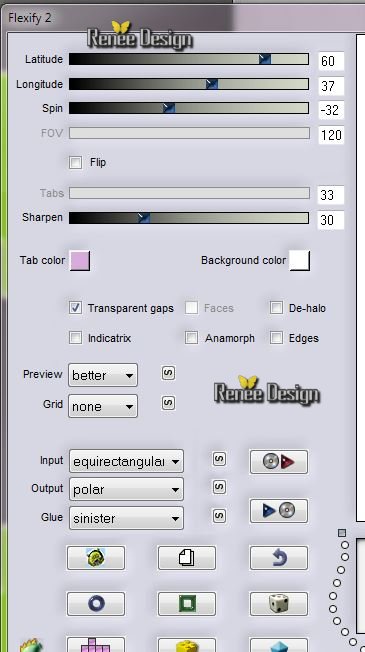
13.
Effects - Plugins Flaming pear - Flexify 2
14.
Image Resize to 65 % all layers unchecked
15
Image Free Rotate - Direction 90 ° Free right
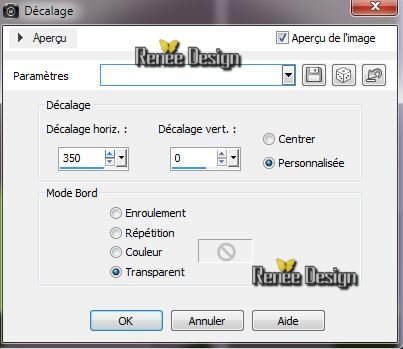
16.
Effects - Image Effects - Offset with the following settings
17.
Effects -Plugins EyeCandy 5 Imapct - Glass - choose my Preset
''hi_tech_glass''
This is the result
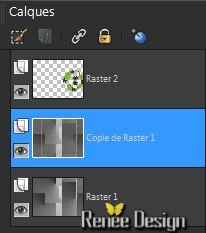
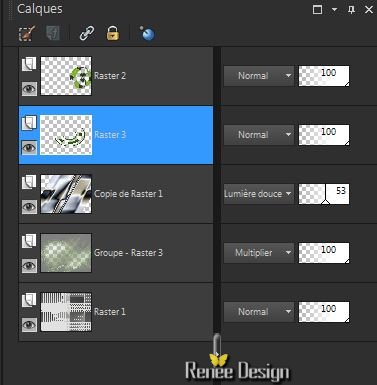
18. Activate the layer underneath (Copie de Raster 1)
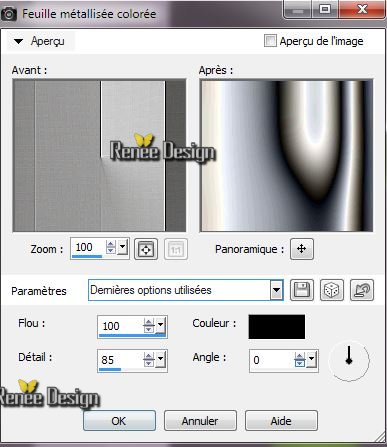
19. Effects
- Artistic Effects- Colored Foil
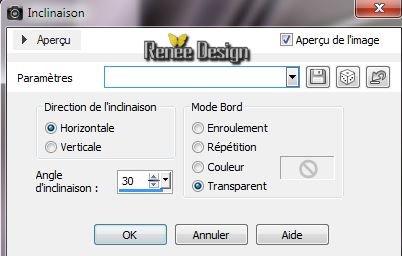
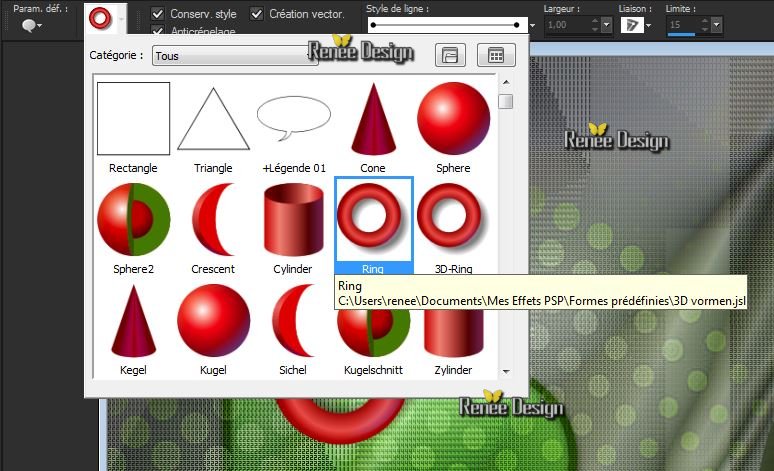
20. Effects - Geometric Effects - Skew with the following settings
21. Blend Mode to this layer "Soft Light " and lower the opacity to 53
%
Activate the bottom layer in your layer palette (Raster 1)
22.
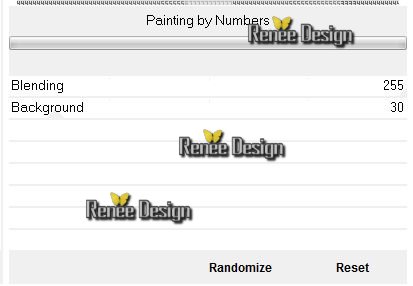
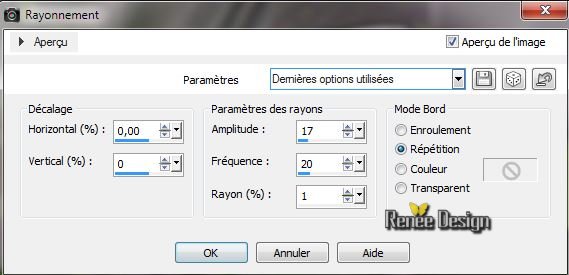
Effects -Plugins VM Experimental - Painting by Numbers
23. Layers-New raster layer- Flood Fill Tool: Fill the layer with:
#818181
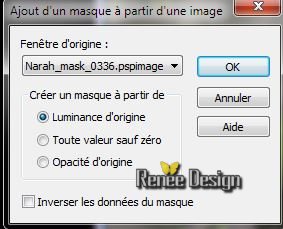
24. Layers-Load/Save Mask-Load Mask from Disk:
"Narah_mask_Abstrack63''
25. Effet-
Edge Effects-Enhance More
Layers-Merge-Merge group
26. Blend Mode to : Mutiply and lower the opacity to 59%
27. Effects
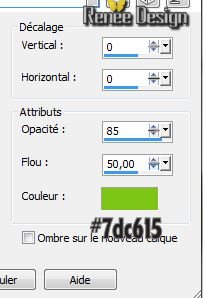
- 3D Effects-Drop Shadow with the following settings
28.
Aktivate the top of the Layers palette
29. Layers-New raster layer
30.
Selections –load/save selection –load selection from disc and choose 'hi_tech2''
31.
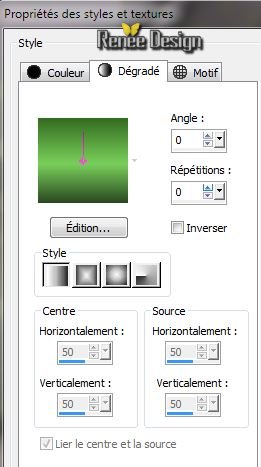
Material Properties: Foregroundcolor to linear ''JGreenerDays'' gradient configured like this
32.
Flood Fill tool : fill the selection with the gradient
33.
Selection - Modify - Contract 5 pixels
34. Effects
- 3D Effects - Cutout
35.
Selection - Select none
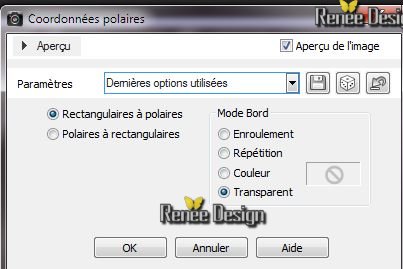
36. Effects
- Distorsion Effects - Polar Coordinates with the following settings
37. Layers-Arrange-Move Down
You are there in your layers palette
Aktivate your top layer in your layer palette
38.
Layers - New Raster Layer
39.
Selections –load/save selection –load selection from disc and choose 'hi_tech3" - Flood Fill Tool: Fill the selection with the gradient
40.
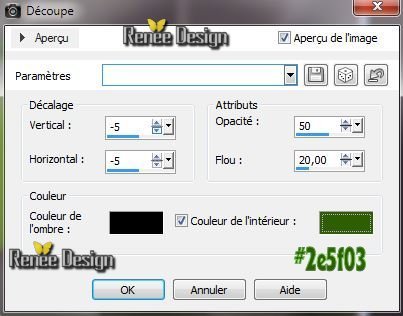
Selection - modify- Select-Selection Borders with the following settings
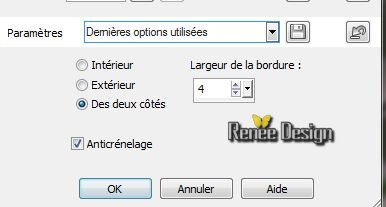
Flood Fill Tool: Fill the selection with :#2e5f03
41.
Effects -Plugins Eye Candy 5 Impact - Glass - and choose my Preset
''hi_tech_glass2''
42.
Selection - Select none
Blend Mode to "Overlay"
43.
Layers-New raster layer
44. Aktivate your Shape Tool:- choose my "Forme ring"
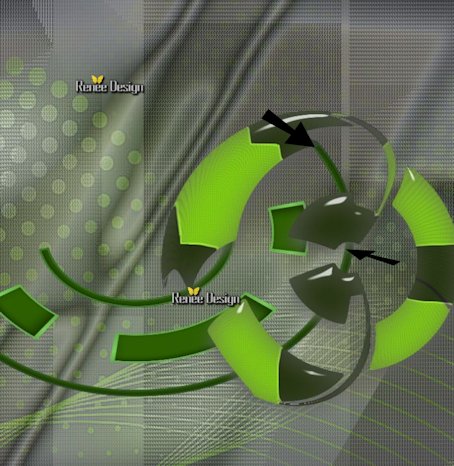
/ (into the materials folder )
draw a shape (See my example)
45.
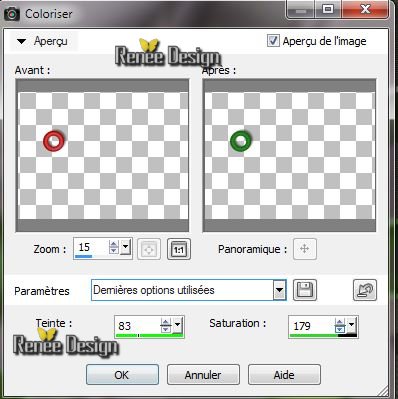
Adjust-Hue and Saturation-Colorize
46. Open the tube
''texteCreativeHi-Tech.png''/Edit/copy-Edit/paste as a new layer place
47. Activate the bottom layer in your layer palette (Raster 1)
48. Open the tube
''hi_tech_bulles/Edit/copy-Edit/paste as a new layer place-do not move it is in the right place
49. Effects
- Distorsion Effects- Spiky Halo with the following settings
50. Blend Mode to "Hard Light"/Image Mirror
This is what you have now
Aktivate the top of the Layers palette
51. Layers - New Raster Layer. Flood Fill tool : fill the layer with white
52. Layers-New mask layer from image and open mask:
''Narah_mask_0336''
53. Image
Mirror/ Layers-Merge-Merge Group
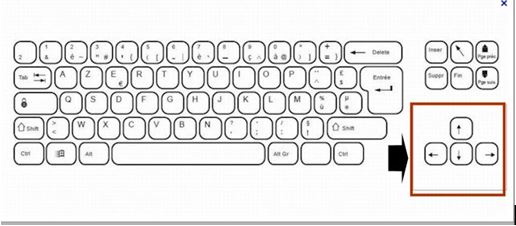
54.
Move against the left edge with arrow keys on your keyboard
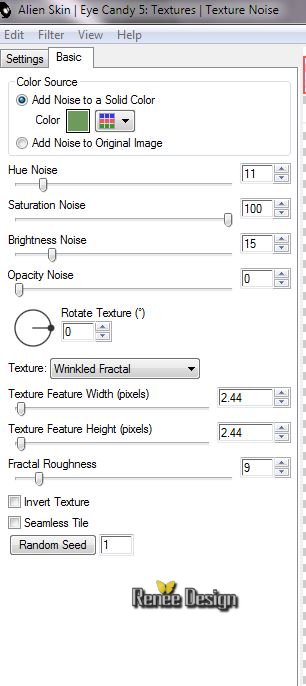
55. Effects
-Plugins EyeCandy 5 -Texture - Texture noise / choose my Preset ''hi_tech_texture
noise '' see the example
56. Effects
- 3D Effects-Drop Shadow 0/0/85/35 black
57. Layers-New raster layer
58.
Selections –load/save selection –load selection from disc and choose ''hi_tech4" /Flood Fill tool : fill the selection with white
59.
Selection - Select none
Material Properties: Foregroundcolor to color : #ffffff and the backgroundcolor to color: #75c600
60.
Effects -Plugins Unlimited -Toadies - What are you - Overdose to
121
61. Effects
- Edge Effects - Enhance
62.
Open the tube
''rainmeter_skin_for_the_steampunk_orrery_and_clock_by_yereverluvinuncleber-d5tsv0k.pspimage''/Image
resize 65% /Edit/copy - Edit/past as a new layer and place
63. Blend Mode to " Luminance Legacy"
64. Aktivate your Pen Tool: draw two lines (If you have troubles the tube is into the materials folder) draw with your backgroundcolor

This is the result
65. Open the tube ''hi_tech_lumiere ''- Edit/copy - Edit/past as a new layer and place
66. Blend Mode to "Dodge " . Lower the opacity to 85%
67. Open the tube ''hiexpo-chrysdesign'' /Image Resize 55% Edit/copy - Edit/past as a new layer and place
68. Blend Mode to "Luminance Legacy"
69 .
Open the tube ''hi_tech_renee_bras '' Edit/copy - Edit/past as a new layer and place.
Blend Mode to "Hard Light "
70. Open the tube
''steampunk_chrome_chromium_dock_icon_by_yereverluvinuncleber-d4qcitw.png''
/Image Mirror /Edit/copy - Edit/past as a new layer and place
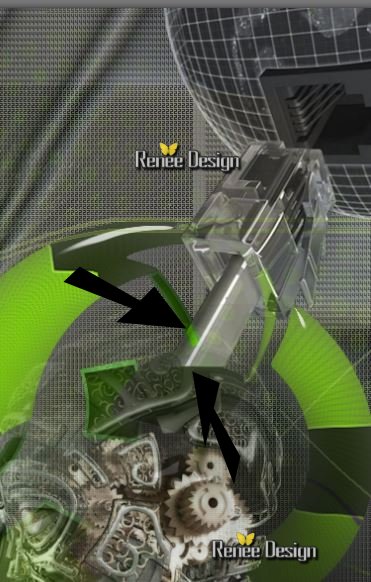
71. Open the tube ''robot_hi_tech_81bc2817'' - Edit/copy - Edit/past as a new layer and place
/ Lower the opacity to 81%
(Take tube with the mask is modified)
72. Open the tube '' Hi-Tech 1024x 768_krysdesign" Edit/copy - Edit/past as a new layer and place /Image resize 70% all layers not checked
67. Layers-Arrange-Move Down. Blend Mode to "Luminance"
68.
Layers-Merge-Merge Visible
69. Image Resize to 995 Pixels Width
70. Image - add borders symmetric 2 pixels > color 2
71. Image - add borders symmetric 2 pixels > color 3
72. Image - add borders symmetric 35 pixels > color
1
73. Image - add borders symmetric 2 pixels > color 2
74. Image - add borders symmetric 2 pixels > color 3
75. Image - add borders symmetric 25 pixels > color 5
76. Open the tube ''titre2" Edit/copy - Edit/past as a new layer and place
''
Image Resize to 995 Pixels Width
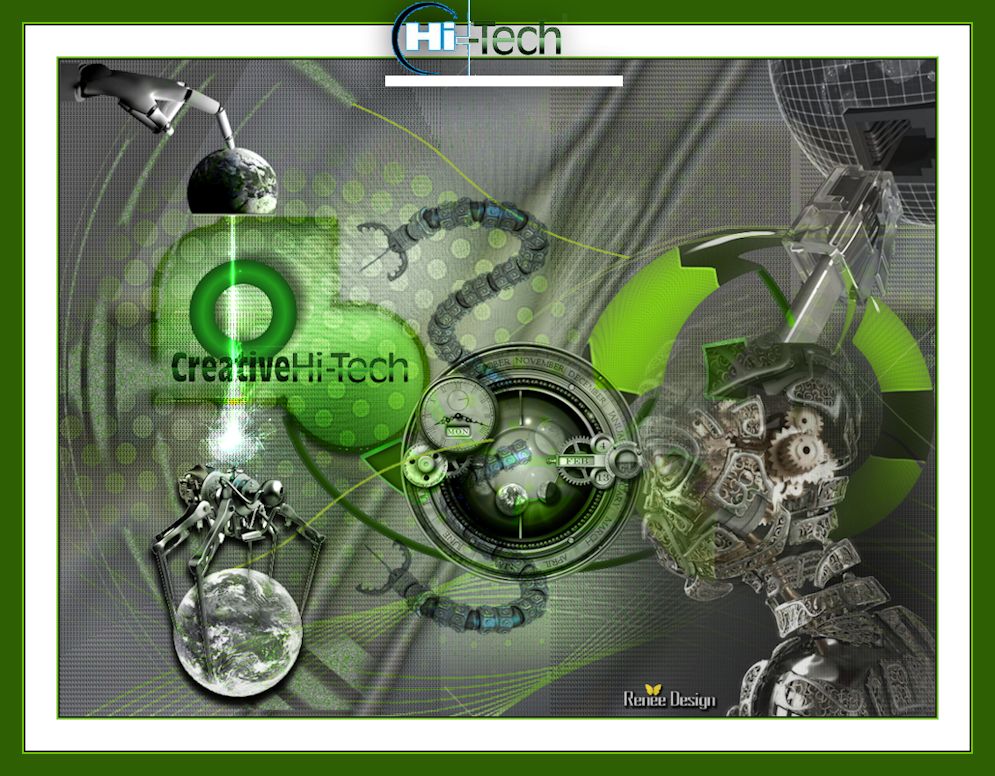
I hope you enjoyed this lesson
Renée
This lesson was written by Renée
16/01/2014
Created the
30/01/2014
*
Any resemblance with an existing lesson is merely a coincidence
*
Don't forget to thank the people who work for us and with us. I named the tubeurs - Testers and the translators. Thanks Renée

| 


 Translations