|
Let's start the lesson
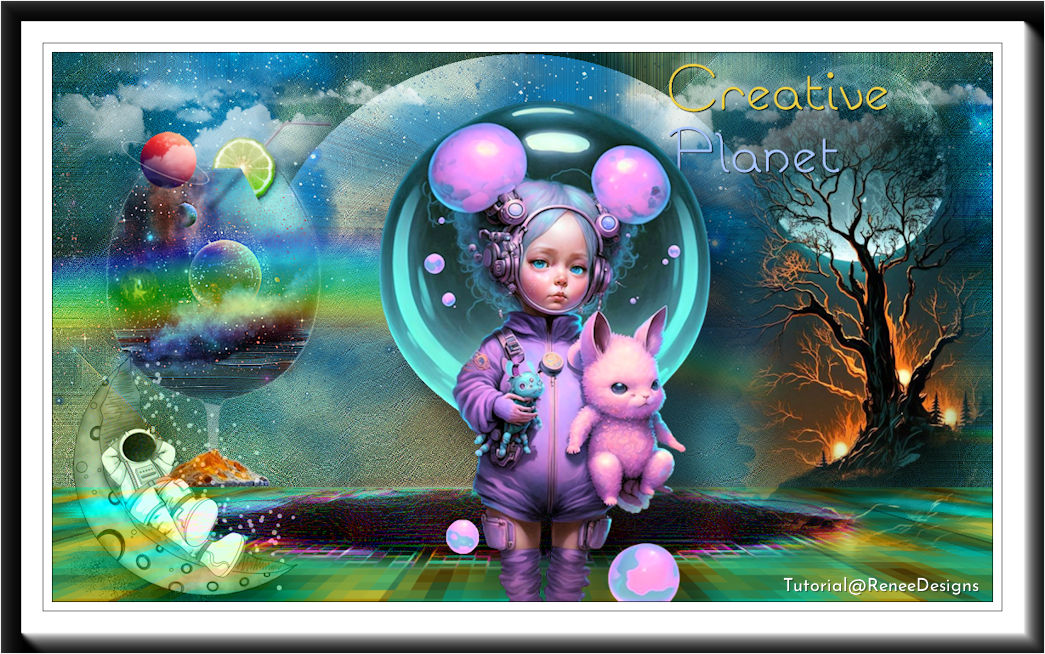
Creative Planet - Planète
créative
1. Open the Image ‘’Fond-Creative-Planet’’-
Promote Background Layer =Raster 1
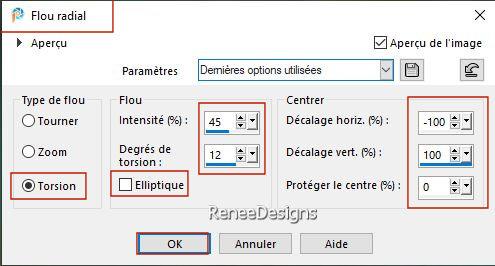
2. Adjust- Blur- Radial Blur use the settings below
3. Effects - Plugins – FM Tile Tools – Saturation Emboss using the default settings
- Repeat this filter a second time
4. Layers – Duplicate
5. Image – Free Rotate -
90° Right
6. Effects – 3D Effects–
Drop Shadow with these settings: 10/10 65/ 30 Color Black
- Repeat -Drop Shadow with these settings :-10/ -
10
- Activate the Bottom of the Layer Palette = Raster 1
7. Effects – Image Effects
– Seamless Tiling use the settings below
- In the Layer Palette, activate the Copy of Raster 1
8. Effects –Distortion Effects– Pixelate with these settings: 45/45
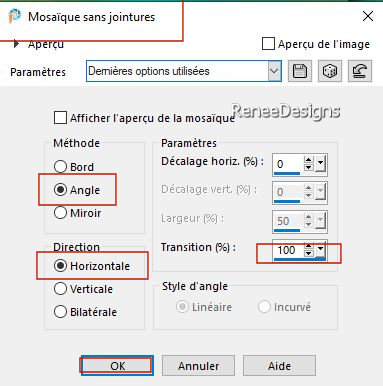
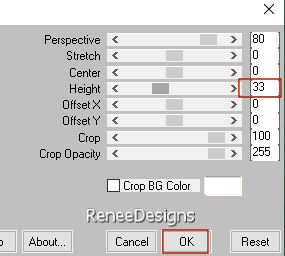
9. Effects – Plugins – Mura’s Meister- Perspective Tiling use the settings below
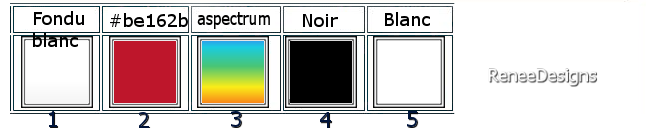
10. Selections –load/save selection –load selection from disc and select my selection: ‘’Creative Planet-1’’
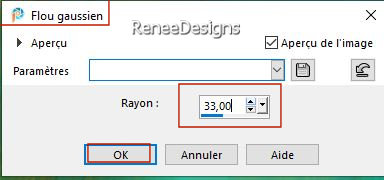
11. Adjust – Blur- Gaussian Blur- Radius 33 %
12. Effects – Artistic Effects– Glowing Edges with these settings


- Activate the bottom of the Layers palette=Raster 1
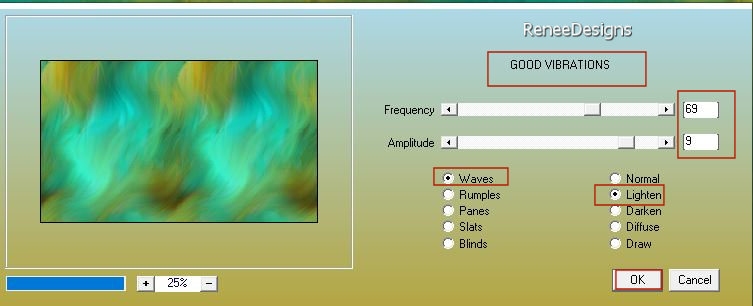
13. Effects – Plugins - AAA Filters – Good Vibrations use the settings below
14. Effects – Edge Effects – Enhance
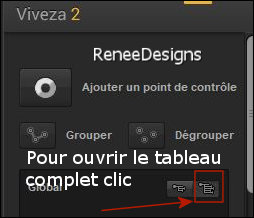
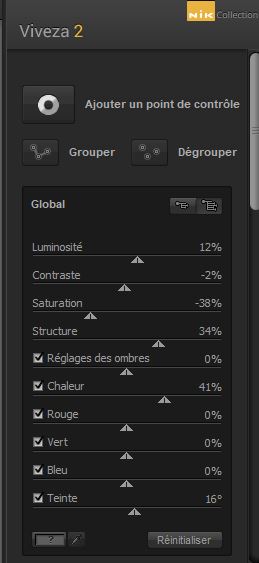
15. Effects - Plugins– Nick Collection - Viveza2 -use the settings below -you can use this filter as a demo
(with problems there is an image with the material and paste as new layer on your work and then -Layers- Merge- Merge Down !!! )
16. Open the Tube ‘’Creative-Planet-Image1’’ -Edit - Copy- Activate your work -Edit - Paste as new layer
- Place against the top edge of your work
17. Layers-Properties-Set the Blend Mode to " Hard Light "
18. Layers –
Duplicate – Layers-Properties-Set the Blend Mode to "Normal"
19. Layers-Merge-Merge Down
- Activate the Top of the layers palette
20. Layers– New Raster Layer
21. Attention !! Selections –load/save selection –load selection from disc and select my selection: ‘’Creative-Planet-verre-1’’
22. Set your Foreground color to color #ffffff
Flood Fill Tool
 –Fill the selection with #ffffff –Fill the selection with #ffffff
23.Open the Tube ’’Image1-crea-verre.’’ -Edit - Copy- Activate your work -Edit - Paste as new layer
- Place in the bottom of the glass
24. Effects - Plugins- FM Tile Tools – Metallic Emboss using the default settings
25. Effects – Edge Effects – Enhance
26. Open the Tube ‘’Image2-crea-verre’’ -Activate your own image or that of Renée
27. Edit - Copy- Activate your work -Edit - Paste as new layer
- Place it correctly -remove the excess that comes over the glass with your eraser or with your lasso
28. Adjust- Sharpness-Sharpen More
29. Layers– Duplicate
30. Layers-Properties-Set the Blend Mode to " Hard Light " -Reduce the Opacity of this layer to 63%
(this will depend on the choice of your image and then adjust if necessary)
31. Open the Tube
‘’planetes-renee ‘’ Choose planets to taste
- Resize to taste and place what you like
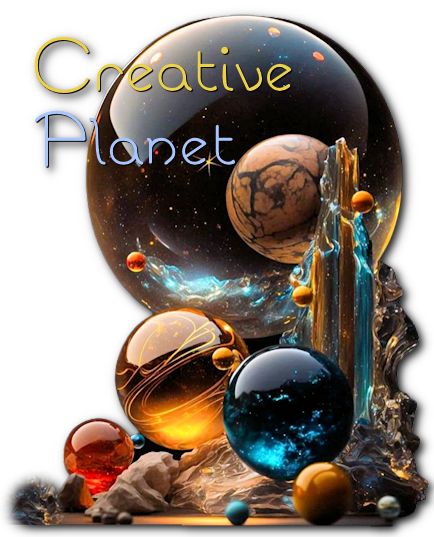
32. Open the Tube ‘’creative-planet-citron’’
and ‘’Image3-crea-verre’’ -Edit - Copy- Activate your work -Edit - Paste as new layer
(For decorating your glass)
- Activate the Bottom of the Layers Palette=Raster 1
33. Layers – Duplicate
34. Effects – Plugins – Simple -Blintz
35. Effects – Plugins – Simple – Half Warp
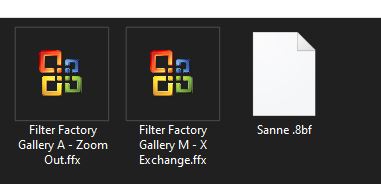
36. Effects - Plugins - Filters in Unlimited 2.0 - Filter Factory
Gallery A - Zoom Out: 81/77/225/217
37. Effects - Plugins - Filters in Unlimited 2.0 - Filter Factory
Gallery M - X Exchange
38. Adjust – Sharpness-
Sharpen
39. Layers-Properties– Reduce the Opacity of this layer to 91%
40. Layers – New Raster Layer
- Properties of the Foreground -Set the Foreground color to "Fading white linear gradient" configured like this
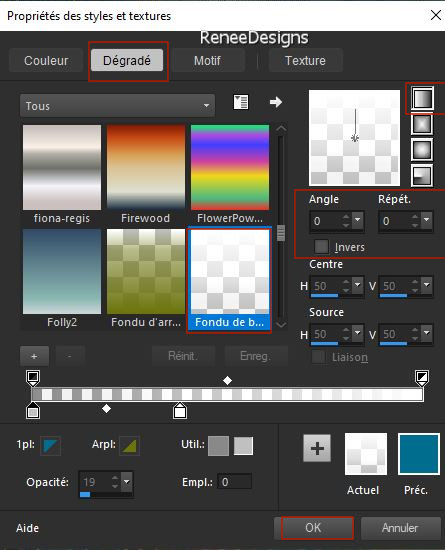
41. Flood Fill Tool
–
Fill the Layer with the Gradient
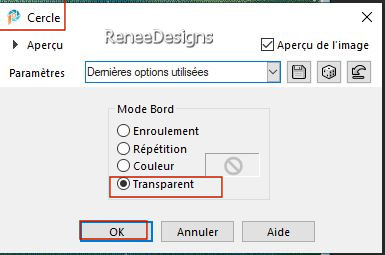
42. Effects – Geometric Effects – Circle-Transparant Checked
43. Layers-Properties– Reduce the Opacity of this layer to 63%
44. Effects – Illumination Effects – Sunburst use the settings below – Color #be162b

45. Effects – 3D Effects –
Drop Shadow with these settings: – 25 /2
/ 78 /100 Color Black
- Activate the Top of the Layers Palette
- Properties Foreground- Prepare a Foreground Linear Gradient and select ’’ aspectrum’’ -configured like this
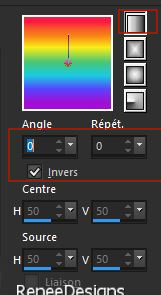
46. Layers- New Raster Layer
47. Selections –load/save selection –load selection from disc and select my selection: ‘’Creative Planet-2’’
48. Flood Fill Tool –
Fill the Selection with the Gradient ( click three times in the selection )
49. Adjust-Blur – Gaussian Blur-Radius 3
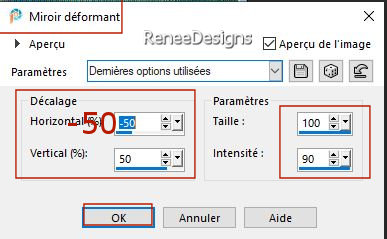
50. Effects – Distortion Effects – Warp use the settings below
51. Layers-Properties-Set the Blend Mode to "Hard Light"
52. Effects – Plugins - L & K’s- Sanne with these settings: 0/109
53. Open the ''Brush-Creative-planete-CLOUDS''- Edit - Copy- Activate your work -Edit - Paste as new layer
-
Place in upper right corner
54. Layers - Duplicate -
Place on the left
55. Layers-Properties-Set the Blend Mode to " Screen" -Reduce the Opacity of this layer to 73%
56. Open the Tube ‘’
creative-planet-Image3’’- Edit - Copy- Activate your work -Edit - Paste as new layer
-Place on the right
57. Open the Tube ’’Titre /texte’’ -Edit - Copy- Activate your work -Edit - Paste as new layer and move
58. Open the Tube ‘’Renee-Tubes-Planetes-1’’ -Edit - Copy- Activate your work -Edit - Paste as new layer
- Move the Tube in the right place
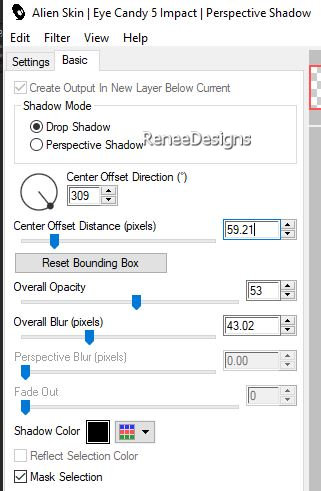
59.
Effects - Plugins- Alien Skin EyeCandy 5 -
Impact - Perspective shadow use the settings below
60. Open the Tube ‘’creative-planet-Image4’’ - Edit - Copy- Activate your work -Edit - Paste as new layer
-Move to bottom - Left
61. Layers-Properties-Set the Blend Mode to " Luminance Legacy "
62. Effects - Plugins - Alien Skin EyeCandy 5 - Impact - Perspective
shadow with the same settings
63.
Image - Add borders-Symmetric checked: 1 Pixel -Color black
-
Image - Add borders-Symmetric checked: 10 Pixels -Color white
-
Image - Add borders-Symmetric checked: 1 Pixel -Color black
-
Image - Add borders-Symmetric checked: 50 Pixels -Color white
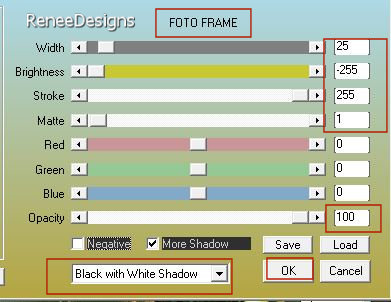
64. Effects – Plugins – AAA Frame – Foto frame use the settings below
65. Image - Resize to 85%- Resize all Layers checked.
66. Paste the author's watermark on your work and your own watermark
67. Layers- Merge- Merge All (flatten)
Save as JPG
I hope you enjoyed this lesson
Renée
This lesson was written by Renée 15/05/2023
Edited and Update
in 2023
*
Any resemblance with an existing lesson is a coincidence
* Do not forget to thank the people who work with us and for us. -I have appointed the tubeurs and translators
Thanks
|
 Translations