|
- Preparation
- Material Properties: Set your foreground color to color #ffffff= 1 – Set your background color to color #03254c = 2
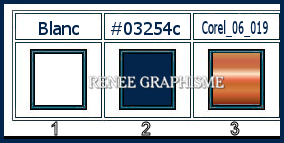
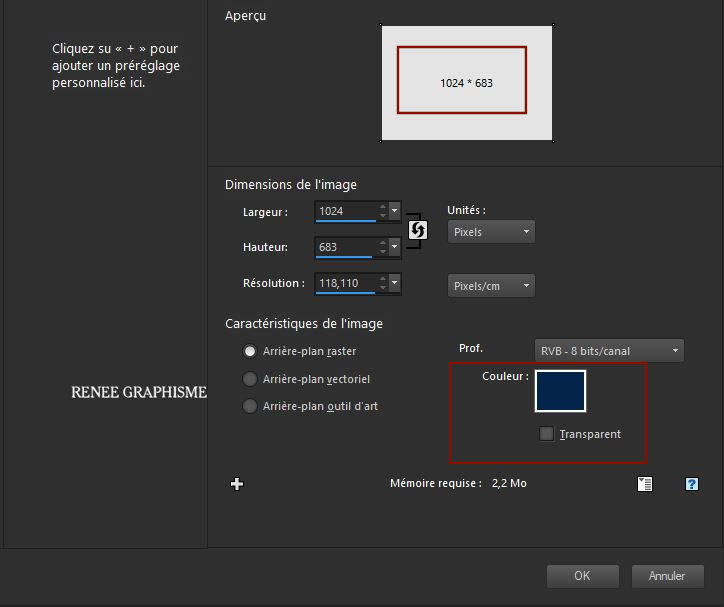
1. File- Open a new image 1024 x 683 Pixels – choose the BG-Color = 2- right mouse click in the color box
- Promote Background Layer = Raster 1

2. Open the tube ‘’ BA-2021- Image
1’’ -Edit - Copy- Activate your work -Edit - Paste as a new layer
3. Adjust- Blur- Gaussian Blur: Radius 35
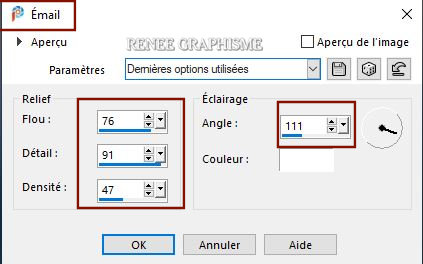
4. Effects– Artistic Effects – Enamel use the settings below
5. Layers- Merge- Merge Down
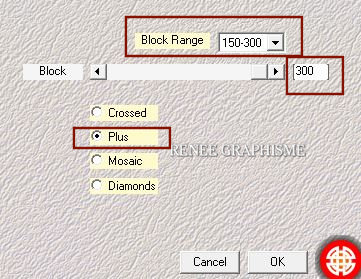
6. Effects - Plugins – Medhi- Sorting Tiles with these settings
7. Effects –Plugins-
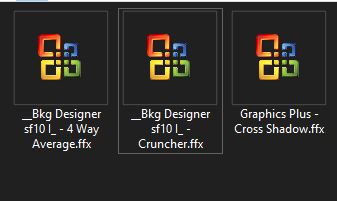
Unlimited 2.0 - &<Bkg Designer sf10 I> - 4 Way Average
8. Effects-
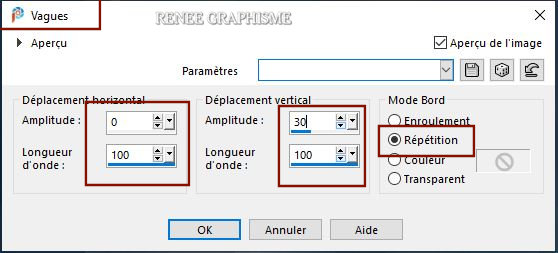
Distortion Effects- Waves use the settings below
9. Effects –Plugins-
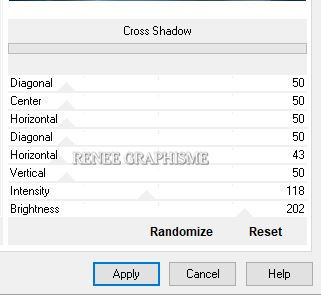
Unlimited 2.0 – Graphic Plus – Cross Shadow use the settings below
10. Layers- Duplicate
11. Adjust- Blur- Gaussian Blur: Radius 35
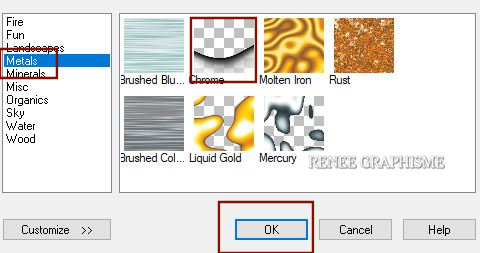
12. Effects – Plugins – XE Xtras – Elemental Metals-Chrome
13. Layers-Properties-Set the Blend Mode to " Soft Light "
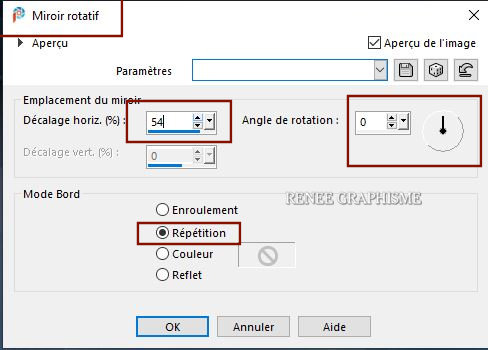
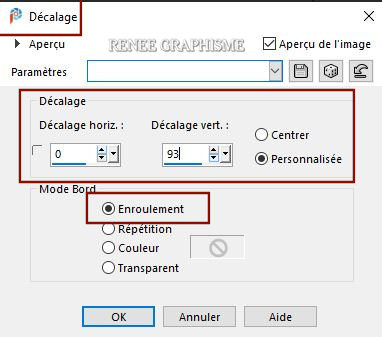
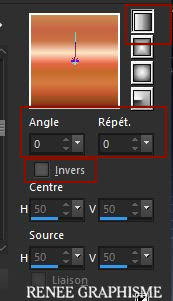
14. Effects – Reflection Effects-Rotating Mirror use the settings below
15. Effects –Plugins-
Unlimited 2.0 - &<Bkg Designer sf10 I> - Cruncher
106/42
16. Layers- New Raster Layer
17.Selections –load/save selection –load selection from disc and select my selection: ‘’ BA-2021-1’’
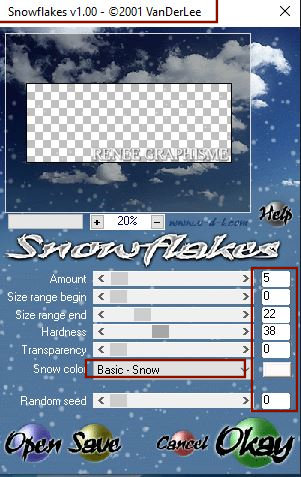
18. Effects – Plugins– VDL Adrenaline - Snowflakes v 1.00 use the settings below
19. Effects – Distortion Effects –Wind direction from right-Wind strength 20
20. Layers- Nieuwe Raster Layer
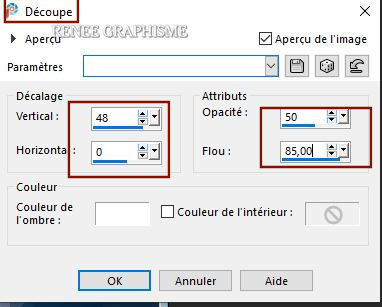
21. Effects– 3D Effects – Cutout use the settings below / Color White
Selections- Deselect All
22.
Open the tube ‘’ BA-2021- Image 2’’ -Edit - Copy- Activate your work -Edit - Paste as a new layer (do not move)
23. Effects – Plugins – Mura’s Meister – Perspective Tiling using the default settings
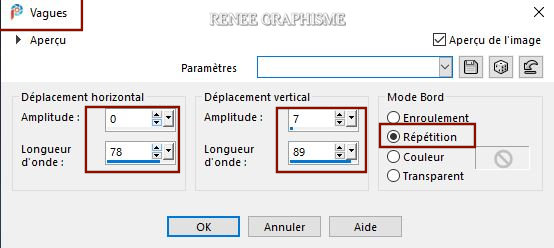
24. Effects - Distortion Effects- Wave use the settings below
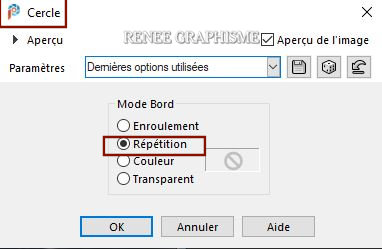
25. Effects –Geometric Effects – Circle-Repeat aktive
26. Effects – Image Effects – Offset with these settings-Wrap aktive
27. Layers-Properties-Set the Blend Mode to " Screen "
28. Selections –load/save selection –load selection from disc and select my selection: ‘’ BA-2021-2’’
DELETE
Selections- Deselect All
29. Layers- Duplicate
30. Layers-Properties-Set the Blend Mode to " Overlay "
31. Layers- Merge- Merge Down (Set the Blend Mode to " Screen ")
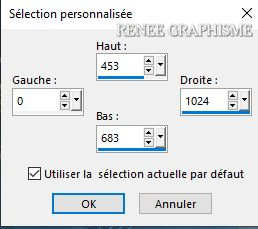
32. Activate Selection Tool -Custom Selection (S) -Rectangle with these settings 
DELETE
Selections- Deselect All
- Preparation
- Material Properties: Foreground color = white– Background on gradient and choose gradient
06 -19 (in Psp =Metal copper)
- Mode Linear with these settings
33.Layers- New Raster Layer
34.Selections –load/save selection –load selection from disc and select my selection: ‘’ BA-2021-3’’
35. Flood fill tool – fill the selection with the Foreground color white ( 2 clicks)
Selections- Deselect All
36. Layers- New Raster Layer
37.Selections –load/save selection –load selection from disc and select my selection: ‘’ BA-2021-4’’
38. Flood fill tool
– fill the selection with the gradient
Selections- Deselect All
39. Open the tube ‘’
Renee-TUBES-2021-new-year-clock’’ -Edit - Copy- Activate your work -Edit - Paste as a new layer
40. Pick Tool (K) Enter these parameters for the X: and Y: positions on the Toolbar
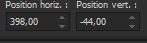 398
/ - 44 398
/ - 44
Press ( M ) to close the Pick Tool
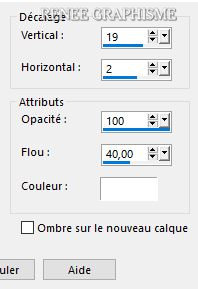
41. Effects – Plugins – Alien skin EyeCandy 5-
Impact- Perspective shadow-Tab- Settings- User/Settings and select my file -Preset : BA-2021-Shadow
42. Layers- New Raster Layer
43.Selections –load/save selection –load selection from disc and select my selection: ‘’ BA-2021-5’’
44. Flood fill tool
– fill the selection with the Foreground color white
Selections- Deselect All
45.Selections –load/save selection –load selection from disc and select my selection: ‘’ BA-2021-6’’
DELETE
46. Effects – 3 D Effects- Drop Shadow with these settings: Color White
Selections- Deselect All
47. Open the tube ‘’ BA-2021-
Image 3’’ -Edit - Copy- Activate your work -Edit - Paste as a new layer
48. Pick Tool (K) Enter these parameters for the X: and Y: positions on the Toolbar
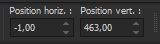 -1 / 463
Press ( M ) to close the Pick Tool
49. Open the tube ‘’BA-2021- Image 4.pspimage’’-Edit - Copy- Activate your work -Edit - Paste as a new layer
- Pick Tool (K) Enter these parameters for the X: and Y: positions on the Toolbar
 49
/ 200 49
/ 200
50.
Layers- New Raster Layer
51.Selections –load/save selection –load selection from disc and select my selection: ‘’ BA-2021-7’’
52. Flood fill tool
- fill the selection with the Foreground color white
Selections- Deselect All
53. Layers- New Raster Layer
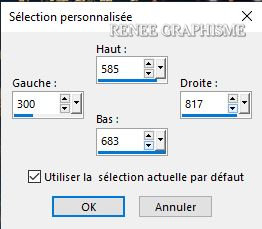
54. Activate Selection Tool -Custom Selection (S) -Rectangle with these settings
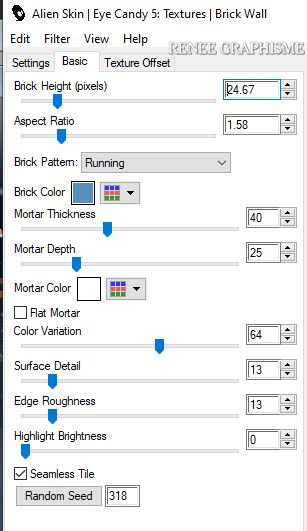
55. Effects – Plugins– Alien Skin EyeCandy 5 –
Textures Brick Wall use the settings below–– Color #5691ba
56. Layers-Properties-Set the Blend Mode to " Soft Light "
Selections- Deselect All
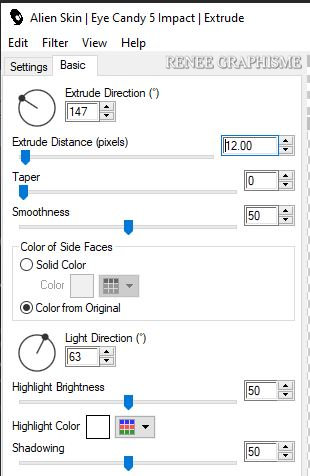
57. Effects – Plugins – Alien Skin EyeCandy 5 –
Impact- Extrude use the settings below
58. Effects – 3 D Effects- Drop Shadow with these settings: 4/23/100/62 -Color # 03254c = 2
59. Open the tube ‘’ BA-2021- Image personnage’’ -Edit - Copy- Activate your work -Edit - Paste as a new layer
- Place well on the wall (see preview image)
60.
Open the tube ‘’BA-2021-
Image 5.pspimage’ ’ -Edit - Copy- Activate your work -Edit - Paste as a new layer
- Place in front of the wall (see preview image) (For Renée Blend Mode "Hard Light" your choice according to your colors)
62. We Are Going to Decorate -Open the tube ‘’
BA-2021- Image- DECOS.pspimage’’ in your psp
- Open the tube ( 4 Layers ) -Edit - Copy- Activate your work -Edit - Paste as a new layer
Place the decorative elements individually according to your taste
63.
Open the tube ’’ 2020-casse’’ - Edit - Copy- Activate your work -Edit - Paste as a new layer -Place it on the right side of the clock (see preview image)
64. Layers- Merge- Merge Visible
65. Edit - Copy !!!
- Open the tube cadre/frame in your psp
66. Activate the Magic Wand - Select with the magic wand in the frame
67. Edit- Paste -Into Selection (Image is still in your PSP memory)
Selections- Deselect All
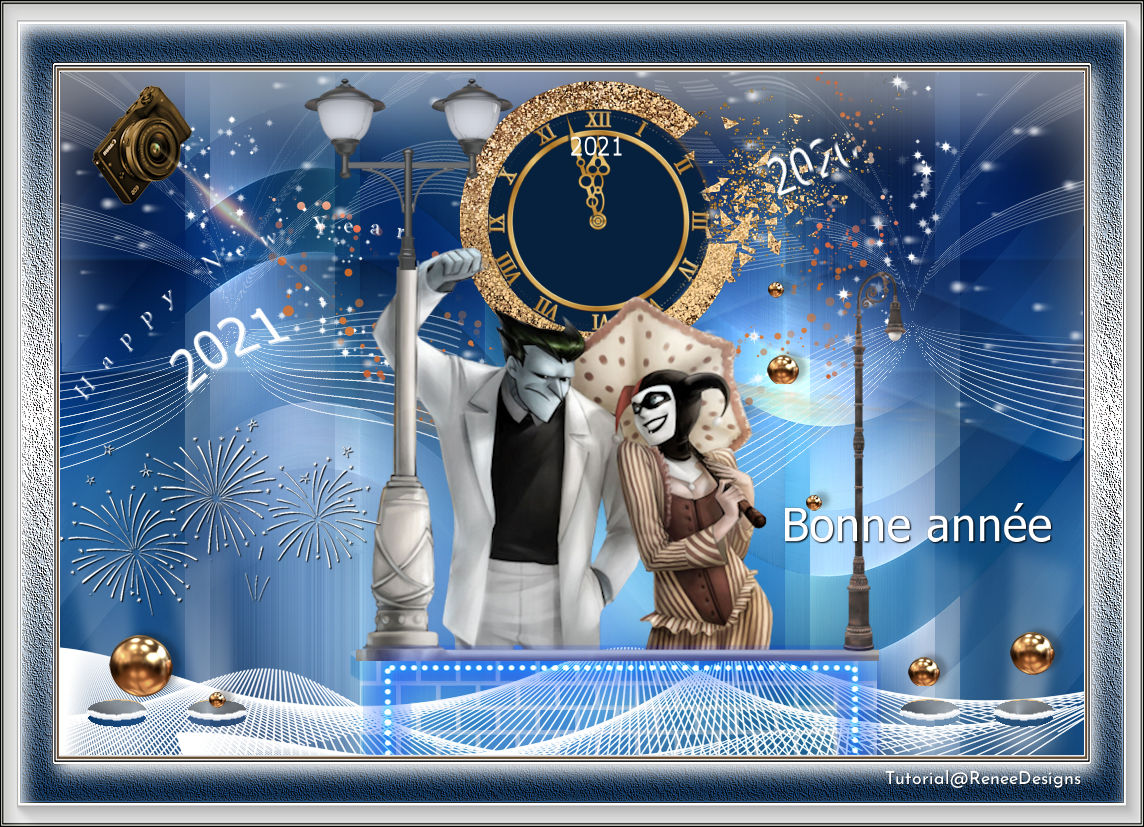
Save as JPG
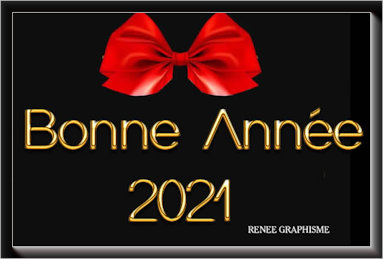
 I wish everyone a happy and healthy New Year I wish everyone a happy and healthy New Year
I hope you enjoyed this lesson
Renée
This lesson was written by Renée 18/10/2021
Edited and Update
December 2020
*
Any resemblance with an existing lesson is a coincidence
* Do not forget to thank the people who work with us and for us
I have appointed the tubeurs and translators
Thanks
*
|


 Translations