|
Let's start the lesson
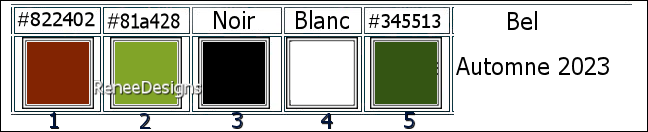
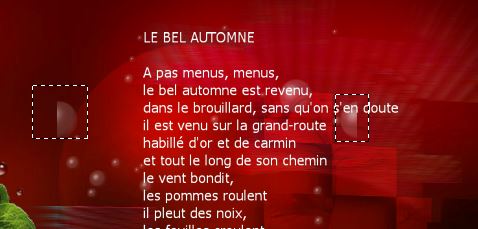
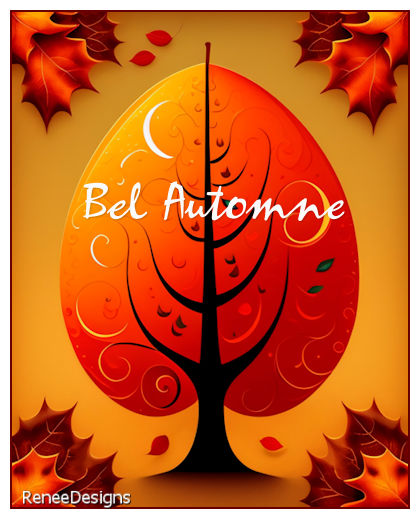
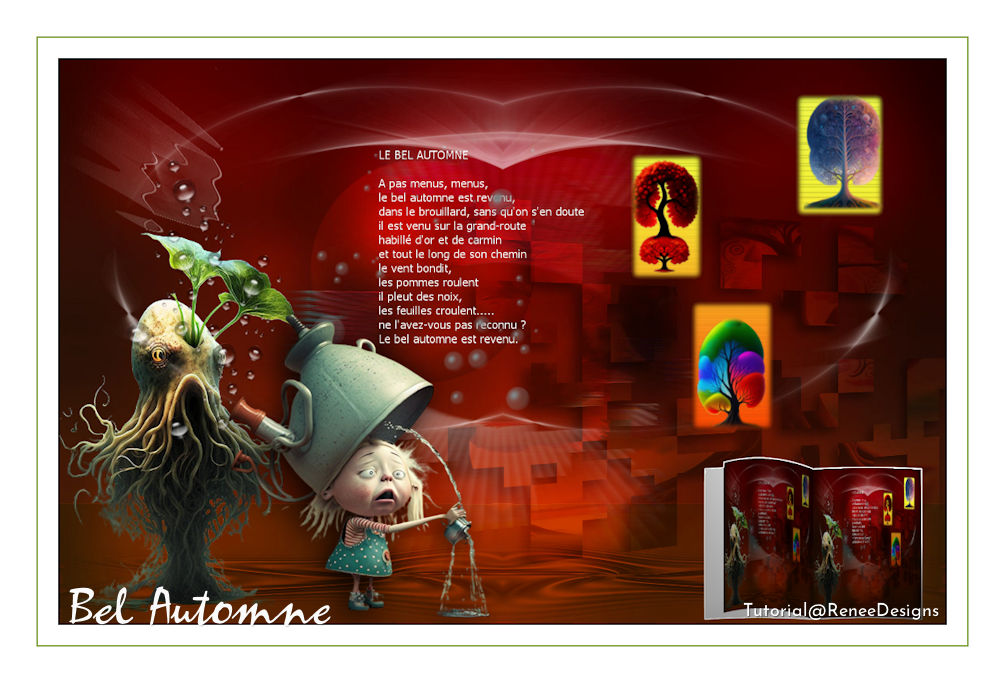
Bel Automne 2023
1. Open the BG-Image
‘’Fond-Bel-automne’’- Promote Background Layer = Raster 1
2. Layers- New Raster Layer
3. Selections –load/save selection –load selection from disc and select my selection: ‘’Bel-Automne-1’’
4. Open the Tube ‘’Renee-Bel-Automne-Paysage’’ --Edit - Copy- Activate your work -Edit - Paste -Into Selection

5. Effects–3D- Effects- Drop Shadow with these settings: 10/ -8
/85/25 Color Black
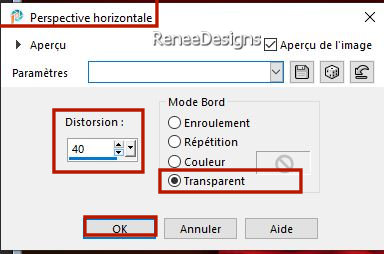
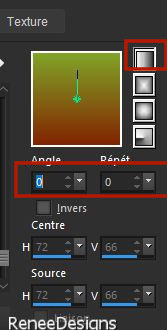
6. Effects –Geometric Effects – Perspective Horizontal use the settings below
7. Layers-Properties-Change the Blend Mode to "Overlay" – Lower the Opacity to 75%
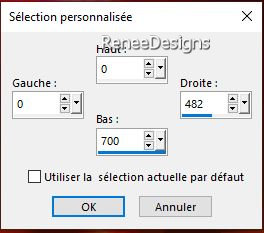
8. Activate Selection Tool -Custom Selection (S) -Rectangle with these settings

9. Edit-Cut !!! – Activate your work -Edit - Paste as a new layer (do not move)
10. Layers- New Mask Layer -From Image and select Mask :
‘’Narah_mask_0186’’

- Layers- Merge- Merge Group
11. Effects – Edge Effects- Enhance
12. Effects - Distortion Effects–
Wind – Wind strenght 46% –Wind direction From Left
13. Layers- Properties-Lower the Opacity to 69%
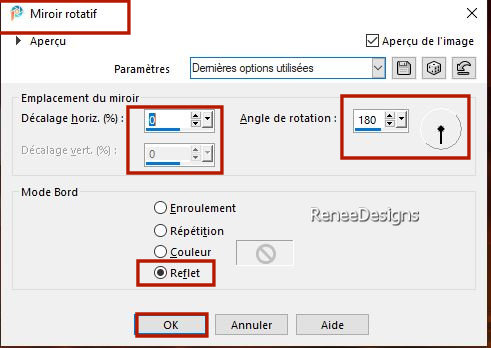
- Activate the bottom of the Layer Palette = Raster 1
14. Layers- New Raster Layer
15. Material Properties: Set your Foreground color to color #345513=5
Flood Fill Tool  –Fill the layer with the Foreground color =5 –Fill the layer with the Foreground color =5
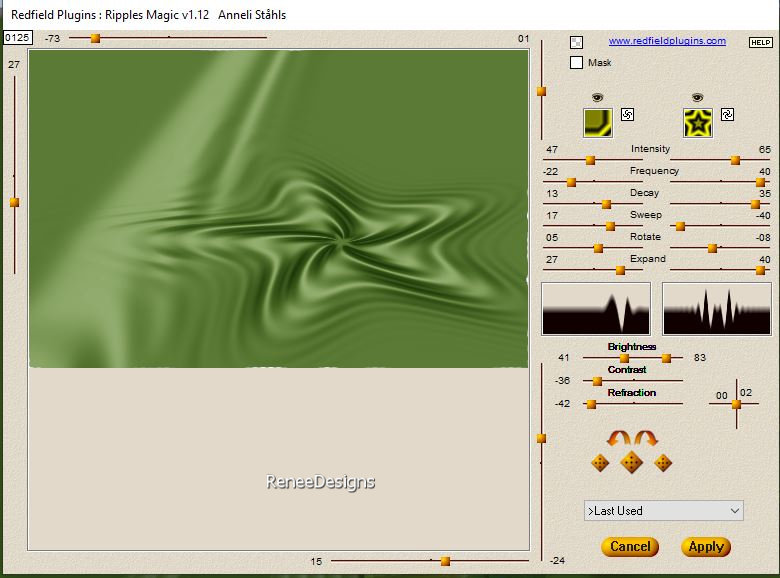
16. Effects –Plugins – Redfield Plugins- Ripples Magic use the settings below
17. Layers-Properties-Set the Blend Mode to "Overlay " – Reduce the Opacity of this layer to 57%
18.
Image - Mirror - Mirror Horizontal (Image - Mirror in older versions of PSP)
19. Activate your Pick Tool (K) – Mode Scale – push the middle node down to 550 Pixels
20. Effects – Plugins – FM Tile Tools – Saturation Emboss using the default settings
21. Effects – Reflection Effects– Rotating Mirror use the settings below
-Activate the top of the Layer Palette
- Properties Foreground- Set your Foreground color to color #ffffff=4
22. Layers- New Raster Layer
23. Activate Brush Tool and select my file ‘’automne-2023-pinceau’’ – use the settings below
If the brush doesn't work -Activate Brush ''‘’automne-2023-pinceau’’ in your Psp/File- Export Custom Brush (Give it a name)

- Place the brush with the Foreground color white in the upper right corner
- Pick Tool: (K) on your keyboard -Enter these parameters on the toolbar
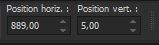 899
/ 5 899
/ 5
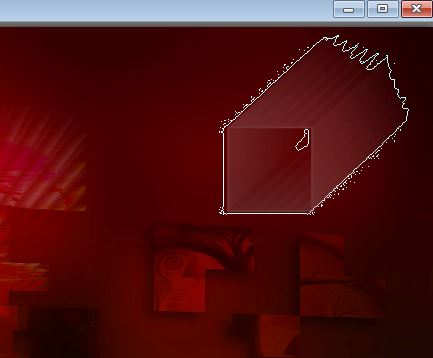
24. Image - Mirror - Mirror Horizontal (Image - Mirror in older versions of PSP)
25. Effects– Distortion Effects - Spiky Halo use the settings below
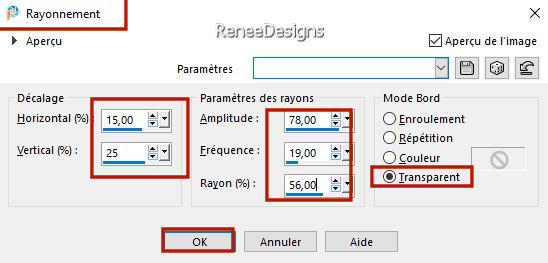
26. Effects- User Defined Filter –
Emboss 3 using the default settings
27. Open the Tube ‘’
Renee-TUBES-Automne20’’
- Image Resize
78%
- Edit - Copy- Activate your work -Edit - Paste as new layer
- Pick Tool: (K) on your keyboard -Enter these parameters on the toolbar
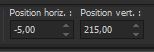 -5
/ 215 -5
/ 215
28. Open the Tube Renee-TUBES-Automne-
bulles’’ - Edit - Copy- Activate your work -Edit - Paste as new layer
- Move the Tube in the right place ( see finished)
29.
Layers- New Raster Layer
30.
Selections –load/save selection –load selection from disc and select my selection: ‘’Bel-Automne-2’’
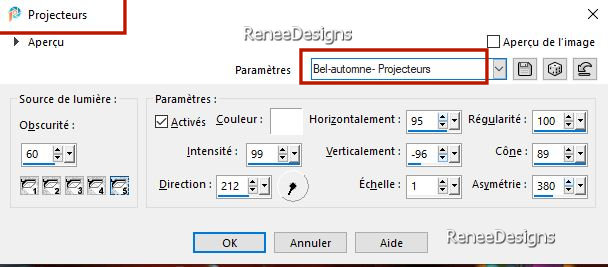
31.
Effects – Artistic Effects – Balls and Bubbles –Select my file-Preset : ‘’Preset_BallsAndBubbles_Bel-Automne-2023’’
32.
Layers-Properties-Set the Blend Mode to " Overlay"
33.
Pick Tool: (K) on your keyboard -Enter these parameters on the toolbar
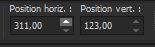 311/
123 311/
123
34. Open the Tube ‘’Renee-Texte-Bel-Automne’’ - Edit - Copy- Activate your work -Edit - Paste as new layer
35. Pick Tool: (K) on your keyboard -Enter these parameters on the toolbar
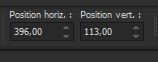 396/
113 396/
113
-Press ( M ) to close the Pick Tool
36. Layers New Raster Layer
37.
Selections –load/save selection –load selection from disc and select my selection:
‘’Bel-Automne-3’’
38.
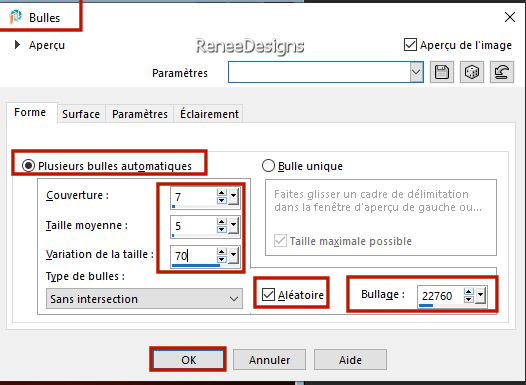
Effects – Artistic Effects – Balls and Bubbles – just choose -
Several automatic bubbles and adapt measurements
If your bubble effect doesn't work -what to do
Here
39.Layers-Properties-Set the Blend Mode to " Exclusion " -Reduce the Opacity of this layer to 75%
40.
Selection Tool-Rectangle -Select these 2 Half Bubbles

41.
Layers- New Raster Layer
42.
Selections –load/save selection –load selection from disc and select my selection: ‘’Bel-Automne-4’’
43.
Flood Fill Tool
–
Fill the selection with the Foreground color #ffffff=4 (2 or 3 clicks)
-Material Properties: Set your Foreground color to color #822402=color 1 – Set your Background color to color #81a428= 2
-
Properties Foreground- Prepare a Foreground/Background Linear Gradient configured like this
44.
Layers- New Raster Layer
45.
Selections –load/save selection –load selection from disc and select my selection: ‘’Bel-Automne-5’’
46.
Flood Fill Tool
– Fill the selection with the Gradient
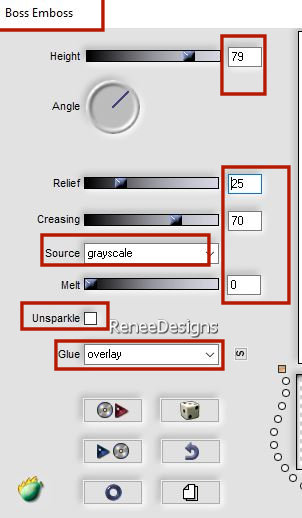
47. Effects -Plugins– Flaming pear – Boss Emboss
If you do not have this Boss Emboss effect in your Flaming Pear filter, I recommend that you download this part of the filter and place it in your filter folder. It will then automatically be visible in the Flaming Pear filter when you open your PSP.
48. Layers- New Raster Layer
49. Open the Tube ‘’ Renee-TUBES-Automne-
arbres’’ - Edit - Copy- Activate your work -Edit - Paste -Into Selection
50.
Edit- Copy Special-Copy Merged
-
Edit- Paste As New Image
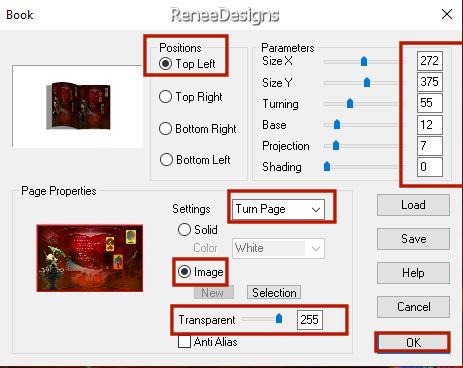
51. Effects – Plugins – Vizros - Book use the settings below
52. Activate the Magic Wand and click in the white area
53. Selections - Invert
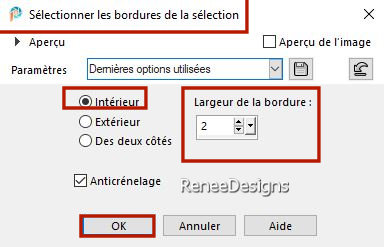
54. Selections – Modify -
Select Selection Borders with these settings
55. Properties Foreground- Set your Foreground color to color #ffffff=4
Flood Fill Tool –
Fill the selection with the Foreground color #ffffff=4
56. Activate Magic Wand Tool - Select the gray part of the book ( left side and bottom)

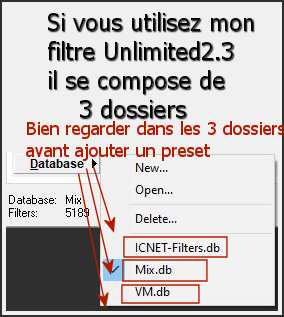
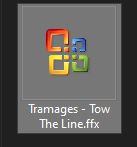
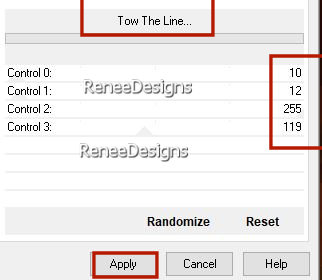
57. Effects - Plugins - Filters in Unlimited 2.0 – Tramages –Tow The
Line use the settings below
58. Effects – Edge Effects– Enhance
59. Image - Resize 50 %- Resize all layers-Not Checked
60. Edit - Copy- Activate your work -Edit - Paste as New Layer
61. Pick Tool: (K) on your keyboard -Enter these parameters on the toolbar
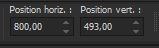 800
/493 800
/493
-Press ( M ) to close the Pick Tool
62. Effects – Illumination Effects – Lights –select my file - Preset : ‘’Bel-Automne-
Projecteurs’’
63. Open the Tube’’Renee-TUBES-Automne34’’
- Image Resize
90% - Edit - Copy- Activate your work -Edit - Paste as New Layer
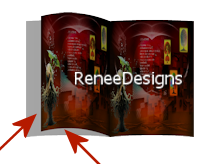
- Move it in the right place ( see finished)
64. Effects- 3D- Effects- Drop Shadow with these settings:
65.-Image - Add Borders-Symmetric checked: 2 Pixels -Color Black
-Image - Add Borders-Symmetric checked: 25 Pixels -Color #ffffff=4
-Image - Add Borders-Symmetric checked: 2 pixels -Color #81a428=2
-Image - Add Borders-Symmetric checked: 45 Pixels Color #ffffff=4
66. Paste the author's watermark on your work and your own watermark
- Activate your Text Tool-Renée chose the font "Borealis Regular" (Included in the material) or choose your own font
Write ''Bel Automne '' not mandatory
67. Layers- Merge- Merge All ( flatten)
68. Image - Resize - 1005 Pixels width-Resize all Layers checked
Save as JPG
I hope you enjoyed this lesson
Renée
This lesson was written by Renée
21/07/2023
Edited and Update
in 2023
*
*
Any resemblance with an existing lesson is a coincidence
* Do not forget to thank the people who work with us and for us -I have appointed the tubeurs and translators
Thanks
|
 Translations