|
Let's start the lesson

- Preparation
-Material Properties: Set your foreground color to color #656d7b=1 – Set your background color to color #131313=2

1. Open the Background image
-Fond-Back-to-school-2021- Promote Background Layer =Raster 1
2. Layers- New Raster Layer
3.Flood Fill Tool  - Fill the layer with the foreground color #656d7b =1
4. Effects – Geometrie Effects – Circle / Transparent
5. Activate your Magic Wand -
Tolerance 0 / Feather 0 /click outside the circle
- Selections- Invert
- Selections –
Modify – Contract by 15 Pixels
- Selections –
Modify –Feather -Feather amount 20
DELETE

- Selections- Invert
DELETE

6. Layers-Properties-Change the Blend Mode to "Screen"
- Activate the bottom of the layer palette =Raster 1
7. Layers- New Raster Layer
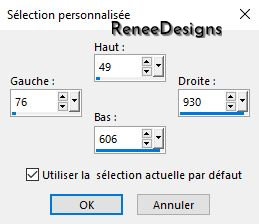
8.Activate Selection Tool -Custom Selection (S) -Rectangle with these setting

9. Activate the tube
‘’Renee-Tube-Back-to-school2021-Image1’’
- Edit - Copy- Activate your work -Edit - Paste into selection
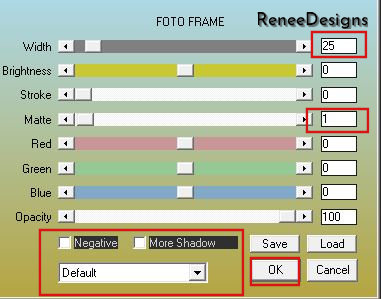
10. Effects – Plugins –AAA Frame- Foto Frame use the settings below
- Color-Palette-Set the Foreground color to color # ffffff=3
11. Selections -
Modify - Select Selection Borders with these settings

12.Flood Fill Tool
-
Fill the selection with the foreground color #ffffff =3
13. Layers- New Raster Layer
14. Selections –load/save selection –load selection from disc and select my selection: ‘’Back-school-2021-1’’
15.Flood Fill Tool
-
Fill the selection with the foreground color #ffffff =3 (2 clicks)
16. Layers- New Raster Layer
17. Selections –load/save selection –load selection from disc and select my selection: ‘’Back-school-2021-2’’
18.Flood Fill Tool
-
Fill the selection with the foreground color #ffffff =3 (2 clicks)
-Close Raster 1 in the layer palette
- Layer palette - make top layer active
19. Layers- Merge- Merge Visible
- Open the bottom layer in the layer palette
- To replace the top of the layer-palette( Merged )
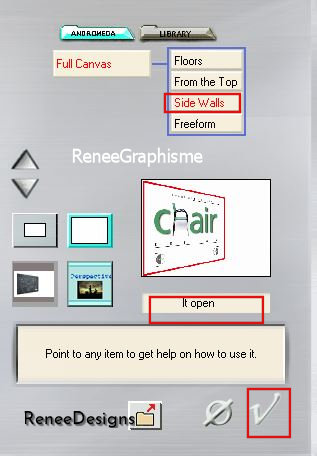
20. Effects – Plugins– Andromeda – Perspective/ Side Walls- Preset :
It Open
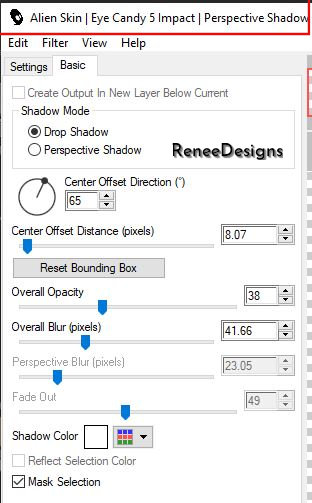
21. Effects – Plugins- Alien kin EyeCandy5 - Impact- Perspective
Shadow use the settings below
22. Activate Pen Tool (V) with foreground colour (White)

Draw a vertical line along the border see red arrow (hold down the shift key for a straight line) (line style is in the material folder and put it in the line style folder of your PSP)
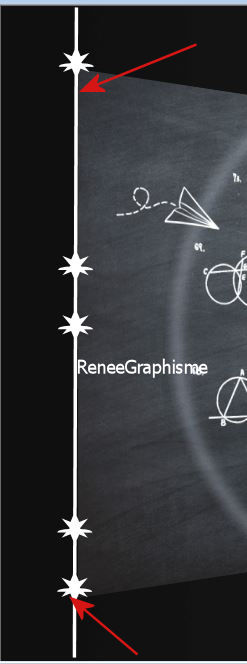
- Convert to Raster Layer
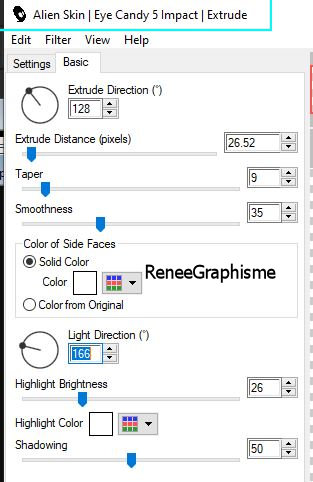
23. Effects –Plugins– Alien Skin EyeCandy 5 – Impact –Extrude use the settings below
24. Open the tube ‘’Renee-Tube-Back-to-school2021-Image2’’ - Edit - Copy- Activate your work -Edit - Paste as a new layer
- Place at the bottom left
- Activate the bottom of the layer palette =Raster 1
- Material Properties: Set your foreground color to color #fffff =3 – Set your background color to color #d61515
=4
25. Layers- New Raster Layer
26. Selections –load/save selection –load selection from disc and select my selection: ‘’Back-school-2021-3’’
27.Flood Fill Tool
–Fill the selection with the Background color =4
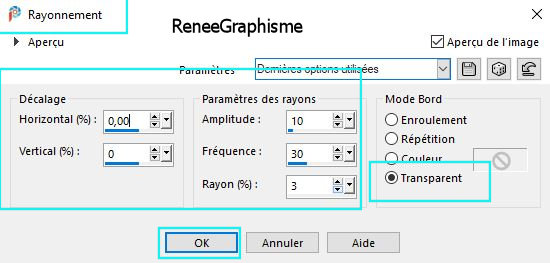
28. Effects-Distortion Effects– Spikey Halo use the settings below
- To replace the top of the layer-palette
29. Layers- New Raster Layer
30. Activate the Brush Tool- search for the brush ‘’Lectrice’’ with these settings

- Stamp with the foreground color
- Place at the bottom right
31.Now to decorate- Open the tube "Renée -Back to School Images " and the tube with the text
Paste as a new layer and place the decorative elements individually according to your taste
32. Image - Add borders-Symmetric checked: 3 pixels Color white
Image - Add borders-Symmetric checked: 5 Pixels Color black
Image - Add borders-Symmetric checked: 15 Pixels Color white
Image - Add borders-Symmetric checked: 1 Pixel Color black
Image - Add borders-Symmetric checked: 45 Pixels Color white
Image - Resize to 90% Resize all layers.
33. Open the tube
‘’deco-cadre’’ -Edit - Copy- Activate your work -Edit - Paste as a new layer and place at the bottom left
34. Layers-Merge- Merge All (flatten)
Save as JPG
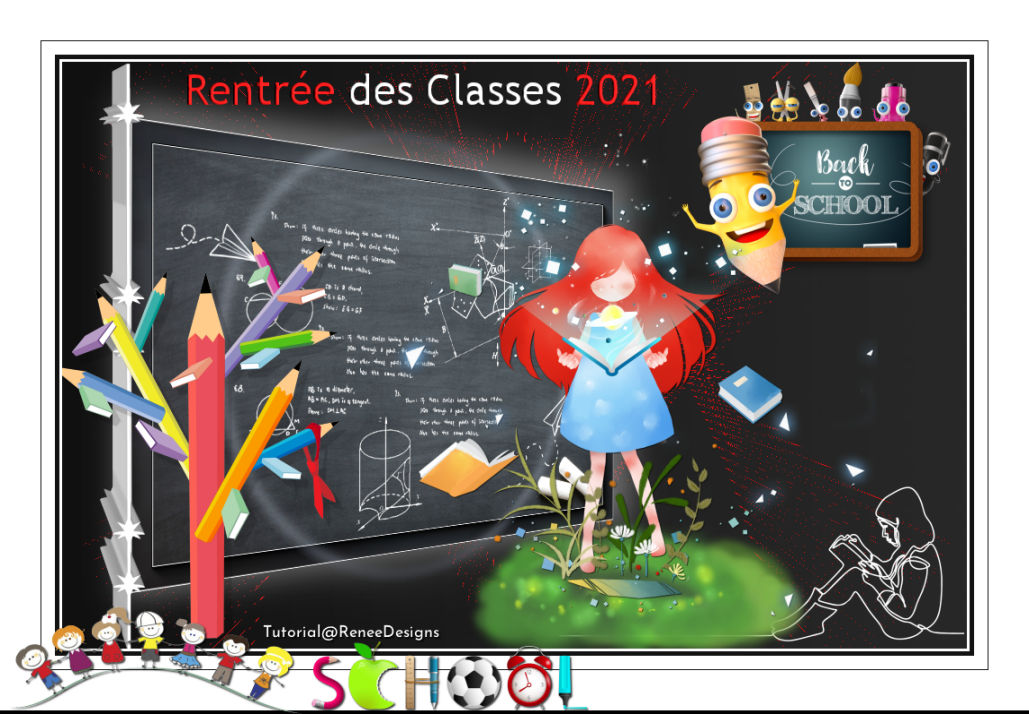
That's it - Thank you / I hope you enjoyed this lesson
Renée
This lesson was written by Renée 15/07/2021
and put in place
in September 2021
*
Any resemblance with an existing lesson is a coincidence
* Do not forget to thank the people who work with us and for us -I have appointed the tubeurs and translators
Thanks
*
|

 Translations