|
Automne 2020/Autumn 2020
Let's start the lesson.
- Preparation
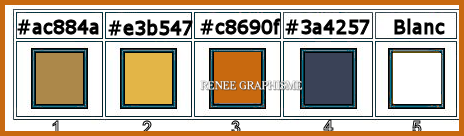
- Material Properties: Set your foreground color to color #ac884a= 1 – Set your background color to color #3a4257= 4
1. File- Open a new transparent Image of 1015 x 615 Pixels
2. Food Fill Tool
 –
Fill the layer with the Foreground color = 1 –
Fill the layer with the Foreground color = 1
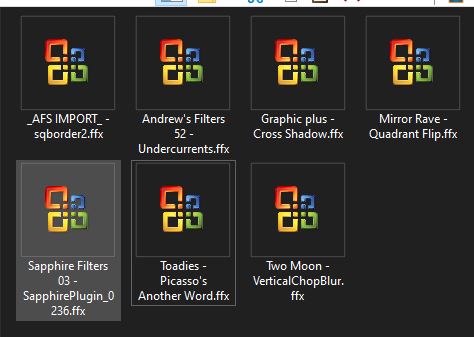
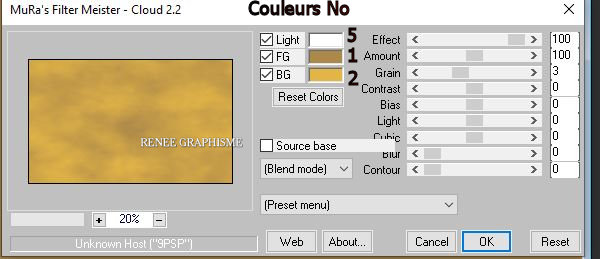
3. Effects – Plugins – Mura’s Meister – Clouds use the settings below
4. Effects -Plugins-
Unlimited 2.0- Sapphire Filters 03
-SapphirePlugin_0236...using the default settings
5. Effects – Edge Effects– Enhance
6.
Layers-New Raster Layer
7. Selections –load/save selection –load selection from disc and select my selection: ‘’
Automne2020 - sel1’’
8. Food Fill Tool
–
Fill the selection with the Background color =4
Selections- Deselect All
9. Effects - Edge Effects – Enhance More
10. Layers-Properties-Change the Blend Mode to " Soft Light "
11. Effects–3 D Effects- Drop Shadow using the default settings
12.
Layers-New Raster Layer
13. Selections –load/save selection –load selection from disc and select my selection: ‘’
Automne2020 – sel2’’
14. Set the Foreground color to color #c8690f=3
Food Fill Tool
–
Fill the selection with the Foreground color =3
Selections- Deselect All
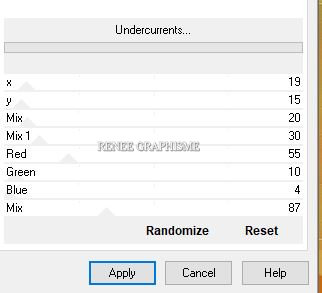
15. Effects –Plugins- Unlimited 2.0 - Andrew's Filters 52 -
Undercurrents..use the settings below.
16. Layers-Properties-Change the Blend Mode to " Overlay " – and Lower the Opacity to 59 %
- Effects–3 D Effects- Drop Shadow using the default settings
17.
Layers-New Raster Layer
18. Selections –load/save selection –load selection from disc and select my selection: ‘’
Automne2020 – sel3’’
19. Set the Foreground color to color # e3b547=2
Food Fill Tool
–
Fill the selection with the FG-Color =2
Selections- Deselect All
20. Effects –Plugins- Unlimited 2.0 - AFS Import-sqborder2 with these settings:
47/34/61
21. Effects–3 D Effects- Drop Shadow using the default settings
22.
Layers-New Raster Layer
23. Selections –load/save selection –load selection from disc and select my selection: ‘’
Automne2020 – sel4’’
24. Food Fill Tool
–Fill the selection with the BG-Color =4
Selections- Deselect All
25. Effects–3 D Effects- Drop Shadow using the default settings
26. Open the tube "Renee-Automne2020-Image
1.pspimage’’ -Edit - Copy- Activate your work -Edit - Paste as a new layer
27.
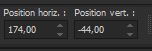
Pick Tool: (K) on your keyboard -Enter these parameters for the X:174 and Y: -44 positions on the Toolbar
 174
/ - 44 174
/ - 44
Press ( M ) to close the Pick Tool
28. Layers- Duplicate
29. Adjust- Blur- Motion Blur with these settings
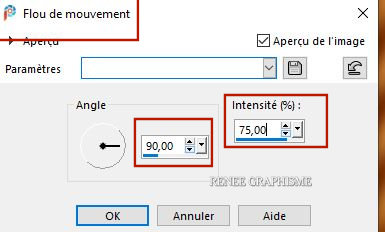
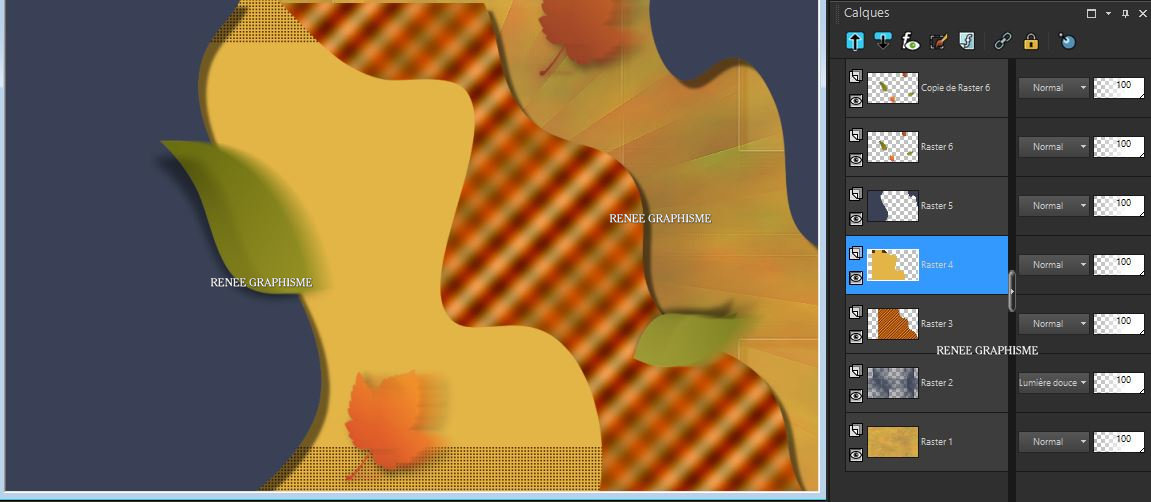
- Your work and Layer Palette look like this now-You should have this result
30. Layers- Merge- Merge Visible
31. Layers- Duplicate
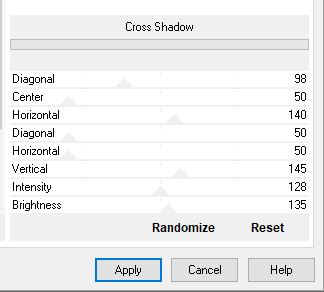
32. Effects –Plugins- Unlimited 2.0 – Graphic Plus- Cross Shadow use the settings below
33. Effects – Plugins – Mura’s Meister –
Perspective Tiling using the default settings
34. Effects – Image Effects – Offset with these settings: H = 0 and V = -
473
- Activate the layer underneath ( merged layer)
35. Selections – Select All
- Activate the layer above
36. Image-Crop to Selection
37. Activate Magic Wand - Feather 32 –Select the transparent part
DELETE 5 times

Selections- Deselect All
38. Layers- New Raster Layer
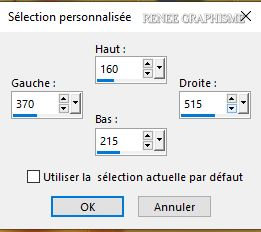
39. Activate Selection Tool -Custom Selection (S) -Rectangle with these settings
40. Set your foreground color to color # ffffff=5
Food Fill Tool
–
Fill the selection with the Foreground color =5
41. Selections- Modify – Contract 1 Pixel
DELETE
Selections- Deselect All
42. Effects–3 D Effects- Drop Shadow with these settings: 1/1/100/5 Color Black
43. With a fine writing font of your choice to write
‘’Automne ‘’ –Place in the small frame (see finished image)
44. Effects–3 D Effects- Drop Shadow with these settings: 10/ 1/ 65/ 5 Color Black
(I added the text "Automne" if you want exactly the same font with the text that I have)
45. Layers-New Raster Layer
46. Selections - Select All
47. Open the tube ‘’Renee-TUBES_Arbre-lumiere’’ -Edit - Copy- Activate your work -Edit - Paste into Selection
Selections- Deselect All
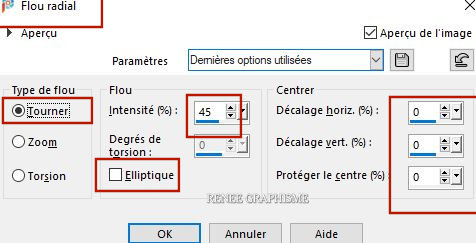
48. Adjust-Blur- Radial Blur use the settings below
49. Effects-Plugins- Unlimited 2.0 - Two Moon - VerticalChopBlur...
100/65
50. Effects – Plugins or Unlimited -Mirror Rave-
Quadrant Flip all sliders on 255
51. Effects – Edge Effects – Enhance
52. Layers-Properties-Change the Blend Mode to " Hard Light "
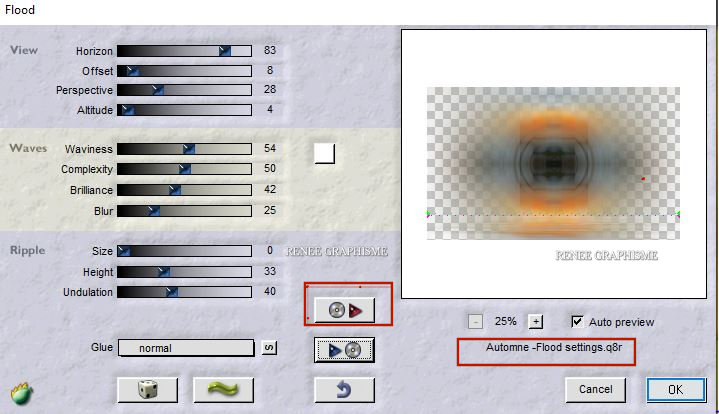
53. Effects – Plugins – Flaming pear – Flood –-click on the red arrow>>select my file -
Preset :
‘’Automne
-Flood settings’ :
‘’Automne
-Flood settings’
Or manual settings as shown in the example below
- Activate the bottom layer in the layer palette (merged layer )
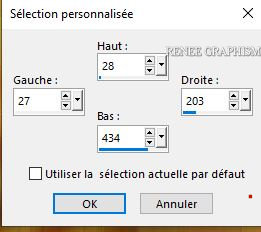
54. Activate Selection Tool -Custom Selection (S) -Rectangle with these settings
55. Selections - Promote Selection to Layer
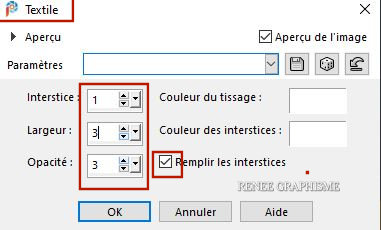
56. Effects – Texture Effects- Weave use the settings below - Color White
Selections- Deselect All
57. Effects–3 D Effects- Drop Shadow with the same settings
58. Open the tube ‘’Renee-Automne2020-Image 2’’ - Edit - Copy- Activate your work -Edit - Paste as a new layer
59.
Pick Tool: (K) on your keyboard -Enter these parameters for the X:27 and Y: 28 positions on the Toolbar
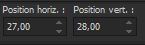 27 / 28
60. Layers- Duplicate
61. Effects –Plugins- Unlimited 2.0 – Toadies - Picasso's Another
Word...with these settings : 24/106/255
62. Layers-Properties-Change the Blend Mode to " Overlay " and Lower the Opacity to
67%
- Activate the top layer in the layer palette
63. Open the tube ‘’Renee-Automne2020-Image 3’’ -Edit - Copy- Activate your work -Edit - Paste as a new layer
64. Objects - Align – Bottom
66. Open the tube "Tube-Automne-soleil rouge’’ C-Edit - Copy- Activate your work -Edit - Paste as a new layer
- Place in the top right corner (see finished image)
67. Layers- New Raster Layer
68. Activate Brush Tool and select my file:
‘’automne " use the settings below .Stamp with white foreground color in the upper right (see finished image)

If the brush does not open, open the brush in jpg in your psp and export as a brush in a custom brush- (Give it a name) - Layers- Arrange- Move Down
69. Open the tube ‘’ Renee_TUBES_Travail tuto automne 2020’’ Edit - Copy- Activate your work -Edit - Paste as a new layer
Activate your Move Tool (M) move it in the right place (see finished image )
Or take the tubes from the folder (reserves tubes) Or other tubes to your liking
70. Image - Add borders-Symmetric checked 1 Pixel BG-Color = 4
- Edit- Copy !!!!
71 Open the tube "Cadre /Frame " in your PSP
- Edit - Paste as a new layer (is still in memory)
72. Layers- Merge- Merge All
73. Image - Resize- Width 1015 Pixels
Save as JPG
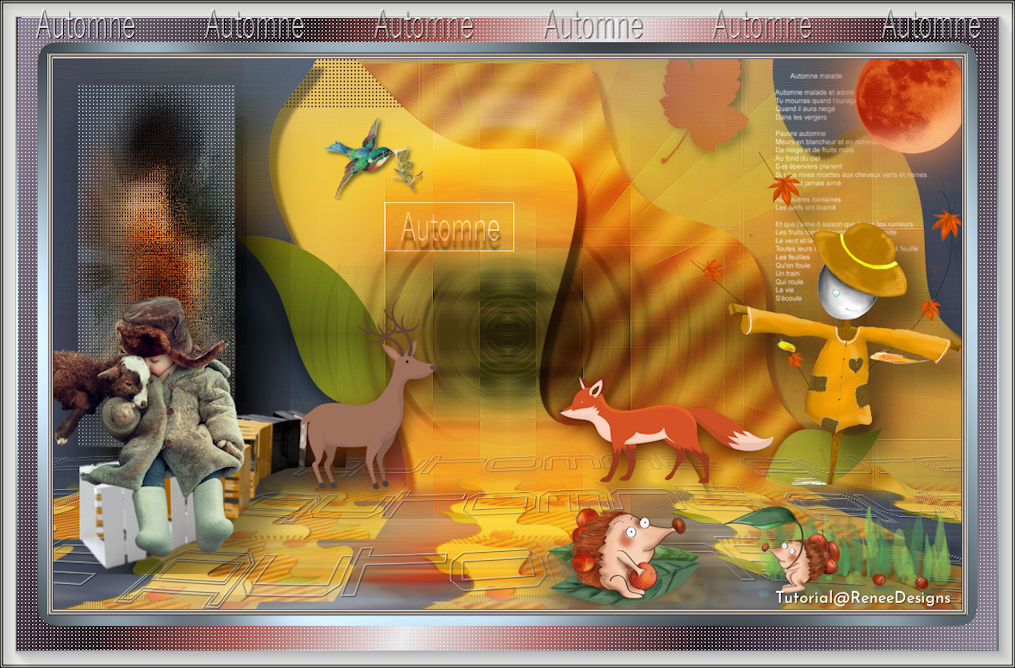
I hope you enjoyed this lesson
Renée
This lesson was written by Renée
31-07-2020
Edited and Update
2020
*
Any resemblance with an existing lesson is a coincidence
*
Do not forget to thank the people who work with us and for us I have appointed the tubeurs and translators
Thanks
*
|

 Translations