|
Let's start the lesson

. Material palette:Set your foreground color to #000000 -Set your background color to #175552
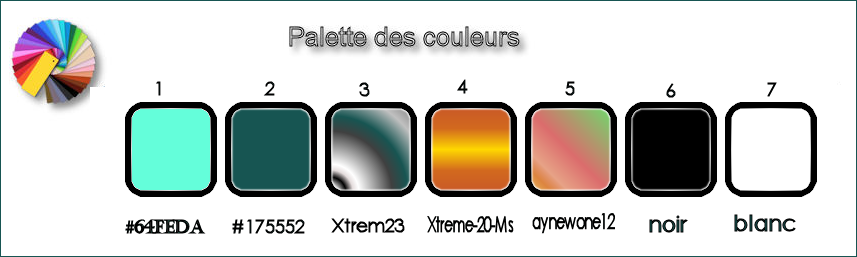
To start the lesson, your material palette looks like this:Use these colors !! - Otherwise you will get a completely different effect 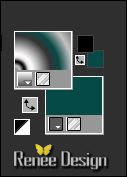
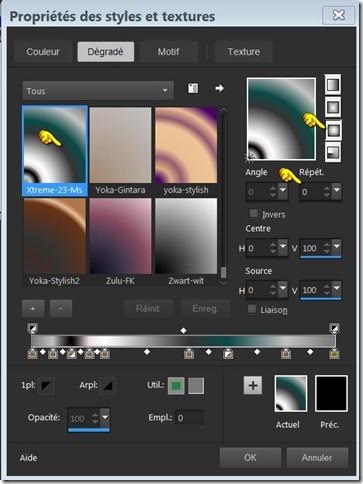
-Foreground material into gradient and select ‘’Xtreme-23-Ms.PspGradient’’- Prepare a sunburst gradient configured like this.
1. File: Open a new transparent image 999 x 579 pixels
2. Activate Flood Fill Tool and fill the layer with the gradient
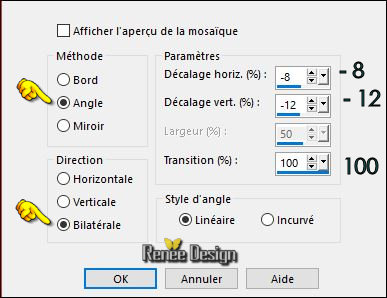
3. Effects- Image Effects- Seamless Tiling use settings below
4. Effects –Plugins – L & K’s Kaithlyn
206/255/239/4 (patch filter -included in the zip )
5. Effects- Image Effects- Seamless Tiling with the same settings
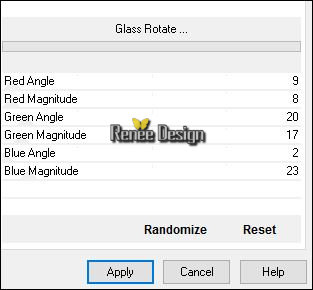
6.
Effects –Plugins - Unlimited - Andrew's Filters 7- Glass Rotate
...
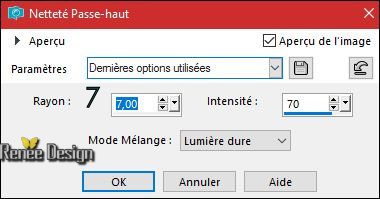
7. Adjust- Sharpness-Sharpen More
8. Layers- Duplicate
9. Effects –
Plugins – L & K’s Antonio 255/255
10. Effects
–Plugins – L & K’s Dimitri 85
11.
Layers-Properties-Set the Blend Mode to "Luminance -Legacy"
12. Layers- Duplicate
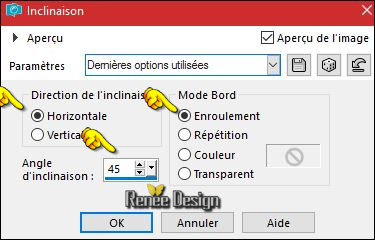
13. Effects- Geometric Effects - Skew use settings below
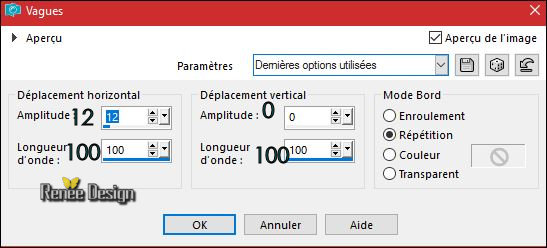
14. Effects- Distortion Effects- Wave use settings below
15. Effects- Edge Effects- Enhance
-Properties foreground - close gradient, put the foreground color to:# ffffff
16. Layers- New Raster Layer
17.
Selections –load/save selection –load selection from disc and select my selection: ‘’
Atlantis_1’’
18. Activate Flood Fill Tool and fill the selection with the foreground color #ffffff
Selections- Deselect All
19. Activate the tube ‘’Atlantis_clouds.png’’
-
Edit - Copy- Activate your work -Edit - Paste as a new layer
- Activate Move Tool (M) move it the right place at the top of your image
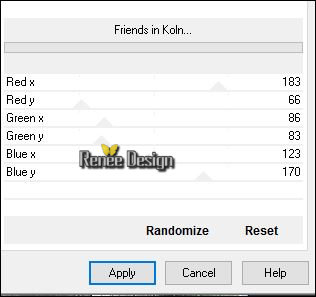
20.
Effects –Plugins- Unlimited - Andrew's Filters 37- Friends in
Koln...
21. Adjust- Sharpness-Sharpen
22.
Layers-Properties-Set the Blend Mode to""Overlay "-Set the Opacity of this layer to 75%
23. Activate the tube ‘’ Atlantis_image_1.pspimage’’
- Edit - Copy- Activate your work -Edit - Paste as a new layer
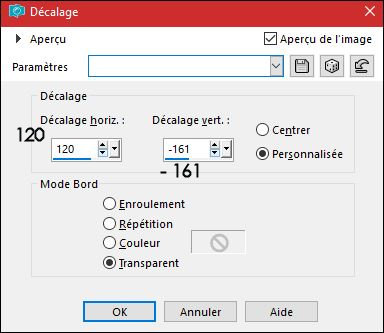
24. Effects-Image Effects- Offset with these settings H = 65 and V = 65
25.
Set the Opacity of this layer to 48%
26. Adjust- Sharpness-Sharpen
27. Adjust- Sharpness- High pass sharpen
28. Activate the tube ‘’Atlantis_image_2.pspimage’’
- Edit - Copy- Activate your work -Edit - Paste as a new layer
29. Effects-Image Effects- Offset with these settings
30.
Layers-Properties-Set the Blend Mode to "Soft Light "
31. Adjust- Blur- Blur More
32. Activate the tube ‘’
Atlantis_image_3.pspimage’’
-
Edit - Copy- Activate your work -Edit - Paste as a new layer
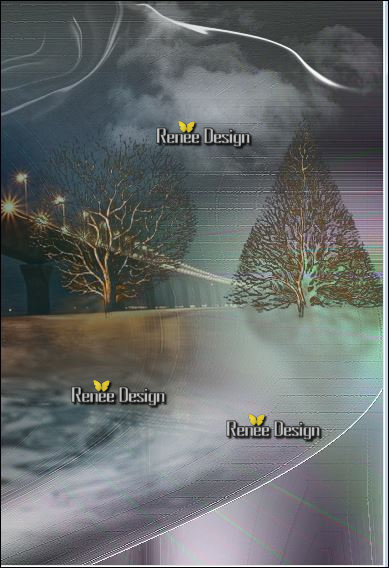
- Move tool: place the tube to the right side as shown in the example below
33.
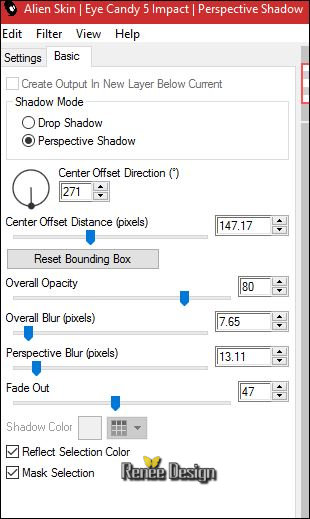
Effects –Plugins – EyeCandy 5 Impact – perspective
shadow-tab Settings/User settings choose my Preset ‘’ Atlantis_shadow’’-Or manual settings as shown in the example below
-
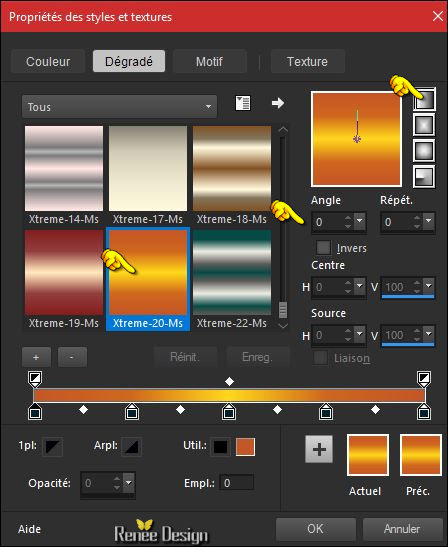
Properties foreground: Change foreground material into gradient and select
‘’Xtreme-20-Ms.PspGradient’’- Prepare a linear gradient configured like this.
34. Layers- New Raster Layer
35.
Selections –load/save selection –load selection from disc and select my selection: ‘’
Atlantis_2’’
36. Activate Flood Fill Tool and fill the selection with the gradient
Selections- Deselect All
37. Layers- Duplicate
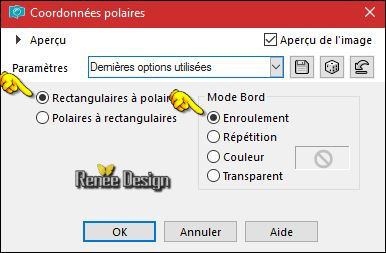
38. Effects- Distortions Effects-Polar Coordinates-Rectangular to Polar
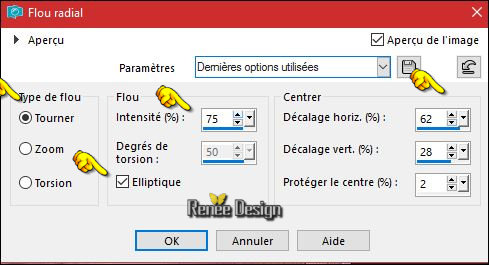
39.Adjust- Blur- Radial Blur use settings below
40.
Set the Opacity of this layer to 36%
41. Activate the tube ‘’ Atlantis_image_4.pspimage’’
-
Edit - Copy- Activate your work -Edit - Paste as a new layer
40. Effects-Image Effects- Offset with these settings H = - 376 and V =
0
41. Effects- Edge Effects- Enhance
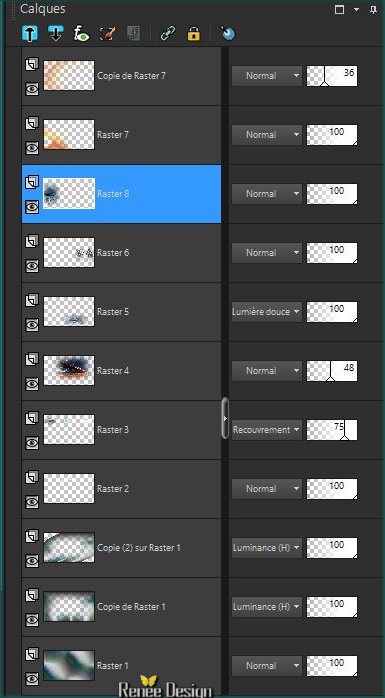
42.Layers- Arrange- Move 2x Down ( above raster 6 )
Layer- Palette look like this now
-
To replace the top of the layers palette
43. Activate the tube’ ‘Renee_tube_Chuttttttttttt.pspimage’’
- Image
Resize to 85%
-
Edit - Copy- Activate your work -Edit - Paste as a new layer
With the move tool, move it in the bottom left corner
( Or choose the tube
‘’Renee_tube_artDigital’’)
44.
Layers-Properties-Set the Blend Mode to " Soft Light "- Set the Opacity of this layer to 79%
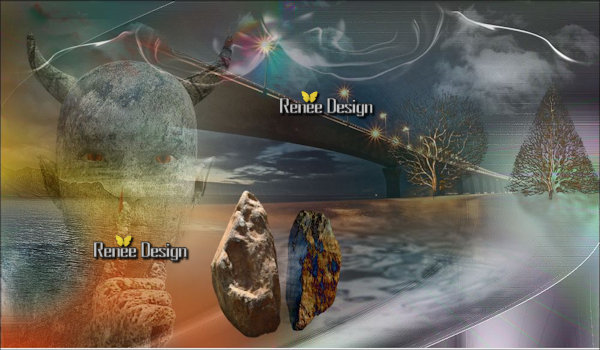
45. Activate the tube ‘’ Renee_tube_Atlantis_rochers’’
- Activate the 2 layers of the tube -Paste as a new layer and move
44. On the Left Stone -Image- Free Rotate -Left
6°
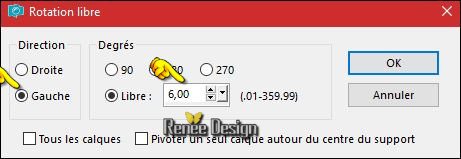
45. Right stone /Layers-Properties-Set the Blend Mode to " Difference"
-
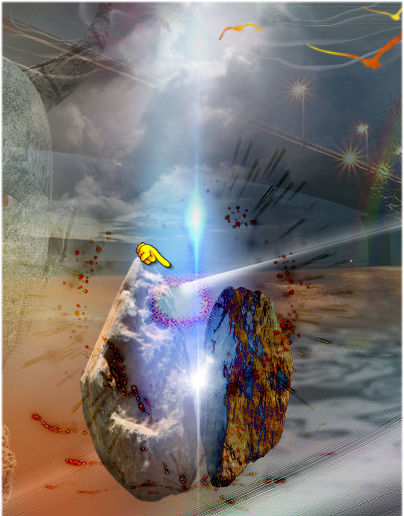
You should have this result
46. Layers- New Raster Layer
47.
Selections –load/save selection –load selection from disc and select my selection: ‘’
Atlantis_3’’
48. Properties foreground - close gradient, put the foreground color to:#ffffff
Activate Flood Fill Tool and fill the selection with the foreground color #ffffff (3 clicks )
Selections- Deselect All
Well placed between the 2 rocks as this -replace as needed

49. Activate the tube ‘’ Atlantis_image_5’’
-
Edit - Copy- Activate your work -Edit - Paste as a new layer
50. Effects-Image Effects- Offset with these settings H = - 41 and V = 184
51. Activate the tube
‘’Renee_tube_Atlantis_lumiere_bleue.pspimage’’
- Edit - Copy- Activate your work -Edit - Paste as a new layer
- Place well between the stones and towards the cloud
52. Activate the tube ‘’ oiseaux.pspimage’’
-
Edit - Copy- Activate your work -Edit - Paste as a new layer
-
Move Tool / place your tube on Top of your image
53. Activate the tube ‘’Atlantis_image_6’’
-
Edit - Copy- Activate your work -Edit - Paste as a new layer
- With the move tool, move it in the upper right corner
54.
Layers-Properties-Set the Blend Mode to " Lighten " -Set the Opacity of this layer to 65%
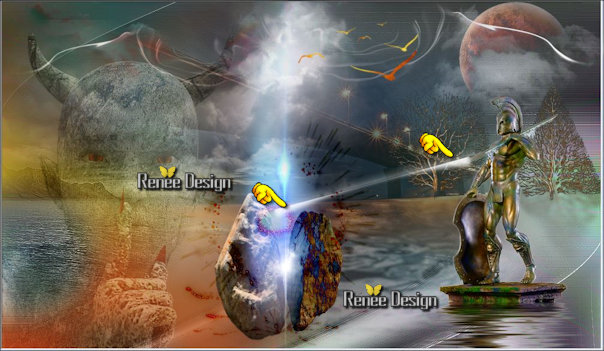
55. Activate the tube ‘’ Renee_tube_Atlantis_Zeus 2.pspimage’’
-
Edit - Copy- Activate your work -Edit - Paste as a new layer
- With the move tool, move it in the bottom right corner
56.
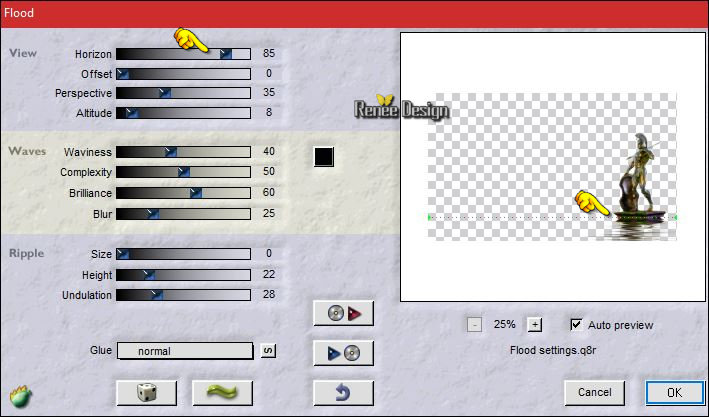
Effects –Plugins – Flaming Pear Flood use settings below
(The filter settings horizon depends where the tube is placed)
57. Layers- New Raster Layer
58.
Selections –load/save selection –load selection from disc and select my selection: ‘’
Atlantis_4’’
59. Activate Flood Fill Tool and fill the selection with the foreground color #ffffff (2 clicks)
Selections- Deselect All
-Position the tube like this
60. Activate the tube ‘’
Renee_tube_Atlantis_lumiere_rouge.pspimage’’
-
Edit - Copy- Activate your work -Edit - Paste as a new layer
Layers-Properties-Set the Blend Mode to""Burn "-Set the Opacity of this layer to 77%
- With your Pick Tool (K) place it in the right place as shown in the example below
61. Layers- Merge- Merge Visible
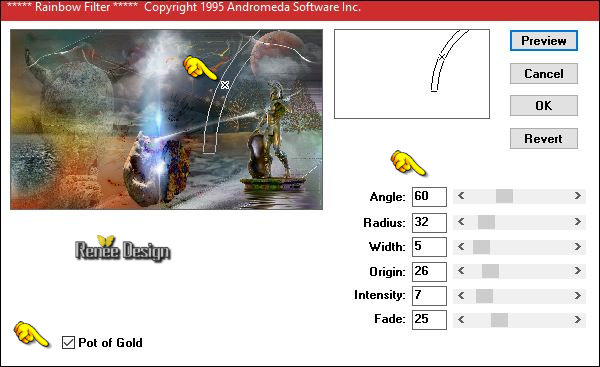
62. Effects
–Plugins – Andromeda –Rainbow
- With these settings
- By means of shifting the cross you determine where the rainbow comes
63. Activate the tube ‘’ Renee_tube_Atlantis_petites_pierres’’
-
Edit - Copy- Activate your work -Edit - Paste as a new layer
- Place on the rocks
64. Image - Add borders-Symmetric checked:1 pixel #175552
65. Image - Add borders-Symmetric checked:2 pixels #fffffff
66. Image - Add borders-Symmetric checked:1 pixel #175552
67. Image - Add borders-Symmetric checked:50 pixels #ffffff
68. Layers- New Raster Layer
69.
Selections –load/save selection –load selection from disc and select my selection: ‘’
Atlantis_5’’
70. Activate Flood Fill Tool and fill the selection with the foreground color #ffffff
Selections- Deselect All
70.
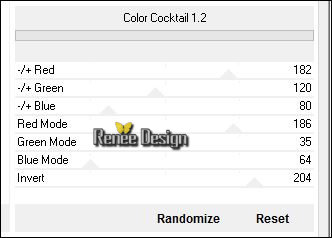
Effects-Plugins- Unlimited - Filter Factory Gallery V- Color Cocktail
1.2
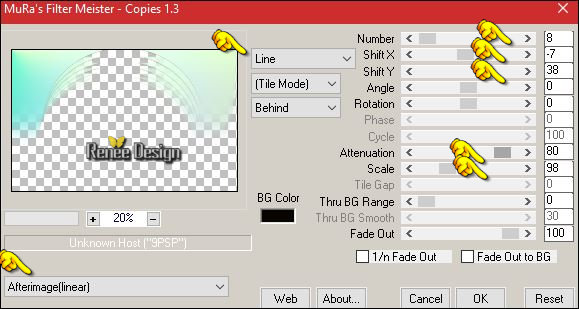
71. Effects-Plugins – Mura’s Meister – Copies use settings below
72. Effects – 3D Effects – Drop Shadow with these settings: – 1/1/100/0 black
-
Layers-Properties-Set the Blend Mode to "Soft Light "
73. Activate the Brush image ‘’ Atlantis’’
File- Export Custom Brush -Give it a name ‘’ Atlantis’’
74.
Layers- New Raster Layer
-
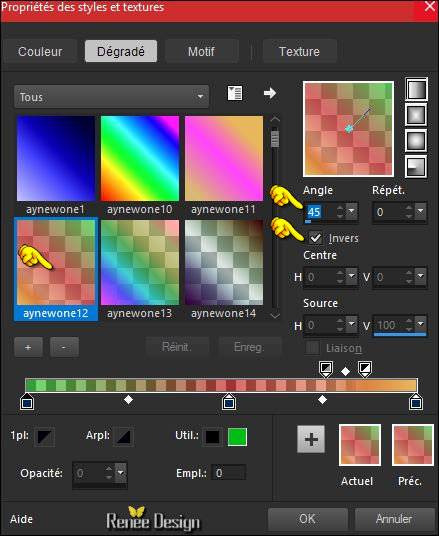
Properties foreground: Change foreground material into gradient and select ‘’aynewone12’’ –
Prepare a linear gradient configured like this.
75. Activate Brush Tool and choose the brush:‘’ Atlantis’’ with these settings

-
Place the brush with the gradient
76. Effects – 3D Effects – Drop Shadow with these settings: 1/1/100/0 black
77. Layers-Merge- Merge All
78. Effects
–Plugins– AAA Frame – Foto Frame use settings below 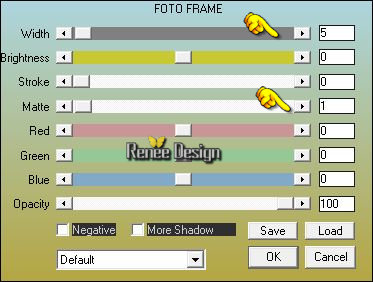
Save as JPG
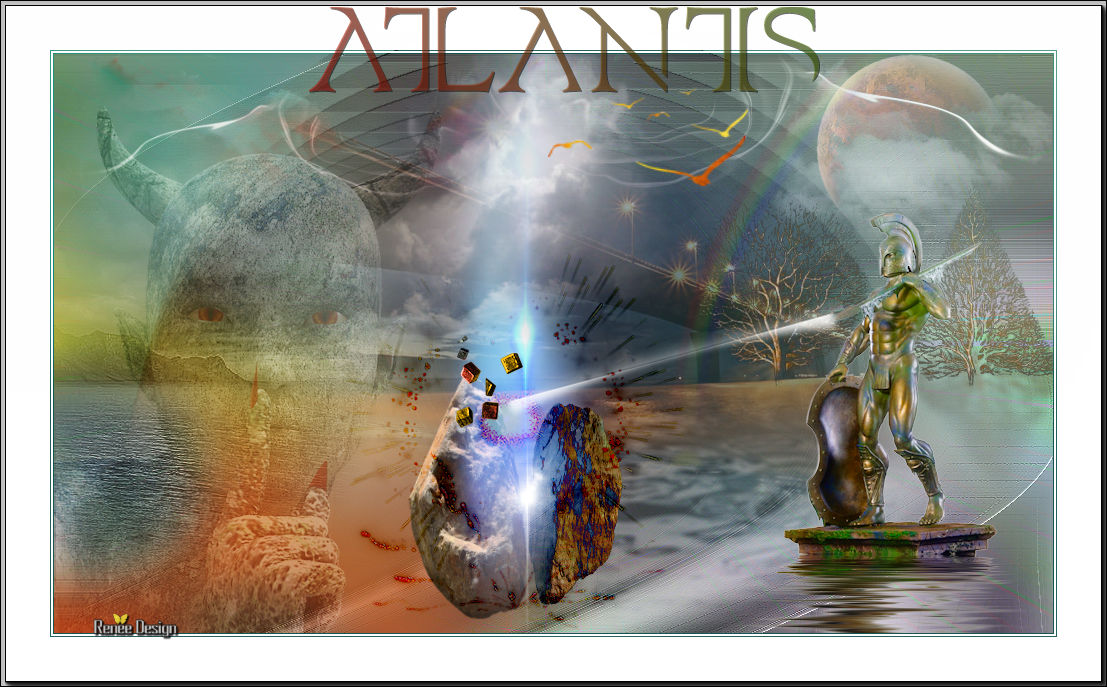
I hope you enjoyed this lesson
Renée
This lesson was written by Renée 10/02/207
Edited and Update
2017
*
Any resemblance with an existing lesson is a coincidence
* Do not forget to thank the people who work with us and for us I have appointed the tubeurs and translators
Thanks Renée *
*
| 

 Translations


 If a plugin supplied appears with this icon it must necessarily be imported into Unlimited *

 All rights reserved