|
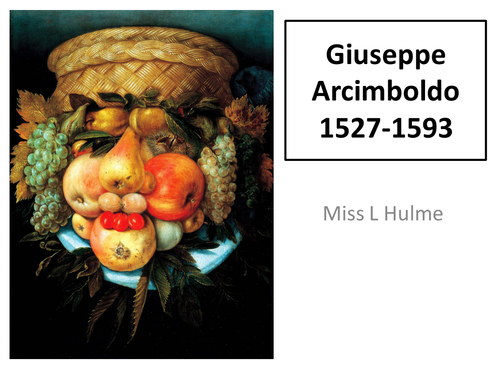
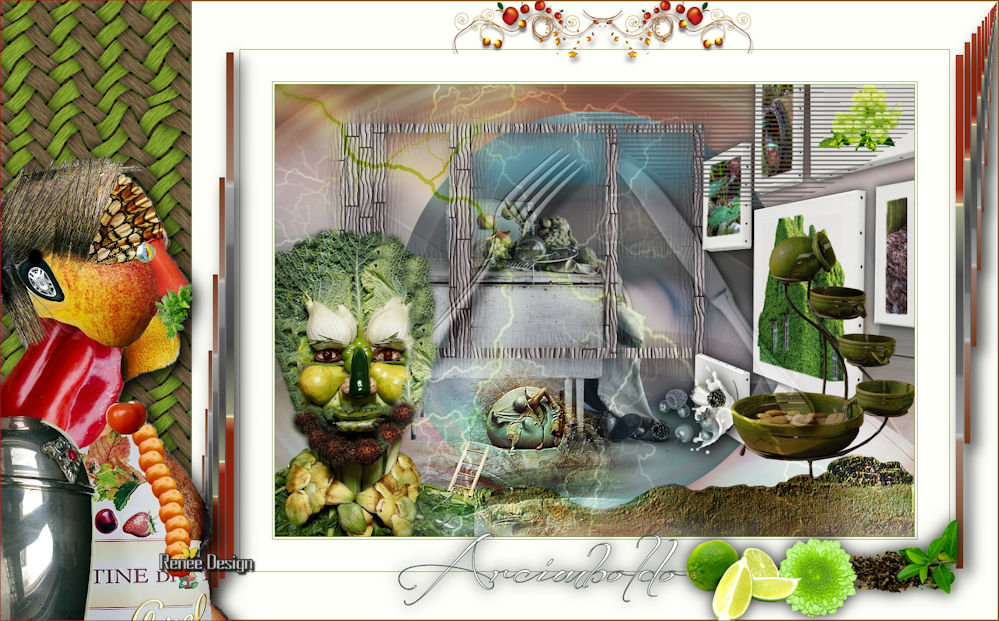
The Seasons of Arcimboldo
Giuseppe Arcimboldo- Italian Mannerist painter whose grotesque compositions of fruits, vegetables, animals, books, and other objects were arranged to resemble human portraits.
Let's start the lesson
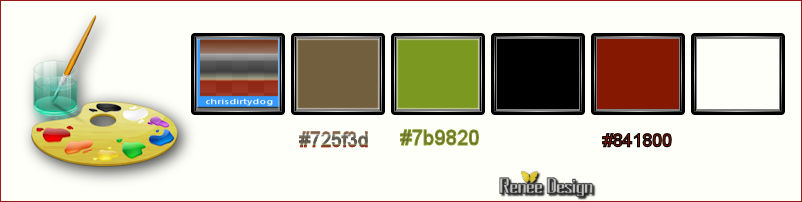
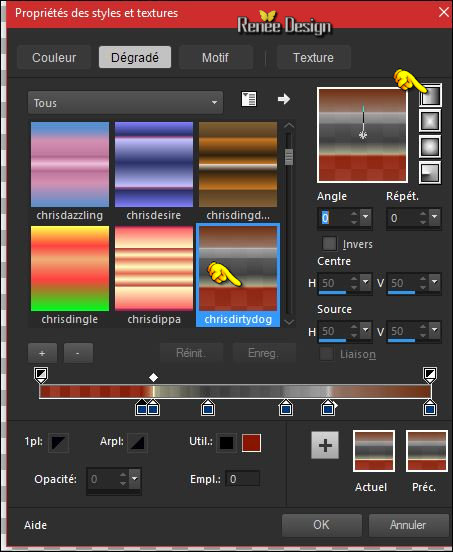
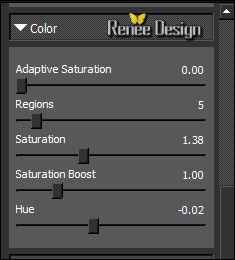
Color-Palette- Set your Foregroundcolor to gradient and select ‘’ chrisdirtydog’’ 
- Prepare a linear gradient configured like this - Set your background color to #725f3d
1.File: Open a new transparent image 1008 x 712 pixels
2. Flood Fill Tool
 Fill the layer with the gradient Fill the layer with the gradient
3. Open the image ‘’
Arcimboldo_image_1.jpg »
-
Edit - Copy -Activate your working area, Edit - Paste as a new layer
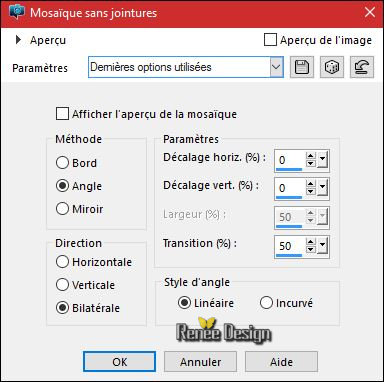
4. Effects – Image Effects- Seamless Tiling use settings below
5. Effects –Plugins – FM Tile
Tools – Blend emboss using the default settings
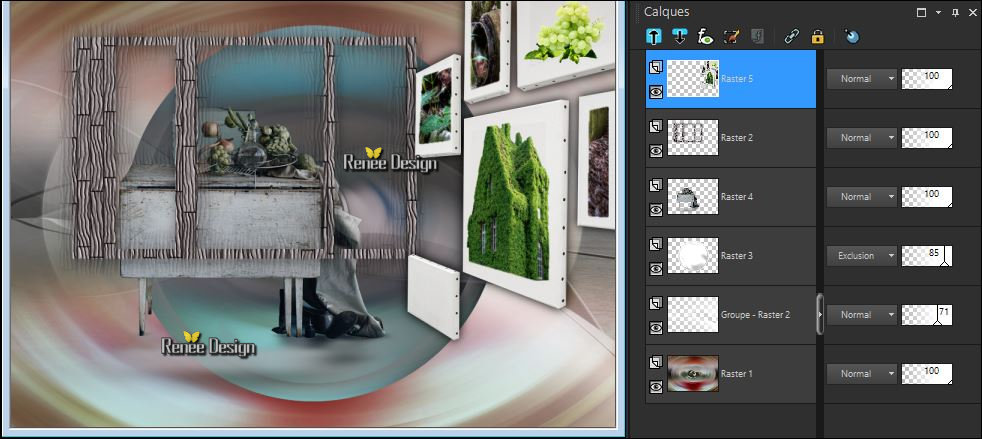
6. Layers-Properties-Set the Blend Mode to "Exclusion"
7. Layers- Merge- Merge Down
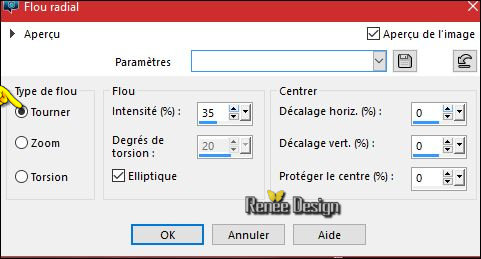
8. Adjust- Blur- Radial Blur use settings below
9. Layers- Duplicate
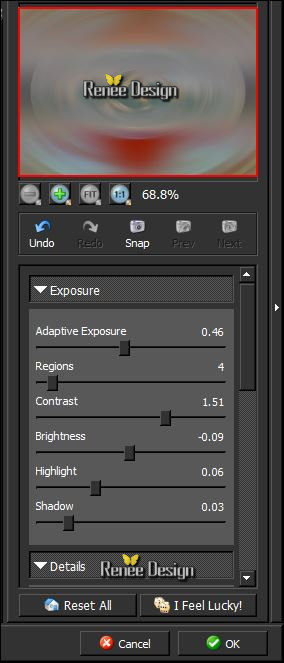
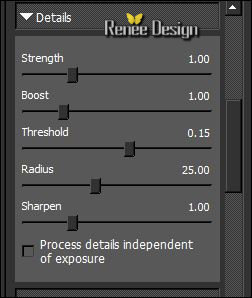
10. Effects-Plugins – Topaz
Labs - Adjust 4 - Exposure use settings below
11. Layers-Properties-Set the Blend Mode to "Overlay "
12. Layers- Merge- Merge Down
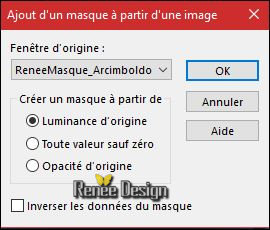
- Open the Mask ‘’
ReneeMasque_Arcimboldo’’ in your PSP and minimize it
- Color Palette- Set your foreground color to #ffffff
13. Layers- New Raster Layer
14. Flood Fill Tool Fill the layer with the foreground color
15. Layers - New Mask Layer - From Image and choose Mask :
- Layers- Merge- Merge Group
- Set the layer Opacity of this layer to
71%
16. Open the tube
‘’Arcimboldo_image_2.png »
-
Edit - Copy -Activate your working area, Edit - Paste as a new layer
- do not move, it is in the same place
17. Effects –Plugins-
Unlimited ICNET Filters – Lens Effects – Refractor2:
227
18. Selections –load/save selection –load selection from disc and select my selection:
‘’Arcimboldo_1’’
Hit the DELETE key of your keyboard 
Selections- Deselect All
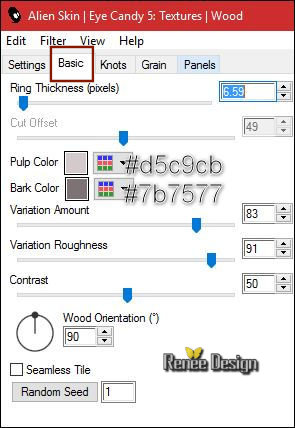
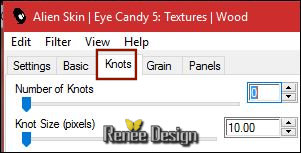
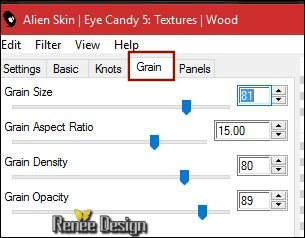
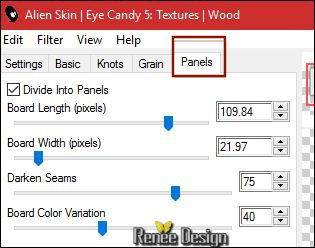
19. Effects –Plugins – EyeCandy 5- textures / Wood -tab Settings/User settings choose my - Preset ‘’
Arcimboldo_textures_Deck Boards”
20. Effects- 3 D Effects- Drop Shadow with these settings:5/2/43/28 black
In the Layer Palette: Activate the layer underneath= Group-
Raster 2
21. Open the tube ‘’
Arcimboldo_assiette.pspimage’’
-Edit - Copy -Activate your working area, Edit - Paste as a new layer
22. Selections- Select All- Float- Defloat
23. Selections- Modify –
Contact 30 pixels
24. Effects –3D Effects – Drop Shadow with the same settings
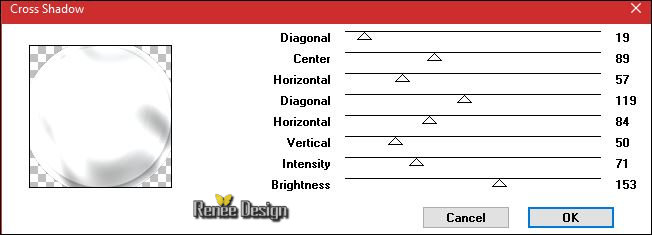
25. Effects –Plugins –
Graphic plus- Cross shadow use settings below
Selections- Deselect All
26. Layers-Properties-Set the Blend Mode to "Exclusion" -Set the layer opacity of this layer to 85
27. Open the tube
« ARCIMBOLDO_DECOS’’
(Do not close we need it later for the rest of the work)
- Activate the layer "Raster 1" of the tube
-
Edit - Copy -Activate your working area, Edit - Paste as a new layer
28. Effects- Image Effects- Offset with these settings: H = - 101 and V = -15
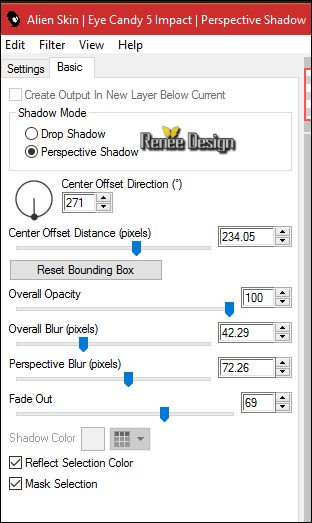
29. Effects –Plugins – EyeCandy 5 Impact – perspective shadows -tab Settings/User settings choose my
Preset ‘’ Arcimboldo_shadows’’
- To replace the top of the layers palette
30. Open the tube ‘’
Arcimboldo_image_3.pspimage’’
- Activate the layer " raster 2" of the tube (
Layer 1 is empty. You can change the composition)
-
Edit - Copy -Activate your working area, Edit - Paste as a new layer
-Activate your Move Tool (M) move to the top right corner
- Your Layer palette look like this now-You should have this result
31. Back on tube " DECOS"
- Activate the layer "raster 5 " of the tube
-
Edit - Copy -Activate your working area, Edit - Paste as a new layer
- Move at the canvas (bottom)
32. Effects- 3 D Effects- Drop Shadow with the same settings
33. Layers-Properties-Set the Blend Mode to "Luminance"
34. Layers- New Raster Layer
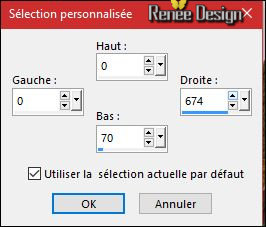
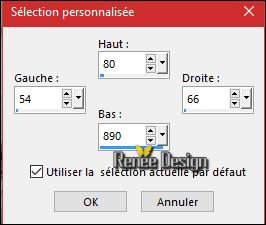
35. Activate Selection Tool -Custom Selection (S) -Rectangle with these settings 
36. Flood Fill Tool
– Change the opacity of the color at 45%
- Fill the selection with the background color
Selections- Deselect All
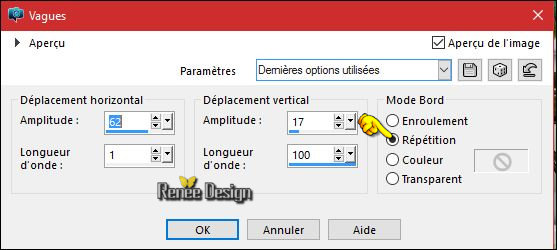
37. Effects- Distortion Effects- Wave use settings below
38. Layers-Properties-Set the Blend Mode to "Luminance "
39. Back on tube "DECOS"
- Activate the layer " raster 2" of the tube
-
Edit - Copy -Activate your working area, Edit - Paste as a new layer
40. Effects- Image Effects- Offset with these settings: H = 360 and V = - 71
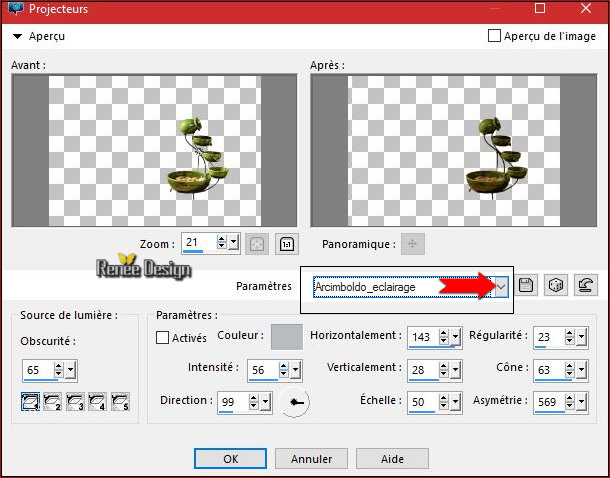
41. Effects- Illumination Effects -and select my file- « Arcimboldo_eclairage » ( C:\Users\YourName\Documents\My PSP-files\extract in to the folder preset défaut)
42. Back on tube "DECOS"
- Activate the layer "raster 3"of the tube
- Edit - Copy- Activate your working area, Edit - Paste as a new layer (do not move it is in the right place)
- Layers-Properties-Set the Blend Mode to " Soft Light"
43. Open the tube
« Arcimboldo_image_3.png »
Edit - Copy- Activate your working area, Edit - Paste as a new layer
- Move Tool / place your tube to the bottom of your image
44. Effects – User Defined Filter –
Emboss 3 using the default settings
- Color Palette- Set your foreground color to #7b9820
45. Layers- New Raster Layer
46. Selections –load/save selection –load selection from disc and select my selection:
‘’Arcimboldo_2’’
47. Activate Paint Brush Tool with these settings!!!

Stamp your brush at the right place by using your foreground color
Stamp 4 ore 5 times to obtain the desired effect
Selections- Deselect All
48. Layers-Properties-Set the Blend Mode to " Multiply"
49. Layers- Duplicate
- Layers- Merge- Merge- Down
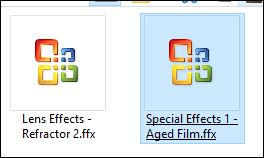
50. Effects –Plugins-
Unlimited ICNET FILTERS - Special Effects 1- Aged
Film: 37/91/214
51. Open the tube ‘’
Renee_tube_Arcimboldo_10’’
-
Edit - Copy -Activate your working area, Edit - Paste as a new layer
- Image Resize to 60
%
- With the Move Tool, move it in the bottom left corner
52. Back on tube "DECOS"
- Activate the layer "raster
4" of the tube
-
Edit - Copy -Activate your working area, Edit - Paste as a new layer
53. Effects- Image Effects- Offset with these settings: H = - 118 and V = - 205
54. Effects –Plugins – FM
Tiles Tools – Blend emboss using the default settings
55. Layers-Properties-Set the Blend Mode to " Hard Light "
56. Layers- New Raster Layer
57. Effects - Plugins – Alien
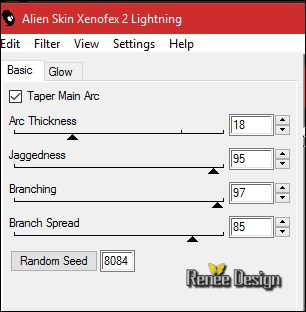
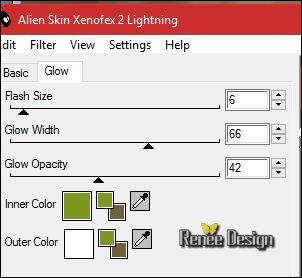
skin Xenofex2 – Lightning with these settings ( Color-Palette:#7b9820/#725f3d/#ffffff )
58. Layers-Properties-Set the Blend Mode to " Overlay "
59. Adjust-Depth of field (Depth of field is the distance at which objects behind or in front of the focus point appear still sharp
- Area of focus -Select Circular Selection Tool
- Aperture shape-Circular Aperture Shape
- Trace a circle
-The circle shows the protection of the part of the image, which must remain sharp
- If the point is outside the sharpness level, all other objects are blurred. (Selects the focusing area and use the settings .)
(Move the circle with the mouse and pull the node (red arrow) and drag it to the desired size
(Now you can increase or decrease the perimeter of what you want to protect. )

60. Image - Add borders-Symmetric checked: 1
pixel #7b9820
61. Image - Add borders-Symmetric checked: 3
pixels #ffffff
62. Image - Add borders-Symmetric checked:1
pixel #725f3d
63. Image - Add borders-Symmetric checked: 50
pixels #ffffff
64. Image - Add borders-Symmetric checked: 1
pixel #7b9820
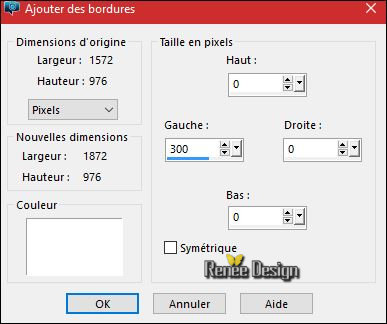
65. Image - Add borders-Symmetric checked: 75
pixel #ffffff
66. Layers- New Raster Layer
- Set your Foregroundcolor to gradient and select ‘’ chrisdirtydog’’ – Lineair 0/0
67. Activate Selection Tool -Custom Selection (S) -Rectangle with these settings
68. Flood Fill Tool –
Change the opacity of the color at 100% -Fill the selection with the gradient
Selections- Deselect All
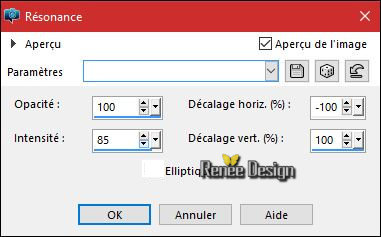
69. Effects-Reflection Effects- Feedback with these settings
70. Layers- Duplicate
71. Image - Mirror CTRL+B)– Image-Flip CTRL + I )
- Layers- Merge- Merge- Down
72. Effects- 3 D Effects- Drop Shadow of your choice
73. Image - Add borders-Symmetric checked: 1
pixel #7b9820
74. Image - Add borders-Symmetric NOT checked #ffffff :
75. Activate Selection Tool -Custom Selection (S) -Rectangle with these settings

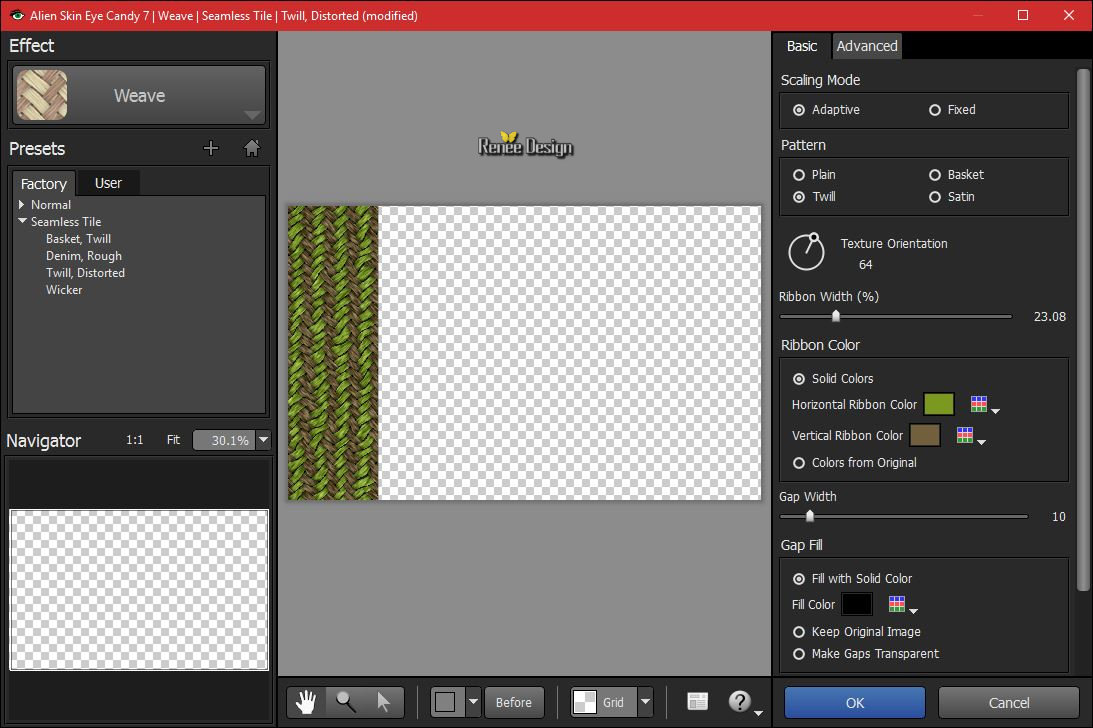
76. Effects –Plugins –
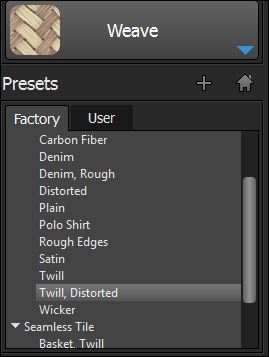
Alien Skin Eye Candy 7 – with these settings /Preset Twill Distorted
(Do you have problems with this? Image ‘’effet-eye candy 7 ’’ is included in the zipfile and paste into selection )
Selections- Deselect All
77. Open the tube ‘’
Renee_tube_Arcimboldo_4’’
-
Edit - Copy -Activate your working area, Edit - Paste as a new layer
With the Move Tool, move it in the bottom left corner
78. Open the tube "TEXT " and tube
‘’ Arcimboldo_fruits.png’’
79. Edit - Copy -Activate your working area, Edit - Paste as a new layer and move
80. Image - Add borders-Symmetric checked: 1
pixel #841800
81. Image Resize to 999 pixels Width
Save as JPG
I hope you enjoyed this lesson
Renée
This lesson was written by Renée 30/10/2016
Edited and Update
2016
*
Any resemblance with an existing lesson is a coincidence
*
Do not forget to thank the people who work with us and for us I have appointed the tubeurs and translators
Thanks Renée *
*
| 
 Translations


 If a plugin supplied appears with this icon it must necessarily be imported into Unlimited *

 All rights reserved