|
Let's start the lesson
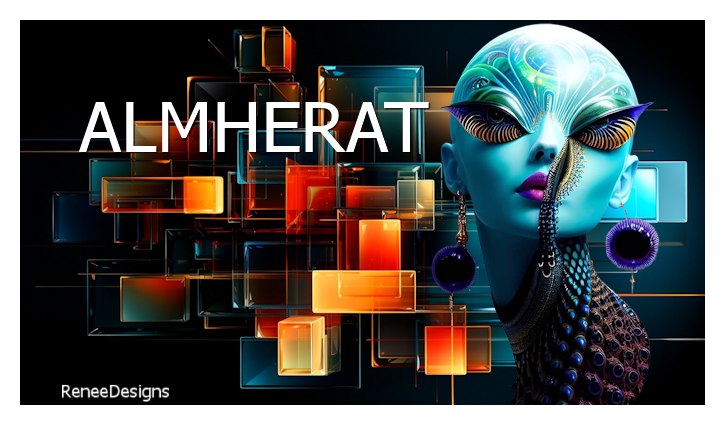
ALMHERAT
1.
Open the Background Image ‘’Renee -Fond-ALMHERAT’’- Promote Background Layer =Raster 1
2.
Layers - Duplicate
3.
Effects – Plugins– Photoshopfun II – Kylie with these settings:
255 / 0
4.
Effects – Plugins– Toadies – What are you : 20
/20
5.
Effects – Edge Effects – Enhance
6.
Selections –load/save selection –load selection from disc and select my selection: ‘’ ALMHERAT-1’’
7.
Selections – Promote Selection to Layer
8.
Effects – Plugins – Carolaine and Sensibility –
CS-Linear H with these settings: 6/7/22
9.
Effects – Edge Effects – Enhance

-
Material Properties:
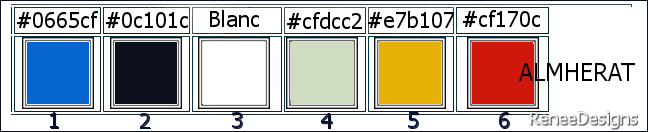
Set your Foreground color to color #0665cf=Color 1 – Set your Background color to color #0c101c=Color 2
-
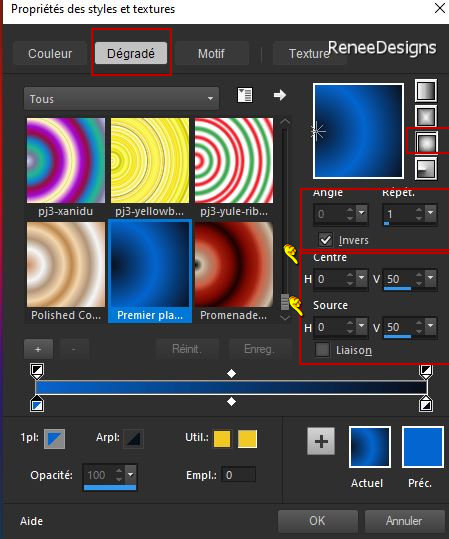
Replace your Foreground color with a Foreground/Background Sunburst Gradient configured like this
10.
Layers- New Raster Layer
11.
Selections –load/save selection –load selection from disc and select my selection: ‘’ ALMHERAT-2’’
12.
Flood Fill Tool
 –
Fill the selection with the Gradient –
Fill the selection with the Gradient
13.
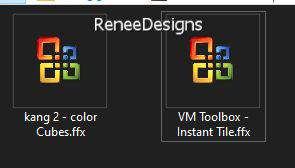
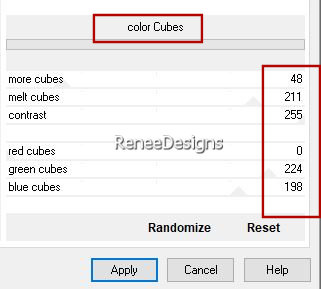
Effects - Plugins - Filters in Unlimited 2.0 - kang
2- color Cubes use the settings below
14.
Adjust- Blur- Gaussian Blur- Radius 32%
15.
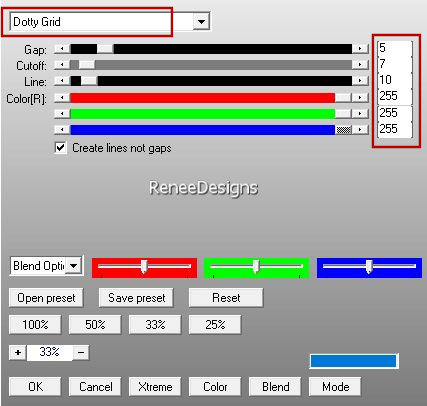
Effects -Plugins - AP[Lines] Lines –
Silverlining use the settings below
16. Layers-Properties-Set the Blend Mode to " Hard Light " -Reduce the opacity of this layer to
51%
17.
Layers – Duplicate
18.
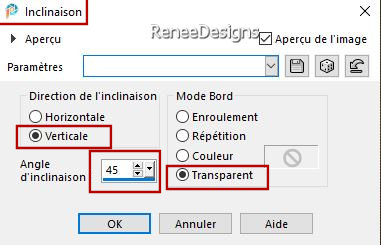
Effects –Geometric Effects – Skew use the settings below
19.
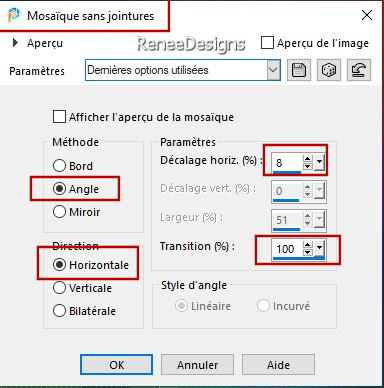
Effects- Image Effects- Seamless Tiling use the settings below
20.
Layers-Properties-Set the Blend Mode to " Hard Light " -the layer Opacity remains at 100%
21.
Edit- Copy Special-Copy Merged
-
Edit- Paste as New Layer
22.
Image - Resize 80 % - Resize all layers- Not Checked
23.
Image - Mirror - Mirror vertical ( Image - Flip in older versions of PSP)
ATTENTION SAVE YOUR WORK,this filter (Frischluft) can close your psp
24.
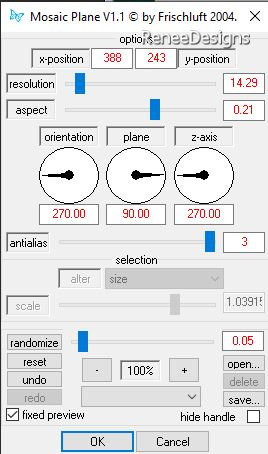
Effects – Plugins – Frischluft – Mosaic Plane
-click reset to set it to default and then follow the settings
25.
Image - Mirror - Mirror vertical ( Image - Flip in older versions of PSP)
26.
Effects- 3D- Effects- Drop Shadow with these settings: 8/8/75/55 Color Black
-Repeat in Negative
-8 /- 8
27.
Layers - Duplicate
28.
Effects – Image Effects- Offset with these settings: H = 0 and V =
-73
29.
Layers-Properties-Set the Blend Mode to " Hard Light" – Reduce the opacity of this layer to 71%
30.
Adjust- One Step Photo Fix
- Activate the layer underneath (Raster 3)
31.Adjust –Hue and Saturation – Vibrancy : 41%
- Activate the bottom of the layer palette ( Raster 1)
32.
Layers – Duplicate
33.
Layers- Arrange- Bring to Top
34.
Image - Resize 80 % - Resize all layers- Not Checked
35.
Effects - Plugins - Filters in Unlimited 2.0 - VM
Toolbox - Instant Tile... using the default settings
36.
Effects - Plugins - VM Toolbox - Seamless Tile...
using the default settings
37.
Effects – Edge Effects – Enhance
38.
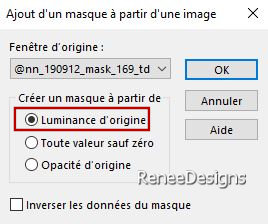
Layers- New Mask Layer- From Image and select Mask ’’@nn_190912_mask_169_tdstudio’’
-
Layers- Merge- Merge Group
39.
Effects- 3D- Effects- Drop Shadow with these settings: 2/2/100/25 Color Black
40.
Selections –load/save selection –load selection from disc and select my selection: ‘’ ALMHERAT-3’’

41.
Open the tube ‘’ALMHERAT-Image-1’’ -Edit - Copy- Activate your work -Edit - Paste as new layer
42.
Pick Tool: (K) on your keyboard -Enter these parameters on the toolbar
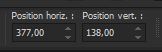 377/
138 377/
138
-
Press ( M ) to close the tool
43.
Layers-Properties-Set the Blend Mode to " Screen "
44.
Open the tube ‘’ALMHERAT-Image-2’’ -Edit - Copy- Activate your work -Edit - Paste as new layer
45.
Effects – Image Effects– Offset with these settings: H = 0 and V = 14
46.
Layers- New Raster Layer
47.
Selections –load/save selection –load selection from disc and select my selection: ‘’ ALMHERAT-4’’
48.
Properties Foreground-Set your Foreground color to color #ffffff=3
Flood Fill Tool –
Fill the selection with the Foreground color #ffffff=3
Do not add a new layer
49.
Selections –load/save selection –load selection from disc and select my selection: ‘’ ALMHERAT-5’’
50.
Properties Foreground-Set your Foreground color to color #cfdcc2=4
Flood Fill Tool –
Fill the selection with the Foreground color #cfdcc2=4
51.
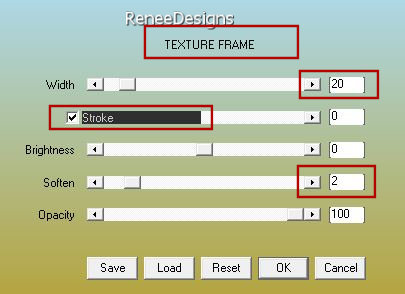
Effects – Plugins– AAA Frame –Texture Frame use the settings below
52.
Activate your Magic Wand – Click in the middle square
53.
Layers- New Raster Layer
54.Open de tube
‘’ALMHERAT-Image-3’’ -Edit - Copy- Activate your work -Edit - Paste into Selection
55. Activate the layer underneath (Raster 6) Layers-Properties-Set the Blend Mode to "Soft Light "
56.
Effects- 3D- Effects- Drop Shadow with the same settings
- Activate the top of the layer palette
57.
Layers- New Raster Layer
58.
Selections –load/save selection –load selection from disc and select my selection: ‘’ ALMHERAT-6’
59. Properties Foreground-Set your Foreground color to color #e7b107=5
Flood Fill Tool - Fill the selection with the Foreground color #e7b107=5
60.
Effects- 3D- Effects- Drop Shadow with these settings: 1/1/100/1 Color Black
(the font used to write this title is included in the file)
61.Open the tube ’’ALMHERAT-Image-3b’’ -Edit - Copy- Activate your work -Edit - Paste as new layer
Do not move, it is in the right place
62.
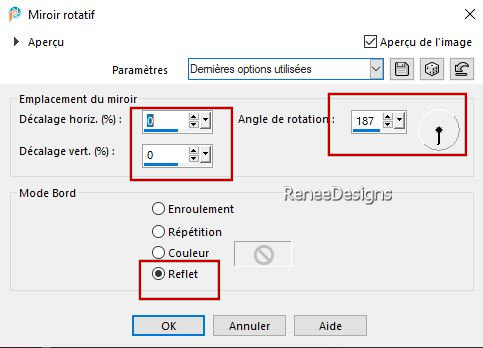
Effects- Reflection Effects- Rotating Mirror use the settings below
63.
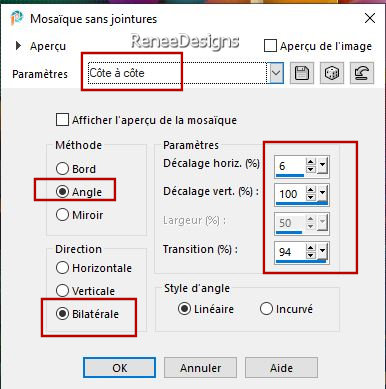
Effects- Image Effects- Seamless Tiling -Side by side
64.
Selections –load/save selection –load selection from disc and select my selection: ‘’ ALMHERAT-7’’
65. Open the tube
’’ALMHERAT-Image-4’’ - Edit - Copy- Activate your work -Edit - Paste as new layer
66.
Objects – Align - Right
67.
Image - Add Borders-Symmetric checked: 1 Pixel -Color #0665cf=1
-
Image - Add Borders-Symmetric checked: 10 Pixels -Color White
-
Image - Add Borders-Symmetric checked: 1 Pixel -Color #cf170c= 6
68.
Selections – Select All
69.
Image - Add Borders-Symmetric checked: 50 Pixels -Color White
70.
Effects- 3D- Effects- Drop Shadow with these settings: 0/0/50/50 Color Black
71.
Selections- Invert
72.
Effects – Plugins – AAA Frame –Texture Frame with the same settings
73.
Open the tube ‘’Renee-TUBES-ALMHERAT-Femme’’
-
Image - Resize 60%
-
Edit - Copy- Activate your work -Edit - Paste as new layer
-
Move to bottom right ( see finished image)
74.
Layers-Properties-Set the Blend Mode to "Normal " -Reduce the Opacity of this layer to 67%
75.
Paste the author's watermark on your work and your own watermark
76.
Layers- Merge- Merge All ( flatten)
77.
Image - Resize - to 89% - Resize all layers- Checked
Save as JPG
I hope you enjoyed this lesson
Renée
This lesson was written by Renée 07/01/2024
Edited and Update
in 2024
*
*
Any resemblance with an existing lesson is a coincidence
* Do not forget to thank the people who work with us and for us - I have appointed the tubeurs and translators
Thanks
|
 Translations