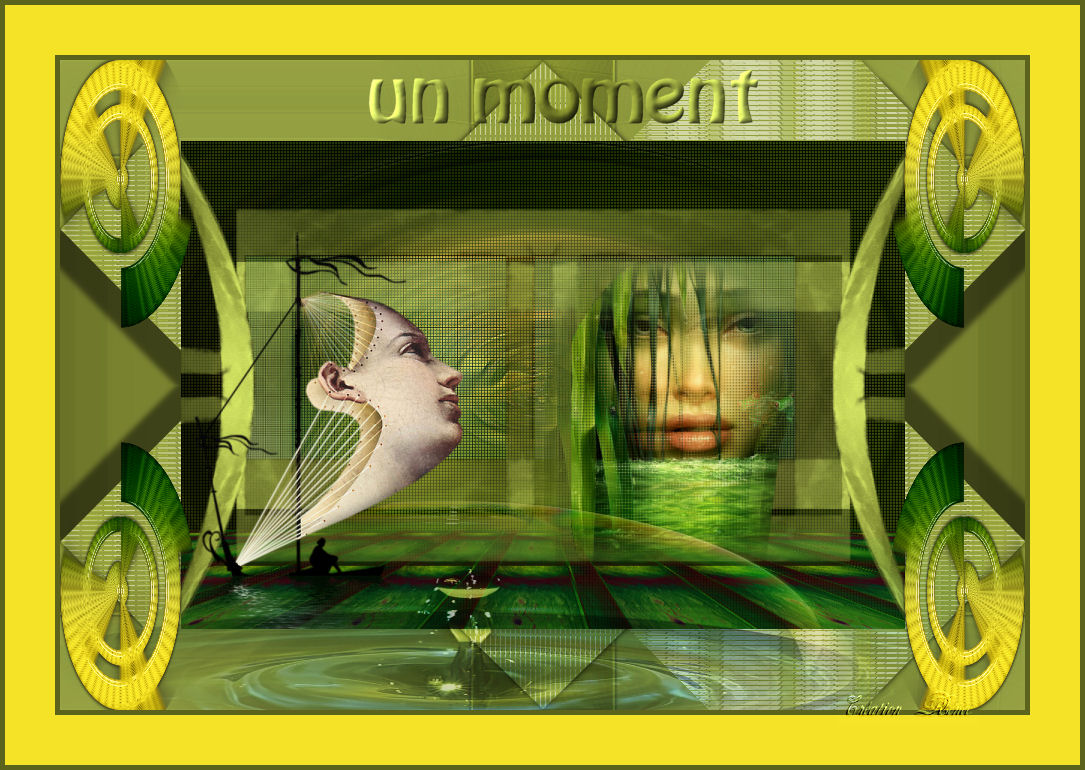
|
New
Un Moment Translations
Let's Start 1. File - New - Open a new transparent image 965 x 650 pixels 2. Color-palette:Set your foreground color to color #cfde64 -Set your background color to color #5b631c 3. Selections- Select All Open the image ''un_moment_fond1'' -Edit/ Copy-Edit - Paste into the selection 4. Selections- Deselect All 5. Adjust- Blur- Radial Blur use settings below
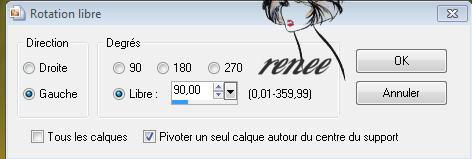
6. Effects- Edge Effects- Enhance More 7. Layers- Duplicate 8. Image- Free Rotate 90° to the left
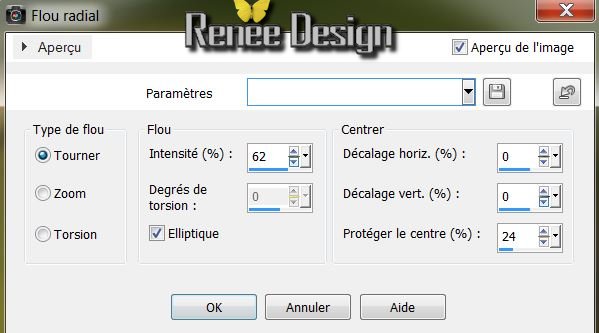
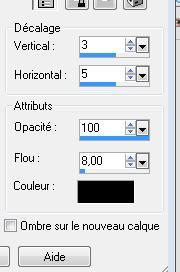
9. Effects- 3 D Effects- Drop Shadow with these settings
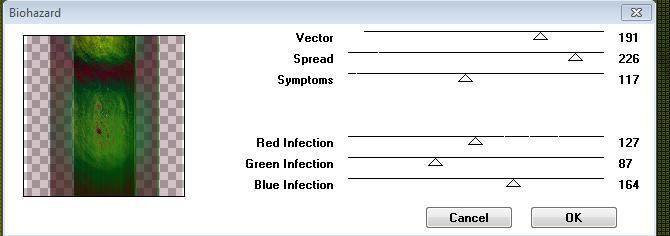
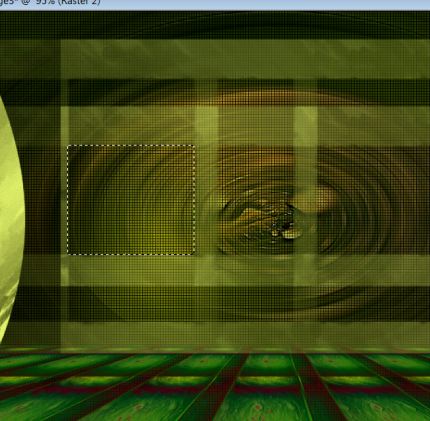
10. Effects- Plugins - Toadies /What are you 38/38 - Repeat: Toadies/What are you with the same settings - To replace the bottom of the layers palette= Raster 1 11. Effects- Plugins - Cybia /Screenwooks/Boxet dot- Transparency a 0 -To replace the top of the layers palette ( copy of raster 1) 12.Effects- Plugins - VM extravanga /Biohazard use settings below
13. Effects- User Defined Filter - Emboss 3- using the default settings 14. Effects- Plugins -Mura's meister /Perspective tilling use the settings below
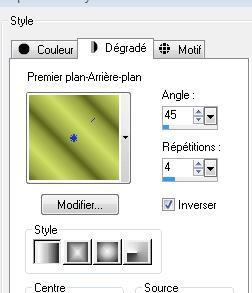
15. Layers- New Raster Layer 16. Selections –load/save selection –load selection from disc and choose my selection: ''@renee-chaquemoment'' 17. Properties Foreground: Set your Foregroundcolor to Foreground/Background Linear Gradient configured like this- --Activate Flood Fill Tool and fill the selections with the gradient
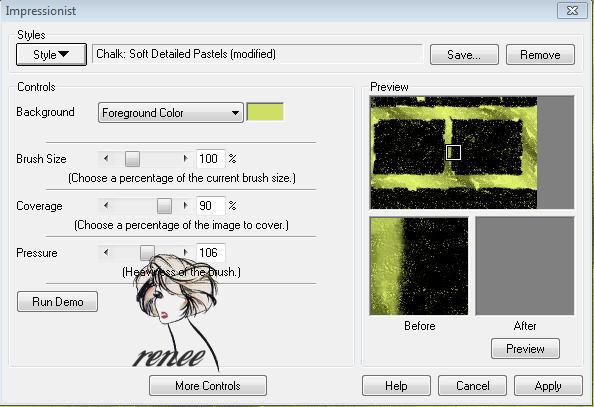
18. Effects- Plugins -Impressionist/click >styles>>Chalk <<Soft detailed Pastels use settings below
19. Selections- Deselect All 20. Image Resize 85 % resize all layers not checked 21. Layers- Duplicate /Image- Free Rotate 90° to the right 22. Effects- Geometric Effects- Circle- Transparent /and Repeat 1x !! 23. Effects- Image Effects- Offset with these settings : H= -550 and V= 0 24. Layers- Duplicate /Image Mirror 25. Layers- Merge- Merge Down - In the Layer- Palette- Make Raster 2 active
26. Effects- Plugins -Unlimited - Italian Editor - Fantasma 41- 41(Do you have problems with this filter - image is into the zipfile and paste as a new layer on your working area and move) 27.To replace the top of the layers palette (copy of raster 2 ) Layers- Merge- Merge- Down 28. With your Magic Wand select the left frame as shown in the example below
29. Layers- New Raster Layer --Open the image « fond4 » Edit/ Copy-Edit - Paste into the selection -Double click on this Layer and set the Blend Mode to "Screen " 30. Selections- Deselect All * Repeat : With your Magic Wand select the right frame /Layers- New Raster Layer /Open the image " fond4 "Edit/ Copy-Edit - Paste into the selection -Double click on this Layer and set the Blend Mode to "Screen "/Selections- Deselect All 31. Open the tube « Betsie 792-03-09-2011 » –Edit/ Copy-Edit - Paste as new layer on your working image and move 32. Effects- Plugins - Flaming Pear - Flood -Glue -Normal The setting of the filter depends on where the tube is placed
33. Layers- New Raster Layer 34. Selections –load/save selection –load selection from disc and choose my selection: ''@renee-chaquemoment2'' 35. Open the tube « ginatubes femme1304 « Edit/ Copy-Edit - Paste into the selection 36. Selections- Deselect All 37. Effects- Plugins L and K's /katharina 2/0 - Layer Palette look like this now
38. Layer palette – Make Raster 2 active 39. Effects- Plugins - &<BKG Designer sf10III -Sim 4way Average.ffx .** attention to import in unlimited ** 40. Layers- Merge- Merge Visible 41. Layers- New Raster Layer Set your foreground to gradient 'Foreground-background' - Sunburst - 0 - Invert not checked. 42. Selections- Select All--Open the tube « element-1-athe-gallery « Edit/ Copy-Edit - Paste into the selection 43. Selections- Deselect All 44. Effects- Plugins - Simple /Blintz -Stay on this layer 45. Selections –load/save selection –load selection from disc and choose my selection: ''@renee-chaquemoment3 '' 46. Effects- Plugins - Backgroundmania / Native illusions use settings below
47. Effects- 3 D Effects- Drop Shadow with these settings
- Repeat: Effects- 3 D Effects- Drop Shadow with these settings -20/-20 48. Selections- Deselect All 49. Effects- Plugins -Simple - Pizza slice mirror 50. Layers- Arrange- Move Down - Back to the Merged Layer 51. Image Resize 75% resize all layers not checked 52. Open the tube « formesrenee » Edit/ Copy-Edit - Paste as new layer on your working image and move to the bottom left 53. Layers- Duplicate /Image Flip 54. Layers- Merge- Merge Down 55. Layers- Duplicate /Image Mirror 56. Open the tube "texte " Edit/ Copy-Edit - Paste as new layer on your working image and move 57. Back to the Merged Layer 58. Layers- New Raster Layer 59. Selections –load/save selection –load selection from disc and choose my selection: "@renee-chaquemoment4'' 60. Open the tube « zeepbellen » Edit/ Copy-Edit - Paste into the selection 61. Selections- Deselect All/Double click and set the Blend Mode to "Hard Light " -Set the layer opacity of this layer to 63% /slightly downward and slightly to the left 62. Layers- Merge- Merge Visible 63. Image - Add borders-Symmetric checked:5 pixels color #5c631d 64. Image - Add borders-Symmetric checked:50 pixels color #f4e327 65. Image - Add borders-Symmetric checked:5 pixels color #5c631d Save as JPEG
I am part of the Tutorial Writers Inc. My tutorials are registered regularly ReneeGraphisme_All rights reserved
|
 Translations