|
New
Translations here
Time of Africa Traducteur
*
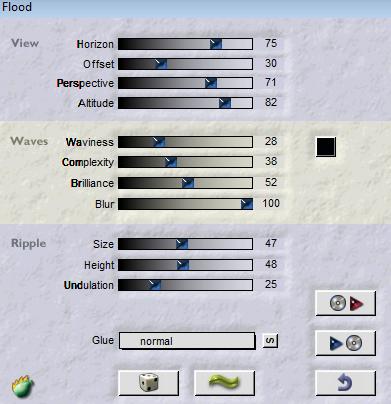
Let's start the lesson. 1. Open the image ''fond1" Window - Duplicate (or shift+D) - Close the original and proceed on the copy 2.Selections-Select All 3. Layers-New raster layer /Open the '' image 1 '' Edit/copy- Edit/ paste into selection 4. Selections-Deselect All 5. Effects - 3D-Effects-Drop shadow with these settings 6/ -5 /50 /12 black 6. Double click on this layer and set the Blendmode to Multiply 7. Layers-Merge-Merge- Visible 8. Effects-Plugins - Flaming pear /flood with these settings
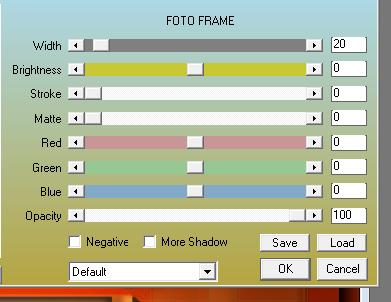
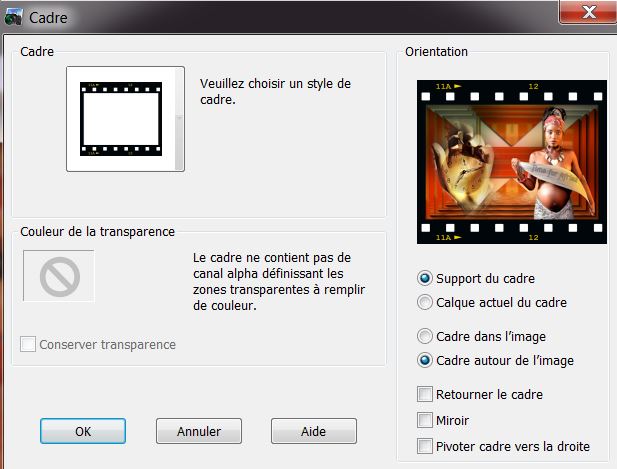
9. Effects-Plugins- AAA Frame - Foto Frame with settings below
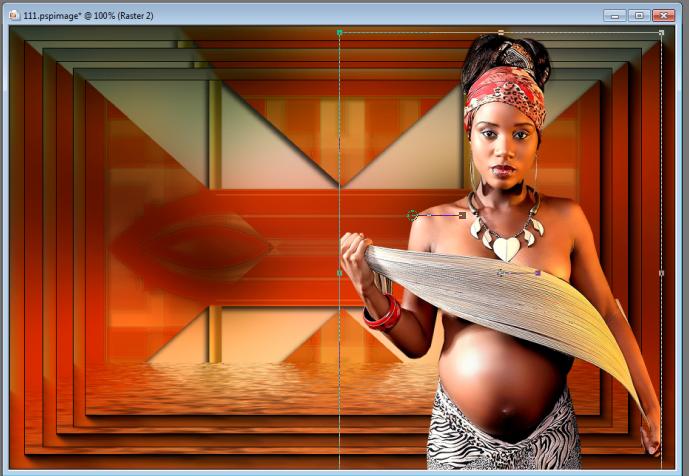
10. Layers- Duplicate-Image resize with 90 % resize all layers not checked 11.Layers- Duplicate-Image resize with 90 % resize all layers not checked 12. Open the tube ''calguisbelle-559'' Image resize with 75% /Edit/copy- Edit/ paste as new layer on your working image - With your move tool: move to the bottom right side as shown in the example below
13. Color-palette:Set your foreground color to #000000 and close the background 14. Activate your Text Tool -Font Agathe Type ''Time for Africa''/ -Activate your Pick Tool (K) Mode Scale place it in the right place
15. Effects - 3D-Effects-Drop shadow with these settings
16. Open the tube ''Cid-11855'' Edit/copy- Edit/ paste as new layer on your working image -With your move tool:move to the left 17. Layers- Merge- Merge- Visible 18.
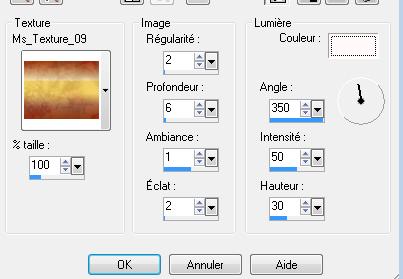
Window - Duplicate (or shift+D) - *Activate your original image 19. Layers- New raster layer 20. Selections –load/save selection –load selection from disc and choose: ''renee-time-for -africa'' 21. Color-palette:Set your foreground color to #cc6c27 22. Prepare a fading foreground gradient-linear -Angle 0 - Repeats 0 - Invert not checked. 23. Activate Flood Fill Tool and fill the selections with the gradient/-Set the layer opacity of this layer to 61% 24. Effects-Texture Effects-Texture and select: ''Ms_Texture_09 with these settings
25. Effects-Plugins - EyeCandy5 - Impact /perspective shadow -tab- Settings/User settings choose my preset: ''renee-time-for-africa'' Adjust-Sharpen-High Pass Sharpen-using the default settings 26. Layers-Merge- Merge-All 27. Activate the Pick Tool/Deformation tool (K) Mode Scale- Pull the node down to 100 pixels and the bottom node up to 500 px as shown in the example below
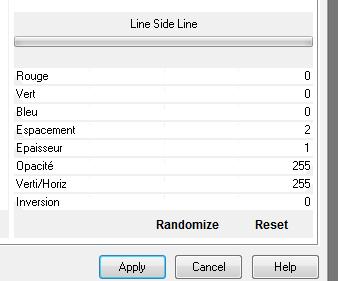
28. Layers- New raster layer -Set your foreground color to #c86c27 29. Flood Fill Tool: fill the layer with the foreground color #c86c27 30. Layers- Arrange- Move Down 31. Effects-Plugins -Unlimited 2.0 &<BkgDesignersf10 II>/line side line
32. Activate your minimized image /Image-Resize with 30% 33. Image -Picture Frame and select:cadre pellicule with these settings
34. Layers-Merge- Merge- Visible 35. Image Resize with 70% -Edit-Copy-Edit Paste as a new layer on your working image /-Set the layer opacity of this layer to 75% / Rename this layer: '' création mini'' 36. Open the tube ''renee-pellicule-time-for-africa ''Edit-Copy-Edit Paste as a new layer on your working image and move to the bottom/Double click on this layer and set the Blendmode to Multiply 37. With your magic wand / select the first frame of the film 38. Layers- New raster layer- Activate the little image ''création mini'' -Edit-copy-Edit paste into selection 39. With your magic wand / select the second film frame Activate the little image ''création mini'' -Edit-copy-Edit paste into selection>see finished image 40. Then select the others frames of the film frame - Always add a new layer -Continue this process for the following images (See FINISHED image)
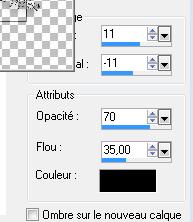
41. Image - Add borders-Symmetric checked: 2 pixels black 42. Image - Add borders-Symmetric checked: 60 pixels #fffddc 43. Choose a dingbat from the “African Design” font included with tutorial materials. Place one in each of the 4 corners of your picture frame. See finished image. 44. Apply drop shadow to each dingbat with settings as before (11, –11, 70, 35, black) 45. Image - Add borders-Symmetric checked: 2 pixels black Save as JPG
I am part of Tutorial Writers Inc. My tutorials are regularly recordedt ReneeGraphisme_All rights reserved
*
|

 Translations