|
New
Translations here
TECHNOLOGIE
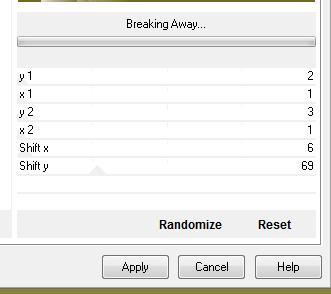
Let's start the lesson. 1. Color-palette:Set your foreground color to color #a19f78 Set your background color to color #FFFFFF 2. File-Open a new transparent image of 900 x650 pixels 3. Selections- Select All 4. Open the tube «background" Edit-Copy-Edit Paste into selections 5. Selections- Deselect All 6. Layers- New Raster Layer -Set your foreground to gradient 'Foreground-background' -Linear - Angle Angle =0 and Repeats 1/ Invert not checked -Activate Flood Fill Tool and fill the layer with the gradient 7. Effects- Plugins -Unlimited 2.0/ Andrews filters 1 /Breaking away
- Double click on this Layer and set the Blend Mode to "Multiply "-Set the layer opacity of this layer to 35% 8. Effects- Edge Effects- Enhance 9. Layers- Merge - Merge Visible 10. Layers- Duplicate 11. Effects-Plugins -Unlimited2.0 / Graphics plus /Horizontale Mirror/using the default settings= 128/0 12. Effects- Plugins--Graphics plus /Cut Glass
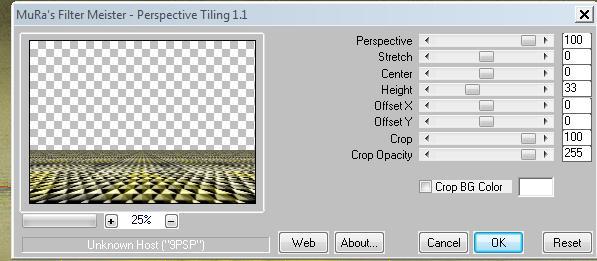
13. Effects- Plugins - Mura's Meister /Perspective tiling 1.1 comme ceci
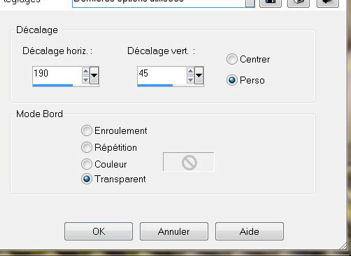
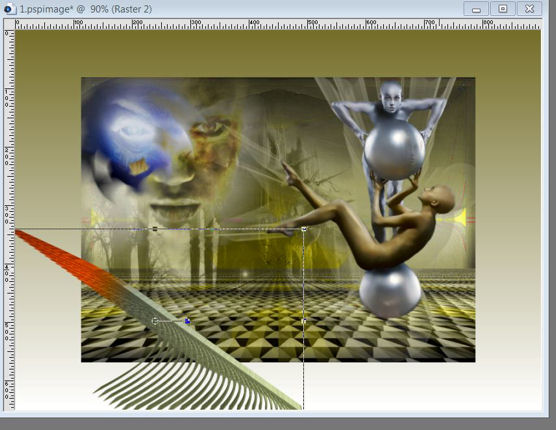
* Stay on the top layer 14. Open the tube « 602-luzcristina ''-Edit/ Copy-Edit - Paste as new layer on your working image /Image Mirror - Effects-Image Effects- Offset with these settings
15. Layers-Duplicate 16. Effects- Plugins - Eyecandy5 Impact - Blacklight-tab Settings/User settings choose my Preset" reneebicolors1" - To replace the top of the layers palette 17. Double click on this Layer and set the Blend Mode to "Luminance" 18. Open the tube "sanctuary ''-Edit/ Copy-Edit - Paste as new layer on your working image and move as shown in the example below- You should have this result
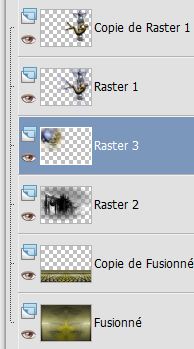
* On this Layer =Raster 2 -Double click on this Layer and set the Blend Mode to "Luminance "-Set the layer opacity of this layer to 57% 19. Open the tube "masque "-Edit/ Copy-Edit - Paste as new layer on your working image and move 20. Layers- Arrange- Move -Down- Layer Palette look like this now
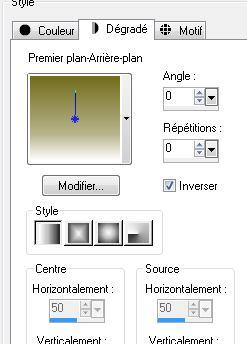
21. Layers- Merge- Merge Visible 22. Image -Resize to 75% resize all layers not checked 23. Layers- New Raster Layer 24. Layers- Arrange- Move Down 25. -Properties foreground: Change foreground material -put the foregroundcolor to: #746d29- put the background color to #ffffff 26. Set your foreground to gradient 'Foreground-background' -Linear -configured like this.
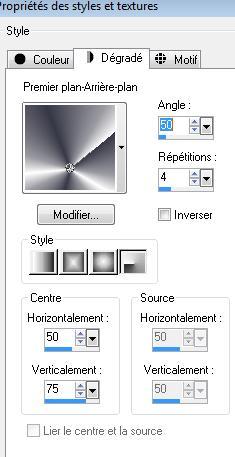
27. Layers- New Raster Layer- Layers- Arrange- Bring to Top 28. Open the tube « aileron « Edit/ Copy-Edit - Paste as new layer on your working image and move as shown in the example below - 29. Layers- Duplicate / Image Mirror 30. Layers- Merge- Merge Down 31. Effects- 3 D Effects- Drop Shadow with these settings 5/2/100/3 black 32. Layers- New raster Layer 33. Selections –load/save selection –load selection from disc and choose my selection:''@renee-techno1'' 34. -Properties foreground: Change foreground material -put the foregroundcolor to #000000 and put the background color to #ffffff - Put your foreground /background on the radial gradient with settings below -Flood Fill Tool-Fill the selection with the gradient
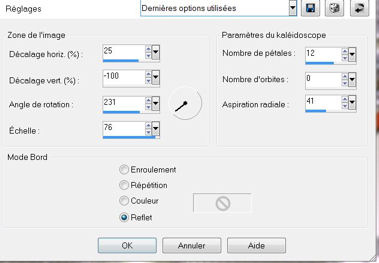
35. Effects- Reflection Effects- Kaleidoscope with these settings
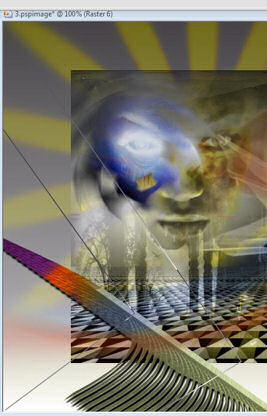
36. Selections -Invert -Hit 10 x the Delete Key of your Keyboard - Double click on this Layer and set the Blend Mode to " Color " 37. Selections- Deselect All 38. Open the tube « arc lunaire «- Edit/ Copy-Edit - Paste as new layer on your working image and move-Double click on this Layer and set the Blend Mode to "Color -Legacy " 39. Layers-Duplicate 40. Adjust- Hue and Saturation -Colorize 12/235 - Blend Mode"Normal" 41. Effects- Distortion Effects- Twirl - 150 -Double click on this Layer and set the Blend Mode to "Normal "-Set the layer opacity of this layer to 46% 42. Layers- New Raster Layer 43. Activate Pen Tool use settings below /Size 2 pixels
44. Open your Pen Tool and Draw lines as shown in the example below -Then convert to raster layer
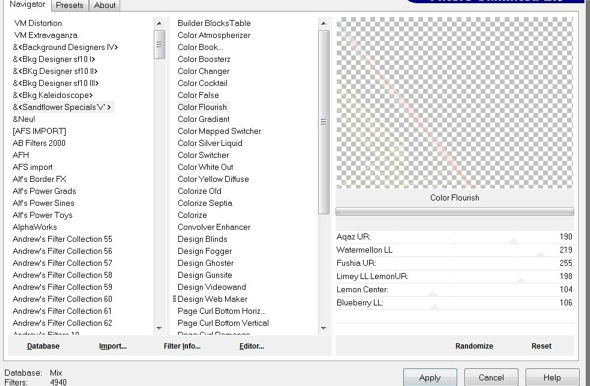
45. Effects- Plugins -Eye Candy5 Impact/blacklight -tab Settings/User settings choose my Preset ''@renee-techno2'' - Double click on this Layer and set the Blend Mode to "Normal "-Set the layer opacity of this layer to 75% 46. Layers- Duplicate 47. Effects- Plugins-Unlimited 2.0/ £<Sandflower Special V >/colour flourish give a color that fits with your tube.
48. Effects- Image Effects- Offset with these settings- H = -150 and V = 0 49. Double click on this Layer and set the Blend Mode to "Overlay "-Set the layer opacity of this layer to 61% 50. Open the tube « cadre/frame « Edit/ Copy-Edit - Paste as new layer on your working image and move on top right side 51. Layers- Duplicate twice and put it on the top right side( 3 little frames) 52. Frame: Activate the Magic Wand with these settings and select the inside of the Frame **
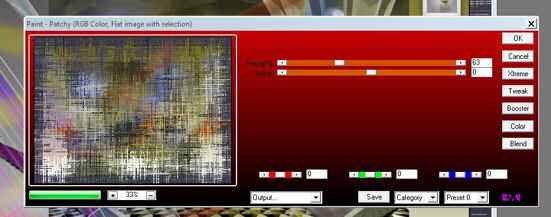
-And paste into selection - the 3 tubes folder See finished image 53.Open the tube "texte "Edit/ Copy-Edit - Paste as new layer on your working image and move 54. Image - Add borders-Symmetric checked: 2 pixels: black 55.Image - Add borders-Symmetric checked:40 pixels #36384d 56. Activate the Magic Wand and select the border of 40 pixels 57. Effects- Plugins - AP GX14 /Paint- Patchy with the following settings( Included into the zipfile)
58. Adjust- Sharpness-High Pass Sharpen -Radius 5 and Strength 50-Blend Mode Hard Light 59 Effects- User Defined Filter - Emboss 3 using the default settings 60.Image - Add borders-Symmetric checked:30 pixels #ffffff Save as JPEG
I am part of the Tutorial Writers Inc. My tutorials are registered regularly ReneeGraphisme_All rights reserved
*
|
 Translations