|
New
Translations here
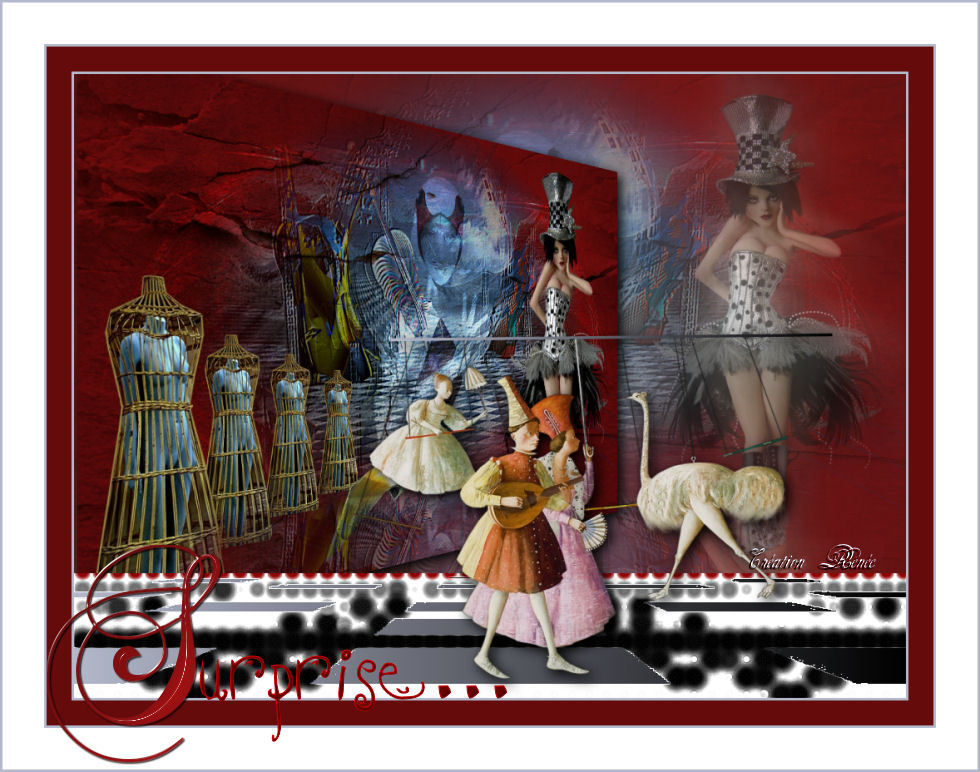
SURPRISE AVEC SUEUR FROIDE
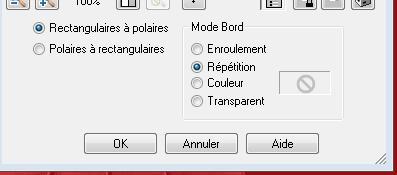
Let's start the lesson. 1. File-Open a new transparent image of1000 x 600 pixels 2. Color-palette:Set your foreground color to color #df4545 -Set your background color to color #961010 -Activate Flood Fill Tool and fill the layer with the background color #961010 3. Open the tube ''effet special'' -Edit/ Copy-Edit - Paste as new layer on your working image and do not move 4. Effects- Distortions Effects-Polar Coordinates-Rectangular to Polar
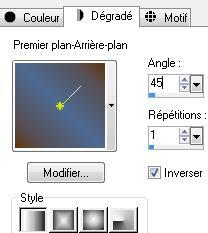
5. Image Flip 6. Open the tube "fantasia 11 " Edit/ Copy-Edit - Paste as new layer on your working image 7. Effects-Image Effects- Offset with these settings H=5 and V =20 8. Layers- Duplicate 9. Layers- Merge- Merge Layers Down 10. Effects- User Defined Filter - / Emboss 3 using the default settings 11. Selections- Select All 12. Layers- New Raster Layer 13. Open the tube « 18.jpg » Edit/ Copy-Edit - Paste into selection 14. Selections- Deselect All -Double click on this Layer and set the Blend Mode to " Multiply" 15. Layers- New Raster Layer 16. Properties foreground:-Set your foreground color to: #4e6a92 -Properties background:-Set your background color to:#60340f -Set your foreground to gradient 'Foreground-background' -Linear -configured like this.
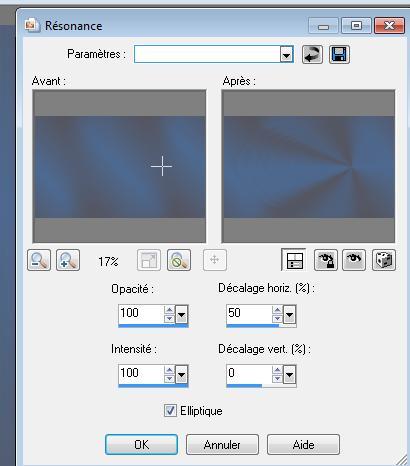
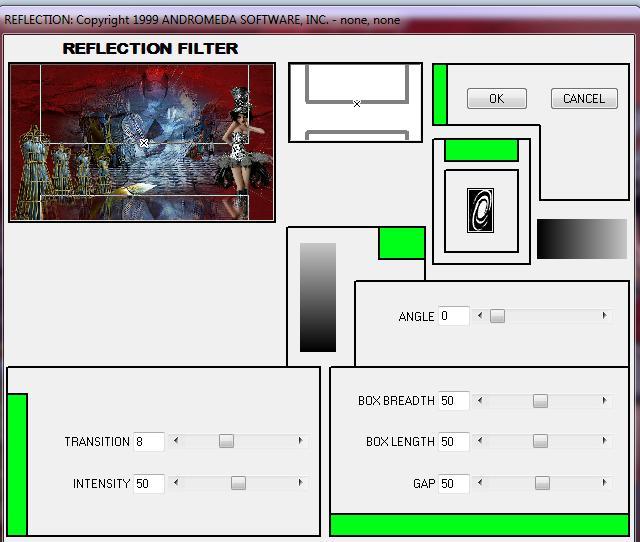
-Flood Fill Tool-Fill the layer with the gradient 17. Effeccts- Image Effects- Seamless Tiling using the default settings 18. Effects- Reflextion Effects- Feedback use settings below
19. Effects- User Defined Filter - Emboss 3 using the default settings / and repeat Emboss 3 20. Layers- Duplicate -Image Flip -Double click on this Layer and set the Blend Mode to "Hard Light " /Layers- Merge- Merge Down On this layer !
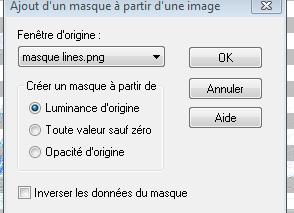
21.Open the Mask- Layers- New Mask layer from Image and choose Mask: « masque lines.png »
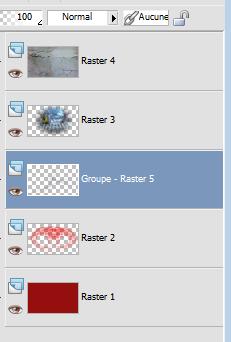
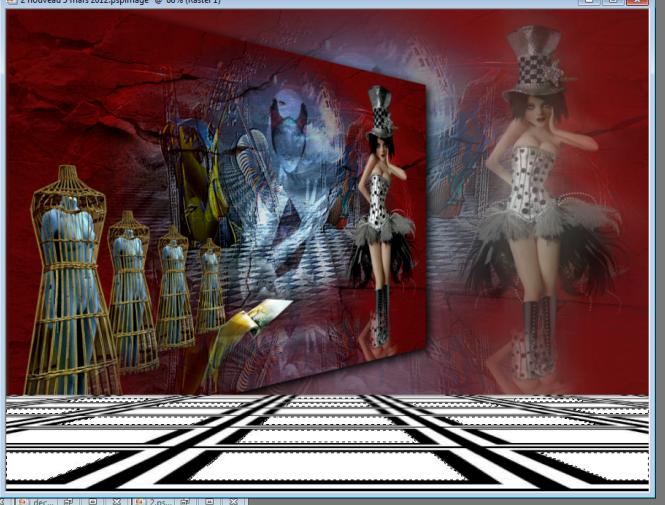
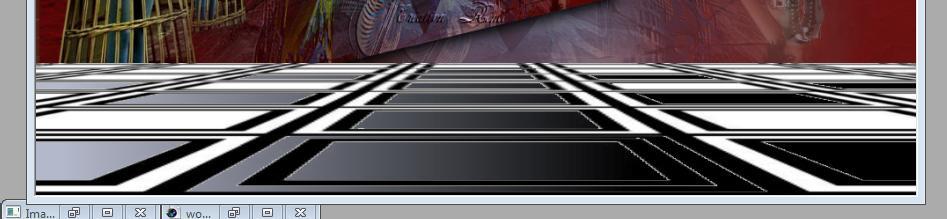
Layers- Merge- Merge Group this mask will just give little lines 22. Layers- Arrange- Move Down - underneath =raster 3 / - You should have this result as shown in the print screen below
23. Activate the top layer of the layer palette 24. Open the tube " woman 371 By Hebe " Image Resize to 55% /- Edit/ Copy-Edit - Paste as new layer on your working image 25. Effects-Image Effects- Offset with these settings H= 325 and V = 0 transparent 26. Open the tube ''GinaTubes divers 108'' -Edit/ Copy-Edit - Paste as new layer on your working image 27. Effects-Image Effects- Offset with these settings H= -218 and V = -118 28. Open the tube" lexHa-jun Februari 2011" / Edit/ Copy-Edit - Paste as new layer on your working image and move Double click on this Layer and set the Blend Mode to "Overlay "-Set the layer opacity of this layer to 67% -Activate the bottom of the layer palette 29. Layers- Duplicate .Close bottom layer but keep top layer active Layers- Merge- Merge- Layers Visible -Activate the merged layer 30. Effects- Plugins-Andromeda /réflexion with these settings
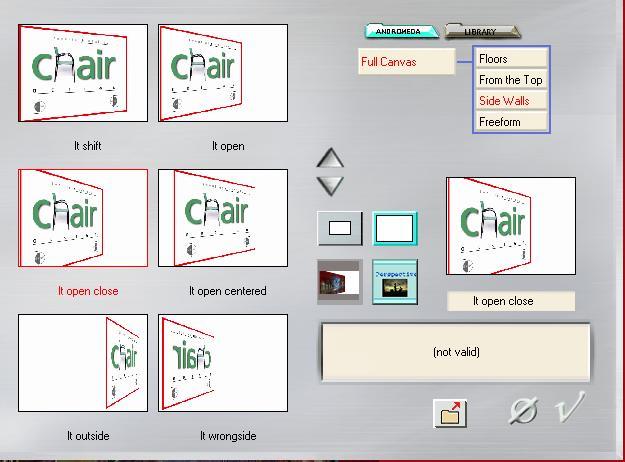
31. Edit-Copy!! 32. Effects- Plugins - Andromeda perspective /Side walls / It open close
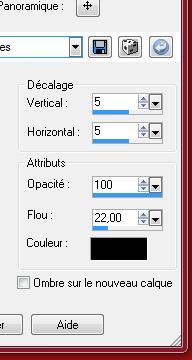
33. Effects- 3 D Effects- Drop Shadow use settings below
34. Open the bottom layer =raster 1 -On this layer !! 35. Layers- New Raster Layer 36.Selections- Select All -Edit - Paste into selection 37.Selections- Deselect All 38. Effects- Plugins -Andromeda /Scaterlight attention SELECT a
PRESET>>>>click on the arrow and select >>>>>> FUNLENS >>liquefer2
39. Activate the bottom layer of the layer palette= raster 1 40.Image- Canvas Size 1000 x 750>>>150 on the bottom 41. Color-palette:Set your foreground color to color #b3b8ca- Set your background color to color black -Set your foreground to gradient 'Foreground-background' -Linear - Angle Angle =90 and Repeats 0/ Invert not checked 42. Layers- New Raster Layer Layers- Arrange- Sent to Bottom- -Activate Flood Fill Tool and fill the layer with the gradient 43. Activate the bottom of the layer palette= raster 1- Activate the Magic Wand and select the transparent part -Stay on this layer Open the tube '' mosaic cameron'' Edit/ Copy-Edit - Paste into selection 44. Selections- Deselect All 45. Activate the Magic Wand and select the white part as shown in the example below
46. Effects- Plugins -Transparency /eliminate white - The Result
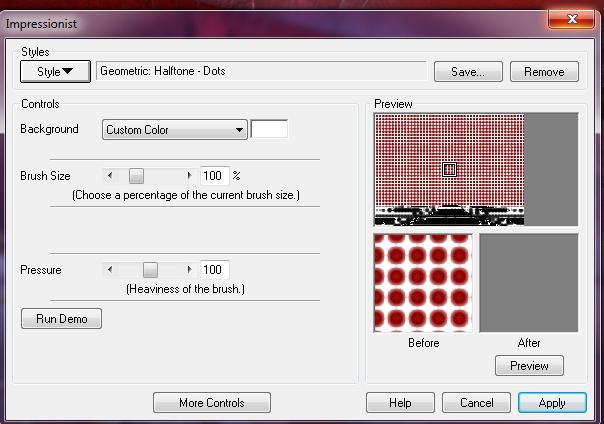
47. Selections- Promote selection to Layer -Selections- Deselect All 48. Effects- Plugins -Impressionniste use settings below -Styles-select Geometric: Halftone -Dots (This filter can result in a slightly different effect !)
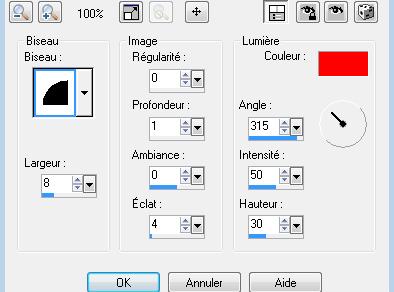
49. Effects-Edge Effects- Enhance More -Activate the top of the layer palette 50. Open the tube'' JHanna 453'' / Image Resize to 75% Edit/ Copy-Edit - Paste as new layer on your working image and move 51.Activate Pen Tool -Size 3 -draw one horizontal line for connecting the vertical lines of the tube see finished image -Then convert to raster layer 52. Effects- 3 D Effects- Drop Shadow with these settings: 5/5/100/22 black 53. Layers- Merge- Merge Layers Visible 54. Image - Add borders-Symmetric checked:3 pixels #b3b8ca 55. Image - Add borders-Symmetric checked: 30 pixels #650b0b 56. Image - Add borders-Symmetric checked: 3 pixels #b3b8ca 57. Image - Add borders-Symmetric checked:50 pixels #ffffff 58. Image - Add borders-Symmetric checked: 3 pixels #b3b8ca 59. Image Resize to 980 pixels width -Here I give you the "S " and paste as a new layer- Text Tool- Font "Crystal ball " ( Included into the zipfile) and write " urprise " Ore write your own text . Effects- 3 D Effects-Inner Bevel use settings below
Save as JPEG
I am part of the Tutorial Writers Inc. My tutorials are registered regularly ReneeGraphisme_All rights reserved
*
|
 Translations


.png)