|
Let's start the lesson.
- Material Properties: Foreground color to color white Background color to color: #c8091f
1. Open Image
''fond''/ Promote Background layer=raster 1
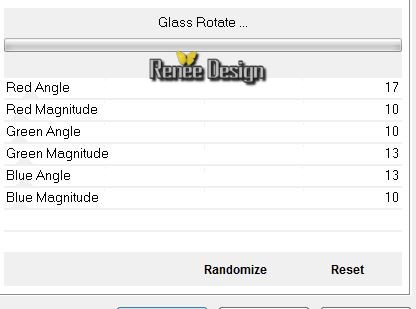
2. Effects- Plugins Unlimited 2.0-
Andrews Filters7- Glass Rotate
3. Effects-Edge effects-Enhance more
4. Layers-Duplicate
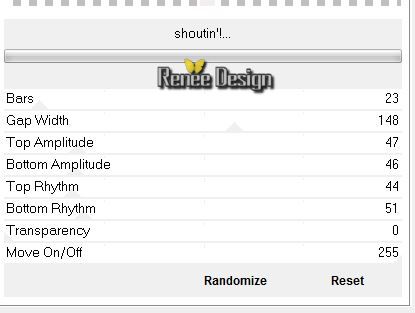
5. Effects-Plugins - VM Extravanga -Shoutin!
6. Effects - 3D Effects - Drop shadow default settings
7. Effects- Plugins Unlimited 2.0 -
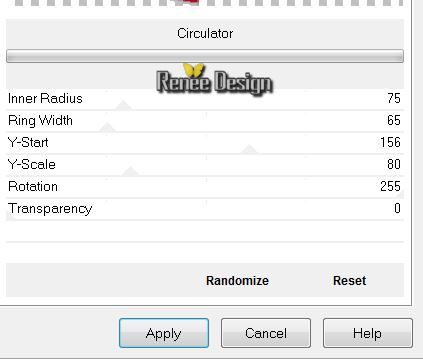
Factory Gallery B - Circulator

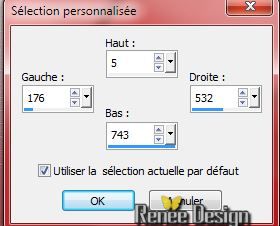
8. Selection Tool ( S ) Custom selection use settings below
9.
Selections-Promote selection to layer
Selections-Deselect All
10. Effects-Plugins - Nick Color Effex Pro3.0/Color set - Moss

11.
Layers- New raster layer /Activate Flood Fill Tool: fill the layer with color white
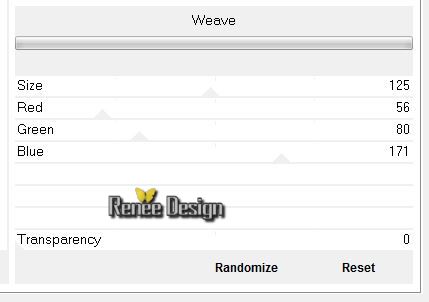
12. Effects- Plugins Unlimited 2.0
- Factory gallery A - Weave
13.
Effects- Plugins Unlimited 2.0- Funhouse - Reverb /default
14. Effects- Plugins Unlimited 2.0
-Factory gallery B - Circulator
15.
Layers- Arrange-Move down
16.
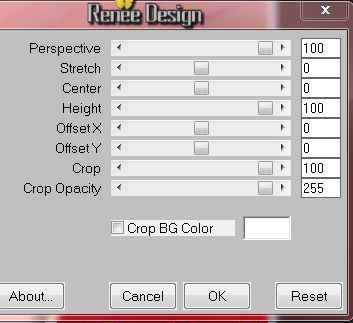
Effects-Plugins - Mura's Meister - Perpective
tilling use settings below
17.Activate Deform tool: select my preset in the list:
 Preset ''had_a_dream" Preset ''had_a_dream"
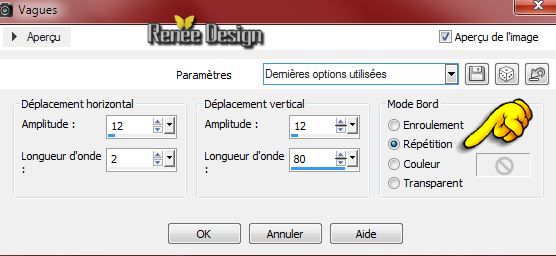
Click on the move tool ( letter M) to get rid of the Deform tool
18.
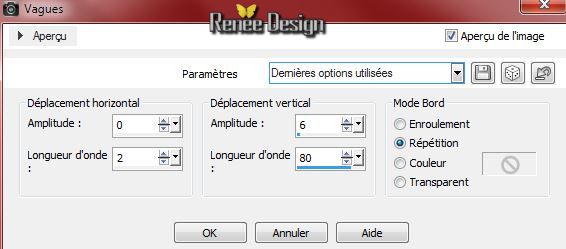
Effects- Distortion effects-Wave use settings below
-
Activate the top of the layer-Palette (Promoted selection)
-
You are there in your work
19. Effects-Plugins Unlimited 2.0
- Factory gallery B- Seismic Twirl

-
Layer Palette -Double click on this Layer and set the Blend Mode to "Soft Light " and lower the opacity down to:
48%
20.
Activate the tube '' had_dream_damier.pspimage''/Edit - Copy -Edit - Paste as new layer on your working area and move
21. Effects-Plugins - EyeCandy5 Impact /Extrude tab-User-User Settings click on the preset ''hav_dream_extrude''
- The result
22.
Activate the tube'' ar24.pspimage''/activate the layer(tube transformé) /Edit - Copy -Edit - Paste as new layer on your working area
23.
Effects-Image effects-Offset use settings below
24.
Adjust-Sharpness- Sharpen more
25.
Layers- Duplicate- Image Mirror
26. Effects- Plugins Unlimited -ICNET
Filters -Pattern generators/Sine Pattern(seamless)
-
-Layer Palette -Double click on this Layer and set the Blend Mode to "Color-Legacy " and lower the opacity down to 79%
27.Layers- Duplicate- Image Flip-
-
Layers- Merge-Merge Down - Replace opacity down to 79% .Blend Mode to "Color-Legacy "
28.
Activate the tube '' nicole-femme9-2012.pspimage''/Edit - Copy -Edit - Paste as new layer on your working area and move
29.Effects - 3D Effects - Drop shadow use settings below
30.
Activate the tube '' anna.br_freedom_27-08-09.psp''/
Edit copy the selected part/-Edit - Paste as new layer on your working area and place
31.Activate the tube'' had_dream_barres''/Edit - Copy -Edit - Paste as new layer on your working area
32.
Effects-Image effects-Offset use settings below

33.
Effects- Distortion effects-Wave use settings below
34.
Layers- Arrange-Move down
- (Look if the tube with the birdcage is good placed)
-. Activate the top of the layer-Palette
35.
Layers- New raster layer
-
Activate Selection Tool (S) Circle (S) draw a small circle/Activate Flood fill tool and fill the selection with color: #b71525
36. Effects-Plugins -EyeCandy 5 Impact -Glass / Preset ''Clear ''
-Selections-Deselect All
Well-placed in the ring of the cage/see finished drawing
-
Layers- Merge-Merge Down
37.
Activate the tube'' have_dream_parapluie_rouge''/Image
Resize 65% / Edit/copy-Edit paste as a new layer . With your move tool move to the right side
38. Effects-Plugins -Faming Pear - Flood use settings below
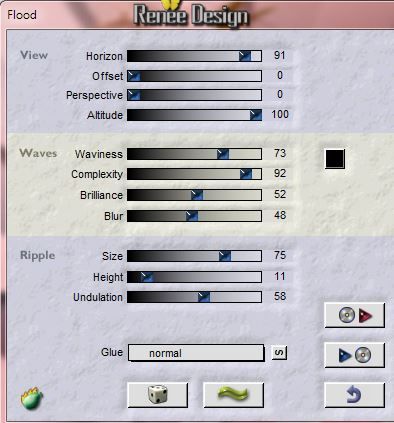
-Attention: Setting Horizon depends on where the tube is
39.
Activate the tube'' had_dream_bouche''/Image
Resize 65 % /Edit/copy-Edit paste as a new layer . With your move tool move to the left. Set the Blend Mode to "Normal"
40.
Activate the tube''had_dream_cages" - activated one after the other these 2
tubes. Edit/copy-Edit paste as a new layer place .With your move tool move to the right side
41.
Layers- Merge-Merge Visible
42.
Image - add borders-Symmetric checked :1 pixel Color black
43.
Image - add borders-Symmetric checked :60 pixels Color white
44.
Activate the calque bordure / Editer Edit - Copy -Edit - Paste as new layer on your working area
-
Material of the Background:background color to color white
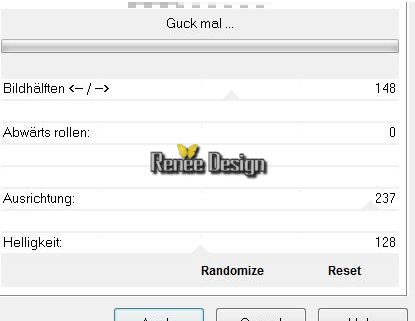
45. Effects- Plugins Unlimited 2.0 -
Kiwi's Oelfilter- Guck mal
46.
Note: close for a moment the layer underneath you will see it better.
Activate the top layer:Activate Selection Tool (S) Rectangel (S) /
Select 2 pieces of white borders /Hit the delete key of your keyboard/(Open the bottom layer)
47.
Activate the tube ''had_dream_goutte_eau''/ Edit - Copy -Edit - Paste as new layer on your working area
-
Layers-Duplicate -Image Resize 75% (Resize all the layers not checked)/ With your move tool move to the left
48.
With the police ''Vivaldi'' write your own text ore take mine
49.
Image - add borders-Symmetric checked :1 pixels Color black
50.
Image - add borders-Symmetric checked :30 pixels Color white
51.Image Resize 1015 pixels Width
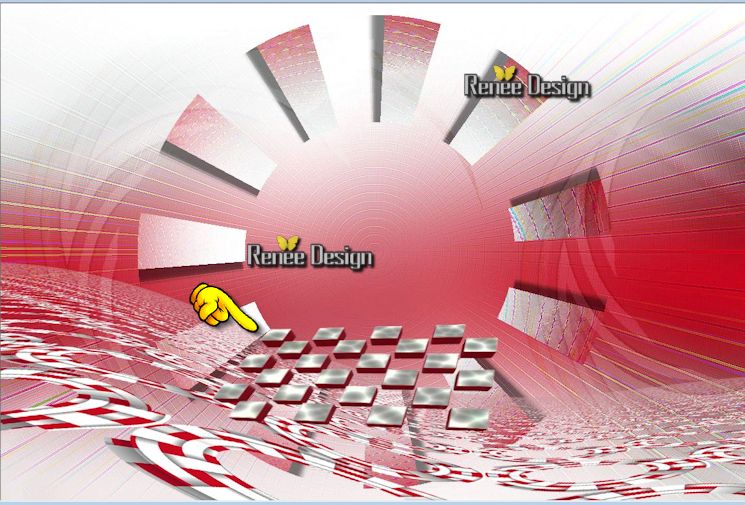
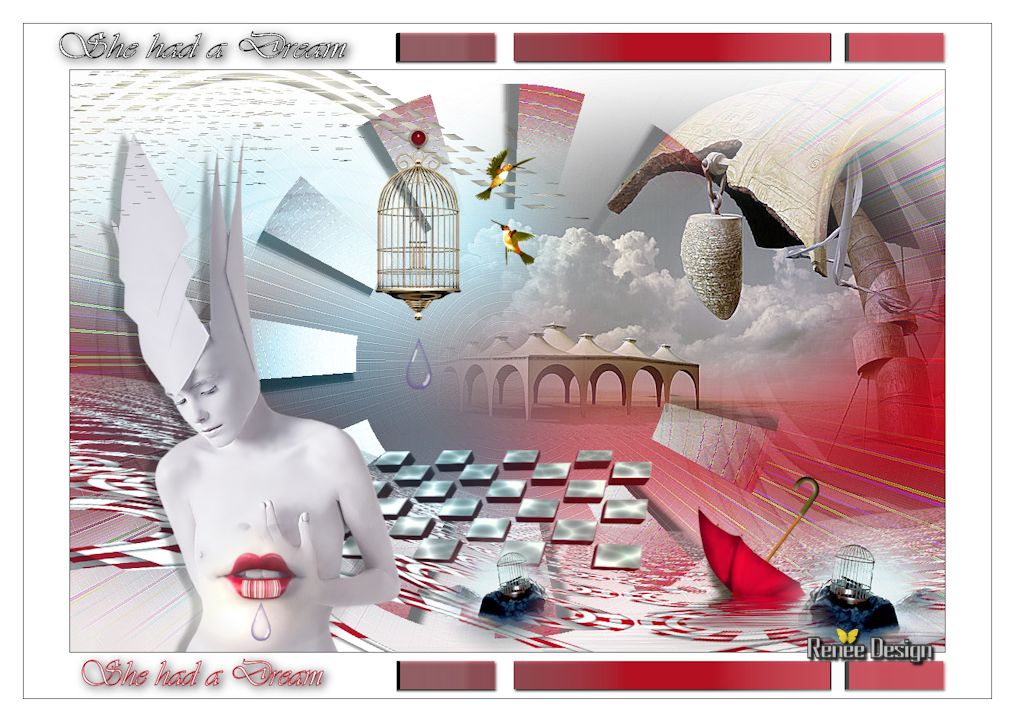
I hope you enjoyed this lesson
Renée
This lesson was written by Renée 21/07/2014
Created the
le 08/2014
*
Any resemblance with an existing lesson is merely a coincidence *
* Don't forget to thank the people who work for us and with us. I named the tubeurs - Testers and the translators.
Thanks Renée. |
 Translations


 All rights reserved