|
New
Translations here
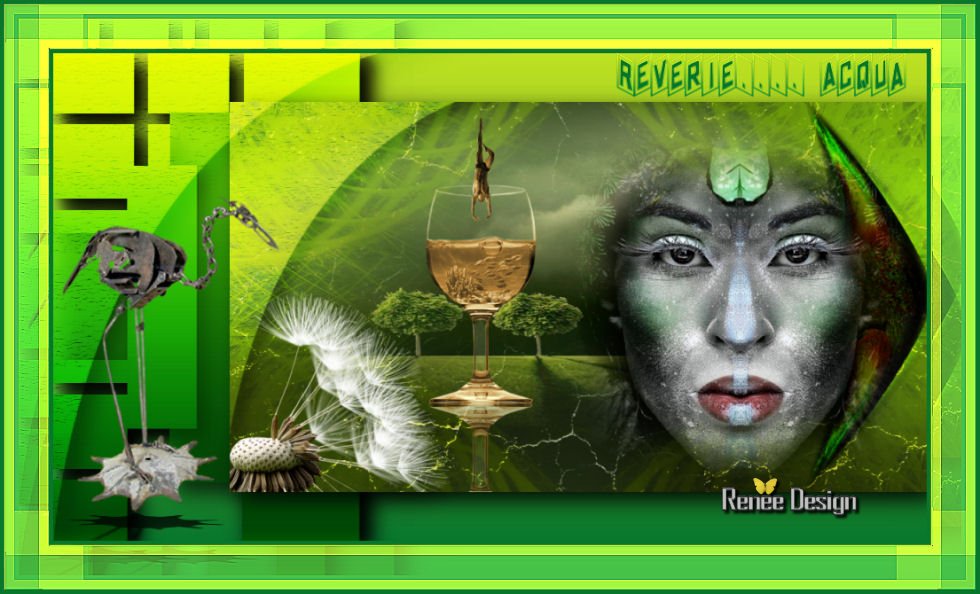
Reverie Acqua
Let's start the lesson. 1. Open the background image '' fond1'' Window - Duplicate (or shift+D) - Close the original and proceed on the copy -Promote Background Layer =Raster 1 2. Effects-Plugins - Photo Aging kit/Craker paper with these settings
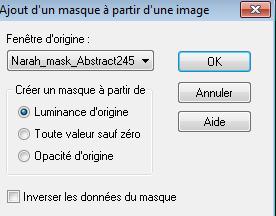
3. Layers-New raster layer- Flood Fill Tool: fill the layer with color #e6df28 4. Layers- New Mask layer from Image and select Mask ''Narah_Mask_abstract245''
5. Effects-Edge Effects-Enhance 6. Layers-Merge-Merge-Group 7. Layers-Duplicate /Image Flip 8. Layers-Merge-Merge-Down -Double click on this layer and set the Blendmode to "Overlay " 9. Layers- Merge-Merge All 10. Open the tube ''manzara tubes3-Hazal'' Edit/ Copy-Edit - Paste as new layer on your working image -Activate your Pick Tool (K) stretch on the both sides and upwards that it fits (see finished image) 11.Open the ''image1'' -Edit/ Copy-Edit - Paste as new layer on your working image and move to the right side 12. Double click on this layer and set the Blendmode to "Hard Light " 13. Open the tube ''MaryGio140312-4'' -Image Resize a 80% /Edit/ Copy-Edit - Paste as new layer on your working image and move 14. Open the tube ''voile1''- Edit/ Copy-Edit - Paste as new layer on your working image and move in the upper left corner 15. Double click on this layer and set the Blendmode to "Overlay " Set the layer opacity of this layer to 44% 16. Effects-3D Effects-Drop Shadow with these settings
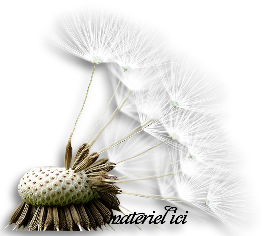
17. Open the tube ''!cid-B002abc1'' -Edit/copy- Edit/ paste as new layer Layers-Duplicate /Image Flip and move (to create a shadow effect) Set the layer opacity of this layer to 69% 18. Open the tube ''Mtm-Plant002-Pluisbol-27 juli 2007'' /Image Resize 50% - Edit/copy- Edit/ paste as new layer and move You should have this result:
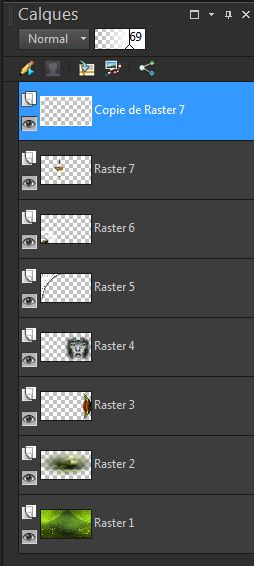
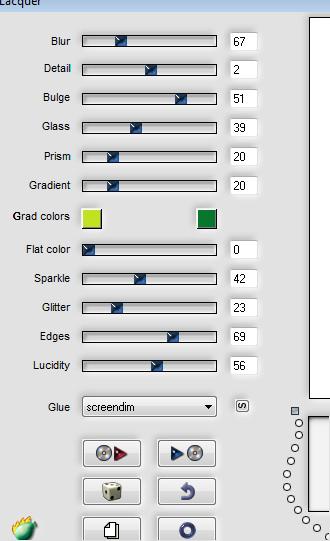
19. Layers-Merge- Merge- All -You may minimize your image for a moment, but do not close, we will need it again soon 20. File - New - Open a new transparent image of 985 x 550 pixels 21. Preparation: Color-palette:Set your foreground color to #bfe221- Set your background color to #08772c 22. Set your foreground to gradient 'Foreground-background' - Linear - Angle 0 - Repeats 0- Invert checked. - Flood Fill Tool - fill the layer with your forground-background gradient 23. Layers-Duplicate 24. Effects-Plugins - Flaming pear /lacquer with these settings ('Foreground-background' color ) preset >> Glue = screendim
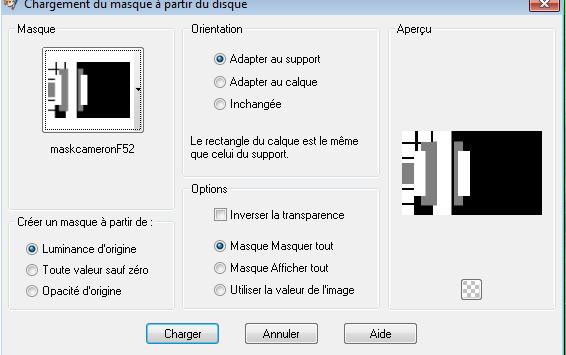
25. Layers- Load/Save mask-Load Mask from Disk and select: ''maskcameronf52''/Layers- Merge-Merge Group
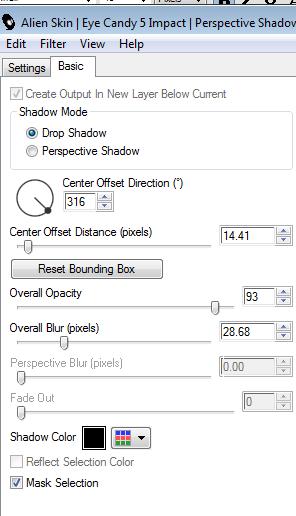
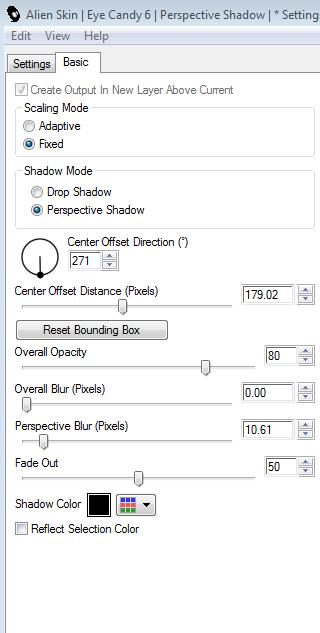
26. Effects-Plugins- Eyecandy5 /Perspective Shadow /drop shadow blury with these settings
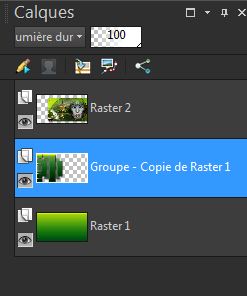
27. Double click on this layer and set the Blendmode to "Hard Light " -Set the layer opacity of this layer between 85 and 60% -Activate the bottom of the layer palette=raster 1 28. Now activate the image from step19/ Image Resize 80% / Edit/copy- Edit/ paste as new layer 29. Effects-Image Effects-Offset H= 100 and V = 0 Transparent 30. Effects-Plugins - Eyecandy5 /perspective /drop shadow blury with the same settings - You should have this result:
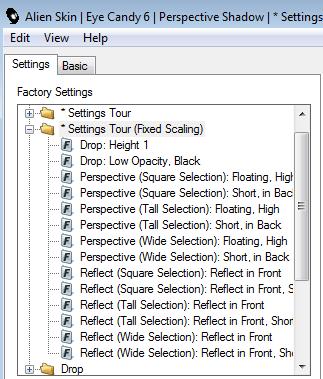
31.Activate the top of the layer palette 32. Open the tube ''oiseaux-duo-metal'' /Edit/copy- Edit/ paste as new layer (I added you mine with shadow effects plugins eyecandy6) Effects-Plugins - Eyecandy6/perspective shadow/settings tour(fixed Scaling)
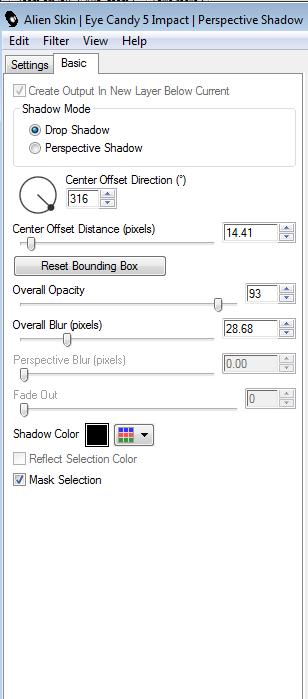
33. Stay on top of the layers palette 34. Open the tube ''voile1'' -Edit/ Copy-Edit - Paste as new layer on your working image and move in the upper left corner 35. Double click on this layer and set the Blendmode to "Multiply" Set the layer opacity of this layer to 44% - Layers-Arrange-Move Down 36. Effects-Plugins - Eye Candy5/perspective /drop Shadow blury with these settings
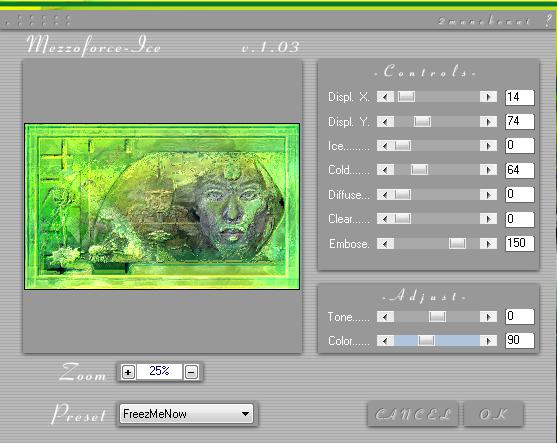
38. Image - Add borders-Symmetric checked: 50 pixels foreground color 39. Image - Add borders-Symmetric checked: 5 pixels background color 40. Activate the magic wand and select the border of 50 pixels If your filter Mezzo force Ice does not give the same result -The effect is included with the material" pspimage'' 41. Effects-Plugins - Mezzoforce...Ice with these settings
42. Effects-Edge Effects-Enhance /Selections-Deselect All The effect is included with the material" pspimage'' 43. Activate your Text Tool -Font ''43'' Write your text"(Font is into the zipfile) 44. Layers-Merge-Merge All 45. Image Resize a 980 pixels Width
Save as JPG I hope you enjoyed this tutorial . Renée This lesson was written by Renée edited and update 2009 *
Any resemblance with an existing lesson is merely a coincidence * * Don't forget to thank the people who work for us and with us. I named the tubeurs - Testers and the translators. Thanks Renée. *
I am part of Tutorial Writers Inc. My tutorials are regularly recordedt ReneeGraphisme_All rights reserved
*
|
 Translations