|
New
Translations here
REVE D'OR
Let's start the lesson. 1. File-Open a new transparent Layer: 900 x 600 pixels transparente 2. Color-palette:Set your foreground color to color #b6aea9 -Activate Flood Fill Tool and fill the layer with the foregroundcolor #b6aea9 3. -Set your background color to color: #131907-Layers- New Raster Layer- Activate Flood Fill Tool and fill the layer with the backgroundcolor #131907 4. Layers- New Mask layer from Image and choose Mask:« Masker_benice_L138 » 5. Layers- Merge- Merge Group 6. Effects-Edge Effects- Enhance More 7. Open the tube « calguismitednow5119 »- Edit/ Copy-Edit - Paste as new layer on your working image and do not move /Layer Palette - Double click on this Layer and set the Blend Mode to "Difference" 8. Layers- Merge- Merge Visible 9. Open the tube « resting » Edit/ Copy-Edit - Paste as new layer on your working image and move 10. Open the tube « bougies »Edit/ Copy-Edit - Paste as new layer on your working image and move Layer Palette - Double click on this Layer and set the Blend Mode to "Luminance" -Set the layer opacity of this layer to 73% 11. Open the tube « mtfp-last_lion_Mickael_parkes «/ Image Resize to 75%/Delete the Lion Tube !!!! Edit/ Copy-Edit - Paste as new layer on your working image and move to the left side -Set the layer opacity of this layer to 89% 12. Layers- Merge- Merge All 13. Edit/ Copy!!!! 14. Open the tube ''cadre de fond'' 15. Layers- New Raster Layer 16. With the magic wand select the inside of the tube 17. Edit - Paste into selection-Selections- Deselect All 18. Layers- Arrange- Move Down 19. To replace the top of the layers palette=raster 1 20. Effects- 3 D Effects- Drop Shadow with these settings - Color- #680000
21. Open the tube «dance »/ Image Resize to 75% Edit/ Copy-Edit - Paste as new layer on your working image and move to the left 22. Open the tube « femme fleur / Image Mirror /Edit/ Copy-Edit - Paste as new layer on your working image and move tot the right side 23. Open the tube" feuille « / Edit/ Copy-Edit - Paste as new layer on your working image and move tot the bottom left 24. Layers- Merge- Merge All 25. Open the tube "titre" - Edit/ Copy-Edit - Paste as new layer on your working image and move -Ore write your own text Image - Add borders-Symmetric checked: 25 pixels #5c0b0a Save as JPEG
I am part of the Tutorial Writers Inc. My tutorials are registered regularly ReneeGraphisme_All rights reserved
*
|
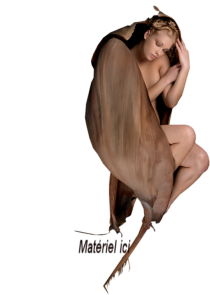
 Translations