|
New
Translations here
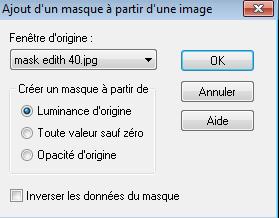
Let's start the lesson. 1. File - New - Open a new transparent image 1000 x 700 pixels 2. Color-palette:Set your foregroundcolor to color #464567--Activate Flood Fill Tool and fill the layer with the foregroundcolor #464567 3. Layers- New Raster Layer 4. Selections- Select All 5. Open the image « fondimage1 « Edit/ Copy-Edit - Paste into selection 6. Selections- Deselect All 7. Effects- Plugins- Unlimited Icnet - Convolution Filters/ Sharpen/187 8. Double click on this Layer and set the Blend Mode to "Hard Light "//Layers- Merge- Merge Down 9. Layers- New Raster Layer -- Color-palette:Set your foregroundcolor to color #ddcae0 //Activate Flood Fill Tool and fill the layer with the foregroundcolor #ddcae0 10. Open the Mask« mask edith40 »/ Layers- New Mask layer from Image and choose Mask:
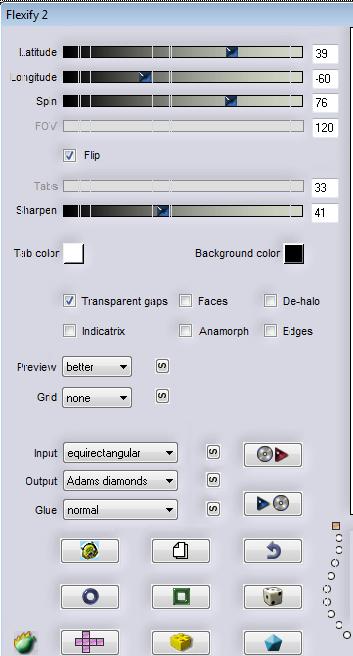
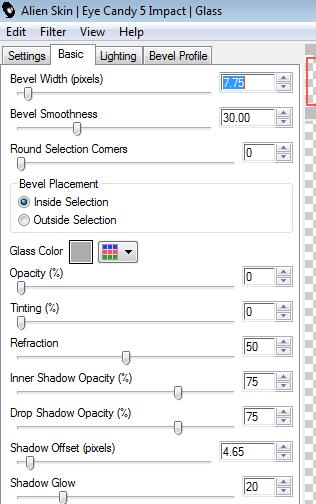
11. Layers- Merge- Merge Group 12. Effects- User defined Filter- "Emboss 3 "using the default settings 13. Layers- Duplicate 14. Effects- Plugins- Flaming pear- Flexify 2 with these settings
15. Double click on this Layer and set the Blend Mode to "Hard Light " 16. Effects- Plugins - VM Toolbox- Seamless Tile with these settings
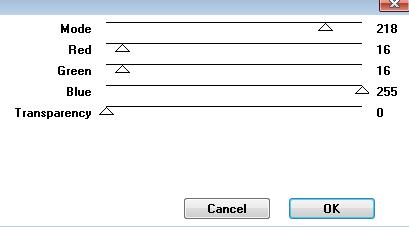
17. Stay on this Layer /Selections –load/save selection –load selection from disc and choose: ''renee-quiproquo selection 1''/ Delete 18. Layers- New Raster Layer /Open the tube ''calguimisted1069 '' Edit/ Copy-Edit - Paste into selection 19. Effects- Plugins - Eye Candy 5 Glass- Preset/ Clear with these settings
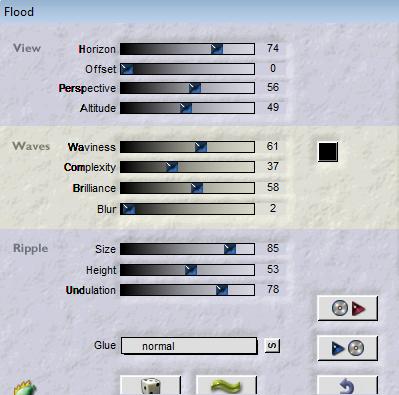
20. Selections- Deselect All-//Layers- Duplicate- Image Mirror /Double click on this Layer and set the Blend Mode to "Hard Light " 21. Open the tube ''Nicole-etrange_by_KatherinaBelkina'' /Image Mirror/ Edit/Copy -Edit paste as new layer on your working image and move to the right 22. Open the tube''Nicole-divers 9''//Image Resize to 85% //Edit/Copy -Edit paste as new layer on your and move to the left 23. Double click and set the Blend Mode to "Luminance " - Set the layer opacity of this layer to 97% 24. Activate the bottom of the layer palette 25. Effects- Plugins- Flaming Pear- Flood with these settings
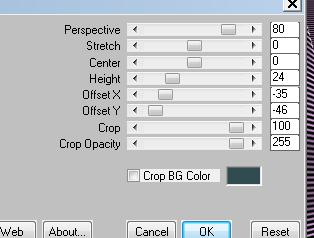
26. Layers- Merge- Merge Visible -Effects- Plugins -Andromeda perspective/Side walls /It shift 27. Effects- 3 D Effects- Drop Shadow with these settings
28. Repeat: Effects- 3 D Effects- Drop Shadow with these settings 13/4/65/35 black 29. Layers- New Raster Layer// Layers- Arrange- Sent to Bottom//-Activate Flood Fill Tool and fill the layer with this color #604363 30. Effects- Plugins - Rorshack /Ripleyer 199/33/1/1 31. Layers- Duplicate 32. Effects- Plugins-Flaming Pear - Flexify 2 use settings below
33. Effects-Edge Effects- Enhance More 34. Layers- Duplicate 35. Effects- Plugins - Mura's Meister- Perspective Tiling with these settings
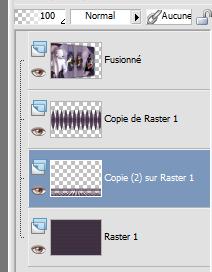
36. Layers- Arrange - Move Down - You should have this result as shown in the print screen below
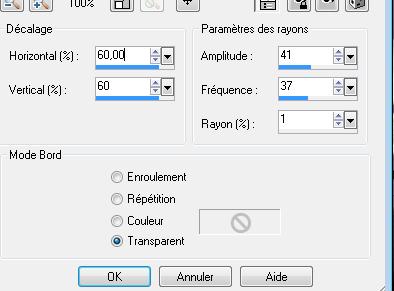
37. In the Layer-Palette-Make Copy (2) of Raster 1 active- Open the tube 'renee-quiproquo effet 1'' Edit/ Copy-Edit - Paste as new layer on your working image 38.Effects- Distortion Effects- Spiky Halo with these settings
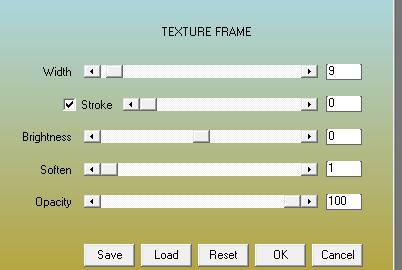
39. Open the tube ''texte- quiproquo''/Edit/ Copy-Edit - Paste as new layer on your working image and move 40. Open the tube ''Nicole-etrange-fleur'' /Edit/ Copy-Edit - Paste as new layer on your working image /Image Resize to 55% all layers not checked/Image Flip //-Double click on this Layer and set the Blend Mode to "Hard Light "and move 41. Open the tube ''abeille-Belles graphics ''//Edit/ Copy-Edit - Paste as new layer on your working image and move 42. Layers- Merge- Merge All 43.Image - Add borders-Symmetric checked: 5 pixels #604363 - Image - Add borders-Symmetric checked: 20 pixels #ffffff 44. Image - Add borders-Symmetric checked: 5 pixels #604363 45. Effects- Plugins - AAA Frame- Texture Frame with these settings /stroke checked
I am part of the Tutorial Writers Inc. My tutorials are registered regularly ReneeGraphisme_All rights reserved
*
|
 Translations