|
New
Translations here
Further than the horizon
*
*
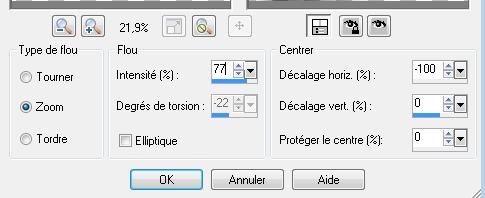
Let's start the lesson. 1. Open File - New - New Image: 1000 x 625 pixels 2. Preparation: Put the foreground color on #b41820 and the background color on #dc8c90 3. Material Properties : Prepare a linear gradient Angle =0 Repeats =1 / invert not checked 4. Flood fill with the gradient 5. Selections- Select All 6. Selections- Modify-Contract with 60 pixels /Delete 7. Selections- Modify-Contract with10 pixelsActivate Flood Fill Tool and fill the selection with the gradient 8. Selections- Modify-Contract with 60 pixels /Delete 9. Selections- Modify-Contract with 10 pixels /Activate Flood Fill Tool and fill the selection with the gradient 10. Selections- Modify-Contract with 60 pixels /Delete 11. Selections- Modify-Contract with 10 pixels /Activate Flood Fill Tool and fill the selection with the gradient 12. Selections- Modify-Contract with 60 pixels /Delete 13. Selections- Deselect All 14. Image-Resize with 75% (All layers not checked) 15. Effects- Plugins - EyeCandy5/Impact - Glass - tab Settings/User settings choose my preset: ''renee plus- loin -que -horizon'' 16. Effects-Geometric Effects-Perspective Horizontal-Distortion 25 Transparent 17. Effects- Plugins - Mura's meister - Pôle Transform with these settings
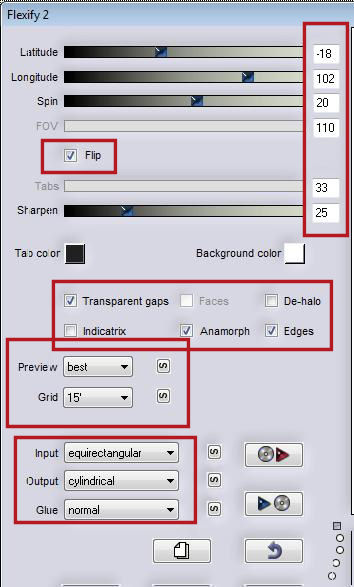
18. Image -Flip 19. Layers- Duplicate -Image-Resize with 70% (All layers not checked) 20. Layers- Arrange- Move Down 21. Layers- Merge- Merge- Visible 22. Effects- Plugins - Flaming pear /flexify2
-If you have too much pink above eraser it - Pick Tool (K) mode scale -place it in the right place as shown in the example below
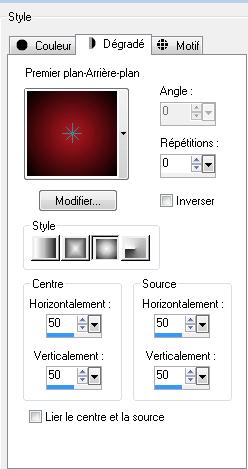
23. Layers- New raster layer 24. Selections-Select All 25. Open the " image1" Edit - Copy -Edit - Paste into selection 26. Selections- Deselect All -Layers- Arrange- Move Down 27. In the layer palette-activate the merged layer -Double click on this layer and set the Blendmode to Multiply 28. Activate the bottom of the layer palette 29. Layers- New raster layer 30. Preparation: Put the foreground color on #b41820 and the background color on black #b41820 Prepare a sunburst gradient configured like thiscomme ceci
31. Flood fill with the gradient 32. Effects-Geometric Effects-Perspective Horizontal-Distortion = 38 Transparent 33. Selections- Select All -Selections Float-Defloat 34. Layers- New raster layer 35. Open the tube ''betty tube-953" Edit - Copy -Edit - Paste into selection 36. Selections- Deselect All 37. Adjust-Blur-Radial Blur with settings shown below
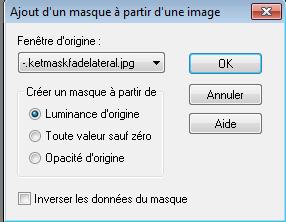
38. Double click on this layer and set the Blendmode to Difference 39. Layers- Merge-Merge Down - On this layer 40. Layers- New Mask layer from Image and choose Mask:''ketmaskfadelateral''
41. Layers- Merge- Merge- Group 42. Image- Mirror Repeat stepp 40
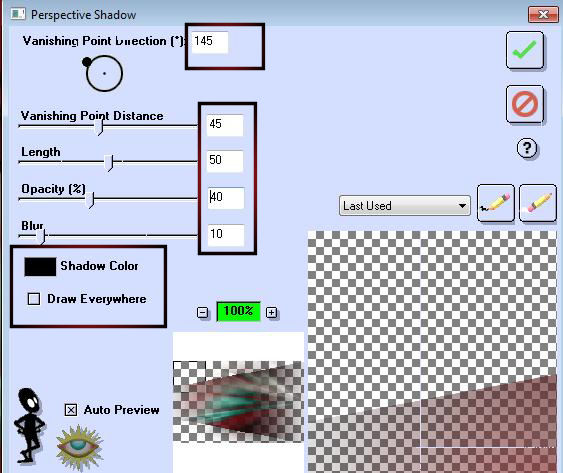
43. Effects -Plugins- EyeCandy3 /Perspective shadow with settings shown below
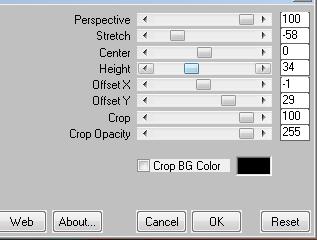
44.Layers- Duplicate 45. Effects- Plugins - Mura's Meister /Perspective Tiling with settings shown below
46. Double click on this layer and set the Blendmode to Difference 47. Layers- Duplicate -Image Mirror - Layer Palette look like this now-You should have this result
48. Activate the top of the layer-Palette 49. Layers - New raster layer 50. Selections - load/save selection- load selection from disk and select my file ''renee-plus-loin-que-horizon 51. Material of the foreground: change your sunburst gradient into a rectangular gradient configured like this
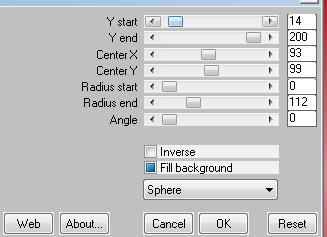
52.Activate Flood Fill Tool and fill the selection with the gradient 53. Selections- Deselect all 54. Effects-Geometric Effects-Perspective Horizontal-Distortion 100 /Transparent 55. Effects- Distortions Effects- Wave with these settings
56. Effects-Geometric Effects-Perspective Vertikal-Distortion 65/Transparent 57. Layers- Duplicate -Image Mirror /Layers- Merge-Merge Down 58. Effects- Plugins - Simple /Center Tile 59.Effects-Artistic Effects- Colored Foil with the default settings /Repeat- Effects-Artistic Effects- Colored Foil - With your Move Tool move as shown in the example below
60. Double click on this layer and set the Blendmode Hard Light and set the layer opacity of this layer to 30% 61 Open the tube '' 27.02_stephudream'' Edit/copy-Edit paste as a new layer on your working area 62. Effects- Image Effects Offset with these settings
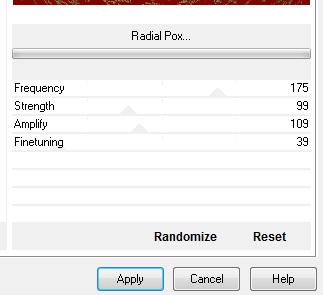
Set the layer opacity of this layer to 81% 63. Open the tube ''tiram-summer_fresshness_el41a'' Edit/copy-Edit paste as a new layer on your working area and move 64. Double click on this layer and set the Blendmode to Luminance Legacy and set the layer opacity of this layer to 80% 65. Open the tube ''5-13'' Edit/copy-Edit paste as a new layer on your working area and move 66. Open the tube ''cid-2DCB1 '' Edit/copy-Edit paste as a new layer on your working area an move in the middle Double click on this layer and set the Blendmode to Luminance Legacy and set the layer opacity of this layer to 85% 67. Open the tube ''castorke_tube_101'' /activate raster 3 of the tube -Edit/copy-Edit paste as a new layer on your working area 68. Effects- Plugins - Eyecandy5/impact /perspectiveTab- Settings- Preset - reflect in front 69. Open the tube du texte- Edit/copy-Edit paste as a new layer on your working area / Ore write your own text 70. Layers- Merge- Merge Visible 71.Image - Add borders-Symmetric checked:2 pixels color black 72.Image - Add borders-Symmetric checked: 50 pixels #7e0601 73. With the magic wand -select the border of 50 pixels 74. Effects- Plugins - Vm distorsion /Radial Pox
75. Selections- Invert 76. Effects- Plugins - EyeCandy6/Perspective shadow/Drop (FixedScaling) angled1Pixel ore Drop shadow blury into EyeCandy 5 77. Selections- Deselect All 78. Image - Add borders-Symmetric checked:3 pixels color black Save as JPG I hope you enjoyed this lesson Renée This lesson was written by Renée Placing in 2011 * Any resemblance with an existing lesson is merely a coincidence * * Don't forget to thank the people who work for us and with us. I named the tubeurs - Testers and the translators. Thanks Renée. * * I am part of Tutorial Writers Inc. My tutorials are regularly recorded. ReneeGraphisme_All rights reserved
*
*
|
 Translations