|
New
Translations
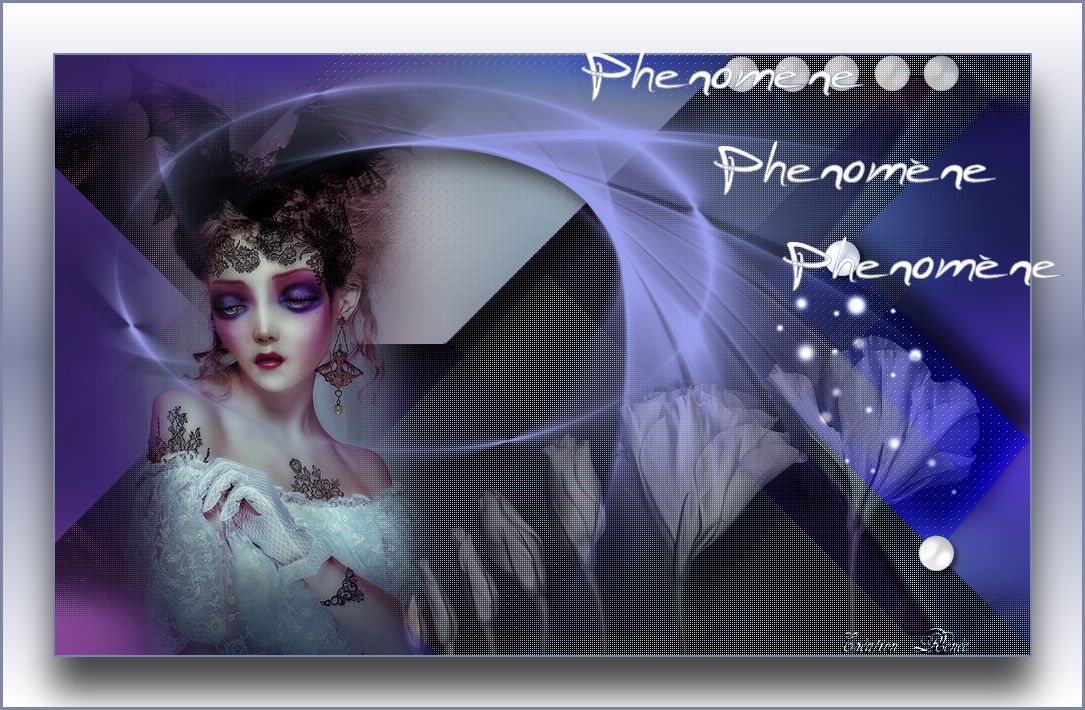
Phénomène These Plugins are used for this Tutorial CPK Screening APLines /Silverling You can find my filters here : http://www.reneegraphisme.fr/filtres/Mes filtres.html
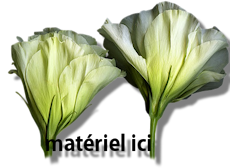
Tube are of Cherokee -SVB -Mask Noisette The tube may not be send without the lesson . Please do not make changes to the tube, because this tube was made for this lesson only. It is forbidden to share this tutorial without a link to the original lesson. Thank you very much Renée * * These tubes were received from tubeurs sharing groups. Or found by me searsching on the net. I Am grateful to have been given permission these beautiful tubes so please use any copyright information as needed. If one of these tubes is yours? Contact me. so I can make a link to your site or remove it. Thanks Renée *
Let's start the lesson. 1. Open a transparent image 975 x 600 2. Selections / Select all 3. Open the background image "fractale 20" (Do not close )Edit/copy- Edit/ paste into selection 4. Selections- Deselect All 5. Effects- Geometric Effects-Skew -Vertical -Skew 45/transparent 6. . Effects - Image effects - Seamless tiling with these settings
7. Material palette:Set your background color to: #9ca3b0 8. Effects- Plugins -Unlimited 2.0 - CPK Designers -Miror 9. Layers- Duplicate-Image Mirror-Image Flip- Image Mirror 10. Layers- New Raster layer - Layers- Arrange- Move Down 11. Selections- Select All/Open background image again "fractale 20 " -Edit/copy- Edit/ paste into selection 12. Selections- Deselect All 13. Adjust- Blur- Gaussian Blur: Radius 40 - you should have this result:
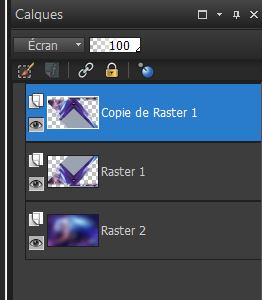
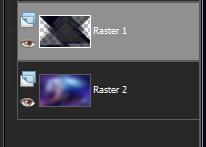
*In the Layer-palette-Make- Raster 1-active -Double click on this Layer and set the Blend Mode to "Overlay " Set the layer opacity of this layer to 67% *In the Layer-Palette-Make- Copy of Raster 1 active --Double click on this Layer and set the Blend Mode to "Screen" 14. In the Layer-Palette-Make- Raster 1-active /Effects- Plugins - CPK /screening * In the Layer-Palette-Make- Copy of Raster 1 active / Effects- Plugins -CPK /screening 15. In the Layer-Palette-Make- Copy of Raster 1 active /Layers- Merge- Merge- Down - stay on Raster 1
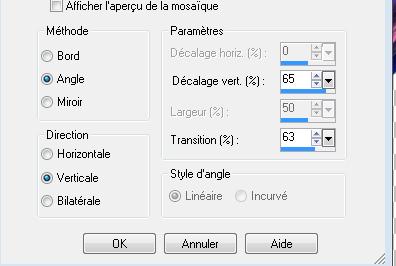
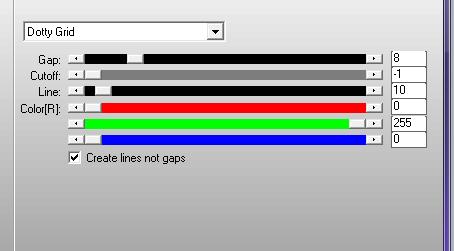
Keep Selections 17. In the Layer-Palette-Make- Raster 2/ Selections- Promote selection to layer 18. Selections- Deselect All 19. Effects- Plugins -AP 01 / Lines silverling with these settings
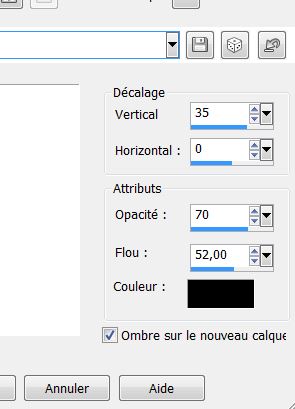
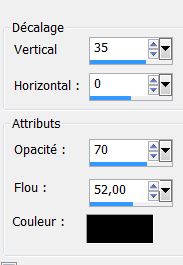
20. Effects- 3 D Effects- Drop Shadow with these settings: 35/0/70/52 -Shadow on new layer checked
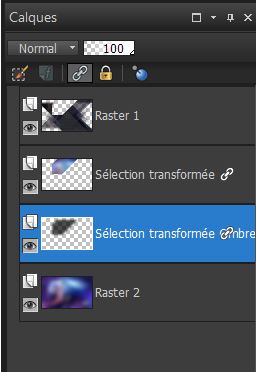
you should have this result:
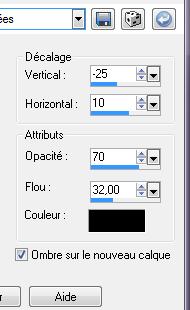
21. Activate promote selection layer active Double click on this Layer and set the Blend Mode to "Luminance"( underneath Raster 1) 22. Close bottom layer, but keep top layer active - Layers- Merge- Merge Visible * Open the bottom layer = Raster 2 23. Stay on Raster 2 24. Selections –load/save selection –load selection from disc and choose: "renee phenomene 3" 25. Promote selection to layer 26. Selections- Deselect All / Double click on this Layer and set the Blend Mode to "Hard Light " 27. Effects- Plugins -AP01 - lines silverling / with the same settings 28. Effects- 3 D Effects- Drop Shadow with these settings: (Shadow on new layer checked )
29. Activate the top of the Layer -Palette 30. Layers- New Raster layer / Flood Fill Tool-Fill the layer with the background color #9ba0ee 31. Layers- New Mask layer from Image and choose Mask: « Mask Noisette 2012 .pspimage»
32. Layers- Merge-Merge Group 33. Effects-Plugins -Eye candy 5 -Impact / perspective shadow /Preset - Drop shadow blury 34. Open the tube « Cherokee-violet-myst-by-natahlieshau » Edit/copy- Edit/ paste as new layer on your working image Activate your Pick Tool (K) place it in the right place as shown in the example below
35. Layers- Arrange- Move Down (underneath the mask layer ) 36. Activate the top of the Layer-Palette 37. Open the tube « perle » - Edit/copy- Edit/ paste as new layer on your working image and move 38. Layers- Duplicate- and move 39. Open the tube « eclat » Edit/copy- Edit/ paste as new layer on your working image and move/ --Double click on this Layer and set the Blend Mode to "Luminance" 40. Open the tube ''billes _phenomene '' -Edit/copy- Edit/ paste as new layer on your working image and move -Double click on this Layer and set the Blend Mode to "Screen" Set the layer opacity of this layer to 75% 41. Open the tube « SvBEvolution » Edit/copy- Edit/ paste as new layer on your working image and move --Double click on this Layer and set the Blend Mode to" Luminance -Legacy " Set the layer opacity of this layer to 44 % 42. Effects-Plugins -Eyecandy5 - Impact -perspective shadow / Preset - drop shadow higher 43. Layers- Merge- Merge Visible 44. Image - Add borders-Symmetric checked: 2 pixels #8085a6 45. Image - Add borders-Symmetric checked: 50 pixels white 46. P Material Palette :Set your foreground color to #8085a6 -Set your background color to #ffffff Set your foreground to gradient 'Foreground-background' - Linear -with these settings
47. With the magic wand select the white border /Activate Flood fill tool and fill the selection with the gradient 48. Selections- Invert 49. Effects- 3 D Effects- Drop Shadow with these settings
50. Selections- Deselect All 51. Image - Add borders-Symmetric checked: 3 pixels #8085a6
Convert to Raster layer 53. Effects- Plugins - Mura's meister copie with these settings / ore...duplicate twice and move
Save as JPG
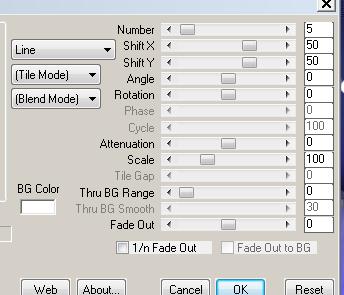
* I hope you enjoyed this tutorial . Renée This lesson was written by Renée
2010 * Any resemblance with an existing lesson is merely a coincidence * * Don't forget to thank the people who work for us and with us. I named the tubeurs - Testers and the translators. Thanks Renée. *
|
 Translations