|
New
Translations here
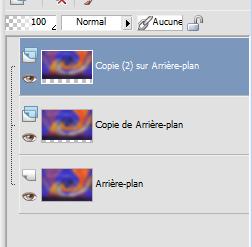
Let's begin . 1. Open the Image : ''fond1'' Promote Background Layer = Raster 1 2. Layers-Duplicate 3. Effects -Image Effects- Offset: H= 0 and V = 45 4. Layers-Duplicate 5. Effects -Image Effects- Offset: H= 0 and V = 45 Layer Palette look like this now
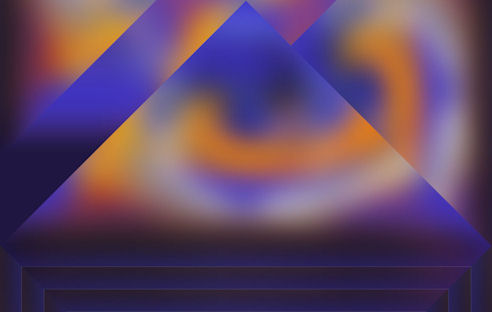
6. Layers-Merge-Merge Visible 7. Layers-Duplicate 8. Effects - Plugins Simple /Blintz - and Repeat -Your work look like this now
9. Effects-Plugins Unlimited 2.0 - Factory GalleryB /Button Deluxe
10. Effects - User Defined Filter/ Emboss 4 default 11. Selections - load/save selection - load selection from disk and choose: ''renee-peur du loup « 12. Selections-Promote Selection To Layer -Keep Selection 13. Effects-Plugins Unlimted 2.0 - Factory G /Bevel 2...Selections - Deselect all
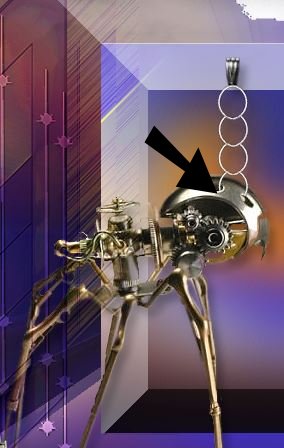
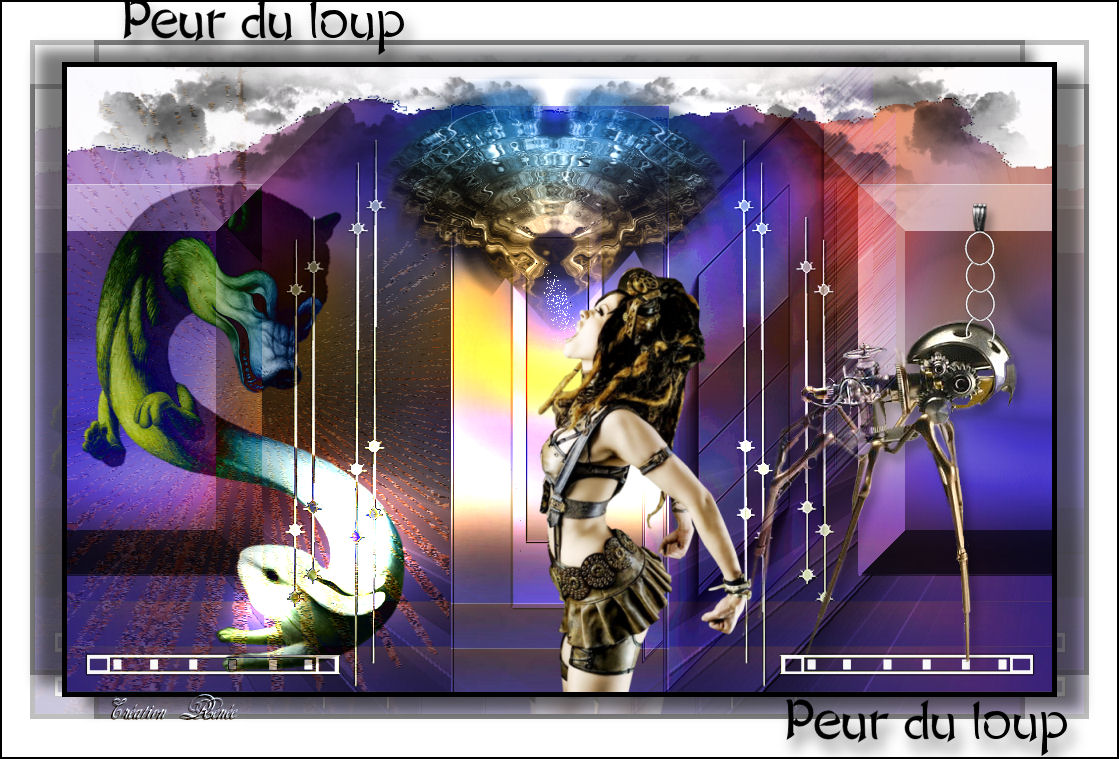
14. Open the tube ''base peur du loup '' Edit/copy -Edit/paste as a new Layer(do not move it is in the right place) 15. Layers- Merge-Merge Down / Layer-Palette: Change the Blend Mode to "Luminance" 16. Open the tube ''image 3-peur du loup'' Edit/copy -Edit/paste as a new Layer (do not move it is in the right place) -Layer-Palette: Change the Blend Mode to "Hard Light" 17. Open the tube ''Glance_Off_jemma_spider'' Edit/copy -Edit/paste as a new Layer and place 18. Open the tube '' attache '' Edit/copy -Edit/paste as a new Layer and place /Eraser Tool: erase the part of the rings coincide with the holes( see Example)
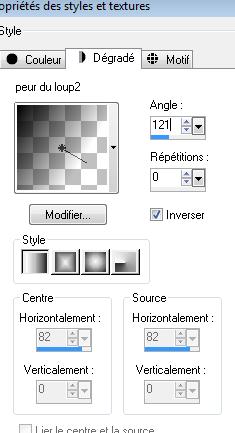
19. Layers- Merge-Merge Down 20. Effects - 3D Effects-Drop Shadow 8/6/32/25 black 21. Open the tube ''calguisshawnroberts25012012'' aktivate: '' calqueloup -lapin''/Image Resize 80% /Image Mirror /Edit/copy -Edit/paste as a new Layer and place to the left -Layer-Palette: Change the Blend Mode to : "Difference" 22. Layers-Duplicate /Layer-Palette: Change the Blend Mode to :"Soft Light " 23. Materials-Properties: Foreground to gradient: Open the gradient: ''peur du loup2'' Prepare a linear Gradient as below:
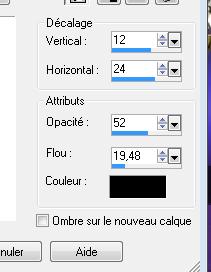
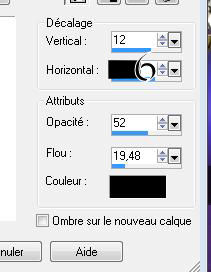
24. Layers - New Raster Layer 25. Open your Paint Brush: ''peur du loup-nuage '' File: Export-Custom Brush enter a name "peur du loup-nuage" .Size 500 -stamp on the top left with your gradient 26. Layers-Duplicate /Image Mirror 27. Open the tube'' panneau-peur du loup « Edit/copy -Edit/paste as a new Layer 28. Effects -Image Effects- Offset: H= 210 and V =0 -Layer-Palette: Change the Blend Mode to :"Soft Light " 29. Aktivate the bottem of the Layers palette 30. Selections - load/save selection - load selection from disk and choose: ''peur-du-loup5'' 31. Selections-Promote Selection To Layer 32. Selections - Deselect all 33.Layers-Arrange-Bring to Top /Layer-Palette: Change the Blend Mode to :"Hard Light" 34. Open the tube ''eclat-peur-du-loup »Edit/copy -Edit/paste as a new Layer -Place on the left against the edge 35. Layer-Palette: Change the Blend Mode to "Soft Light" and lower the opacity down to 65% 36. Layers - New Raster Layer 37. Selections - load/save selection - load selection from disk and choose: ''renee -peur du loup 2 '' 38. Open the ''image6-peur du loup'' Edit/copy -Edit/paste into selection / Selections - Deselect all 39. Effects -Image Effects- Offset: H=-24 and V =0 40. Open the tube ''effet peur du loup » Edit/copy -Edit/paste as a new Layer (do not move it is in the right place) 41. Open the tube ''claudiaviza-mujer2267'' Image Resize 3x 80% /Edit/copy -Edit/paste as a new Layer and place 42. Open the tube ''souffle-peur du loup '' Edit/copy -Edit/paste as a new Layer and place 43. Layers-Merge-Merge Visible 44. Image - Add Borders - Symmetric checked 5 pixels black 45. Image - Add Borders - Symmetric checked 60 pixels white 46. With your magic wand select the border of: 60 pixels 47. Effects-Plugins Unlimited 2.0/Factory Gallery J/Drink to me.../overdose 15 48. Selections-Invert 49. Effects - 3D Effects-Drop Shadow
-Repeats: Effects - 3D Effects-Drop Shadow : -12/-24 50. Selections - Deselect all 51. Image - Add Borders - Symmetric checked 2 pixels black 52. Aktivate your Text Tool: Font: 'Dragonclan'' size 48 Write your text "Peur du Loup" 53. Layers-Duplicate /and place / Layers- Merge-Merge Down 54. Effects - 3D Effects-Drop Shadow
55. Layers-Merge-All ( Flatten) *
I am part of Tutorial Writers Inc. My tutorials are regularly recorded
|
 Translations