|
New
Translations
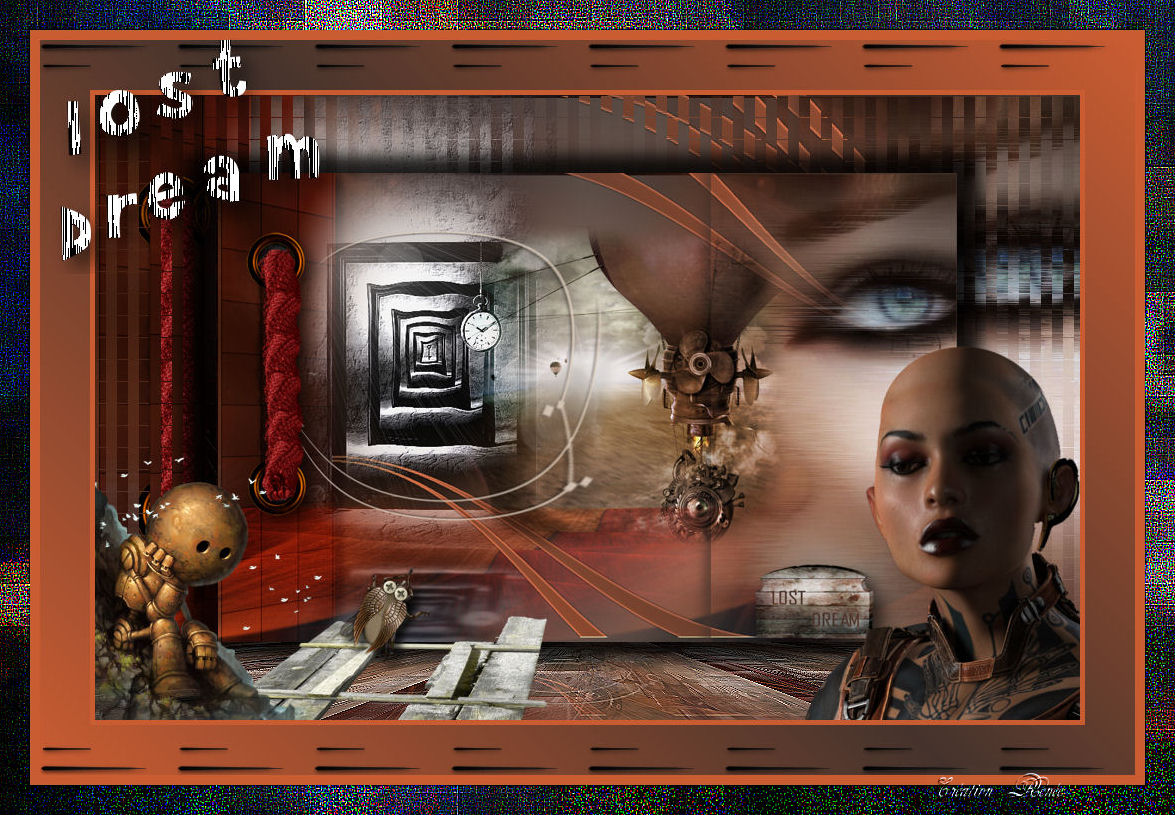
Tubes are of GUISMO - DREVERS - LIBELLULEGRAPHISME- GUTA MELO-CibiBijoux and NATASCHA ATTENTION : If it is your intention to share these tubes or these lessons in a group, please ask permission to the owner . The tube may not be send without the lesson . Please do not make changes to the tube, because this tube was made for this lesson only. It is forbidden to share this tutorial without a link to the original lesson. Thank you very much Renée * These tubes were received from tubeurs sharing groups. Or found by me searsching on the net. I Am grateful to have been given permission these beautiful tubes so please use any copyright information as needed. If one of these tubes is yours? Contact me so I can make a link to your site or remove it. Thanks Renée These Plugins are used for this Tutorial &<Bkj Designer -kaleidoscope Toadies Plain mosaic Blur Andromeda perspective FM Tile Tools EyeCandy 5 - Impact VM Toolbox Vanderlee Unplugged Defocus L & K's - Katharina You can find my filters here http://www.reneegraphisme.fr/filtres/Mes filtres.html Let's start the lesson. 1. Open the background image ''fond1-lost dream"Promote Background Layer =Raster 1'' 2. Layers - New raster layer/Activate Flood Fill Tool and fill the layer with this color #ca5c32 3. Layers- New Mask layer from Image and choose Mask: ''Narah -mask_06''
4. Layers- Merge- Merge Group 5. Effects-Image Effects-Seamless Tiling use settings below
6. Image Flip 7. Layers - New raster layer 8. Selections- Select All 9. Open the tube ''libellulegraphisme_Latex_by_vanburnham'''/ Edit/copy-Edit-paste into selection 10. Adjust-Blur-Radial Blur with these settings
11. Adjust-Blur-Gaussian Blur;Radius 40% 12. Effects- Plugins -Unlimited 2.0 / -&<Bkj Kaleidoscope – 4 Qflip Upperl 13. Layers - New raster layer 14. Color Palette: FG-Color #ca5c32 BG-Color #44332c /Prepare a linear gradient configured like this.
15. Selections - load/save selection - load selection from disk and choose my selection: ''renee-lost dream1'' 16. Activate Flood Fill Tool and fill the selection with the gradient 17. Effects- Plugins - Toadies- Plain Mosaic Blur with these settings
18. Effects - 3D Effects - Drop shadow with these settings 5/ 12/ 32 /13 Black 19. Selections- Deselect All 20 Effects- Plugins Andromeda -Side walls -It open close
21. Double click on this layer and set the Blendmode to Soft Light 22. Open the tube ''fenetre_etrange_de Drevers '' Edit/copy-Edit paste as a new layer on your working area /Activate Pick Tool- (K) Mode Scale and place 23. Effects- Plugins - FM Tile tools - Blend Emboss using the default settings 24. Effects- Illumination Effects - Sunburst with these settings
25. Effects- Plugins -EyeCandy5 -Impact -Perspective shadow- tab Settings/User settings choose my preset: ''renee-lost-dream- persp1 '' 26. Activate the top of the Layer-Palette 27. Layers - New raster layer 28. Selections - load/save selection - load selection from disk and choose my selection: ''renee-lost-dream2'' 29. Activate Flood Fill Tool and fill the selection with the gradient 30. Selections- Deselect All 31. Effects- Edge Effects- Enhance 32. Open the tube ''calguismistlarme2710'' - Image Mirror 33. Edit/copy-Edit paste as a new layer on your working area and move to the right side 34. Selection Tool-Rectangle-Select this part of the tube
35. Effects- Plugins- VM Toolbox -Blast to 176 - Keep selected 36. Effects- Plugins EyeCandy5 Impact -perspective shadow - tab Settings/User settings choose my preset: '' renee-lost-dream2'' 37. Selections- Deselect All
38. Effects- Plugins - Fm Tile tool
- Blend Emboss 39. Layer Palette: activate raster 2 40. Layers- New raster layer -Selections - load/save selection - load selection from disk and choose my selection: ''renee-lost-dream3'' 41 .Open the image ''lost dream -collines'' - Edit/copy-Edit-paste into selection / Selections- Deselect All 42. Layer Palette -Double click on this layer and set the Blendmode to Hard Light and set the layer opacity of this layer to 53% 43. Activate the top of the layer-Palette 44. Open the tube ''Steampunk_Airballoon '' - Image Resize 65% -Edit/copy-Edit paste as a new layer on your working area and move 45. Layer Palette -Double click on this layer and set the Blendmode to Hard Light 46. Open the tube ''renee lost dream poignée ''- Edit/copy-Edit paste as a new layer on your working area and move t 47. Open the tube ''renee-lost-dream - pancarte '' Layer Palette: activate raster 5 -Edit/copy-Edit paste as a new layer on your working area and move 48. Layers- Merge- Merge Visible 49. Layers- Duplicate 50. Image Resize 75% (Resize all the layers not checked) 51. Layers- Duplicate 52. Effects- Plugins -Unlimited2.0 - Vanderlee Unplugged x- Defocus
53. Layers- Arrange- Move Down 54. Effects- Plugins -Mura's Meister -Perspective Tilling with these settings-Color- #43322A
55. Effects- Edge Effects- Enhance 56. Your layer palette looks like this
57. Activate the bottom of the Layer-Palette 58. Effects- Plugins - L & K's – Katharina 22/0 - Effects- Edge Effects- Enhance 59. Activate the top of the Layer-Palette 60. Effects- Plugins -EyeCandy 5-Impact -perspective -shadow* *Settings- Drop shadow blury- Tab- Settings-Basic with these settings
61. Open the tube ''futgm.de guta melo ''Image Resize 70 % /Image Mirror /Edit/copy-Edit paste as a new layer on your working area 62. Open the tube ''lost dream plancher ''/Edit/copy-Edit paste as a new layer on your working area and move 63. Open the tube ''Mattdixon_cosmos_CibiBijoux'' Image Resize 50% -Image Mirror /Edit/copy-Edit paste as a new layer on your working area and move 64. Open the tube ''renee-lost-dream-scarabée'' /Edit/copy-Edit paste as a new layer on your working area and move 65. Layers- Merge- Merge All 66. Image - Add borders-Symmetric checked: 5 pixels FG-Color 67. Image - Add borders-Symmetric checked: 50 pixels Black 68. With the magic wand select the black border of 50 px /Activate Flood Fill Tool and fill the selection with the gradient 69. Open the tube renee ''lost-dream-effet fluide"/Edit/copy-Edit paste as a new layer on your working area 70. Open the tube Text / Edit/copy-Edit paste as a new layer on your working area .Ore write your own text (On your own text/ Effects - 3D effects - Drop shadow what you like. ) 71. Image - Add borders-Symmetric checked: 10 pixels FG-Color 72. Image - Add borders-Symmetric checked: 30 pixels /With the magic wand select the white border of 10 px /Open the tube ''22'' Edit/copy-Edit-paste into selection 73. Effects- Edge Effects- Enhance More 74. Selections- Deselect All Save as JPG
I hope you enjoyed this lesson
|

 Translations


