|
New
Translations here
My Combat
*
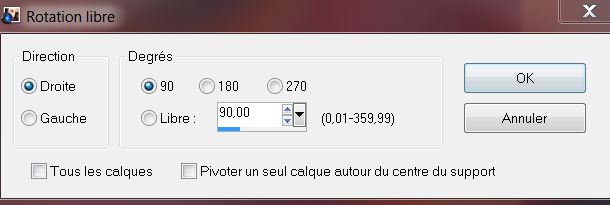
Let's start the lesson. 1. Open the Background image : ''renee_combat_fond 1' Window duplicate /Promote Background Layer =Raster 1 2.Effects- Distortion Effects- Twirl 180° 3. Layers- Duplicate 4. Effects- Plugins -Kiwis Oelifer – Guk Mal with these settings 134/0/128/128 5. Image Free rotate 90° Right
6. Image Resize with 85% resize all layers not checked 7. Effects-Distortion Effects- Warp with these settings
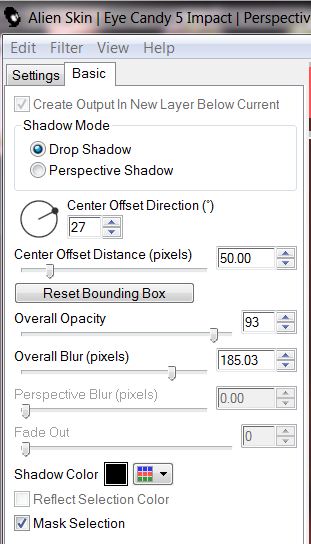
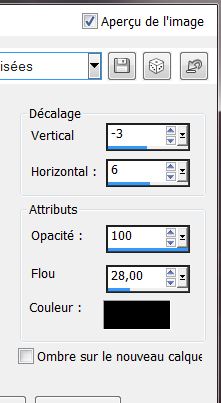
8. Effects- Image Effects- Offset-H = - 280 and V= 0 / transparent 9. Effects- Plugins -EyeCandy 5 Impact _ Perspetive Shadow /preset / DROP SHADOW BLURY use settings below
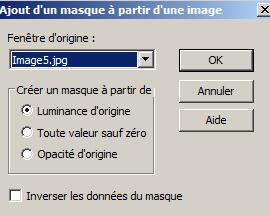
10.Effects- Plugins- Simple – Blintz 11. Layers- Duplicate / Image Mirror 12. Layers - New raster layer / Flood Fill Tool: fill the layer with color white 13. Layers- New Mask layer from Image and select Mask ''image 5 .jpg''
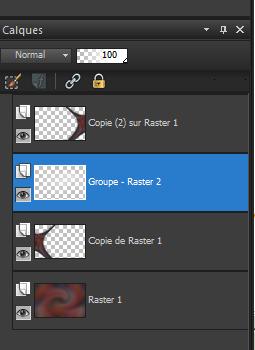
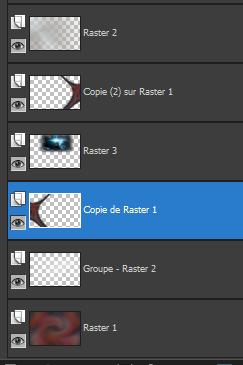
14. Layers- Merge - Merge Group 15. Layers- Arrange- Move Down - Your Layer Palette look like this now
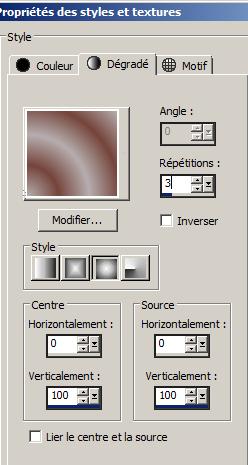
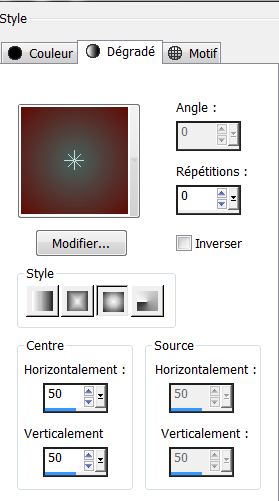
16 Layer Palette: activate Group -Raster 2 17. Effects- Plugins -FM Tile Tools - Blend emboss 18. Activate the top of the Layer Palette 19. Layers- New raster layer 20. Material Properties: Foreground color to this color #b5aeae Background color to color #75443b 21. Prepare a sunburst gradient configured like this.
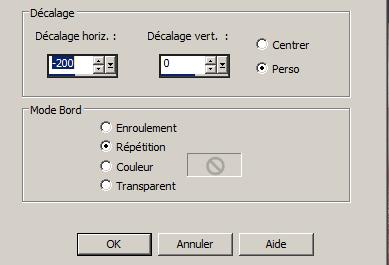
22. Activate Flood Fill Tool and fill the layer with the gradient 23. Image Resize with 80% resize all layers not checked 24. Effects- Image Effects- Offset with these settings
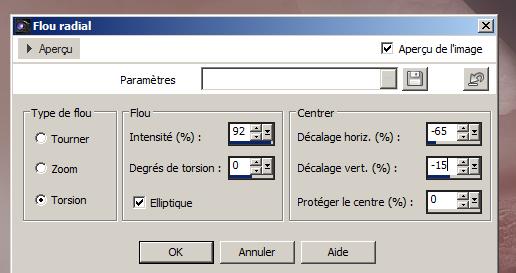
25. Repeat: Adjust-Blur-Radial Blur with these settings
26. Repeat: Adjust-Blur-Radial Blur with the same settings 27. Effects- Plugins - L and K's - Djin settings 24/18 28. Effects - Plugins - Adjust Variation / click 1x to Lighter and click 1x to Current pick 29. Layer Palette -Double click on this layer and set the Blendmode to Difference and set the layer opacity of this layer to 73% 30.Open the tube ''1900_tubeTR_9-012' -Image resize with 70% Edit/copy-Edit paste as a new layer on your working area/ Activate your Move Tool (M) place it in the right place
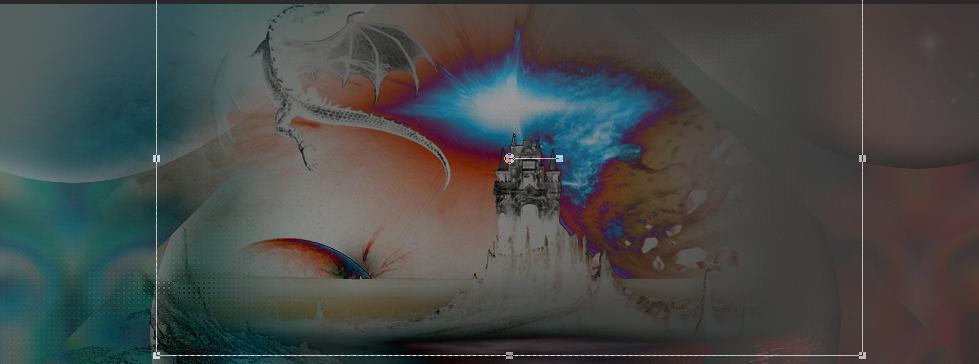
- Layers- Arrange- Move 2x Down / The result
32. Effects - FM Tile Tools -Blend Emboss using the default settings -Your Layer Palette look like this now
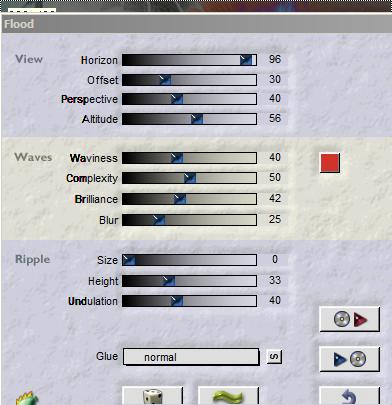
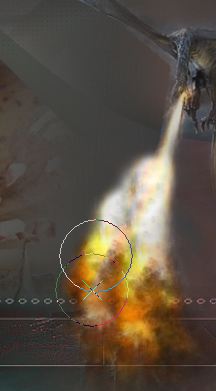
33. Activate the top of the Layer Palette 34. Open the tube ''Treagen_3025 '' Edit/copy-Edit paste as a new layer on your working area / With your Move Tool(M) move to the bottom right side 35. Effects- Plugins -Flaming Pear -Flood -color#CC3427
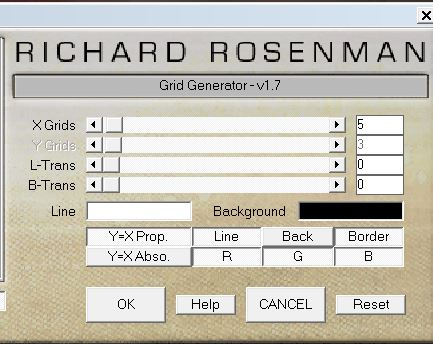
36. Open the tube ''Treagen3404_08_03_12''-Image Mirror - Image resize with 70% repeat-Image resize with 90% Edit/copy-Edit paste as a new layer on your working area/ Activate your Move Tool (M) place it in the right place 37. Effects- Plugins -Eyecandy6- Perpsective shadow Tab-Settings/user settings choose my preset: Drop_renee_ low OpacityRed_le combat '' 38. Layers- Merge- Merge Visisble 39. Layers- Duplicate 40. Image Resize with 85 % resize all layers not checked 41. Effects- Plugins - Richard Rosenman-Grid Generator/click Back with these settings 5/3/0/0
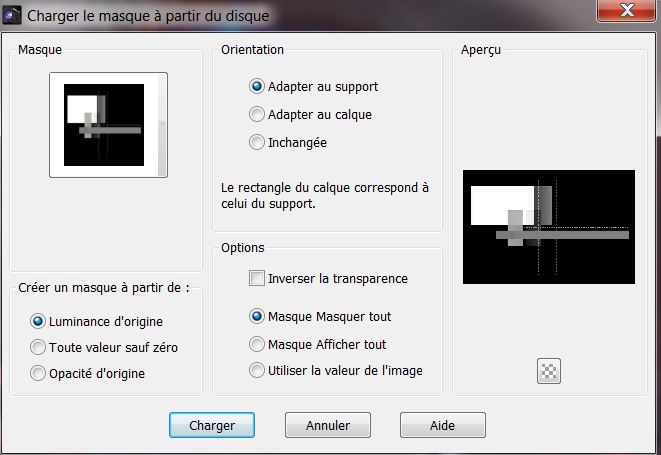
- Stay on this layer 42. Layers - load/save mask - load mask from disk and select''maskcameron_plate1''
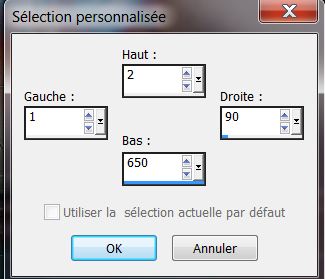
43. Layers- Merge- Merge Group 44. Effects- Edge Effects- Enhance More 45. Effects -Plugins -EyeCandy 5 Impact – Perspective - tab Settings/User settings choose my preset: ''renee_le_combat2'' 46. Activate the bottom of the layer-Palette. 47. Activate Selection (S) Tool - Custom selection with these settings
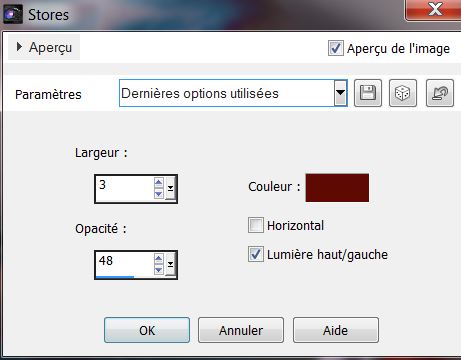
48. Promote selections to layer 49. Effects- Texture Effects- Blinds withe these settings -color #5f0c06
50. Selections Deselect All 51. Layers- Duplicate -Image Flip 52. Layers- Merge- Merge Down 53.Effects-3D effects-Drop Shadow with these settings
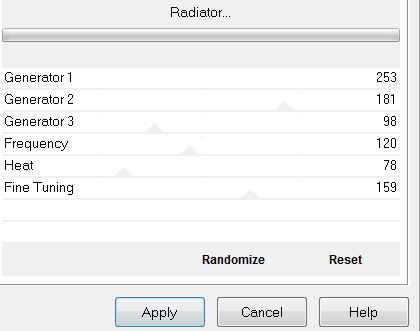
54. Layer Palette -Double click on this layer and set the Blendmode to Luminance and set the layer opacity of this layer to 77% 55. Effects- Plugins - VM Distorsion - Radiator
56. Layers-Arrange- Bring to Top - Your Layer Palette look like this now
57. Material Properties: Foreground color to this color #48615e Background color to color #5f0c06 58. Prepare a sunburst gradient configured like this.
59. Layers- New raster layer 60 Flood Fill Tool: fill the layer with the gradient 61. Effects- Plugins -Flaming Pear- Flexyfi 2 with these settings
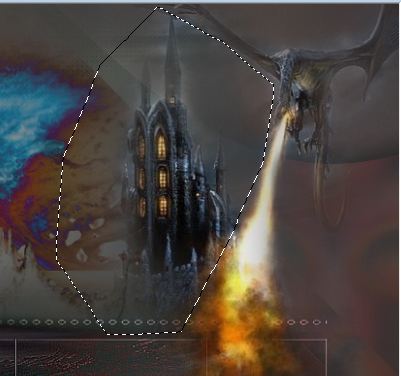
62. Effects- Plugins - Eye Candy 6 /Glass - tab Settings/User settings choose my preset: ''Clear_gentle_renee_le combat '' 63. Image Resize with 18 % place the tube on his hands 64. Open the tube ''renee_sol_le combat'' Edit/copy-Edit paste as a new layer on your working area /Activate your Move Tool (M) place it on the bottom - Layer Palette -Double click on this layer and set the Blendmode to Hard Light and set the layer opacity of this layer to 76% 65. Ouvrir le tube 1228506057_feerie'' coller comme nouveau calque - Activate your Move Tool (M) place it in the top right corner 66. Activate Freehand selection (lasso) /point to point /draw a selection like this
67 Hit the DELETE button on your keyboard 68. With the clone brush (C) with these settings /How do we proceed:Open the tool – size not larger than 57/ Blend mode Luminance Legacy (see example)
69. Make your shape using this tool . Place the brush on the spot you want to create (see print screen) and push on your right mouse button Go to the spot where you want to apply your shape and push your left mouse button to apply .Your example has to be simular on mine
70. Effects- Plugins - FM Tile Tools -Blend Emboss using the default settings 71.
Open the tube ''renee-asteroide_le combat '' Edit/copy-Edit paste as a new layer on your working area 72. Layer Palette -Double click on this layer and set the Blendmode to Dodge and set the layer opacity of this layer to 77% 73. Open the tube ''12930422217_divers_nikita'' On this tube !!!! 74. You take mine text on the book? /Layers -Merge- Merge Visible /Ore write your own text on this book and merge visible 75. Image resize with 36% Edit/copy-Edit paste as a new layer on your working area and move 76. Layers- Merge- Merge Visible 77. Edit- Copy !! 78. Image - Add borders-Symmetric checked: 5 pixels black 79. Image - Add borders-Symmetric checked: 35 pixels BG-color 80 Activate Magic Wand select the border of 35 pixels 81. Edit/copy-Edit paste into selection (is still in your psp memory) 82. Adjust-Blur -Motion Blur with these settings
83. Selections- Invert 84.
Effects- Plugins- Eye Candy 5/Perspective 85. Selections-Deselect All * I hope you enjoyed this lesson
This lesson was written by Renée Placing 23/01/2013 * Any resemblance with an existing lesson is merely a coincidence * * Don't forget to thank the people who work for us and with us. I named the tubeurs - Testers and the translators. Thanks Renée.
* I am part of Tutorial Writers Inc. My tutorials are regularly recorded. ReneeGraphisme_All rights reserved
|
 Translations