|
Let's begin .
1.
File: Activate the image: "fond_dragon''/Promote Background Layer = raster 1
2.
Material Properties: Foreground color to color:
#f9f3b5
3.
Layers - New Raster Layer/Activate flood fill tool and fill the layer with the foreground color
4.
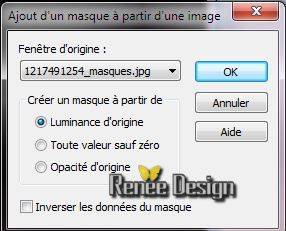
Layers-New Mask Layer From Image and choose Mask: 1217491254
5.
Effects - Edge Effects -Enhance
6.
Layers- Merge - Merge Group
7.
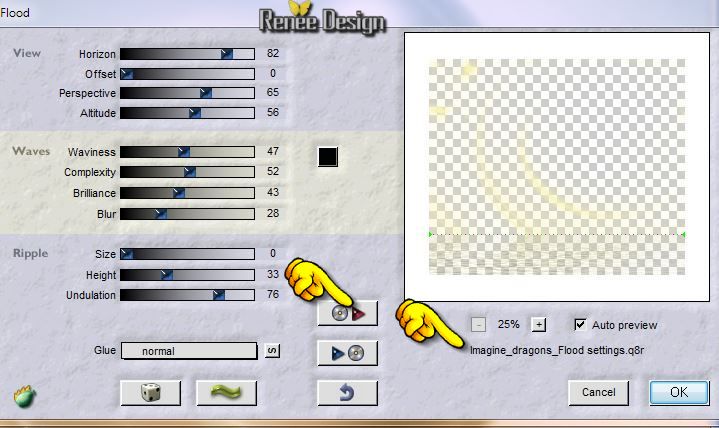
Effects - Plugins -Flaming Pear Flood and choose my preset
''Imagine_dragons_Flood settings'' Click on the red arrow and find your preset and OK
8.
Layer-Palette: Change the Blend Mode to "Soft Light"
9.
Effects- Edge Effects -Enhance More
10.
Layers - New Raster Layer/Flood fill tool: fill the layer with color black
11.
Layers-New Mask Layer From Image and choose Mask:
''imagine_dragons_1''

12.
Layers- Merge - Merge Group
13.
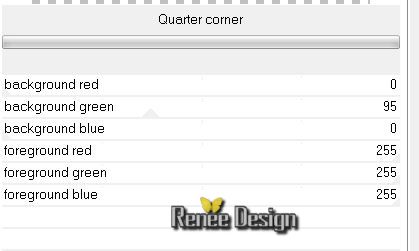
Effects -Plugins - Simple / Quarter
Corner
14.
Layers- Duplicate -Image Mirror - Opacity:
81%
15.
Layers- Merge-Merge Down
16.
Selections - load/save selection - load selection from disk and choose:
"imagine_dragons_1''
17.
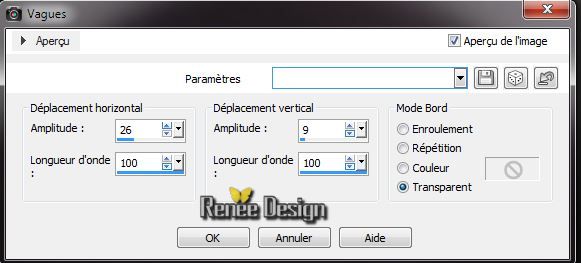
Adjust-Blur-Gaussian Blur: Radius: 35 %
Selections - Deselect all
18.
Activate the tube ''chrismist_Fractal_Art_18.pspimage''/Image
Resize 125%
Edit/copy -Edit/paste as a new Layer(do not move it is in the right place)
19.
Layer-Palette: Change the Blend Mode to "luminance Legacy"
20.
Activate the tube '' imagine_dragons_image_flaque.pspimage''/
Edit/copy -Edit/paste as a new Layer
and place against the bottom edge / Layer-Palette: Change the Blend Mode to "Dissolve" /Opacity 77%
21.
Activate the tube ''Blue_Dragon_Fantasy_tubed_by_Thafs'' /
Edit/copy -Edit/paste as a new Layer
22.
Layer-Palette: Change the Blend Mode to "luminance Legacy"
23.
Activate the tube ''KRYSFANTASTIQUE-07-04-14-030.png'' Edit/copy -Edit/paste as a new Layer and move
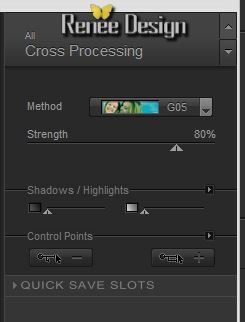
24.
Effects - Plugins -Nick Color Effex Pro3.0 / Cross
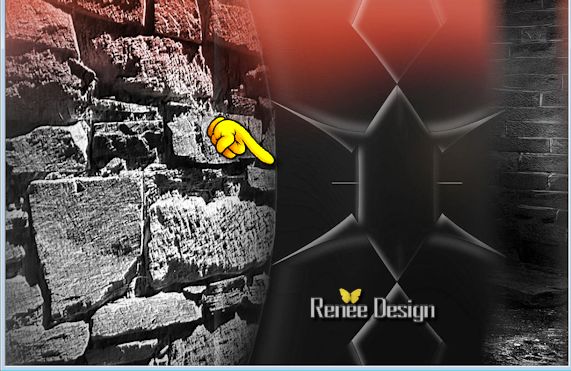
Processing - G05
Your work look like this now
25. Activate the tube ''calguismistedweb10012012.pspimage''/Edit/copy -Edit/paste as a new Layer/ and move to the left
26. Effects
-Edge Effects -Enhance
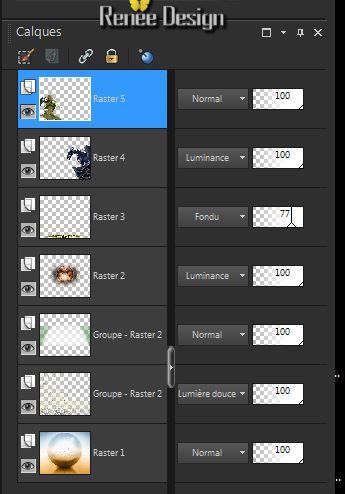
27. Layers-Merge-Merge Visible
28. Image
Resize 800 pixels Width
29. Image - Add Borders - Symmetric checked 1 pixels black /Rename this layer ''creation-1''
Open your choice of 2 frames (or choose another frame depending on your creation)
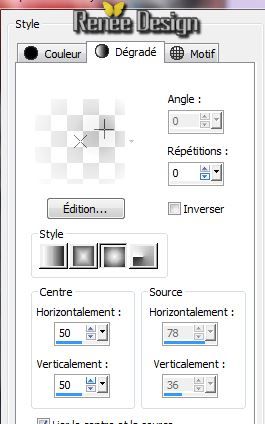
30. Activate your magic wand and select the inside of the frame
31.
Selections- Modify -Expand 5 pixels
32.
Layers- New raster layer
33. Activate
''creation-1'' /Edit/copy -Edit/paste into selection
34. Effects -
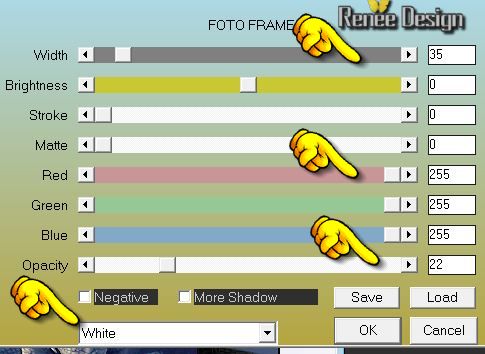
Plugins - AAA Frame - Foto Frame
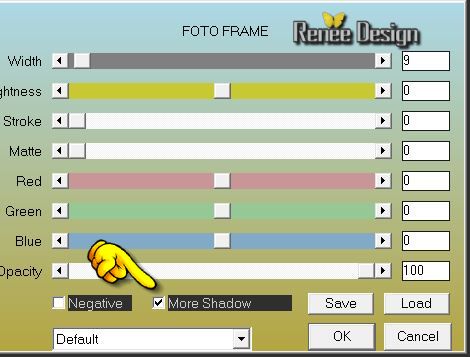
35.Selections - Deselect all
36. Layers-Arrange- Move Down- Layers-Merge-Merge Visible
Put aside for now
37. File: Aktivate the image: ''fond_dragon_2''/ Promote Background Layer = raster 1
38. Effects
-Distortion Effects- Polar Coordinates/Polar to rectangular
39.
Layers- Duplicate
40. Effects-
Geometric Effects /Skew

41. Effects
-Distortion Effects -Wave
42. Effects -
3D Effects-Drop Shadow 10/10 /75 /25 black
43. Effects
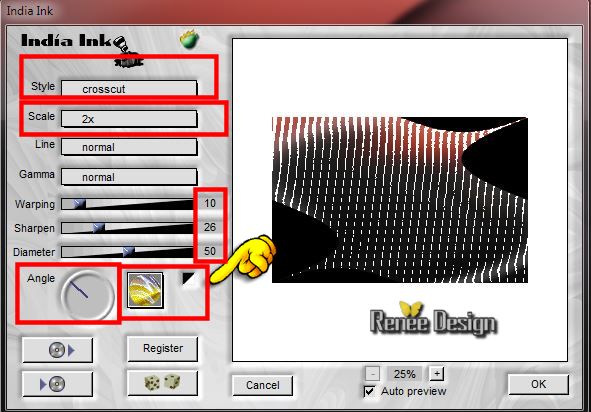
-Plugins Flaming Pear - Indian ink
attention open the filter-click Register -put the code and then -Activate the tube put the settings right and OK. As shown in the screen
44. Layer-Palette: Change the Blend Mode to "Soft Light" Opacity 71%
45. Effects -
Plugins -Simple - Pizza Slice
46. Effects -
Plugins -Simple- Top Left Mirror
47. Effects-
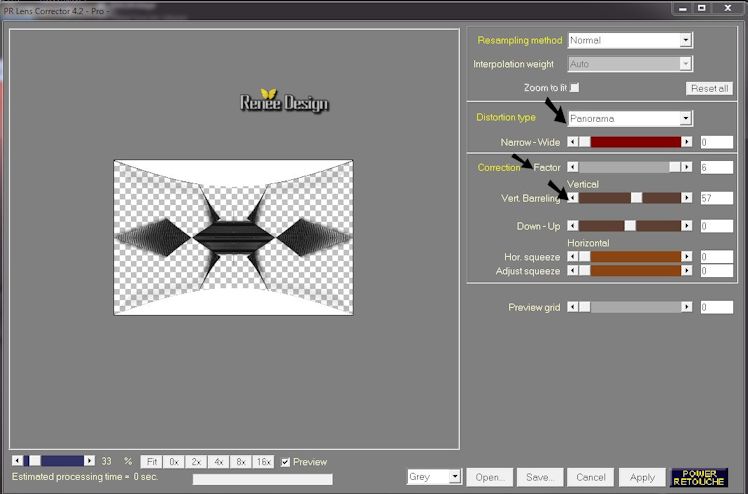
Plugins -Power retouche - PR Lens
Corrector
48. Effects -
3D Effects- Cutout (do not add new layer/effect on the same layer )
49. Image
-Free Rotate 90° Right
50. Effects -
Image Effects- Offset
51.Layer-Palette: Change the Blend Mode to "Hard Light"/Opacity 71%
52. Activate the tube ''image_dragons_mur'' / Edit/copy -Edit/paste as a new Layer
53.Effects -
Image Effects- Offset
54. Effects -
Plugins - Graphic Plus /White out 255/
47
55. Activate the tube ''imagine_dragons_moellons" / Edit/copy -Edit/paste as a new Layer
place like this
56. Layer-Palette: Change the Blend Mode to "Luminance"
57. Activate your picture frame ( point 36) ( 800 x 800 pixels )
Image Resize 75% ( You must keep these sizes if you are using any other image)
Edit/copy-Edit paste as a new layer ( do not move)
58. Effects
-Plugins - Andromeda Perpsective
59. Activate the tube ''KRYSFANTASTIQUE-07-04-14-029.pspimage''/ Image
Resize 55 % /Edit/copy -Edit/paste as a new Layer
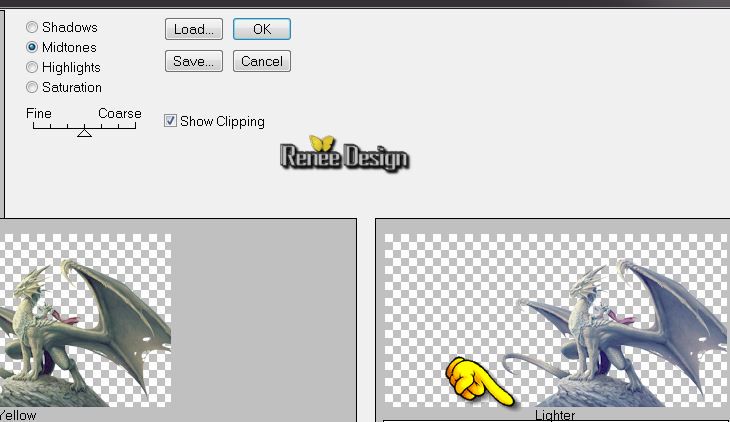
60. Effects
-Plugins -Adjust Variations / Lighter/ 2 x
(You can choose a different color to taste)
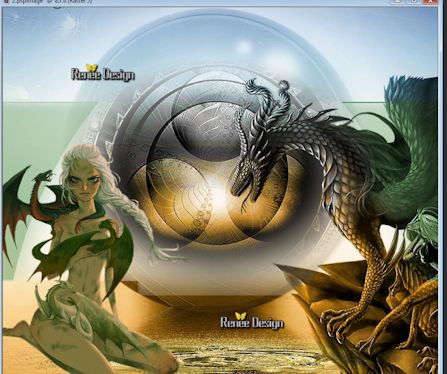
see the final result for the placement of the frame and the tube
61. Activate the tube ''imagine_dragons_boule_rouge.pspimage'' /Edit/copy -Edit/paste as a new Layer /place on the top right
62. Layer-Palette: Change the Blend Mode to "Soft Light"
63. Activate the tube ''imagine_dragons_sparkles.pspimage''/Edit/copy -Edit/paste as a new Layer(do not move it is in the right place)
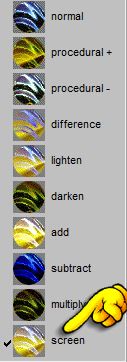
64. Layer-Palette: Change the Blend Mode to "Screen". Opacity 61%
65. Layers-Arrange- Move 2x Down
The result
Aktivate the top of the layer palette
66. Activate the tube ''Idavi_clous" - 2 tubes Edit/copy -Edit/paste as a new Layer and place to the left
Merge into one single layer (Idavi clous tubes -and Frame)
67. Effects -
3D Effects- Drop Shadow 0/0/25/20 black
68. Layers-Merge-Merge Visible
69. Image - Add Borders - Symmetric checked 1 pixels black
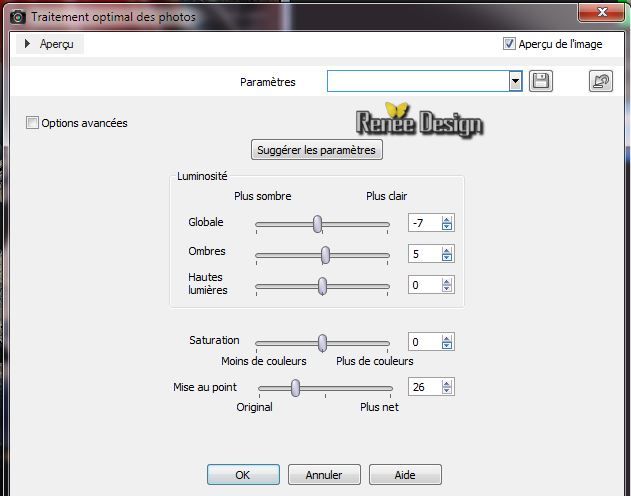
70. Adjust
- Smart Photo Fix
71. Image - Add Borders - Symmetric checked 55 pixels color:
#cecfe3
72. Material Properties: Foreground color to color white:prepare a fading-foreground gradient with these settings (Sunburst) below
73. With the magic wand select the border of 55 pixels
74.
Selections - Promote selection to layer / Activate flood fill tool and fill the selection with the gradient (do not add new layer)
75.Selections - Deselect all
76. Effects -
Plugins- AAA Frame Foto Frame
77. Activate the tube '' nuages_dans_le_desert_tubed_by_thafs''/Image
Resize 50%/ Edit/copy -Edit/paste as a new layer
78. Activate the tube " titre" Edit/copy -Edit paste as a new layer .Or write your own text
79. Image - Add Borders - Symmetric checked 1 pixel black

I hope you enjoyed this lesson
Renée
This lesson was written by Renée 9/04/2014
Created 2014
*
Any resemblance with an existing lesson is merely a coincidence
*
Don't forget to thank the people who work for us and with us. I named the tubeurs - Testers and the translators.
Thanks Renée. | 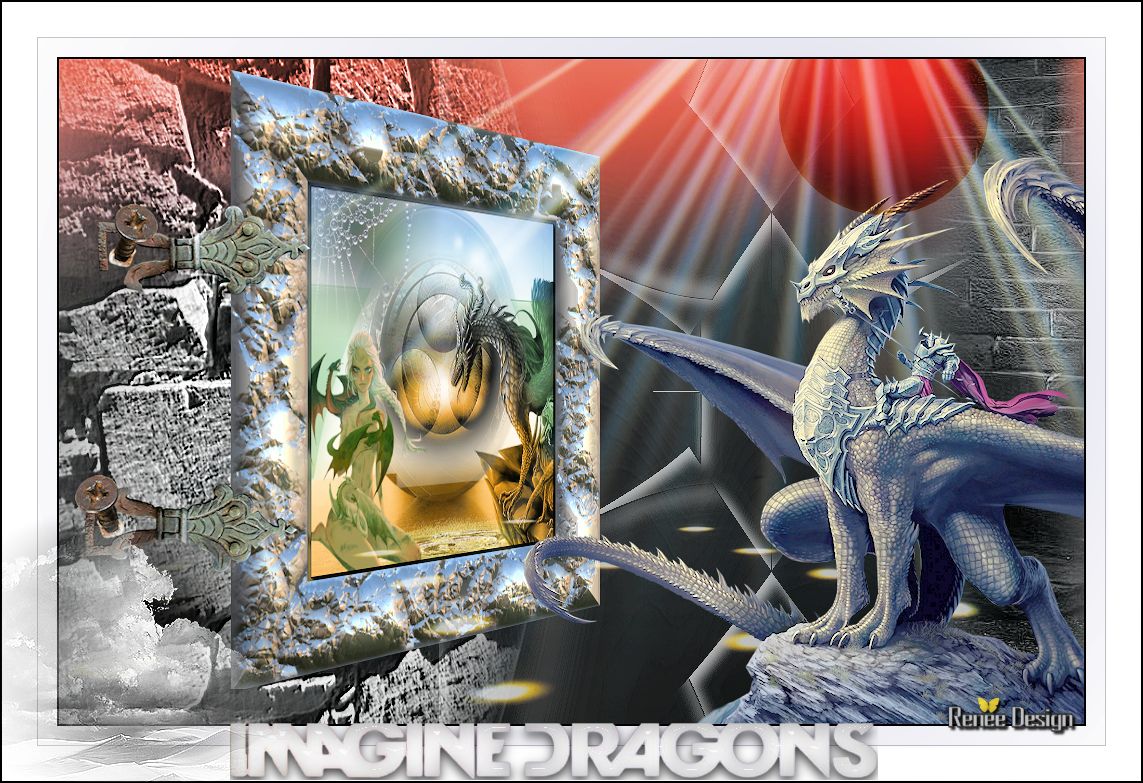
 Translations