|
Hallucination Translations here
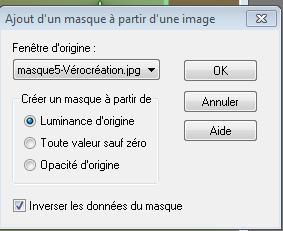
1. File - New - Open a new transparent image 900 x 625 pixels 2. Color-palette: Set your foreground color to gradient and select ''@nn _170410" - Angle 0 - Repeats 0 / Activate Flood Fill Tool and fill the layer with the layer with the gradient 0/0 uncheck invert 3. Effects- Edge Effects- Enhance 4. Adjust- Blur- Gaussian Blur: Radius: 20 5. Layers- Duplicate 6. Effects - Geometric Effects- Circle /Repeat checked 7. Effects- Edge Effects- Enhance 8. Layers- New Raster Layer -Activate Flood Fill Tool and fill the layer with the layer with this color #86dc93 - Layers- New Mask layer from Image and choose Mask: " masque5-Verocreation.jpg''
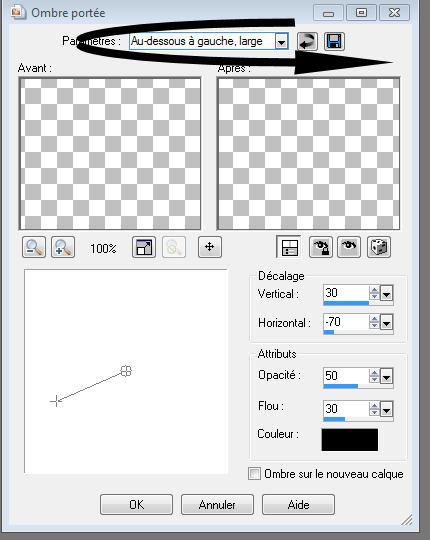
9. Layers- Merge- Merge- Group 10. Effects- 3 D Effects- Drop Shadow with these settings
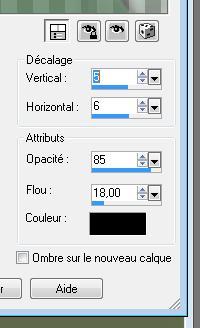
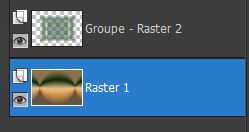
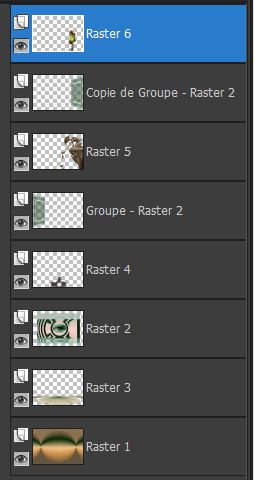
- Repeat : Effects- 3 D Effects- Drop Shadow negative V -5 and H -6 - Layer Palette look like this now
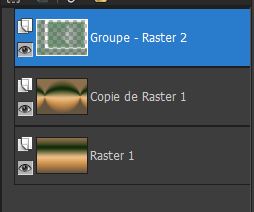
11. Effects- Plugins -Simple /4 way average 12. Effects-Used Defined Filter - Emboss3 using the default settings 13. Image Resize 70 % resize all layers not checked - In the Layer-Palette: Make Copy of Raster 1 active 14. Layers- Merge- Merge Down - Layer Palette look like this now
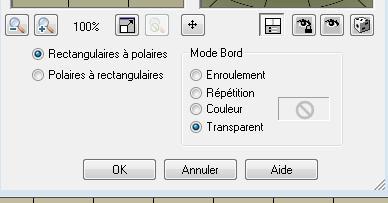
15. Activate the top of the layer palette = Group of Raster 2 16. Image- Free Rotate 90° to the right 17. Effects-Image Effects- Offset with these settings : H= -225 and V= 0 - Activate the bottom of the layer palette=Raster 1 18. Open the tube "496397_R -K -Berg altmann" //Edit/ Copy-Edit - Paste as new layer on your working image (do not move it is in the right place) 19. In the Layer- Palette- Double click and set the Blend Mode to "Hard Light " -Set the layer opacity of this layer to 89% 20. Effects- Plugins - Nick Color Pro effex 3.0 /Cross processing and select preset G05/apply 21.Activate the top of the layer palette 22. Color-palette:Set your foreground color to color #ded6b6 - Set your background color to color #30411b 23. Set your foreground to gradient 'Foreground-background' - Linear - Angle 0- Repeats 0 Invert not checked 24. Layers- New Raster Layer -Activate Flood Fill Tool and fill the layer with the layer with the gradient 25. Effects- Plugins - Toadies / Ommadawn click reset /apply 26. Effects- Distortions Effects-Polar Coordinates-Rectangular to Polar-Transparent checked
27. Effects- Plugins - Mura's meister /perspective tilling with these settings
28. Layers-Arrange- Move 2x Down 29. Effects- Edge Effects- Enhance
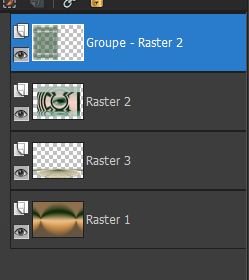
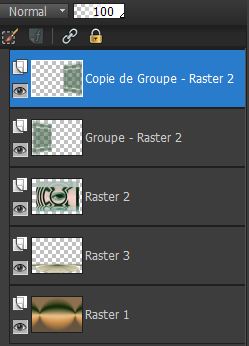
30. Effects- Plugins - Andromeda /perspective /preset /it open 31. Layers- Duplicate /Image Mirror - Layer Palette look like this now
32. On these 2 layers (Group -of Raster 2 and Group Copy of Raster2) - Activate Pick Tool-(K) - Mode Scale -on the left side -Push upward to - 170 px -On the right side push to 700 px as shown in the example below
33. Activate the top of the layer palette 34. Open the tube "Galets-Cibijoux "/Image Resize 70% // Edit/ Copy-Edit - Paste as new layer on your working image 35. Open the tube « Fant4_Cibijoux » // Edit/ Copy-Edit - Paste as new layer on your working image and move to the right - Layers- Arrange- Move Down 36. Activate the top of the layer palette 37. Open the tube « MKDesigns-EggHunt-ep « Image Resize 45% //Edit/ Copy-Edit - Paste as new layer on your working image and move 38. Effects- 3 D Effects- Drop Shadow with these settings: 5/-3/85/18 black - Layer Palette look like this now
39. Activate the top of the layer palette 40. Open the tube « jongleur-cibijoux »//Edit/ Copy-Edit - Paste as new layer on your working image and move to the left 41. Effects- 3 D Effects- Drop Shadow with these settings /(Below wide left)
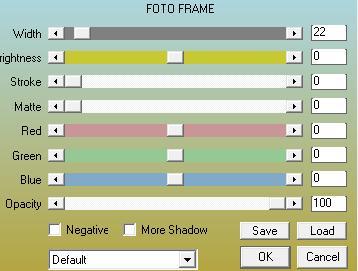
42. Open the tube « mouche '' Edit/ Copy-Edit - Paste as new layer on your working image 43. Effects- 3 D Effects- Drop Shadow with the same settings 44. Layers- Merge- Merge- Visible 45. Open the tube Text //Edit/ Copy-Edit - Paste as new layer on your working image 46. Open the tube "mouche 2 " //Edit/ Copy-Edit - Paste as new layer on your working image 47. Image - Add borders-Symmetric checked:5 pixels #30411b 48. Image - Add borders-Symmetric checked:35 pixels #ded6b6 49. Effects- Plugins-AAA Frame - Foto frame with these settings
50. Image - Add borders-Symmetric checked:5 pixels #30411b Save as JPEG
I hope you enjoyed this lesson This lesson was written by Renée I am part of the Tutorial Writers Inc. My tutorials are registered regularly ReneeGraphisme_All rights reserved
* Any resemblance with an existing lesson is a coincidence * Do not forget to thank the people who work with us and for us I have appointed the tubeurs and translators Thanks Renée
|