|
New
Translations here
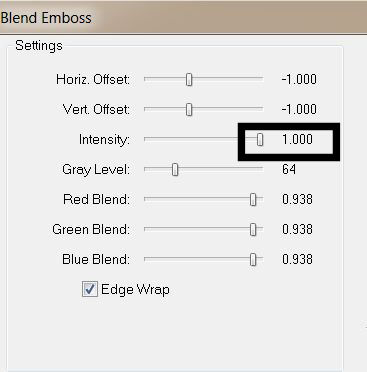
1. File - New - New Transparent Image: 985 x 625 pixels 2. Selections-Select All. Open ''fond _gobelin ''Edit/copy-Edit paste into selection 3. Selections-Deselect All 4. Layers- Duplicate 5. Material Properties: Foreground color to color : #000000 Background color to color : #062e07 6. Effects-Plugins Funhouse – Face Ofset / 240 7. Effects -Plugins- FM Tile tools – blend emboss
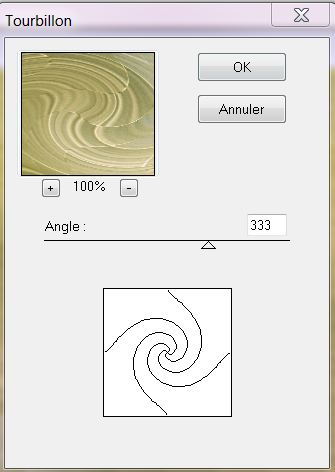
8. Effects – Plugins Déformation -Tourbillon 333
9. Layerpalette: Blend Mode "Color Legacy" 10. Open tube ''gobelin_image_mur'' Edit/copy-Edit paste as a new layer
*Stay on this layer 11. Effects-Plugins L & K' s / Zitah
12. Open tube ''gobelin_image_1'' Edit/copy- Edit paste as a new layer and place
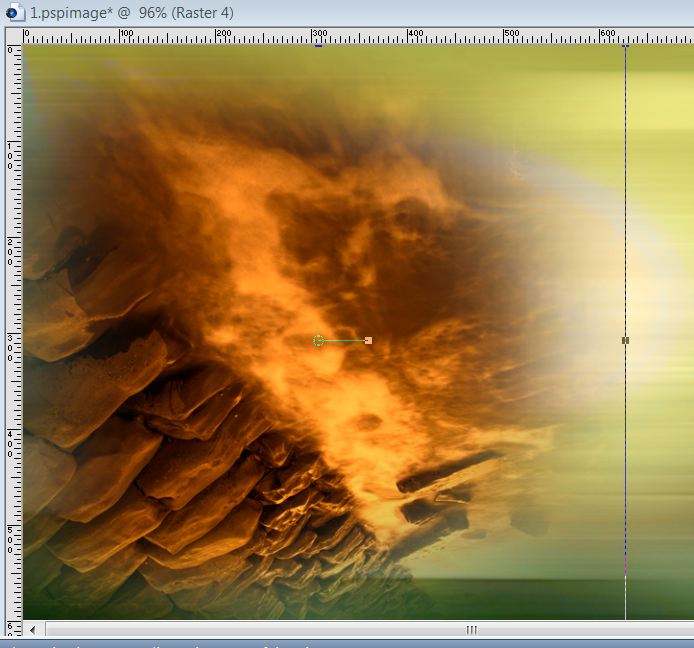
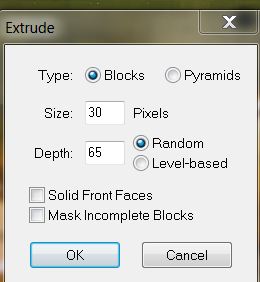
13. Layers- Duplicate 14. Effects –Plugins Stylize- extrude
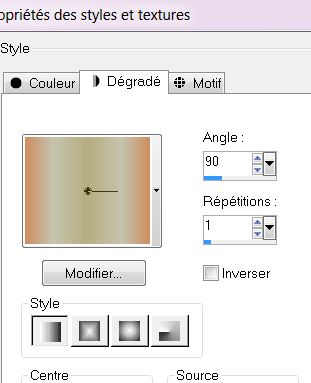
15.Layerpalette: Blend Mode "Luminance" - If you do not achieve the result with the filter, proceed as follows: - Layers- New Raster layer - Selections - load/save selection - load selection from disk and choose : ''renee_gobelin_technologie_5'' - Open l’image fournie ''effet-stylize-extrude psp image '' Edit/copy-Edit paste into selection - Selections- Deselect All - On Copy layer: Opacity: 62% 16. Layers- New raster layer 17. Selections - load/save selection - load selection from disk and choose : ''renee_gobelin_technologie_1'' 18.Materials Properties:FG-Color to gradient ''mp_bronzegold'' -Prepare a linear gradient configured like this
19. Flood Fill Tool: Fill the selection with the gradient 20. Layerpalette: Blend Mode "Hard Light" 21.Selections- Deselect All - Aktivate the top of the Layers palette 22. Selections - load/save selection - load selection from disk and choose : ''renee_gobelin_technologie 2'' 23. Layers- New raster layer 24. Open tube ''aclis-paysage-02-06-07-2012'' Edit/copy-Edit paste into selection 25. Selections- Deselect All 26. Layers- New Raster layer 27. Selections - load/save selection - load selection from disk and choose :''renee_gobelin_technologie 3'' - Flood Fill Tool: Fill the selection with this color: #63622a 28. Selections- Deselect All 29. Effects-Plugins Vanderlee- Unppluged X- defocus
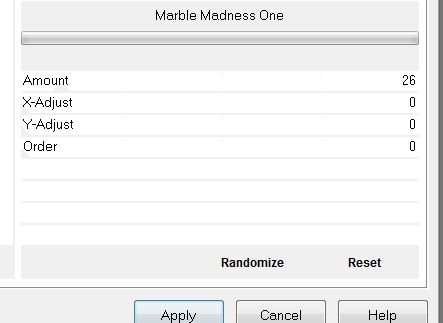
30. Layerpalette: Blend Mode "Lumiance". Opacity 71% 31. Open tube ''1293007533_feerie_nikita'' Edit/copy-Edit paste as a new layer and place slightly back up 32. Open tube ''Belle Graphics-gobelin-personnage'' Edit/copy-Edit paste as a new layer and place on the trunk 33. Open tube ''lampadaires'' Edit/copy-Edit paste as a new layer and place 34. Layerpalette:Blend Mode "Hard Light" 35.Layers- New raster layer 36. Selections - load/save selection - load selection from disk and choose : ''renee_gobelin_technologie 4'' - Flood Fill Tool: Fill the selection with this color: #64690c 37. Layerpalette:Blend Mode "Hard Light" 38. Selections- Deselect All 39. Effects-Plugins Unlimited Filter FactoryGallery A/ Marble Madness One
- Move to the left
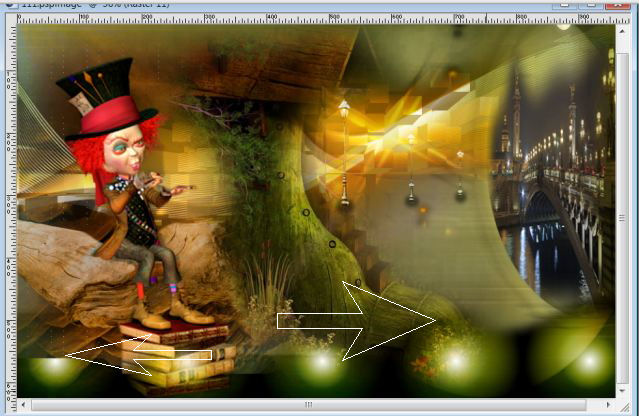
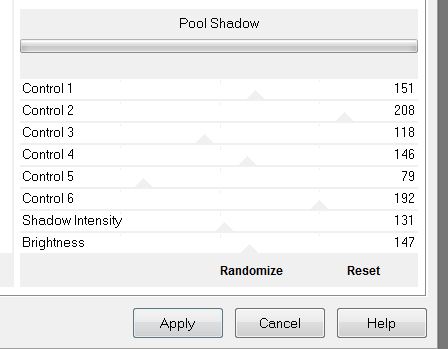
40. Open tube ''Gobelin -mur carre ''Edit/copy-Edit paste as a new layer and place on the left 41. Open tube ''bouteille-gobelin ''Edit/copy-Edit paste as a new layer and place on the wall 42. Open tube ''Iphones-renee-gobelin'' Build it yourself or take raster 5 .Edit/copy-Edit paste as a new layer and place 43. Open tube ''renee_gobelin_sac_ancienne technologie'' Image Resize 75% Edit/copy-Edit paste as a new layer and place 44.Open tube''gobelin_conserve 1'' Image Resize 74% Edit/copy-Edit paste as a new layer and place on the wall 45. Open tube ''alejendra rosales-phones '' Edit/copy-Edit paste as a new layer and place 46. Open tube ''gobelin_feu ''Edit/copy-Edit paste as a new layer and place .Blend Mode "Soft Light " 47. Open tube BS17-Farol2'' Edit/copy-Edit paste as a new layer and place -Everything is in place 48. Layers- Merge- Merge Visible 49. Image - Add Borders - Symmetric :5 pixels black 50. Image - Add Borders - Symmetric :45 pixels color #aca02d 51. With your magic wand select the border of 45 pixels 52.Selection-Promote selection to layer 53. Effects-Plugins Unlimited /Factory Gallery A- Pool Shadow
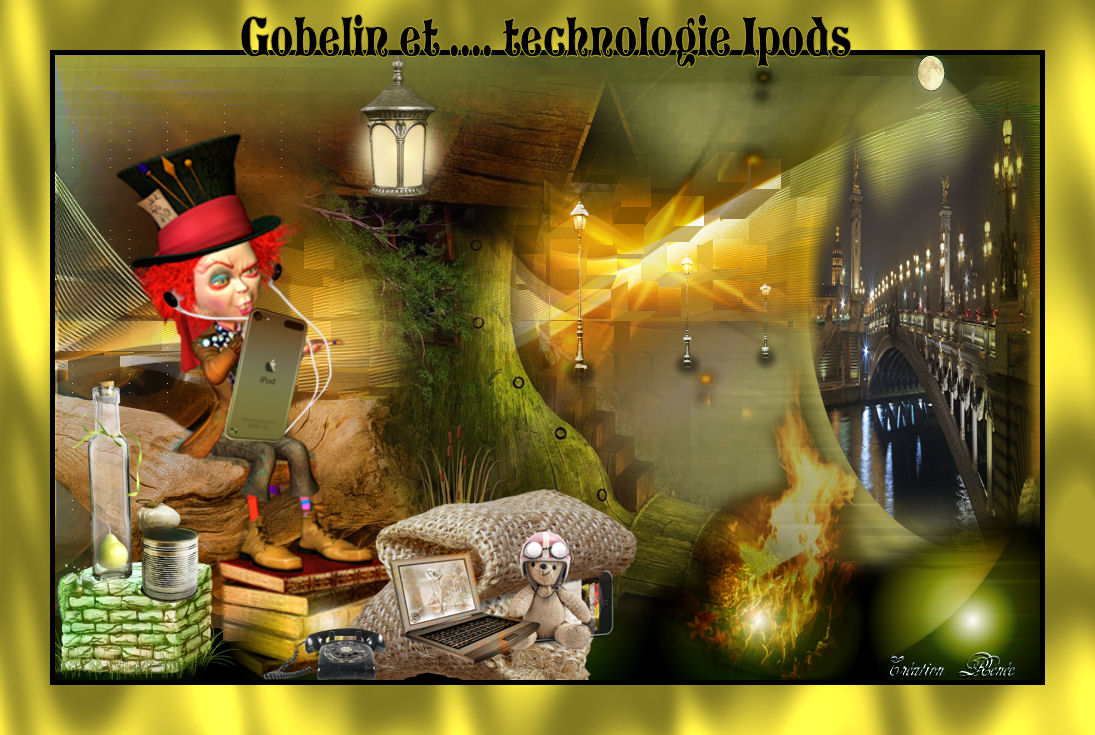
54. Selections- Deselect All 55. Open tube "Text " .Edit/copy-Edit paste as a new layer and place
*
I am part of Tutorial Writers Inc. My tutorials are regularly recorded
|
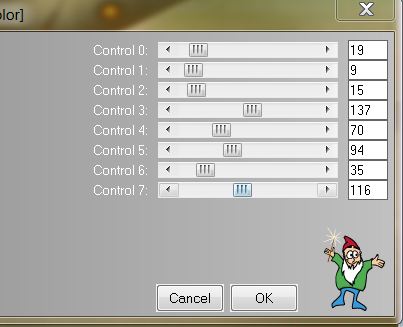
 Translations


 Let's begin