|
New
Translations here
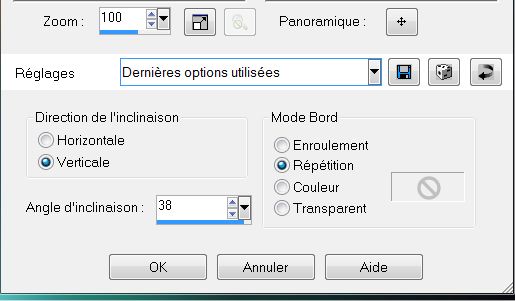
Let,s begin 1. File: File: Open a New transparent image of 985 x 625 pixels 2. Seletions-Select all.Open the image ''fond_entrave'' Edit/copy- Edit paste into selection 3. Selections - Deselect all 4. Effects-Geometric Effects -Skew
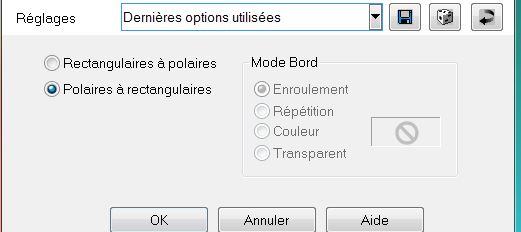
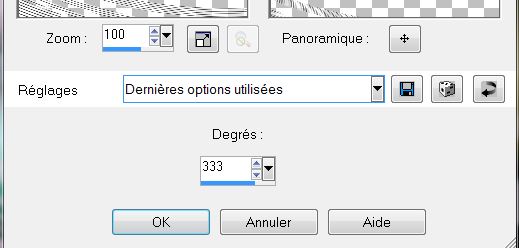
5. Layer-Duplicate 6. Effects- Distortion Effects- Polar Coordinates-Polar to rectangular
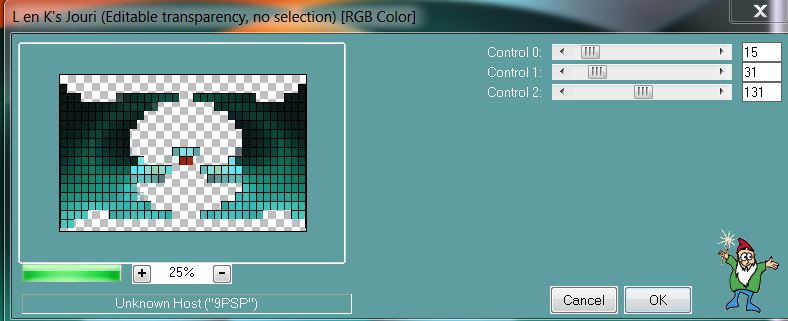
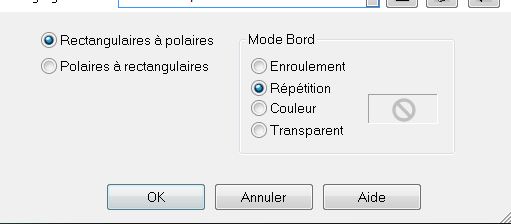
- Repeats: Effects- Distortion Effects- Polar Coordinates 8. Effects-Plugins VM Instart – Tripolis default 128/76/52/136/127 9. Selections - load/save selection- load selection from disk and select my file ''renee_entrave_1'' 10. Delete 11. Selections - Deselect all 12. Effects-Plugins L and K's / Jouri
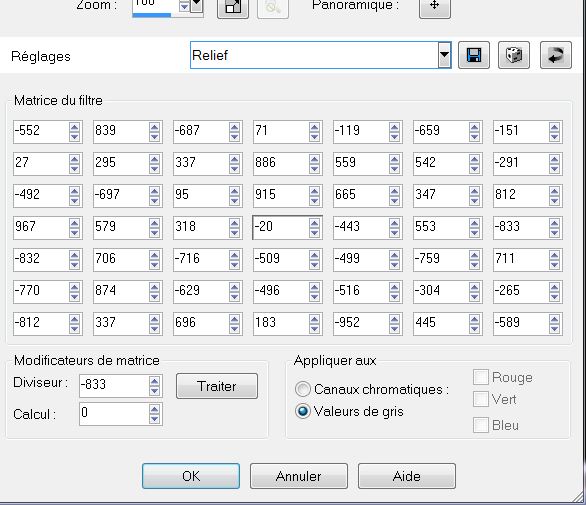
13. Effects- User Defined Filter -preset ''relief'' /The preset in the zip file/ default settings)
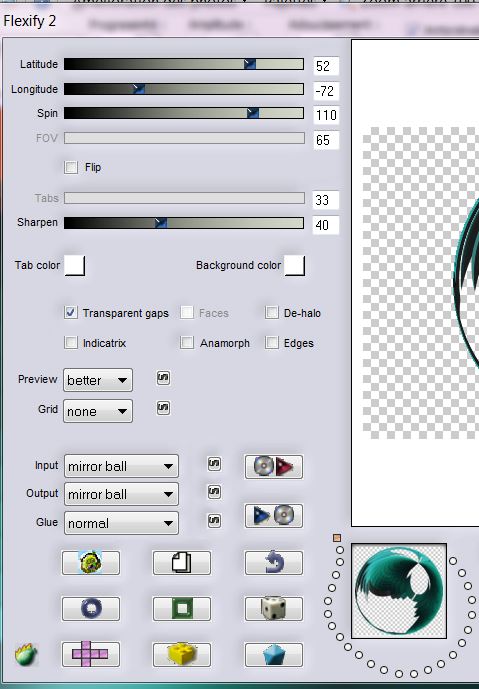
14. Effects -Plugins EyeCandy5 Impact / extrude and choose my preset ''renee_entrave_extrude' 15.Effects-Plugins Flaming Pear / Flexify 2
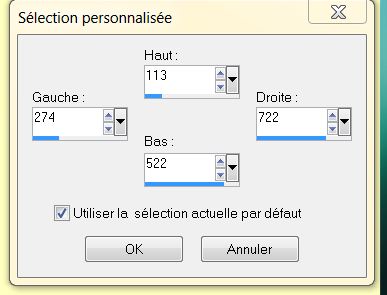
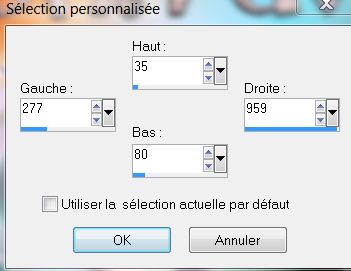
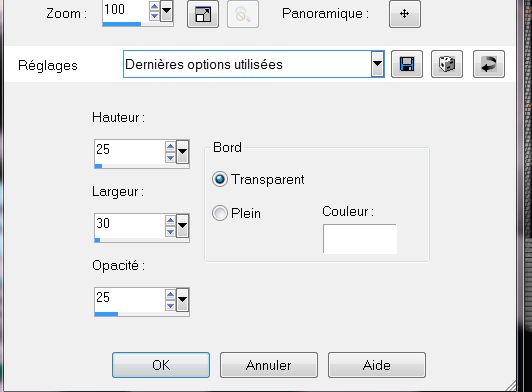
16. Image Resize 42% (All layers not checked) 17. Effects-Plugins EyeCandy 5 – Gradient Glow and choose my preset ''renee_entrave _gradient glow'' 18. Layers- New Raster layer 19. Selections- Gustom selection with these settings:
20. Flood Fill Tool: fill the selection with this color: #d9e2df 21. Selections - Deselect all 22. Adjust-Blur-Gaussian Blur : Radius 100 23. Effects -Plugins Unlimited -Tramage – Glass Pyramide a 125 24. Effects- Distortion Effects- Polar Coordinates-Rectangular to polar
25. Layers- Arrange- Move Down / Layer palette: Blend mode: "luminance Legacy" - Layer Palette look like this now
26. Aktivate the Top of the layers palette 27. Layers- New Raster layer 28. Selections - load/save selection- load selection from disk and select my file ''renee_entrave_3'' 29. Materials-Properties: forground color to color white 30. Prepare a Fading foreground sunburst gradient configured like this: = 0 (Invert not checked) 31. Flood Fill Tool: fill the selection with fading foreground gradient - Selections-Select none 32. Effects - Plugins AP 01 Innovation -AP Lines-Silverling
33. Effects- Distortion Effects– Twirl
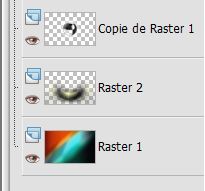
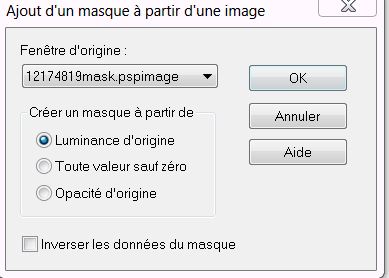
34. Layers- Arrange- Move Down 35. Effects -Plugins EyeCandy 5 -extrude and choose my preset ''renee_entrave_extrude-2'' - Aktivate the top of the layer palette 36. Layers- New Raster layer 37.Flood Fill Tool: fill the layer with color white 38. Layers- New Mask Layer From Image and choose Mask : ''121748819mask ''
39. Layers-Merge - Merge Group 40. Layers-Duplicate 41. Effects -Edge Effects -Enhance More 42. Effects-Plugins Unlimited – Tramage -Wire Mesch
43. Lower the opacity down to 65% 44. Open the tube ''logane_steampunk7_02decembre 2012'' Edit/copy-Edit paste as a new layer 45. Effects-Image Effects- Offset H=310 and V = 15 46. Layers- Arrange- 2x Move Down - With your keyboard and the arrow keyboard back down to the bottom edge of the work 47. Aktivate the Top of the layers palette 48. Layers- New Raster layer 49. Selections - load/save selection- load selection from disk and select my file ''renee_entrave_5'' Flood Fill Tool: fill the selection with color white 50. Selections - Deselect all 51. Layers- New Raster layer 52. Selections - load/save selection- load selection from disk and select my file ''renee_entrave_6'' - Flood Fill Tool: fill the selection with this color : #456656 53. Selections - Deselect all 54. Effects- Distortion Effects -Wind from right– 100 55. Effects -Edge Effects -Enhance More - Your Layer Palette looks like this now
56. Aktivate the Top of the layers palette 57. Layers- New Raster layer 58. Selections- Custom Selection with these settings
- Flood Fill Tool: fill the selection with this color #dad6d3 59. Effects- Texture Effects– Weave
60. Selections - Deselect all 61. Effects-Plugins EyeCandy 5 Glass choose my preset ''renee_entrave_glass'' 62. Layer Palette: Set the Blend mode to "Darken" 63. Layers- New Raster layer 64. Selections - load/save selection- load selection from disk and select my file ''renee_entrave_7'' 65. Flood Fill Tool: fill the selection with this color #456656 66. Selections - Deselect all 67. Effects-Plugins Eye Candy 6 Perspective Shadow with these settings / Or give a Drop Shadow
68. Open the tube ''Gears_SilTerencio-raster1'' Edit/copy-Edit paste as a new layer and place 69 Open the tube ''DoudouDesign-boitemail'' Edit/copy-Edit paste as a new layer and place 70. Open the tube ''Finn-Dragon''/ Edit/copy-Edit paste as a new layer and place 71. Open the tube "titre" Edit/copy-Edit paste as a new layer and place .Effects-Plugins Eye Candy 6 Perspective Shadow ore give a Drop Shadow *I have the text with separate letters and text that has already been done in the zip 72. Layers- Merge-Merge- Visible 73. Image - Add Borders - Symmetric checked 5 pixels color black 74. Image - Add Borders - Symmetric checked 40 pixels color: #ffffff 75. With the magic wand -select the border of 40 pixels 76. Effects - 3D Effects-Buttonize
77. Selections - Deselect all
I am part of Tutorial Writers Inc. My tutorials are regularly recorded
|
 Translations