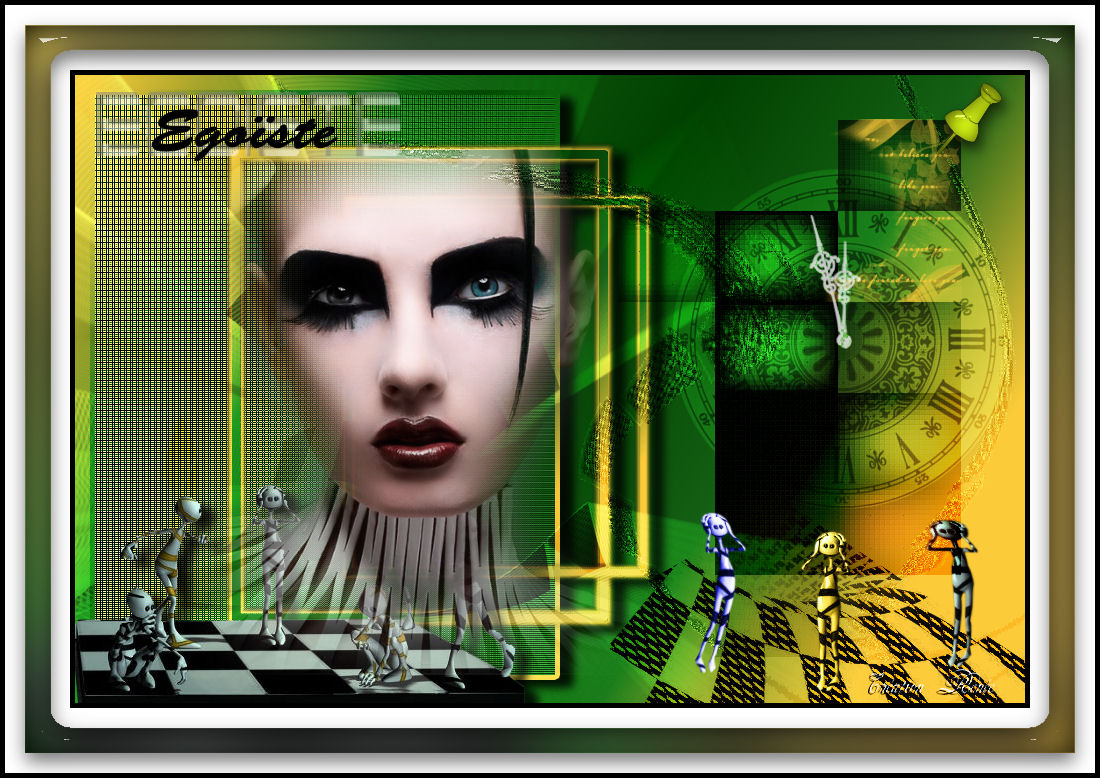
|
Egoïste Traducteur
New
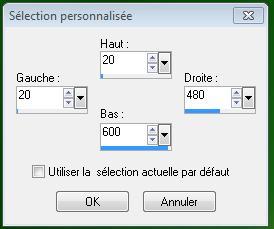
Let's start the lesson. 1. Open a transparent image of 950 x 628 pixels 2. Selections-Select All-Open the image ''fond'' Edit/copy-Edit paste into selection 3. Selections-Deselect All 4. Selection Tool ( S ) Custom selection with these settings
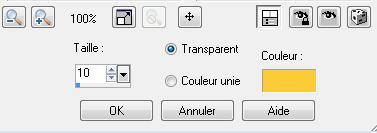
5. Selections- Promote selection to layer 6. Effects-Plugins - UNlimited - Filtre Factory M/ loom / 0 / 255 -If problems with FactoryM filter /Open the image ''tube fond2'' Edit/copy-Edit paste into selection 7. Layers- New raster layer 8. Selections-Modify-Select-Selection Borders with these settings -Both sides
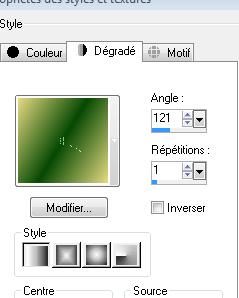
9. Material Properties- Set your foreground color to: #e4d97f Set your background color to: #064904 10. Set your foreground to gradient 'Foreground-background' - Linear -with these settings
11. -Activate Flood Fill Tool and fill the selection with the gradient 12. Layers- Duplicate 13. Effects-3D Effects - Chisel with these settings-Color #fbcb39
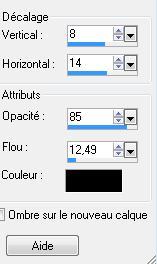
14. Selections- Deselect All 15. Image- Resize a 80% resize all layers not checked 16. Effects-Image Effects-Offset with these settings: H= 50 and V = 0 17. Layers- Duplicate 18. Image- Resize a 80% resize all layers not checked 19. Effects-Image Effects-Offset with these settings: H= 50 and v = 0 - - Close the bottom layer in the layer palette /Activate an open layer in the layer palette 20. Layers-Merge-Merge Visible 21. Effects-3D Effects- Drop Shadow with these settings
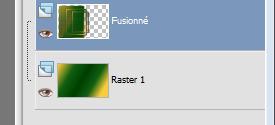
22. Open the bottom layer - Layer Palette look like this now-You should have this result
23.Layers- New raster layer 24. Selections –load/save selection –load selection from disc and choose: '' renee -egoiste'' - Activate Flood Fill Tool and fill the selection with : #000000 25. Selections- Deselect All 26. Effects-Plugins - Penta Com /Color dot Settings 165-28-255-255-255
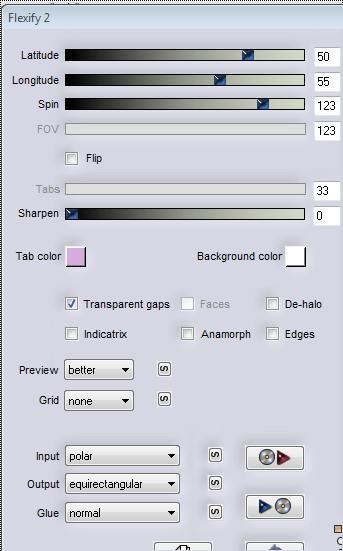
27. Effects-Geometric Effects-Perspective Horizontal 35-transparent 28. Effects-Plugins -Simple /zoom out and flip 29. Effects-Plugins - Flaming pear /Flexify2 with these settings
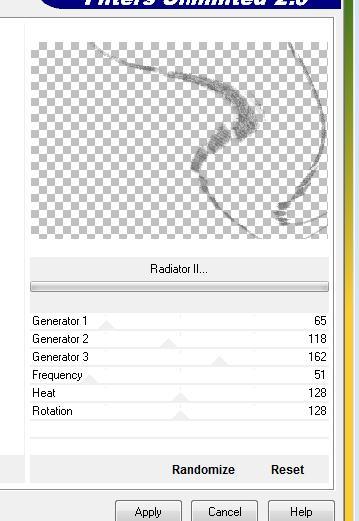
-Do you have problems with this- PNG image is into the zipfile and paste as a new layer on your working area and move 30. Effects-Plugins - EyeCandy5 / blacklight -tab Settings/User settings choose my preset: ''renee-egoiste_blacklight '' 31. Double click on this Layer and set the Blend Mode to "Overlay"-Opacity 100% 32. Open the tube ''12479954679-femmes'' -Edit-Copy- Edit paste as a new layer on your working image and move a little in the frame 33. Open the tube ''personnages'' -Edit-Copy- Edit paste as a new layer on your working image and move to the left 34. Open the tube ''image5'' Edit-Copy- Edit paste as a new layer on your working image 35. Effects-Image Effects-Offset with these settingsH= 238 and V = 0 Transparent 36. Effects-Plugins -VM Distorsion /Radiator II with these settings
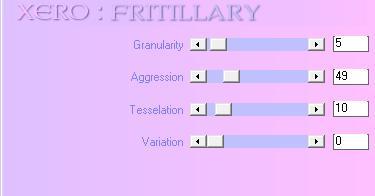
37. Double click on this Layer and set the Blend Mode to "Overlay" 38. Open the tube ''égoïste -tube 7'' -Edit-Copy- Edit paste as a new layer on your working image and move to the bottom right side 39. Effects-Edge Effects-Enhance 40. Open the tubes de « figurines 1-3-4'' -Edit-Copy- Edit paste as a new layer on your working image and move to the bottom right site 41. Open the tube ''egoiste-13'' -Edit-Copy- Edit paste as a new layer on your working image 42. Effects-Image Effects-Offset with these settings: H=240 and V =0 Transparent 43. Double click on this Layer and set the Blend Mode to "Overlay" 44. Effects-Plugins - Xero / Fritillary with these settings
45. Open the tube ''horloge-égoïste »-Edit-Copy- Edit paste as a new layer on your working image and move to the upper right corner 46. Double click on this Layer and set the Blend Mode to "Overlay"-I have lowered the opacity of that layer to 40% 47. Layers- New raster layer 48.Open the brush image ''pinceau -égoïste'' in your PSP File- Export -Custom Brush - Give it a name ''pinceau -égoïste'' Size 183 Set the foreground color to #fbcb39 Activate Brush Tool and select my file: ''pinceau -égoïste'' -Stamp your brush in the upper right corner by using your foreground color as shown in the example below
49. Open the tube ''attache-egoiste ''Edit-Copy- Edit paste as a new layer on your working image and move 50. Open the tube ''aiguille -horloge-egoiste »Edit-Copy- Edit paste as a new layer on your working image and move - Double click on this Layer and set the Blend Mode to "Luminance "-I have lowered the opacity of that layer to 77% 51. Open the tube ''texte-egoiste ''Edit-Copy- Edit paste as a new layer on your working image and move to the upper left corner 52. Layers- Merge-Merge Visible 53. Edit -Copy!! 54. Image - Add borders-Symmetric checked:5 pixels #000000 55. Image - Add borders-Symmetric checked:65 pixels #ffffff 56. With the magic wand -select the white border of 65 pixels 57. Selections-Modify-Contract 20 pixels 58. Edit paste into selection (Image is still in your PSP memory) 59. Adjust-Blur-Gaussian Blur: Radius 35 60. Effects-Plugins -EyeCandy5-Impact - Glass-tab Settings/User settings choose my preset: ''renee-egoiste_glass'' 61. Selections- Deselect All 62. Image - Add borders-Symmetric checked:5 pixels #000000 Save as JPG I hope you enjoyed this tutorial . Renée This lesson was written by Renée 10/2009 edited and update 21/10/2009
** I am part of Tutorial Writers Inc. My tutorials are regularly recordedt ReneeGraphisme_All rights reserved **
** Any resemblance with an existing lesson is merely a coincidence * * Don't forget to thank the people who work for us and with us. I named the tubeurs - Testers and the translators. Thanks Renée.
|
 Translations