|
New
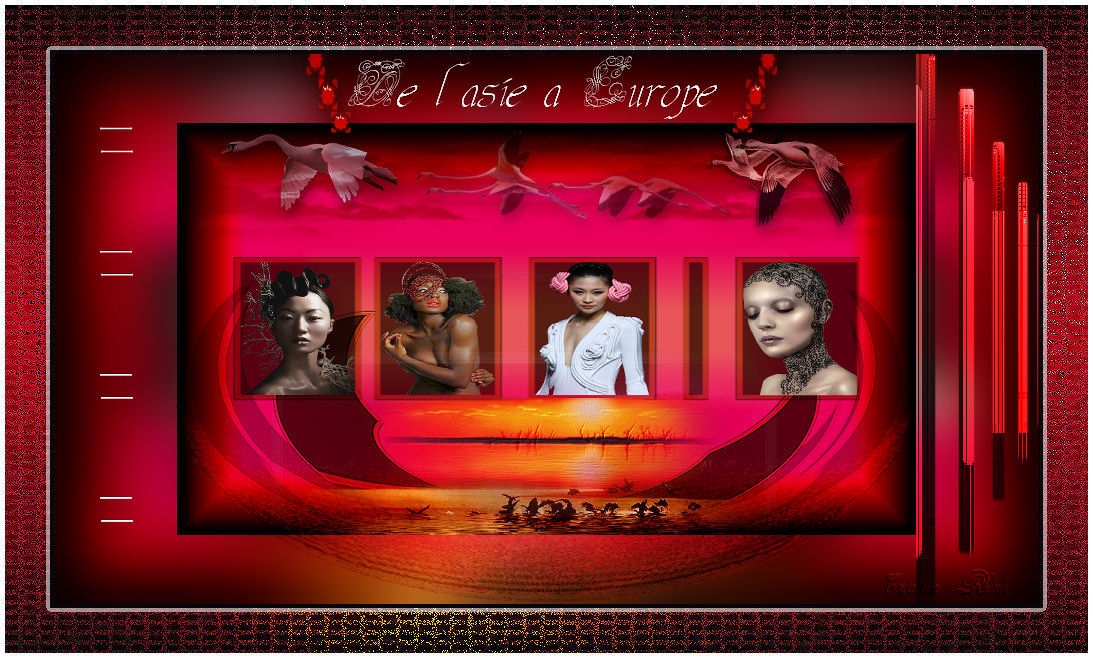
Translations here De l'Asie a Europe
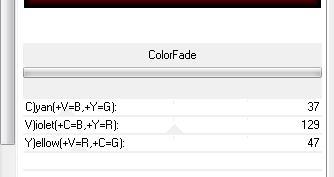
1. File-Open a new transparent image 985 x 550 pixels 2. Activate Flood Fill Tool and fill the layer with : #e85659 3. Effects-Plugins -DCS special /Color fade
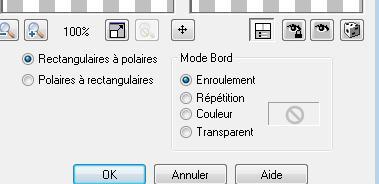
4. Open the tube ''cadre'' Edit/ Copy-Edit - Paste as new layer on your working area (do not move it is in the right place) 5. Double click on this Layer and set the Blend Mode to "Multiply" 6. Layers- Duplicate 7. Effects- Distortions Effects-Polar Coordinates-Rectangular to Polar-Transparent 8.Effet Filtre Eyecandy 5 Impact /perspective shadow -tab Settings/User settings choose my preset: ''@renee nuit chinoise'' 9. Effects- Distortions Effects-Polar Coordinates-Rectangular to Polar-Wrap
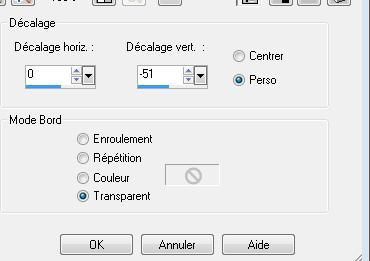
10. Selections –load/save selection –load selection from disc and choose: ''renee nuit chinoise'' / Delete (Activate the Eraser tool: erase the excess black line) 11. Selections-Deselect All 12. Effects- Image Effects- Offset with these settings
13. Effects-Edge Effects-Enhance More 14. Open the tube « nuage nuit chinoise « Edit/copy- Edit/ paste as new layer on your working image 15. Double click on this Layer and set the Blend Mode to "Multiply" -Set the layer opacity of this layer to 75 % Adjust-Sharpness-Sharpen More you should have this result:
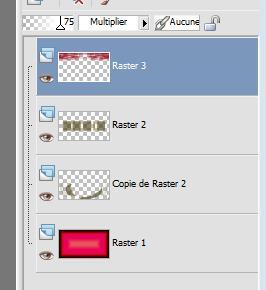
The Frames 16. Layer palette – Make raster 2 active ( 4 Frames ) 17. With the magic wand select inside of the first frame 18. Layers-New Raster layer 19. Open the tube '' 1Patries-VR284-redoneBrench lady-4-10-09'' -Edit/copy- Edit/ paste into selection/Selections- Deselect All 20. Vous replacer sur raster 2 21. With the magic wand select inside of the second frame 22. Layers-New Raster layer 23. Open the tube''crealios ethies -bustes-341 ''-Edit/copy- Edit/ paste into selection/Selections- Deselect All 24. With the magic wand select the the 3rd frame 25. Layers-New Raster layer 26. Open the tube "Crealios asie bustes -499 " Edit/copy- Edit/ paste into selection/Selections- Deselect All 27. With the magic wand select the the 4rd frame 28. Layers-New Raster layer 29. Open the tube "37-Silvina-vanesa-orsi " Edit/copy- Edit/ paste into selection/Selections- Deselect All 30. Activate the top of the layer-Palette 31. Open the tube " oiseaux d'asie " - Edit/copy- Edit/ paste as new layer on your working image 32. Layers- Arrange- Move down (underneath raster 3 ) 33. Layers- Merge- Merge- Visible 34. Open the tube « matou-paysage-2417436mdad9-17-10-2010 » -Edit/copy- Edit/ paste as new layer on your working image 35. Double click on this Layer and set the Blend Mode to "Hard Light " 36. Layers- Merge- Merge- Visible 37. Layers- Duplicate 38. Stay on this layer /Image Resize 75% resize all layers not checked 39. Activate the bottom of the layer-Palette ( merged layer) 40. Adjust-Blur-Gaussian Blur: Radius: 25 41. Open the tube « attaches « - Edit/copy- Edit/ paste as new layer on your working image and move 42. Material Properties: Set your foreground color to: #e85659- Set your background color to #000000 43. Set your foreground to gradient 'Foreground-background' - Linear - Angle 0 - Repeats 0 - Invert checked. 44. Layers- New raster layer - Selections –load/save selection –load selection from disc and choose: '' @renee -nuit chinoise3'' Activate Flood Fill Tool and fill the selection with the gradient 45. Selections-Deselect All 46. Adjust-Add/Remove Noise/Add Noise with these settings
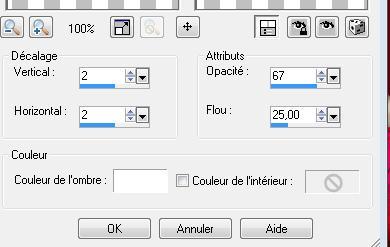
47. Effects-Texture Effects-Mosaic Antique with these settings
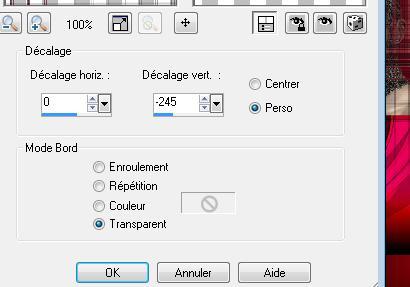
48. Effects- Image Effects- Offset with these settings
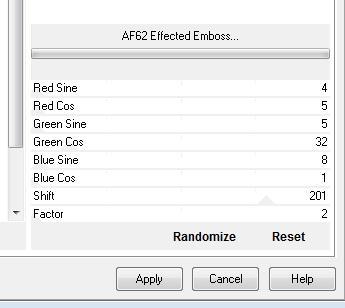
49. Effects-Plugins -Unlimited 2.0 <BkDesignsf10 I>/AF62 Effected Emboss
50. Effects- Geometric Effects- Circle - Transparent 51. Double click on this Layer and set the Blend Mode to "Soft Light " 52. Activate your Pick Tool (K) place it in the right place as shown in the example below
53. Open the tube « asie barre "Edit/copy- Edit/ paste as new layer on your working image and move to the right side 54.Effects-Illumination Effects-Sunburst and choose my preset- ''@renee -asie'' - (into the zip ) 55. Open the Brush-Tube '' ligne verticale'' Edit/copy- Edit/ paste as new layer on your working image and move to the left side 56. Click on your Text Tool/Font is into the zip- Write your text/Effects-Edge Effects-Enhance 57. Image - Add borders-Symmetric checked: 4 pixels black 58. Image - Add borders-Symmetric checked: 45 pixels white 59 Material Properties:Set your foreground color to: #af0012- Set your background color to #000000- Set your foreground to gradient 'Foreground-background' - Linear with these settings
60. Activate the Magic Wand and select the white part 61. Activate Flood Fill Tool and fill the selection with the gradient 62. Adjust-Add/Remove Noise/Add Noise with the same settings 63. Effects-Texture Effects-Mosaic Antique with the same settings 64. Effects- Edge Effects- Enhance 65. Selections- Invert- Selections Float Selections-Modify-Select Selection Borders with these settings
66.Effects- 3 D Effects- Cutout with these settings
67. Image - Add borders-Symmetric checked: 5 pixels white 68. Open the ''coucher de soleil ''-Edit/copy- Edit/ paste as new layer on your working image -Layers-Merge-Merge All. Save as JPG
I am part of Tutorial Writers Inc. My tutorials are regularly recordedt ReneeGraphisme_All rights reserved
*
|
 Translations