|
New
Translations here
Complexité
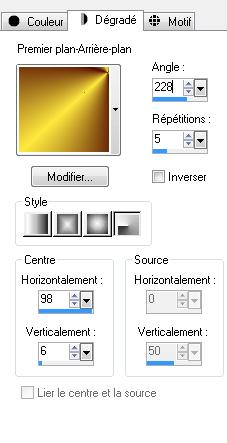
Let's start the lesson 1. Open the Backgroundimage "fond1" Window - Duplicate (or shift+D) - Close the original and proceed on the copy -Promote Background Layer =Raster 1 2. Set your foreground to gradient 'Foreground-background' -Prepare a radial gradient configured like this. - Set your foreground color to #fee93e- Set your background color to #4f0800
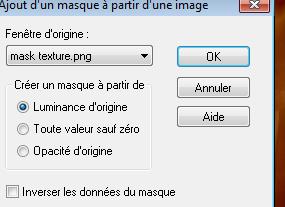
3. Layers- New raster layer -Activate Flood Fill Tool and fill the layer with the gradient 4. Layers- New Mask layer from Image and choose Mask:'''mask texture.png''
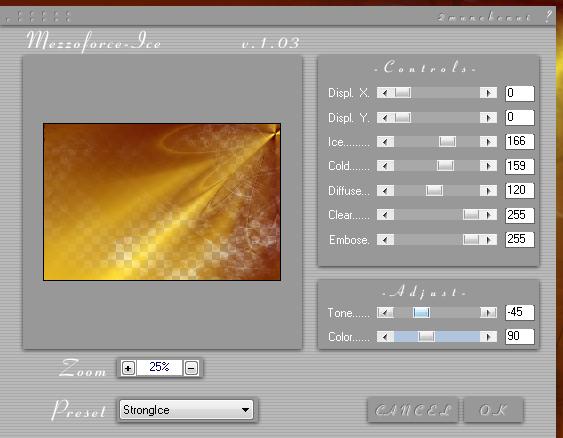
5. Layers Merge- Merge Group If your filter Mezzo force Ice does not give the same result -The effect is included with the material" pspimage'' -Paste it as a new layer on your working area -Skip from point 3 to 6 and continue with step 7) 6. Effects-Plugins- Mezzo force...Ice v.1.03/Strongle with these settings ( This filter does not work in versions of Psp 14 and 16)
7. Layers- New raster layer 8. Selections - Select all 9. Open the tube ''dejs1hjd'' Edit/ Copy-Edit - Paste into selection 10. Selections - Float Selections – Defloat. 11. Effects- Plugins Red Prince noise generator/Add light noise This plugin has 4 set ups. If you want this plugin to be complete you should install all three. If not just install the one you like best - Selections- Deselect All- Set the layer opacity of this layer to 65% 12. Layers- Merge- Merge Visible 13. Layers- Duplicate 14. Effects- Plugins- Photo Agin/Hair and Dust /128/128 15. Open the tube ''Treagen3402-08-03-12'' Edit/ Copy-Edit - Paste as new layer on your working area -With your move tool move to the left - Double click on this layer and set the Blendmode to Luminance Legacy 16. Effects- Plugins -FMTile Tools /Blend emboss /using the default settings 17. Open the tube ''SS_1586_Misted'' Edit/ Copy-Edit - Paste as new layer on your working area -With your move to the bottom right - Double click on this layer and set the Blendmode to Screen 18. Effects- Plugins - Graphic plus /cross shadow /Click Reset -and OK 19. Open the tube ''Azyzam-Flower-1-27dec2008'' Image Resize with 35% Edit/ Copy-Edit - Paste as new layer on your working area-Image Flip and move - Double click on this layer and set the Blendmode to Luminance 20. Open the tube ''AR646'' On this tube !! Layers- New Mask layer from Image and choose Mask:''Top fade ''/ Layers- Merge- Merge Group Edit/ Copy-Edit - Paste as new layer on your working area - Double click on this layer and set the Blendmode to Luminance Legacy 21. Layer palette-Close the bottom layer 22. Activate your top layer / Layers- Merge- Merge Visible 23. Selections - load/save selection - load selection from disk and select my file: ''renee-complexite'' 24. Effects- Plugins- Distorsion filters / cracked at 64 25. Effects- Plugins - Eyecandy5 Perspective shadow Tab-Settings -Preset - drop shadow blury 26. Effects- 3 D Effects-Drop Shadow with these settings: 10/-9/65/12 black 27. Selections-Deselect All 28. Image Resize with 85% Resize all Layers not checked 29. Effects- 3 D Effects-Drop Shadow with these settings:
- Repeat: Effects- 3 D Effects-Drop Shadow with these settings: -5 and 9 - Activate the bottom of the layer-Palette/Open the layer 30. Effects- Plugins- Unlimted Unplugged Tools /Spiral with these settings
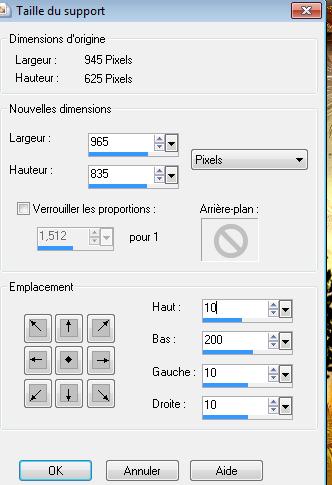
- Stay on the bottom layer 31. Image -Canvas Size with these settings
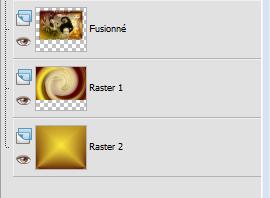
32. Layers- New raster layer 33. Layers- Arrange-Move Down /Activate Flood Fill Tool and fill the layer with the gradient 34. Image Flip 35. Layers- Duplicate / Image Mirror /Set the layer opacity of this layer to 51%
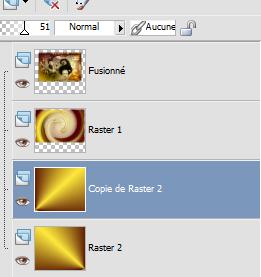
36. Layers-Merge-Merge Down - Layer palette look like this now
- Activate the top of the layer-Palette( merged layer) 37. Layers- Duplicate 38. Effects- Plugins- Andromeda perspective /Floors /front view 39. Pick Tool (K) place it in the right place as shown in the example below
- Double click on this layer and set the Blendmode to Hard Light /Set the layer opacity of this layer to 65% 40. Layers- New raster layer 41. Selections - load/save selection - load selection from disk and select my file: ''renee-complexite1 '' - Pot of Paint: Change the opacity of the color at 80% as shown below
- Activate Flood Fill Tool and fill the layer with #a9ae57 ***Pot of Paint: Change the opacity of the color at 100 % - Eraser Tool-erase the yellow line as shown below
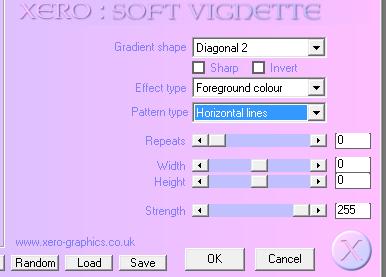
42. Open the tube ''element -complexite'' -Edit/ Copy-Edit - Paste as new layer on your working area 43. Activate the tube ‘’titre ‘ -Edit /Copy -Edit - Paste as new layer on your working area and move. Ore write your own text. /Double click on this layer and set the Blendmode to Hard Light 44. Layers- Duplicate /Image Flip /Set the layer opacity of this layer to 26 45. Layers- Merge- Merge All 46. Image - Add borders-Symmetric checked:5 pixels black 47. Image - Add borders-Symmetric checked:20 pixels #9a9046 48. With the magic wand select the border of 20 pixels 49. Effects- Plugins - Xero /soft vignette with these settings
50. Effects- Plugins - Adjust Variation /click 2x lighter 51. Selections- Deselect All 52. Image - Add borders-Symmetric checked:5 pixels black Save as JPG I hope you enjoyed this tutorial . Renée This lesson was written by Renée -June 2012 * Any resemblance with an existing lesson is merely a coincidence * * Don't forget to thank the people who work for us and with us. I named the tubeurs - Testers and the translators. Thanks Renée.
I am part of Tutorial Writers Inc. My tutorials are regularly recordedt ReneeGraphisme_All rights reserved
*
|
 Translations