|
New
Translations here
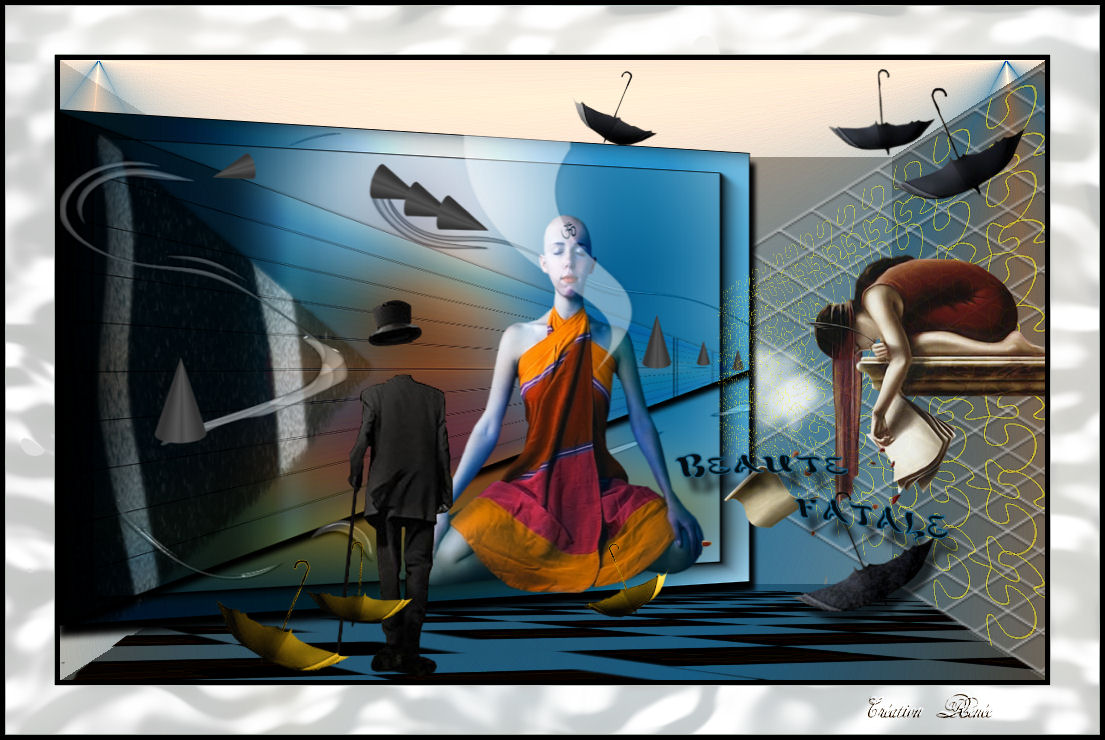
Beauté Fatale
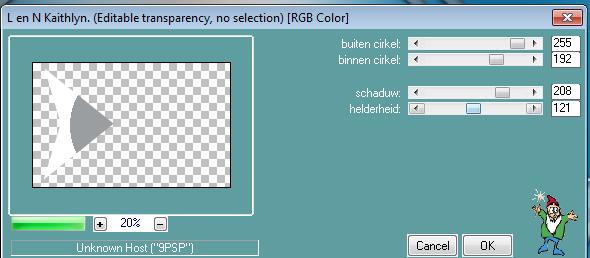
Let's start the lesson. /Open the Color Palette 1. Open the image "fond de départ"-Window - Duplicate (or shift+D) - Close the original and proceed on the copy 2. Layers- New raster layer 3. Selections –load/save selection –load selection from disc and choose: '' renee-beauté -fatale '' 4. Color-palette:Set your foreground color to #9a9ea1-Activate Flood Fill Tool and fill the selections with the foreground color /#9a9ea1 5. Selections-Deselect All 6. Effects-Plugins - L and k's /Kaithlyn with these settings
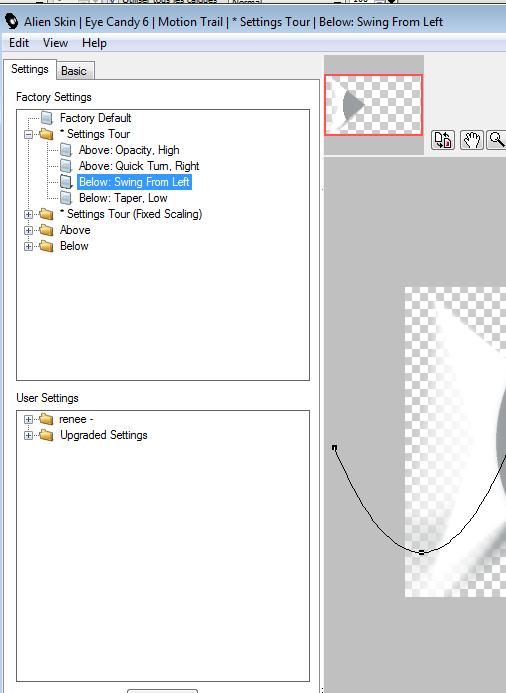
7. Effects-Plugins - Eyecandy 6/Motion Trail / settings Tour/Below:Swing From Left
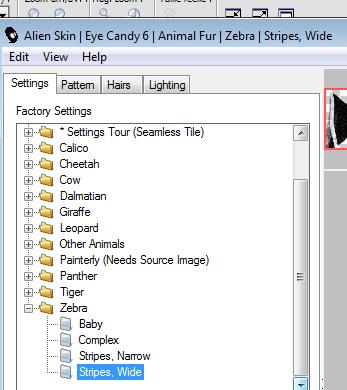
8. Effects-Plugins - Eye Candy6 / Texture/Animal fur/ Zebra/Stripes ,wide
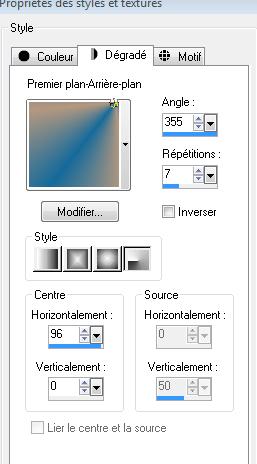
9. Set the layer opacity of this layer to 59% 10. Layers- New raster layer 11. Preparation: Color-palette:Set your foreground color to #b5987f -Set your background color to #166a9b 12.Properties Foreground; Set your Foregroundcolor to forground-background radial gradient, with these settings 13. Layers- New raster layer
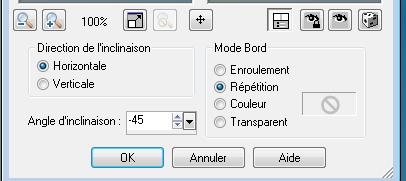
14. Flood Fill Tool - fill the layer with your forground-background gradient 15. Effects-Geomertic Effects-Skew with these settings
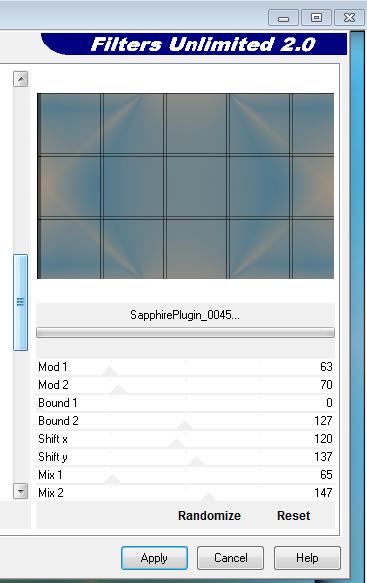
16. Effects-Plugins - Simple /4way average 17. Double click on this layer and set the Blendmode to Hard Light /Effects-Edge Effects-Enhance 18. Effects-Plugins - Unlimited 2.S - Sapphire 001Plugin_ 0045 with these settings
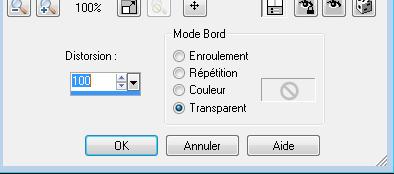
19. Effects-Geomertic Effects-Perspective Horizontal with these settings
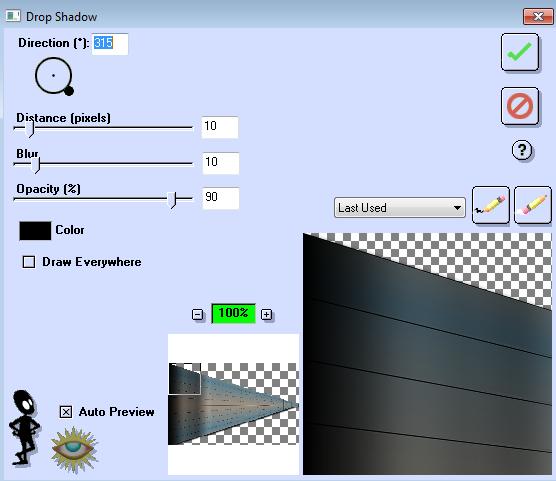
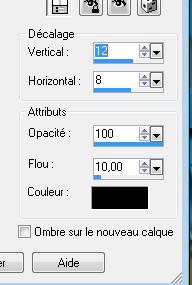
20. Effects-Plugins - EyeCandy 3 /Drop shadow with these settings
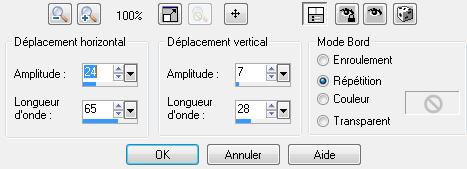
21. Open the tube ''renee-beaute fatale -voile1'' Edit/copy- Edit/ paste as new layer (do not move it is in the right place) 22. Effects-Distortion Effects-Wave with these settings
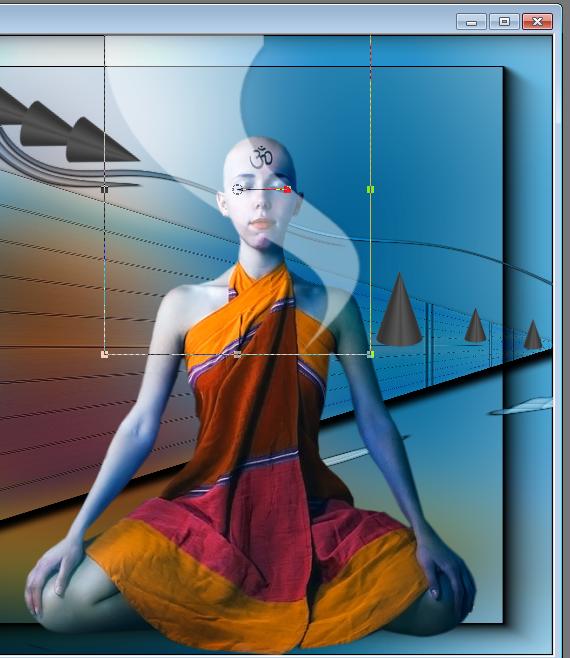
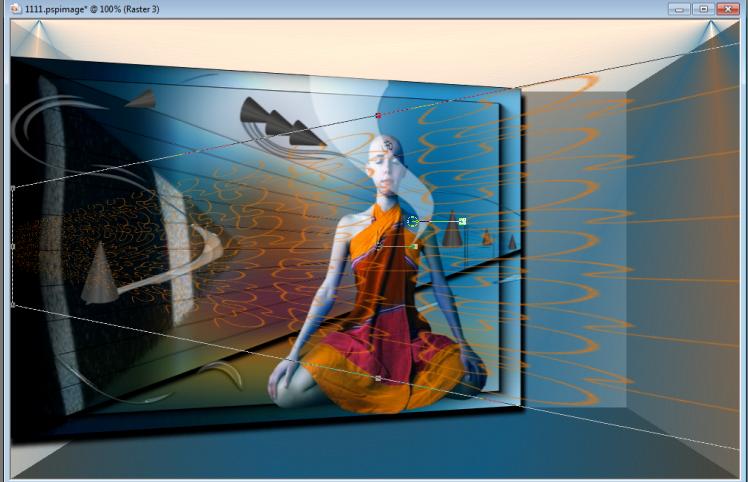
23. Double click on this layer and set the Blendmode to Luminance Legacy 24. Open the tube ''cônes placés '' -Edit/copy- Edit/ paste as new layer and move 25. Open the tube ''anna rizzi-arr 551'' Image Resize 87% -Edit/copy- Edit/ paste as new layer and move 26. Open the tube ''renee-beaute-fatale -image2 '' -Edit/copy- Edit/ paste as new layer - With your move tool place it as show in the example below
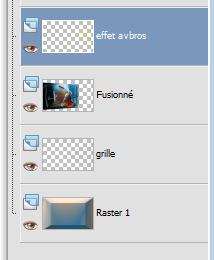
27. Layers-Merge-Merge-Visible 28. Image Resize 85% resize all layers not checked 29. Layers- New raster layer /Layers-Arrange-Sent to Bottom 30. Flood Fill Tool - fill the layer with your forground-background gradient
31. Layers-Duplicate-Image Mirror-and set the layer opacity of this layer to 40% - you should have this result:
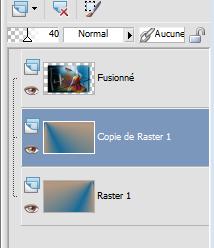
32. Layers- Merge-Merge- Down 33. Activate the bottom of the layer palette=Raster 1 (merged layer ) 34. Effects-Plugins - Toadies /*Sucking Toad*Bevel I... / 80/199/253 35. Activate the top of the layer palette /Effects-3D Effects-Drop Shadow with these settings
Make the merged layer active 36. Effects-Geometric Effects- Perspective Horizontal -Distorsion = 20 Transparent 37.Activate the Pick Tool/Deformation tool (K) mode scale -push the node to 700 as shown in the example below Hit the M key of your Keyboard to remove the Nodes
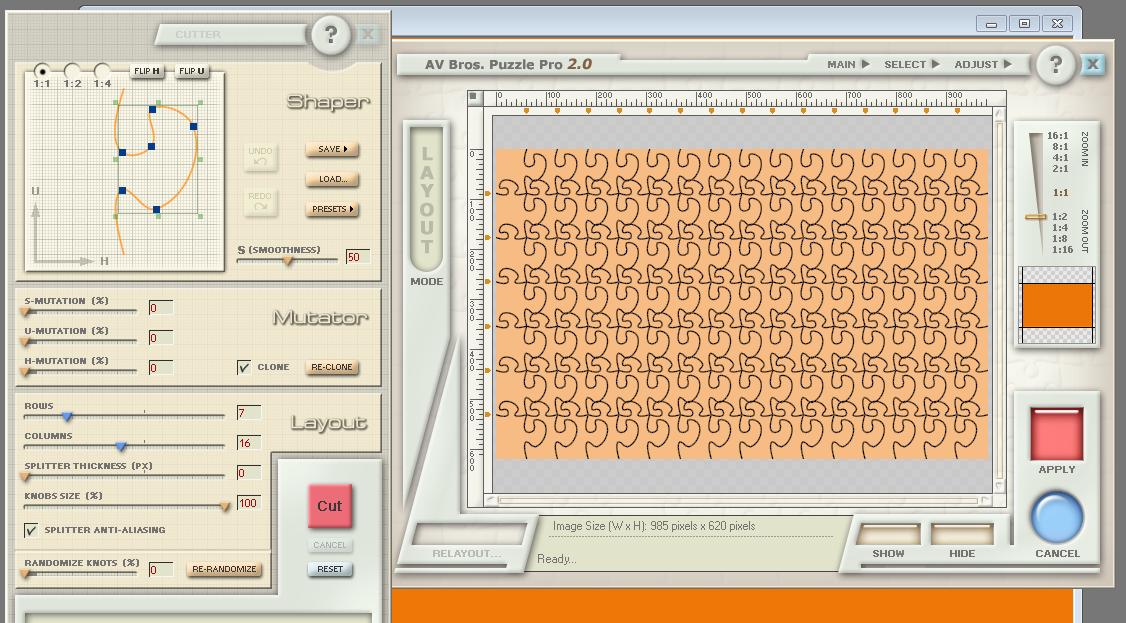
38. Preparation: Color-palette:Set your foreground color to #ee7709-Flood Fill Tool- fill the layer with the foreground color #ee7709 About the filter AV BROS The effect is included with the material " pspimage effect AVbros '' Paste it as a new layer on your working area and move to the right side - go directly to point 41 39. Effects-Plugins - AVBros 2.2 puzzle with these settings (!!!!!Attentions !!Do you have problems with PSP, try it in photoshop )
- Activate your Pick Tool (K) Mode Scale with these settings
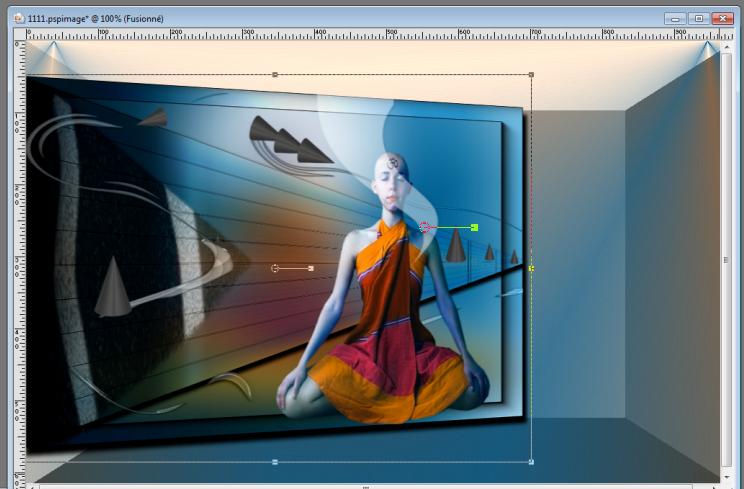
You can stretch it in this model, and then push into the form ( see finished image )
40. Effects-Edge Effects-Enhance More 41. Open the tube ''renee -beaute-fatale-grille" Edit/copy- Edit/ paste as new layer on your working image 42. Effects-Image Effects- Offset with these settings H= 400 and V =0 Transparent 43 Layers-Arrange- Move Down-underneath the merged layer - you should have this result:
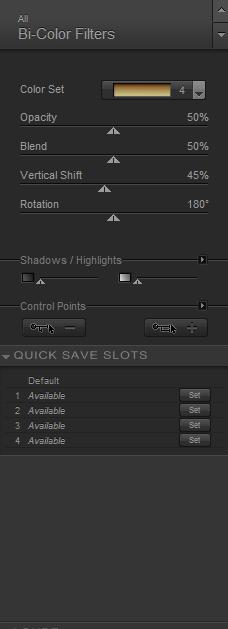
44. Open the tube ''parapluie -nikita-13186825846'' Edit/copy- Edit/ paste as new layer on your working image and move 46. Layers-Duplicate /Image Flip 47. Effects-Plugins - Nick color effex Pro.3 /Bi-Color /Color set 4
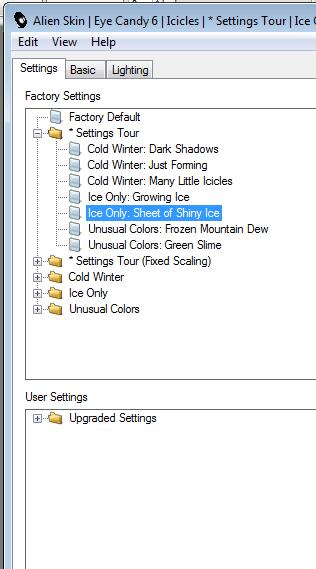
48. Image Mirror/ Image Flip and move 49. Open the tube - Homme ''chapeau-nikita-13186825846''/ Edit/copy- Edit/ paste as new layer on your working image and move **Attention!!! Window - Duplicate (or shift+D) - Close the original and proceed on the copy -** 50. Open the tube -'' modifié SKF '' Image Resize 85 % -Edit/copy- Edit/ paste as new layer on your working image and move to the right side (See FINISHED image) 51. In the layer palette -Make raster 1 active - Open the tube ''sol'' Edit/copy- Edit/ paste as new layer on your working image and move to the bottom 52. Open the tube texte-Edit/copy- Edit/ paste as new layer on your working image and move to the right side 53. Layers-Merge- Merge- Visible 54. Image - Add borders-Symmetric checked: 5 pixels black 55. Edit-Copy!!!!! 56. Image - Add borders-Symmetric checked: 50 pixels white 57. Activate the Magic Wand and select the white border of 50 pixels Edit paste into selection (Image is still in your PSP memory) 58. Adjust-Blur-Gaussian Blur :Radius: 22% 59. Effects-Plugins - Eyecandy6/ Icicles /*Settings Tour /Ice Only: Sheet of Shiny ice
60. Selections-Deselect All 61. Image - Add borders-Symmetric checked: 5 pixels black Save as JPG
I am part of Tutorial Writers Inc. My tutorials are regularly recordedt ReneeGraphisme_All rights reserved
|
 Translations