|
Let's begin
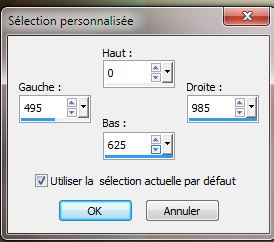
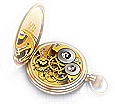
1. Open a transparent image of 985 x 625 pixels
2. Properties foreground: Color palette : Foreground color #f7e8b1 and Backgroundcolor: #570905
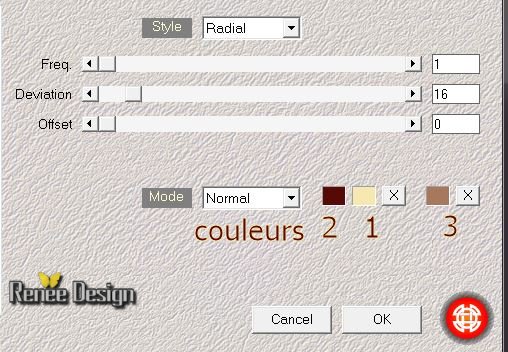
3. Effects - Plugins Medhi - Wavy lab
4. Effects -Plugins Simple - Top bottom
warp
5.
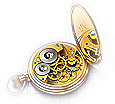
Open the tube ''voyage_image_1'' Edit/copy-Edit/and Paste as a new layer
Blend Mode of this layer:"Overlay" - Opacity to 100
6.
Effects -Distorsion Effects-Twirl
7.
Activate your bottom layer in your layer palette (raster 1)
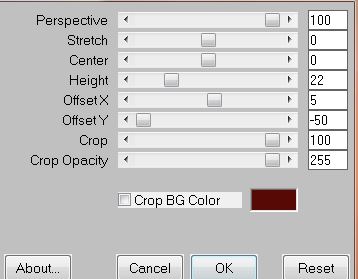
8.
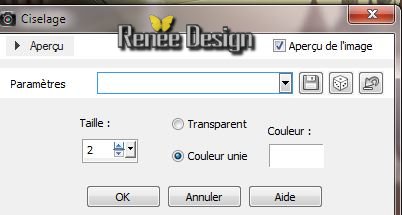
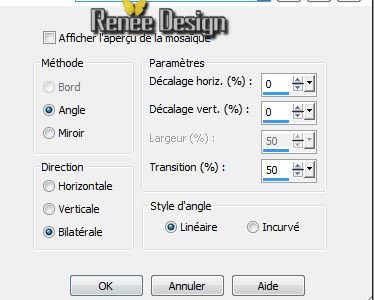
Selections-Custom selection with these settings
9.
Selections-Promote Selection To Layer
-
Selections-select none
10.
Activate your top layer
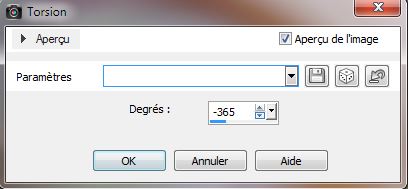
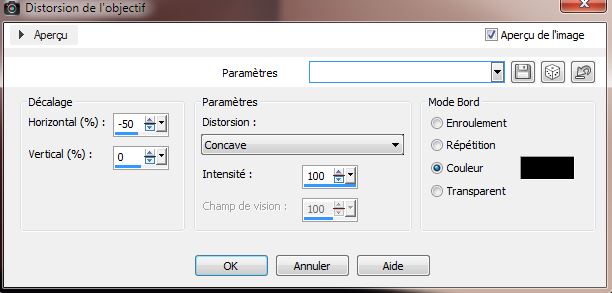
11.
Effects - Distorsion effects- Lens Distorsion
(black color)
12.
Blend Mode of this layer "Luminance" and the Opacity to 44%
13
Effects-Plugins Simple - 4 Way Average
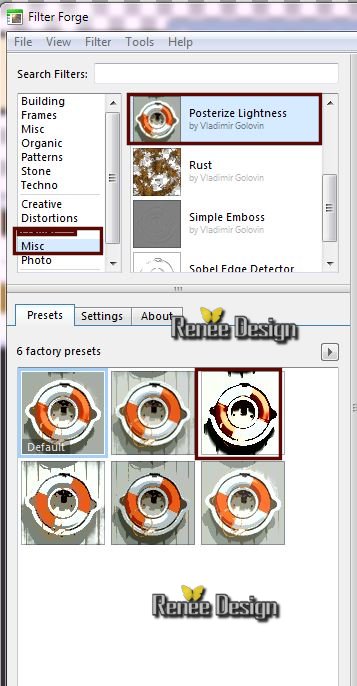
14. Effects - Plugins Forge / Misc -Posterize
Lightness
15.
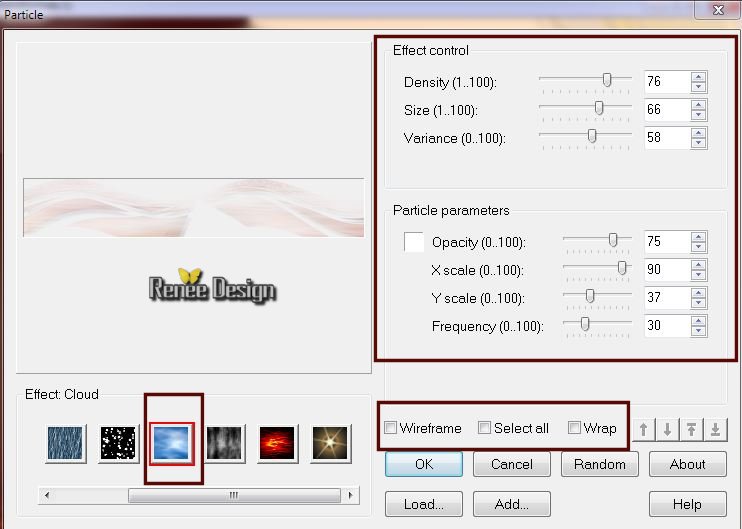
Stay on the layer selection transformed
16.
Selections - load/save selection - load selection from disk and choose ''voyage_1'' / Selections-Promote Selection To Layer
17.
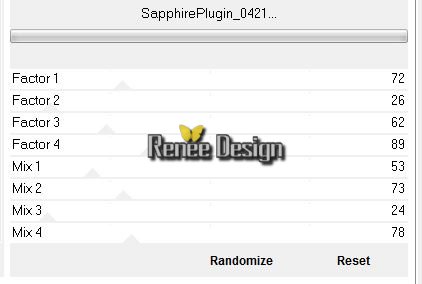
Effects- Plugins Unlimited -Sapphire Filters 05/ Sapphire
Plugin _0421
18. Effects - Plugins Unlimited Factory Gallery M -Loom
35/65
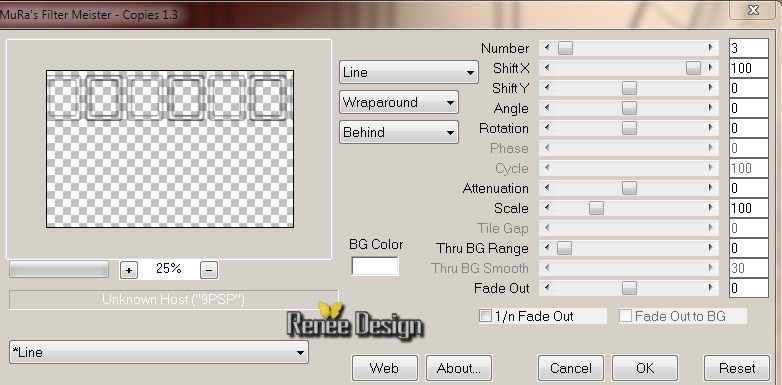
Selections-select none
19.
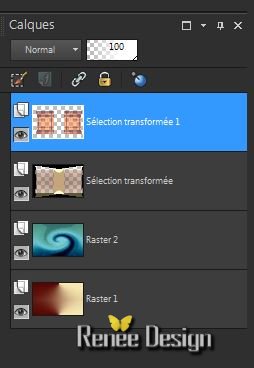
Layer Duplicate-Image Mirror /Layers-Merge-Merge Down
Here are my layers
20.
Effects - Plugins Mura's Meister - Perspective Tilling
21.
Effects- 3D effects-Drop Shadow: 10/10/50/5 black
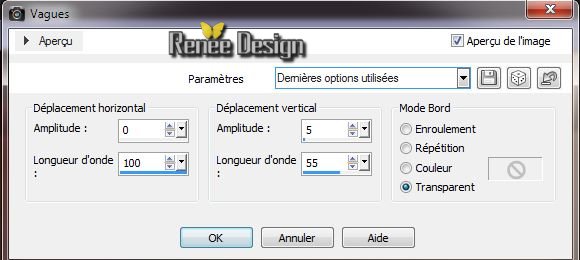
22.
Effects - Distortion Effects- Wave
23.
You stay on this layer below(selection transformed)
24.
Effects -Geometric Effects- Perspective Horizontal
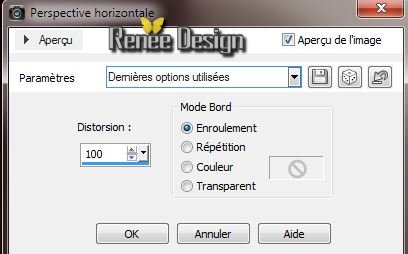
25.
Stay on this layer- Effects - Plugins Transaprency
-Eliminate Black
26.
Effects - 3D Effects - Drop Shadow ( always in memory )
27.
Be placed on this layer- (Raster 2)
28.
Effects - Plugins Flaming Pear - Flood

29.
Effects- Edge Effects-Enhance More
30.
Be placed on the top layer (Selection transformed 1)
31.
Layer-Duplicate
32.
Effects - Plugins Ulead Effect -Particle
33.
Blend Mode on this layer"Hard Light"and the Opacity to
71%
34.
Open the tube ''voyage_image_2'' /Edit/ copy- Edit/ paste as new layer and place
35.
Select tool (K) Put like this to 600
36.
Layers-New Raster layer
37.
Selections - load selection from disk and choose''voyage_2"
38.
Effects - Plugins EyeCandy 5 - Glass -Preset ''Clear''
39.
Selections-select none
40.
Effects - Plugins Mura's Meister - Copies
41.
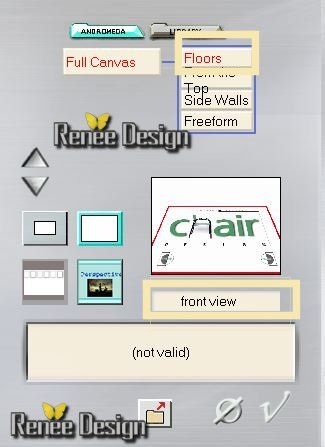
Effects-Plugins Andromeda - Floors - Front viewer
42.
Eraser-Tool: Erase the excess right to have this

43.
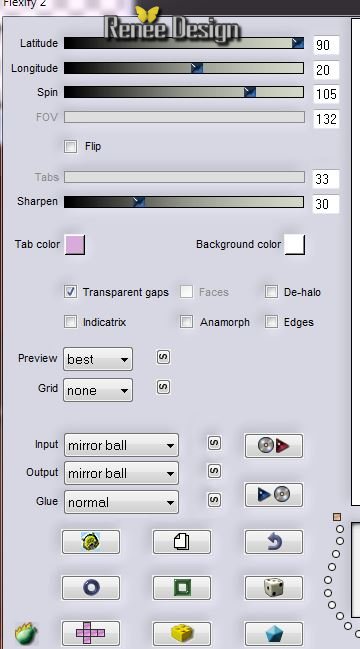
Effects - Plugins Flaming Pear -
Flexify 2/Preset ''Flexify_-q2_voyage '' or save settings
to bring the preset click on the red arrow
44. Layers-Duplicate
45.
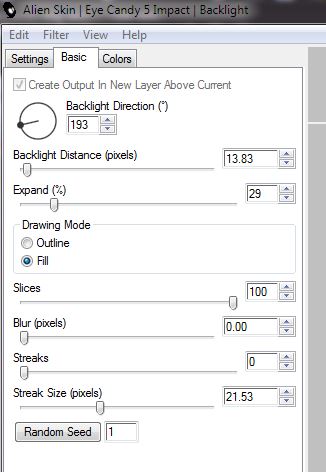
Effects -Plugins EyeCandy5-Imapct / BlackLight
/ Use the preset:Preset ''BlackLight_voyage''
46.Layers-Arrange -Move Down- .Blend Mode of this Layer""Hard Light" and the Opacity 55%
46.
Be placed on the top layer / Layers-Merge-Merge Down /Move Tool:Place the tube as shown in the screen below.
47.Be placed on the top of the Layers palette
48.
Open the tube ''voyage_image_chaine '' - Edit/copy-Edit/and Paste as a new layer/and place
Properties foreground: Color palette : Foreground color
#5c5c5c
49.
Open the Lighten and Darken Brush-Dodge( L) - configured as follows:/Size 185 and the Opacity 76

Giving small strokes in places arrows like this(to clear up the places)
50.
Open the tube''voyage_image clou '' / Edit/copy-Edit/and Paste as a new layer/
Image
Mirror -and place
51.
Effects - 3D Effects -Drop Shadow 10/10/50/5 black
Layers-Merge-Merge Down
52.
Layers-New Raster layer
53.
Selections - load/save selection - load selection from disk and choose''voyage_3'' /Flood Fill Tool :Opacity 50 -Fill the selections with white
54.
Selections-select none
55.
Open the tube ''voyage_image_3'' Edit/copy-Edit/and Paste as a new layer/and place
56.
Open the tube ''voyage_image_terre'' Edit/copy-Edit/and Paste as a new layer
and place
57.
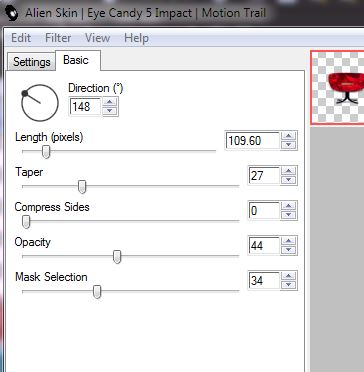
Effects -Plugins EyeCandy 5 -Impact - Motion trail
/Use the preset: Preset ''voyage -motion _trail''
58.
Open the tube ''voyage_hommeassis ''Edit/copy-Edit/and Paste as a new layer.Move tool:Place move right underneath
59.
Effetcts- Plugins Graphic plus - Cross Shadow
default
60.
Open the tube''Lize27'' Image Resize 65%
-Edit/copy-Edit/and Paste as a new layer/ Move tool: Place the tube at the top left
-
Opacity of this layer 63%
61.
Open the tube ''lize_kameel'' /Image Mirror/Image
Resize 75 %-
Edit/copy-Edit/and Paste as a new layer
62.
Open the tube ''voyage_image_chaine2'' / Edit/copy-Edit/and Paste as a new layer/Move tool: Place the tube
63.Be placed on the raster layer 2 and the Opacity to 100%
64.
Open the tube mot "" voyager ""/ Edit/copy-Edit/and Paste as a new layer/Fill the selection with white. Move Tool : Place the tube as shown in the screen below
65.
With Rectangle Selection Tool/Draw a selection around the word - Selections-Modify - Select Selection borders
66.
Flood Fill Tool: Fill the selection with white
67.
Effects- 3D Effects- Chisel
68.
Effects- Image Effects- Seamless Tiling
69.Selections-select none
70.Layers-Merge-Merge Visible
71.
Image - add borders symmetric 5 pixels color {Take colors two of the color palette # 570905}
72.
Edit copier
73.
Image - add borders symmetric 35 pixels white
74.Activate your Magic wand : Click with your magic wand in to the 35 pixels
75.Edit/Past in to te selection(The Image is still in memory)
76.
Adjust-Blur-Gaussian Blur: Radius 50
77.Selections-Invert
78.
Effects- 3D Effects -Drop Shadow 10/10/50/5 black= refaire
-10/-10
79.
Selections-select none
80.
Image - add borders symmetric 20 pixels white
81.
Open the tube
''titre -Edit/copy-Edit/and Paste as a new layer''
That's it !! You've done it !
Renée
This lesson was written by Renée 12/12/2013
Created the
le
11/01/2014
*
Any resemblance with an existing lesson is merely a coincidence
*
Don't forget to thank the people who work for us and with us. I named the tubeurs - Testers and the translators .
Thank you
| 

 Translation