|
Let's start the lesson.
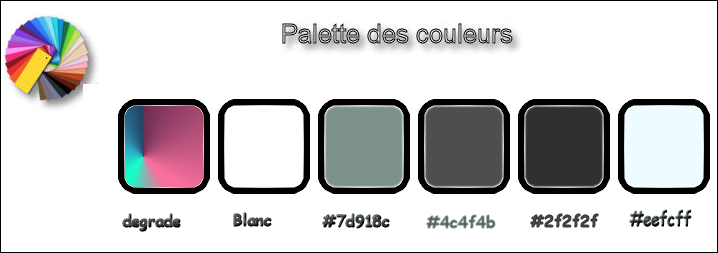
Used Colors
-
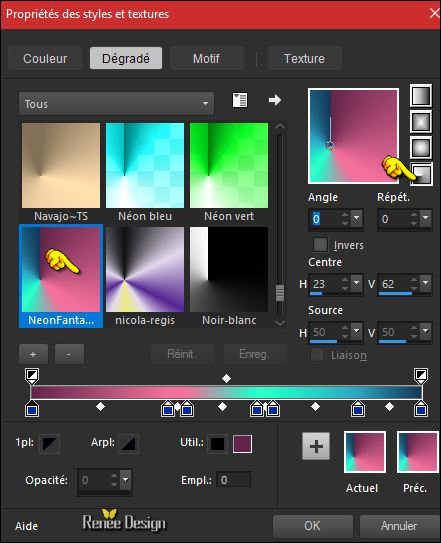
Preparation : Color Palette:Set your Foreground color to Gradient and select :‘’NeonFantasy_CC ‘’ Prepare a foreground-radial gradient configured like this.Set your Background color to #ffffff
1.
Open the image ‘’Trouble_Fleurs’’- Window - Duplicate (or shift+D) - Close the original and proceed on the copy -Promote Background Layer = Raster 1
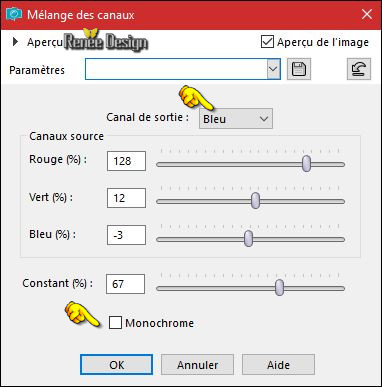
2. Adjust-Color-Channel Mixer use the settings below (Adapt here according to the colors of your tube if you do not take mine )
3.
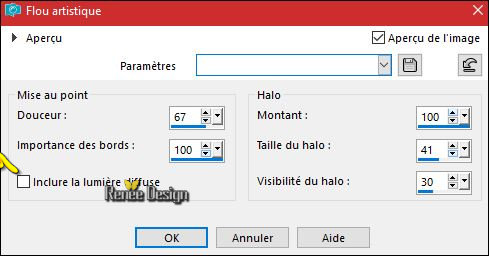
Adjust- Softness-Soft Focus with these settings
4.
Adjust- Blur-Gaussian Blur: Radius 65
5.
Layers- New Raster Layer
6.
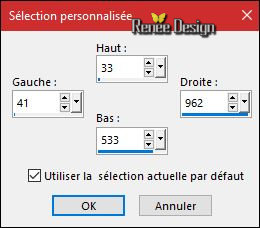
Activate Selection Tool -Custom Selection (S) -Rectangle with these settings
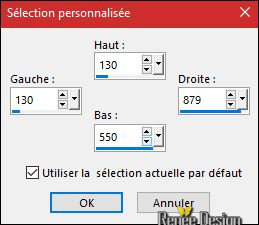
7.
Activate Flood Fill Tool and fill the selection with the gradient
8.
Adjust- Blur-Gaussian Blur: Radius 65
9.
Effects- Art Media Effects-Brush Strokes use the settings below-Color #716587
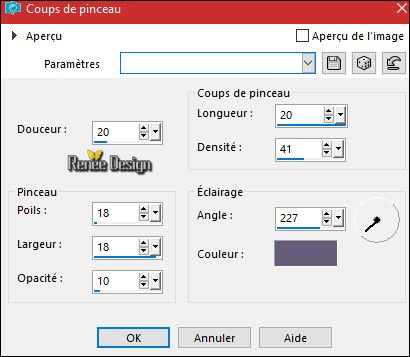
10.
Effects- Edge Effects- Enhance More
Keep Selected
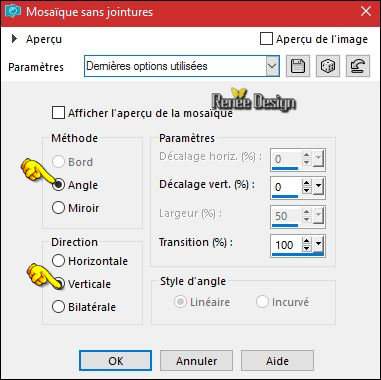
11.
Effects- Image Effects- Seamless Tiling use the settings below
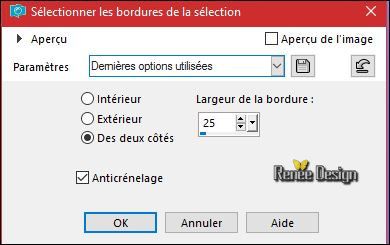
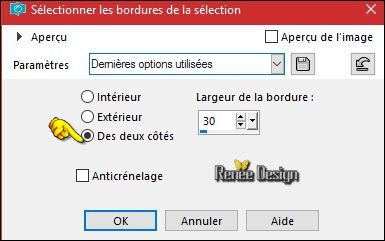
12.
Selections- Modify-Select Selection Borders with these settings
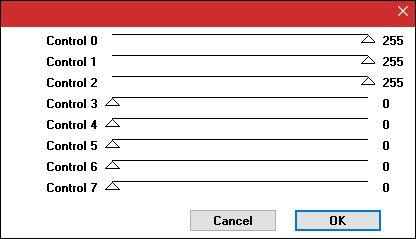
13.
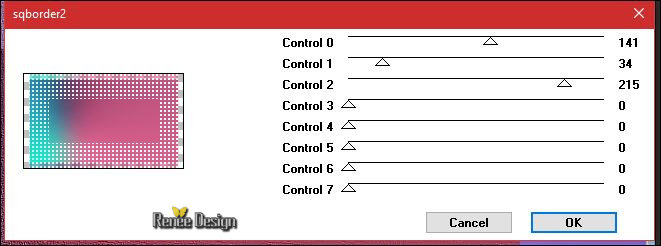
Effects –Plugins– [AFS IMPORT] sqborder
2 use the settings below
14.
Effects- 3 D Effects- Drop Shadow with these settings 1/1/100/6 black
15.
Selections- Promote Selection to Layer
- In the Layer Palette- Activate the Layer underneath = Raster 2
DELETE

Selections- Deselection All
- In the Layer Palette- Activate the Layer above (promoted selection )
15. Effects
–Plugins - Unlimited - &<Background Designers IV>- @Frame
Gradient Switcher (Option: Choose a color based on the colors of your work )

- In the Layer Palette- Make Raster 2 active
16. Layers- Duplicate
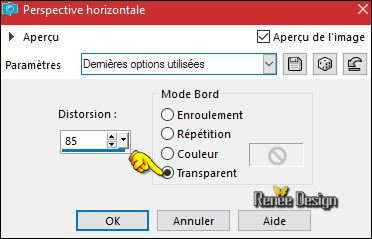
16. Effects
– Geometric Effects – Perspective Horizontal
17. Effects
– Image Effects –Offset with these settings H = - 336 and V = 0
18. Layers- Duplicate
19. Image - Mirror - Mirror Horizontal (Image - Mirror in older versions of PSP)
20. Layers-Properties-Set the Blend Mode to " Overlay "
- In the Layer Palette- Make Raster 2 active
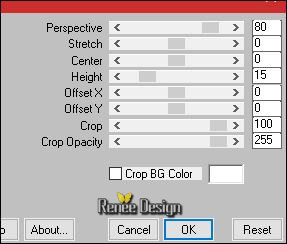
21. Effects
–Plugins - Mura’s Meister Perspective Tilling use the settings below
22. Effects- Edge Effects- Enhance
You should have this result
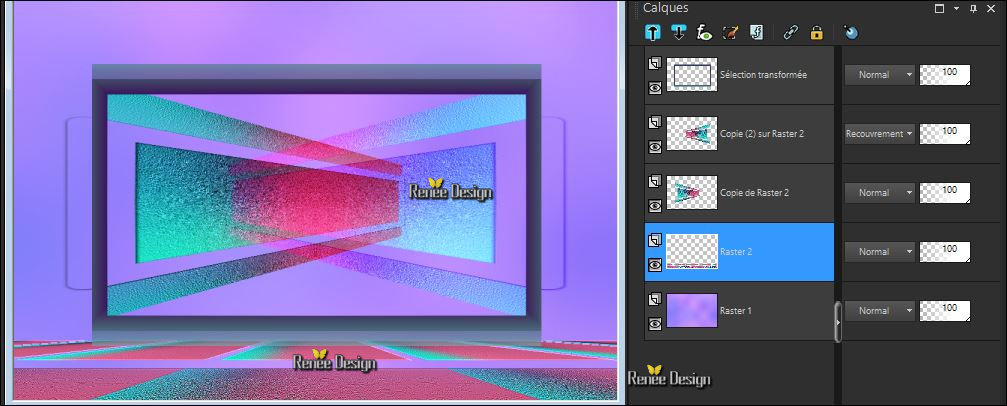
- Activate the top layer in the layer palette
(promoted selection)
23. Effects
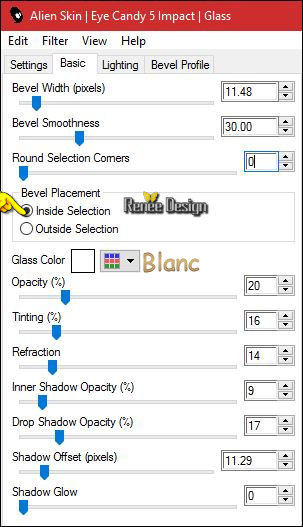
–Plugins– EyeCandy 5 impact Glass with the default settings
24. Image -Resize to
30%- All Layers not checked
25. Image -Free Rotate
90° right
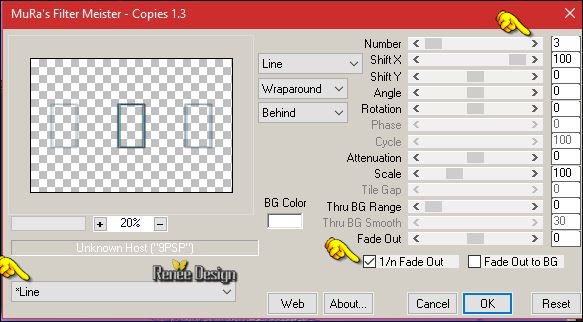
26. Effects
–Plugins – Mura’s meister – Copies use the settings below
27. Effects- 3 D Effects- Drop Shadow with these settings 5/5/35/17 black
28. Layers- New Raster Layer
29.
Selections –load/save selection –load selection from disc and select my selection:‘’Trouble_1’’
30. Flood Fill Tool -Settings of your paint pot to 50% / Activate Flood Fill Tool and fill the selection with the background color #ffffff
31.
Effects -Plugins- Unlimited –It@lian Editors Effect - Rete -
www_italianeditors_com 35 / 78
Selections- Deselect All
DO NOT ADD NEW LAYER
32.
Activate Selection Tool -Custom Selection (S) -Rectangle with these settings
33. Effects- 3 D Effects- Drop Shadow with these settings 5/5/35/17 black
- Repeat- Drop Shadow- Negative -5/-5
34.
Selections- Modify-Select Selection Borders with these settings
35.
Effects-Plugins – [AFS IMPORT] sqborder 2 use the settings below
Selections- Deselection All
36.
Effects- Edge Effects- Enhance
37.
Open your tube ‘’
Renee_tube-petits_pois.pspimage’’
-
Image -Resize to 665 Pixels Height
-
Edit - Copy- Activate your work -Edit - Paste as a new layer
-
Activate your Move Tool (M)-move to the bottom right
38.
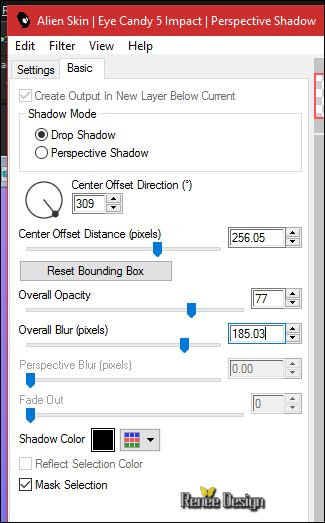
Effects – Plugins – EyeCandy 5 Impact –Perspective
Shadow use the settings below
39. Layers- New Raster Layer
40.
Selections –load/save selection –load selection from disc and select my selection:‘’Trouble_2’’
41. Flood Fill Tool -Settings of your paint pot to 100%
-Activate Flood Fill Tool and fill the selection with the gradient (Left mouse click ) and fill the selection with the background color #ffffff (
Right mouse click )On the same layer
Selections- Deselect All
42. Open your tube ‘’ Touble_mots’’
- Edit - Copy- Activate your work -Edit - Paste as a new layer
- Activate your Move Tool (M) place it in the right place (see finished image)
You may minimize your working area for a moment, but do not close, we will need it again soon
- If you do not want to
create your own hummingbird, there is a bird tube in the folder.
- Continue to step 73
-
We will create a Hummingbird.
43. File - New - Open a new transparent image of 869 x 732 pixels
- Color Palette:Set your Foreground color to #7d918c -Set your Background color to #4c4f4b
44.
Selections –load/save selection –load selection from disc and select my selection:Colibri_1’’
45.
Activate Flood Fill Tool and fill the selection with the foreground color #7d918c
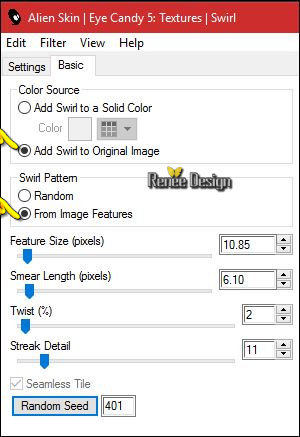
46. Effects
–Plugins – EyeCandy 5 – Texture - Swirl use the settings below
47. Effects- Edge Effects- Enhance More
Selections- Deselect All
-Color Palette- Set your foreground color to #2f2f2f
48 Layers- New Raster Layer
49.
Selections –load/save selection –load selection from disc and select my selection:Colibri_2’’
50.
Activate Flood Fill Tool and fill the selection with the foreground color #2f2f2f
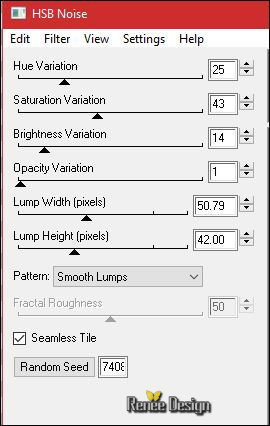
51. Effects
–Plugins -EyeCandy 4000 /HSB Noise use the settings below
Selections- Deselect All
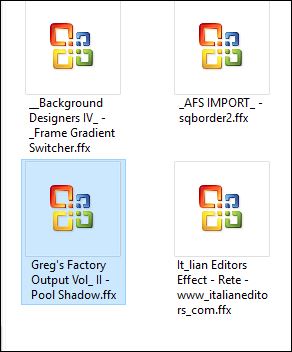
52.
Effects – Plugins – Greg ‘s Factory Output vol II
– Poolshadow with these settings
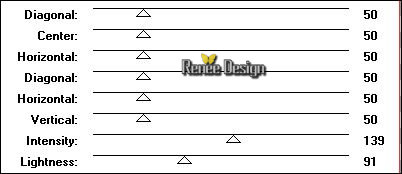
On the same layer
53.
Selections –load/save selection –load selection from disc and select my selection:Colibri_3’’
54. Effects
–Plugins – EyeCandy 5 Impact – Glass use the settings below
Selections- Deselect All
55. Layers- New Raster Layer
56.
Selections –load/save selection –load selection from disc and select my selection:’’ Colibri_4’’
57. Open tube ‘’texture – metal ‘’ in your Psp
- Edit - Copy- Activate your work -Edit - Paste into selection
58. Adjust- Blur-Gaussian Blur: Radius 5
Selections- Deselect All
59. Layers- New Raster Layer
60.
Selections –load/save selection –load selection from disc and select my selection:’’ Colibri_5’’
61. Activate Flood Fill Tool and fill the selection with the background color #4c4f4b
Selections- Deselection All
62. Layers- New Raster Layer
63.
Selections –load/save selection –load selection from disc and select my selection:’’ Colibri_6’’
64. Activate Flood Fill Tool and fill the selection with the foreground color#2f2f2f
65. Effects
– Plugins -Eyecandy 5 Glass with the same settings
Selections- Deselect All
- Color Palette- Set your foreground color to
#eefcff
66. Layers- New Raster Layer
67.
Selections –load/save selection –load selection from disc and select my selection:’’ Colibri_7’’
68. Activate Flood Fill Tool and fill the selection with the foreground color #eefcff
Selections- Deselect All
69. Open your tube ‘’ Coeur_Colibri’’
- Edit - Copy- Activate your work -Edit - Paste as a new layer
- Activate your Move Tool (M) place it in the right place (see finished image)
70. Open the tube ’’Bouton_Colibri’’
- Edit - Copy- Activate your work -Edit - Paste as a new layer and move
71. Effects
–Plugins –EyeCandy 5 Impact – Glass with the same settings
Is all in place ??
72. Layers- Merge- Merge- Visible
73. Activate the Tool Lighten/Darken brush (push L on your keyboard) use the settings below

- Do it regularly in small steps
Where you want to darken or
where you want to brighten up, just try it, according to your choice
Your result will depend on these moves as shown in the example below
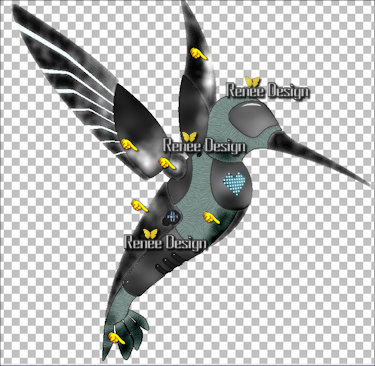
74. Open your tube ‘’ Colibri _aile’’
-
Edit - Copy- Activate your work -Edit - Paste as a new layer
- It must be placed in the right place
(You have its shape to place this tube if needed )
75. Layers- New Raster Layer
76.
Selections –load/save selection –load selection from disc and select my selection:’’ Colibri_8’’
77. Color Palette:Set your foreground color to #ffffff -Activate Flood Fill Tool and fill the selection with the foreground color #ffffff
(You can arrange this layer down (below the layer of the bird ) or above the layer of the bird (your choise))
Selections- DeselectAll
78. Layers- Merge- Merge- Visible
79. Image
Resize to 50 %
80. Edit-Copy – Now activate the image from step 42
- Edit - Paste as a new layer
- Activate your Move Tool (M) place it in the right place (see screen)
81. Open your tube ‘’clef’’
-
Edit - Copy- Activate your work -Edit - Paste as a new layer
- Activate your Move Tool (M) place it in the right place (see screen )
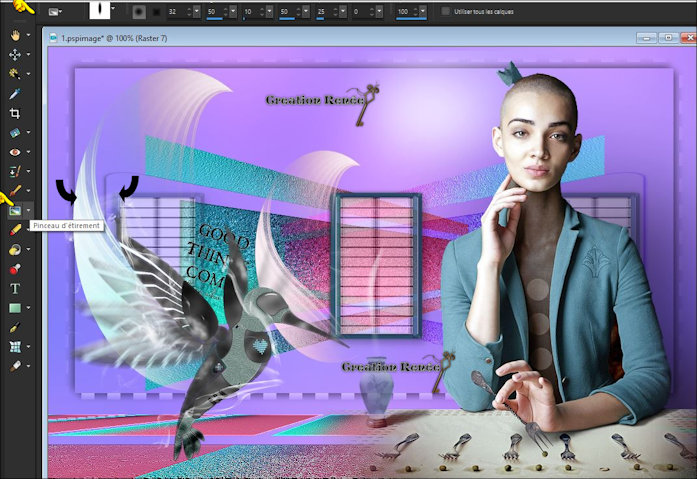
82. Activate Smudge Brush use the settings below

Stretch slightly to remove the line that cuts the horizontal a effect
(See the 2 black arrows on the screen above )
To see it better, take a new layer and fill with black, remove this layer when they have finished it.
83. Open the tubes ‘’chaines ‘’ and ‘’pois ‘’
-
Edit - Copy- Activate your work -Edit - Paste as a new layer
- Activate your Move Tool (M) place it in the right place (see finished image)
84. Layers- Merge- Merge- Visible
85. Layers- New Raster Layer
86.
Selections –load/save selection –load selection from disc and select my selection:‘’Trouble_3’’
87. Activate Flood Fill Tool and fill the selection with the foreground color #ffffff
Selections- Deselection All
88.
Lower the Opacity of this Layer to 55%
89. Image - Add borders-Symmetric checked 1 pixel black
90. Image - Add borders-Symmetric checked 5 pixels #ffffff
91. Image - Add borders-Symmetric checked 1 pixel black
92. Image - Add borders-Symmetric checked 40 pixels #ffffff
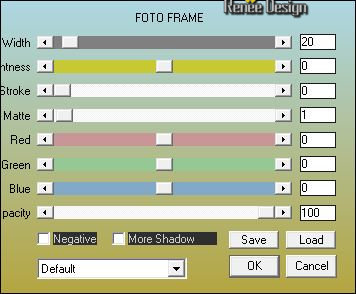
93. Effects
– Plugins - AAA Frame - Foto Frame use the settings below
94. Open your Text Tube (2) or take a text of your choice
Move Tool / place your tube to the bottom of your image (see finished image)
95. Layers- Merge-Merge- All (flatten)
Save as JPG
I hope you enjoyed this lesson
Renée
This lesson was written by Renée 17/04/2017
Edited and Update
2017
*
*
Any resemblance with an existing lesson is a coincidence
* Do not forget to thank the people who work with us and for us I have appointed the tubeurs and translators
Thanks Renée
| 
 Translations


 If a plugin supplied appears with this icon it must necessarily be imported into Unlimited *

 All rights reserved