|
Let's start the lesson

1. Open the Backgroundimage- Fond-Steampunk-56’’-
Promote Background Layer =Raster 1
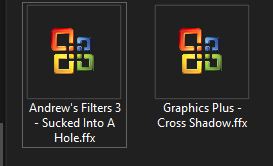
2. Effects –Plugins-
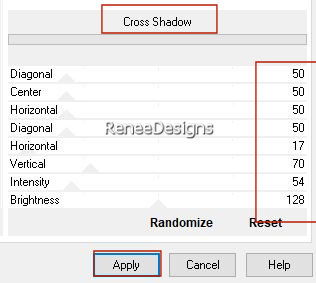
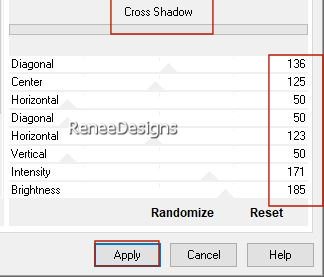
Unlimited 2.0 – Graphic Plus – Cross Shadow use the settings below
3. Effects – Distortion Effects– Twirl – Degrees = 450
4. Effects- Texture Effects – Soft Plastic with the following settings /Color white

5. Layers- Duplicate
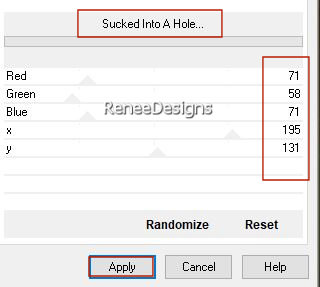
6. Effects -Plugins- <I.C.Net
Software> - Filters Unlimited 2.0 - Andrew's Filters 3-Sucked
Into A Hole..use the settings below.
7. Layers-Properties-Set the Blend Mode to " Hard Light "– Lower the Opacity to 40%
8. Effects – Edge Effects – Enhance
9. Layers- New Raster Layer
10. Selections –load/save selection –load selection from disc and select my selection:’’ ‘STP-56-1’’
11. Effects - Plugins- Alien Skin EyeCandy 5 – Textures-Tab- Settings-User Settings -choose my Preset ‘’
Renee-STP56-Brick Wall’’
12. Lower the Opacity to 34%

13. Open the Tube ‘’ Renee-TUBES-STP56-
Image 1’’ -Edit - Copy- Activate your work -Edit - Paste as a new layer
14. Pick Tool: (K) on your keyboard -Enter these parameters on the toolbar
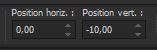 0/ -10
Press ( M ) to close the Pick Tool
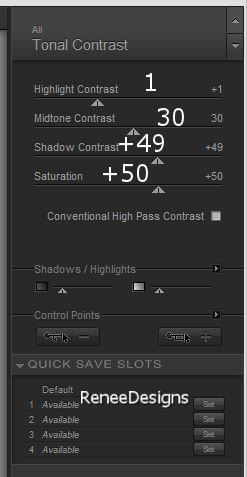
15. Effects - Plugins - Nick Softwar Color Effex Pro.3 0- Tonal
Contrast use the settings below
- Preparation
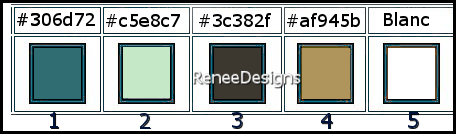
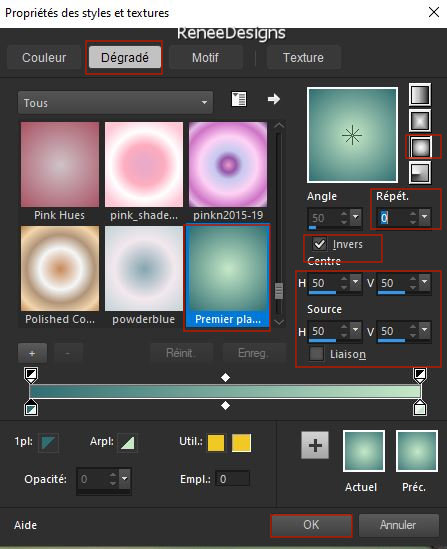
-Material Properties: Set your Foreground color to color #306d72= color 1- Set your Background color to color # c5e8c7=color 2
Prepare a foreground/background-sunburst gradient configured like this
16. Layers- New Raster Layer
17. Activate Flood Fill Tool  –Fill the layer with the gradient
18. Effects- Plugins- Ulead Effects - Particle
- Choose - Effect :
Cloud
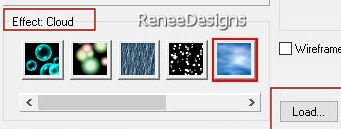
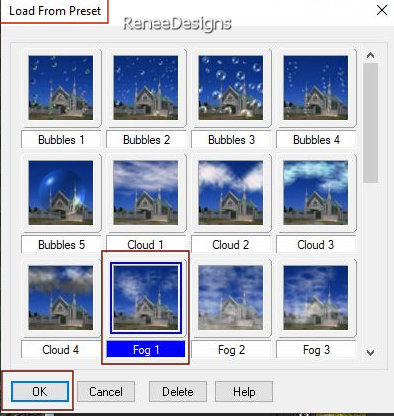
- Click on the Load button :
Choose Fog1
Ok
- Using the following settings
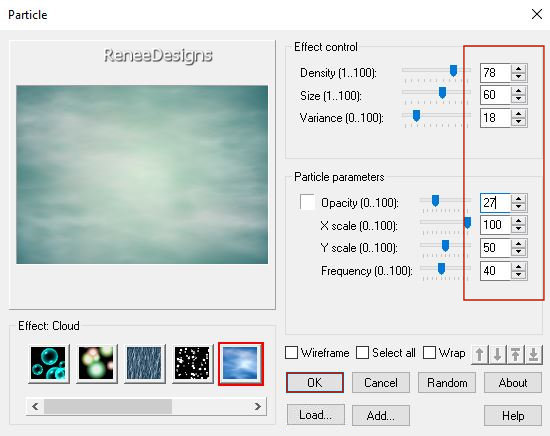
Click Ok
19. Layers- Arrange-Move Down
20. Layers-Properties-Set the Blend Mode to " Overlay "
21. Layers-Duplicate
22. Layers- Merge- Merge Down
23.
Selections –load/save selection –load selection from disc and select my selection:’’
‘STP-56-2’’

24. Layers-Properties-Set the Blend Mode to " Hard Light "– Lower the Opacity to 67%
25. Layers- New Raster Layer
26. Selections –load/save selection –load selection from disc and select my selection:’’ ‘STP-56-3’’
27. Open the Tube ’’ Renee-TUBES-STP56-
Image -paysage 2’’ -Edit - Copy- Activate your work -Edit - Paste into selection
28. Effects -Plugins - Alien Skin EyeCandy 5 - Impact –Tab- Settings-User Settings -choose my Preset :
Renee-STP56-Glass
- Activate the layer above
29. Layers- Merge- Merge Down
-Material Properties: Set your Foreground color to color #3c382f=color 3
30. Layers- New Raster Layer
31. Selections –load/save selection –load selection from disc and select my selection:’’ ‘STP-56-4’’
32. Activate Flood Fill Tool
–
Fill the selection with the foreground color= color 3
33. Effects -Plugins- <I.C.Net
Software> - Filters Unlimited 2.0- Graphic Plus- Cross
Shadow use the settings below
34. Effects - Plugins- Alien Skin EyeCandy 5 - Impact – Bevel-Tab- Settings-User Settings -choose my Preset :
Renee-STP56- Bevel
- Repeat this effect a second time
35. Layers- New Raster Layer
36. Selections –load/save selection –load selection from disc and select my selection:’’ ‘STP-56-5’’
37. Activate Flood Fill Tool
–
Fill the selection with the foreground color= color 3
38. Effects - Plugins - Alien Skin EyeCandy 5 - Impact – Bevel-Tab- Settings-User Settings -choose my Preset :
Renee-STP56- Bevel
39. Layers- Merge-Merge Down
40. Effects- 3 D-Effects- Drop Shadow with these settings: -2 /0 /48 /14 Color black
41. Open the Tube ‘’ Renee-TUBES-STP56-
Image 3’’ -Edit - Copy- Activate your work -Edit - Paste as a new layer
42. Pick Tool: (K) on your keyboard -Enter these parameters on the toolbar
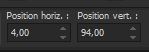 4
/94 4
/94
Press ( M ) to close the Pick Tool
43. Layers –
Duplicate
44. Image - Mirror - Mirror Horizontal (Image - Mirror in older versions of PSP)
45. Layers- Merge- Merge Down
46. Layers-Properties-Set the Blend Mode to " Overlay "
47. Effects- 3 D-Effects- Drop Shadow with these settings: -2 /0 /48 /14 Color black
48. Lower the Opacity to 83%
49. Open the Tube ‘’ Renee-TUBES-STP56’’ (the birds) -Edit - Copy- Activate your work -Edit - Paste as a new layer
-Activate your Move Tool (M)-move to the top left (see finished image)
50. Open the Tube ‘’ Renee-TUBES-STP56-
Image 5’’ -Edit - Copy- Activate your work -Edit - Paste as a new layer
51. Objects – Align
- Bottom
52. Layers-Properties-Set the Blend Mode to " Overlay " -Lower the Opacity to 63%
53. Layers- New Raster Layer
54. Selections –load/save selection –load selection from disc and select my selection:’’ ‘STP-56-6’’
55. Activate Flood Fill Tool
–
Fill the selection with the foreground color= color 3
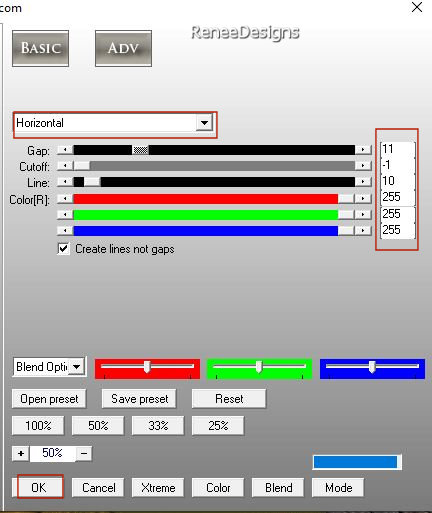
56. Effects – Plugins - Filter – AP [Lines] Lines – Silverlining use the settings below
57. Selections –load/save selection –load selection from disc and select my selection:’’ ‘STP-56-7’’
58. Effects -
Plugins- Alien Skin EyeCandy 5 - Impact –
Bevel-Tab- Settings-User Settings -choose my Preset : Renee-STP56- Bevel
59. Open the Tube
‘’Renee-TUBES-STP56- Image6’’ -Edit - Copy- Activate your work -Edit - Paste as a new layer
60. Pick Tool: (K) on your keyboard -Enter these parameters on the toolbar
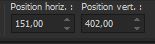 151/402
Press ( M ) to close the Pick Tool
61. Open the Tube ‘’Renee-TUBES-STP56- Image7’’ -Edit - Copy- Activate your work -Edit - Paste as a new layer
62. Objects - Align-Top
63. Effects- Distortion Effects- Wave use the settings below

64. Layers-Properties-Set the Blend Mode to " Overlay "
65. Layers- New Raster Layer
66. Selections –load/save selection –load selection from disc and select my selection:’’ ‘STP-56-8’’
67. Color Palette-Set your Background color to color # ffffff= color 5
Activate Flood Fill Tool
–
fill the selection with #ffffff= color 5
68. Adjust- Blur- Gaussian Blur-Radius 4
69. For the embellishment of our work.
Renée has a separate folder with tubes that you can use.
Drop Shadows of your choice -Resize to your liking .
70. Image - Add borders-Symmetric checked: 1 Pixel #c5e8c7=color 2
- Image - Add borders-Symmetric checked: 10 Pixels #ffffff=color 5
- Image - Add borders-Symmetric checked: 2 Pixels #30bd72=color 1
- Image - Add borders-Symmetric checked: 25 Pixels #ffffff=color 5
- Image - Add borders-Symmetric checked: 1 Pixel #3c382f=color 3
- Image - Add borders-Symmetric checked: 45 Pixels #ffffff=color 5
71. Activate the Magic Wand - Select the white border of 25 Pixels
72. Open the Tube ’’ steampunk-cadre’’ -Edit - Copy- Activate your work -Edit - Paste into selection
73. Effects - Plugins- Alien Skin EyeCandy 5 - Impact –Tab- Settings-User Settings -choose my Preset :
Renee-STP26-Glass 2’’
74. Paste the author's watermark on your work and your own watermark
- Layers- Merge- Merge All (flatten)
Image - Resize to 90 % (Resize all layers checked)
-Save as JPG
That's it - Thank you / I hope you enjoyed this lesson
Renée
This lesson was written by Renée
19/04/2022
Edited and Update
in 2022
*
Toute ressemblance avec une leçon existante est une pure
coïncidence
*
* Do not forget to thank the people who work with us and for us
I have appointed the tubeurs and translators
Thanks
|
 Translations