|
Let's start the lesson

1. Open the Background Image ‘’Fond-Steampunk-55’’-
Promote Background Layer =Raster 1
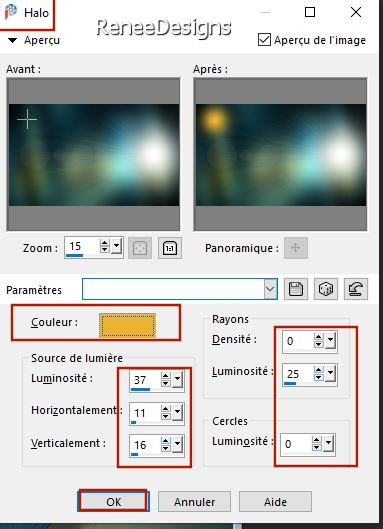
2. Effects – Illumination Effects –Sunburst use the settings below– Color White
3.Layers- New Raster Layer
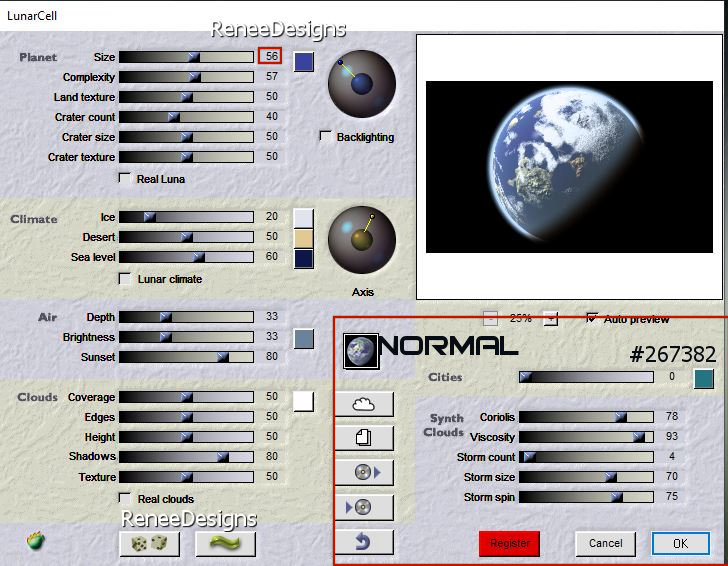
4. Effects – Plugins – Flaming Pear – Lunar cell
(code activation LunarCell 38683374
If code refused - open your psp as administrator and paste the code, it will work)
Click on the blue arrow >>and select my preset " Preset-LunarCell q1q " search in any folder of your choice.
(Click on the preset and OK)
5. Effects – Plugins – Transparency - Eliminate Black
6. Layers-Properties-Set the Blend Mode to " Overlay "-Lower the Opacity to 65%
- Activate the bottom of the layer palette =Raster 1
7. Layers- Duplicate
8. Image - Mirror - Mirror Horizontal (Image - Mirror in older versions of PSP)
9. Effects –Plugins-
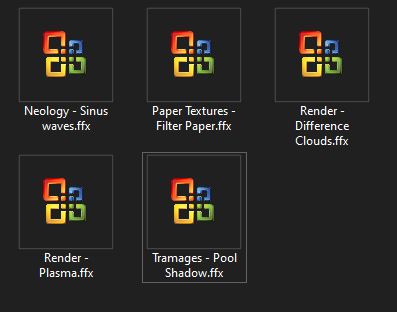
Unlimited 2.0 – Neology – Sinus Waves using the default settings
10. Layers-Properties-Set the Blend Mode to " Hard Light "-Lower the Opacity to 61%
- To replace the top of the layer-palette
-
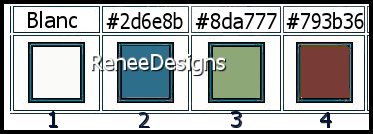
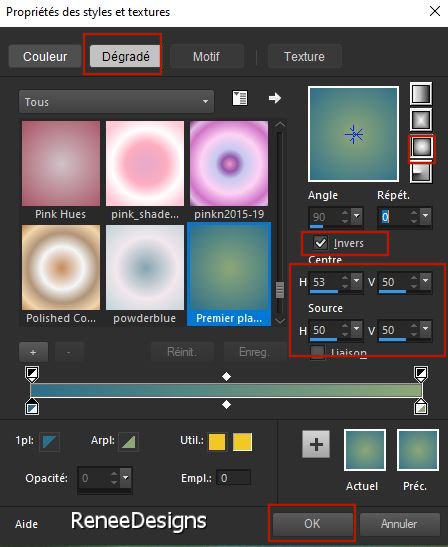
Material Properties: Set your foreground color to color #2d6e8b =2- Set your background color to color #8da777 =3
- Set your Foregroundcolor to foreground-background "sunburst" gradient configured like this
11. Layers- New Raster Layer
12. Selections –load/save selection –load selection from disc and select my selection: ‘’STP-55-1’’
13. Activate Flood Fill Tool
 -
Fill the selection with the gradient -
Fill the selection with the gradient
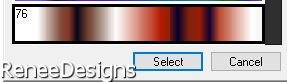
14. Effects –Plugins -
Unlimited 2.0- Render – Plasma –In the menu, select number 76 and Apply and then.. set the settings right
15. Layers-Properties-Set the Blend Mode to " Hard Light "-Lower the Opacity to 42%
16. Effects - Plugins – Mura’s Meister – Perspective Tiling using the default settings
17. Selections –load/save selection –load selection from disc and select my selection: ‘’STP-55-2’’
 2 times
 
18. Effects – Plugins – FM Tile Tools – Blend Emboss using the default settings
- Repeat : Effects – Plugins – FM Tile Tools – Blend Emboss using the default settings
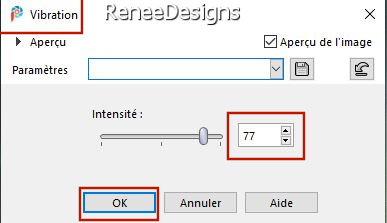
19. Adjust- Hue
and Saturation – Vibrancy use the settings below
20. Layers- New Raster Layer
21. Selections –load/save selection –load selection from disc and select my selection: ‘’STP-55-3’’
- Color-Palette-Set the Foreground color to color #793b36 = 4
22. Activate Flood Fill Tool
–
Fille the selection with the foreground color=4
23. Effects –Plugins-
Unlimited 2.0- ICNET-Filters - Paper Textures- Filter
Paper with these settings: 128/74
24. Effects –Plugins-
Unlimited 2.0- ICNET-Filters – Render- Difference Clouds with these settings:
16/188
25. Open the Tube ’’ Renee-TUBES-STP55-Image
1’’ -Edit - Copy- Activate your work -Edit - Paste as a new layer
26. Pick Tool: (K) on your keyboard -Enter these parameters on the toolbar
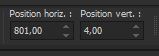 801/ 4
-
Press ( M ) to close the Pick Tool
27. Effects - Plugins- Alien Skin EyeCandy 5 - Impact Perspective Shadow-Tab-Settings-User Settings and select my file-Preset :
‘’STP55_Shadow1’’
28. Open the Tube ’’ Renee-TUBES-STP55-Image
2’’ -Edit - Copy- Activate your work -Edit - Paste as a new layer
29. Pick Tool: (K) on your keyboard -Enter these parameters on the toolbar
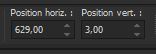 629/ 3
Press ( M ) to close the Pick Tool
30. Layers Arrange- Move Down
-To replace the top of the layer-palette
31. Open the Tube ’’ Renee-TUBES-STP55-Nuage’’ -Edit - Copy- Activate your work -Edit - Paste as a new layer
-Place at the bottom of the work – Layers- Duplicate 2 times and move as shown in the example below
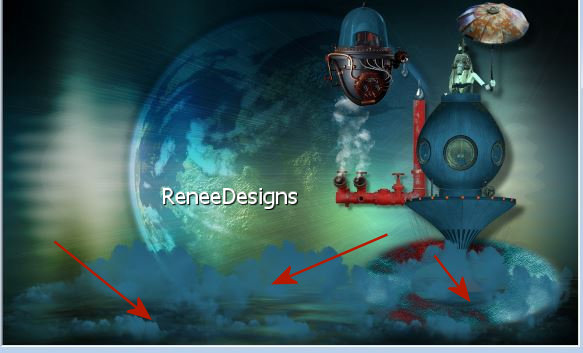
32. Layers- Merge- Merge down and repeat one more time (three layers with clouds on one layer)
33. Effects – Edge Effects- Enhance
34. Layers-Properties-Change the Blend Mode of this layer to " Lighten "
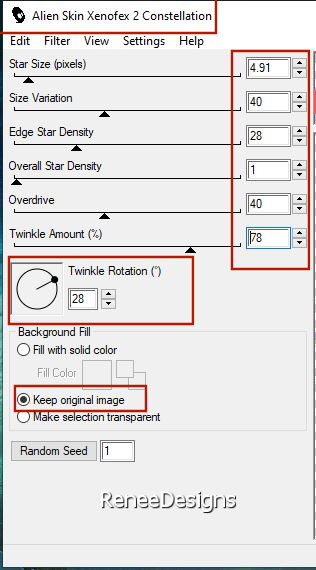
35. Effects – Plugins – Alien Skin Xenofex 2- Constellation use the settings below
- Activate the bottom of the layer palette =Raster 1
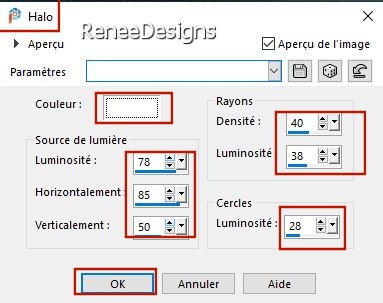
36. Effects – Illumination Effects –Sunburst use the settings below– Color #ebb431
- To replace the top of the layer-palette
37. Open the Tube ‘’Renee-TUBES-STP55-lune-nuage’’ -Edit - Copy- Activate your work -Edit - Paste as a new layer
- Place at the top left
38. Layers-Properties-Change the Blend Mode of this layer to " Overlay"
- In the layer palette-activate Copy of Raster 1
39. Selections –load/save selection –load selection from disc and select my selection: ‘’STP-55-4’’
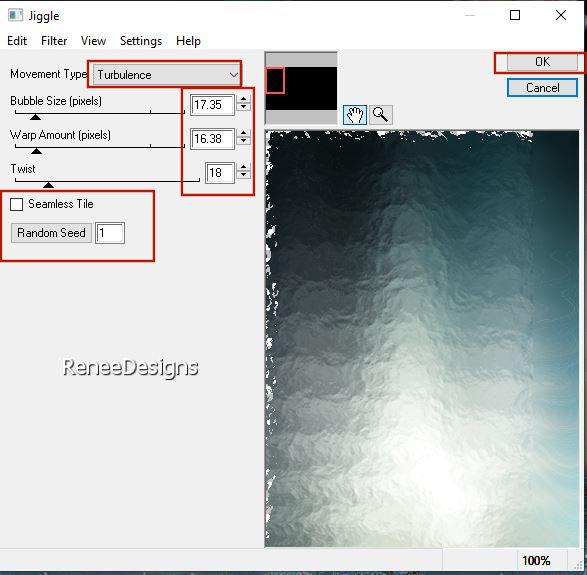
40. Effects – Plugins – EyeCandy 4000- Jiggle use the settings below
Put the image aside for now, we will need it later
41.Open the Tube ‘’Pour
créer le tube ‘’ in your Psp
If you choose your own tubes to create this box you must have a background of
300/300 Pixels
42. Layers- Merge- Merge Visible
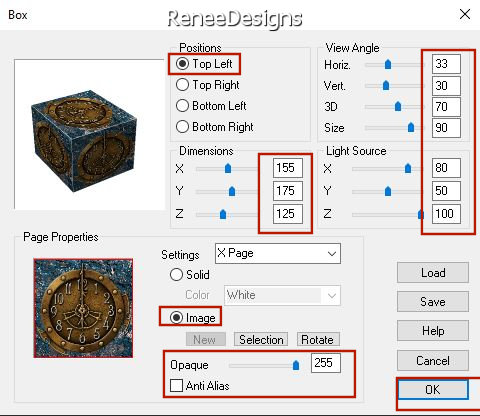
43. Effects – Plugins - Vizros - Box use the settings below
44. Activate your Magic Wand Tool- Feather and Tolerance = Zero
-Click in the white part
Selections – Invert
Selections – Modify
– Contract with 1 Pixels
Selections- Invert
45. Edit Copy !!
- Activate your minimized image of point 40
- To replace the top of the layer-palette
- Edit-Paste as a new layer
If the filter does not work or you do not have this filter, there is an image "‘ Renee-TUBES-STP55-cubes’’ in the folder.
46. Pick Tool: (K) on your keyboard -Enter these parameters on the toolbar
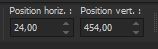 24/ 454
47.Layers- Duplicate
48. Image –
Resize 68%
- Move it in the right place ( see finished image)
49. Layers- Merge -Merge Down
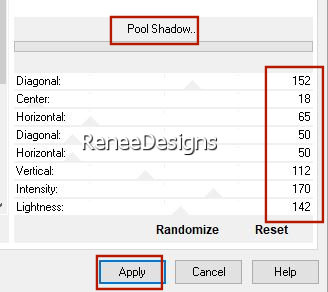
50. Effects –Plugins-
Unlimited 2.0 – Tramage – Pool Shadow use the settings below
51. Open the Tube " Tubes
Renee-TUBES-STP55-robots’’
-Decorate to your taste with the tube of your choice (Renée has a separate folder with decorations you can use.) –
Resize as desired and Place on cube( see finished image)
52. Open the Tube ‘’Renee-TUBES-STP55-Rhino’’-Edit - Copy- Activate your work -Edit - Paste as a new layer
53. Pick Tool: (K) on your keyboard -Enter these parameters on the toolbar
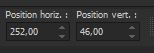 252/
46 252/
46
-
Press ( M ) to close the Pick Tool
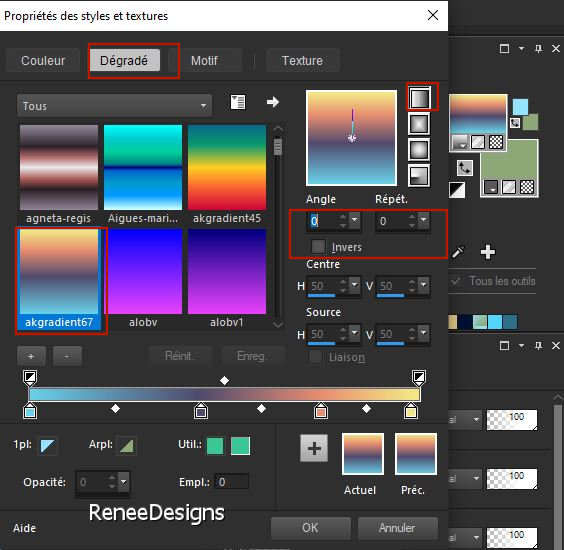
54. Color Palette: Set your foreground color to gradient and select : ‘’
akgradient67’’ – Prepare a linear gradient configured like this
55. Layers- New Raster Layer
56. Selections –load/save selection –load selection from disc and select my selection: ‘’STP-55-5’’
57. Activate Flood Fill Tool –Fill the selection with the gradient
58. Adjust- Blur- Gaussian Blur- Radius 5
59. Layers- New Raster Layer
60. Color-Palette-Set the Foreground color to color #ffffff=1
Activate Flood Fill Tool –Opacity
50% –
Fill the selection with the foreground color =1
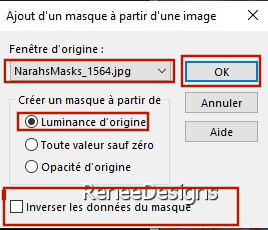
61. Layers- New Mask Layer- From Image and select Mask
''NarahsMasks_1564''
- Layers- Merge- Merge Group
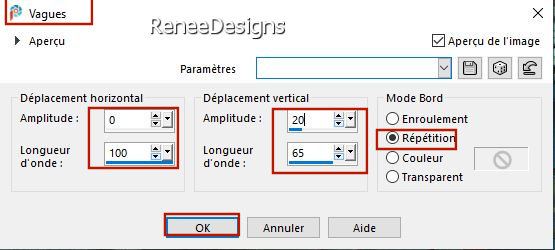
62. Effects –Distortion Effects –Wave use the settings below
63. Layers-Properties-Change the Blend Mode of this layer to " Overlay"
64. Layers- Merge- Merge Visible
65. Edit- Copy !!
66. Open the Tube " cadre"
- Edit - Paste into Selection (Image is still in your PSP memory)
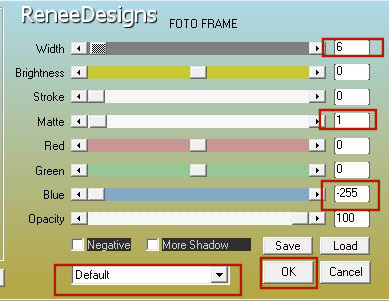
67. Effects – Plugins – AAA Frame- Foto Frame use the settings below
- Paste the author's watermark on your work and your own watermark
68. Write the title if you want, the font used is in the folder
69.Layers-Merge-Merge All (flatten)
Image –
Resize 1150 Pixels width
Save as JPG
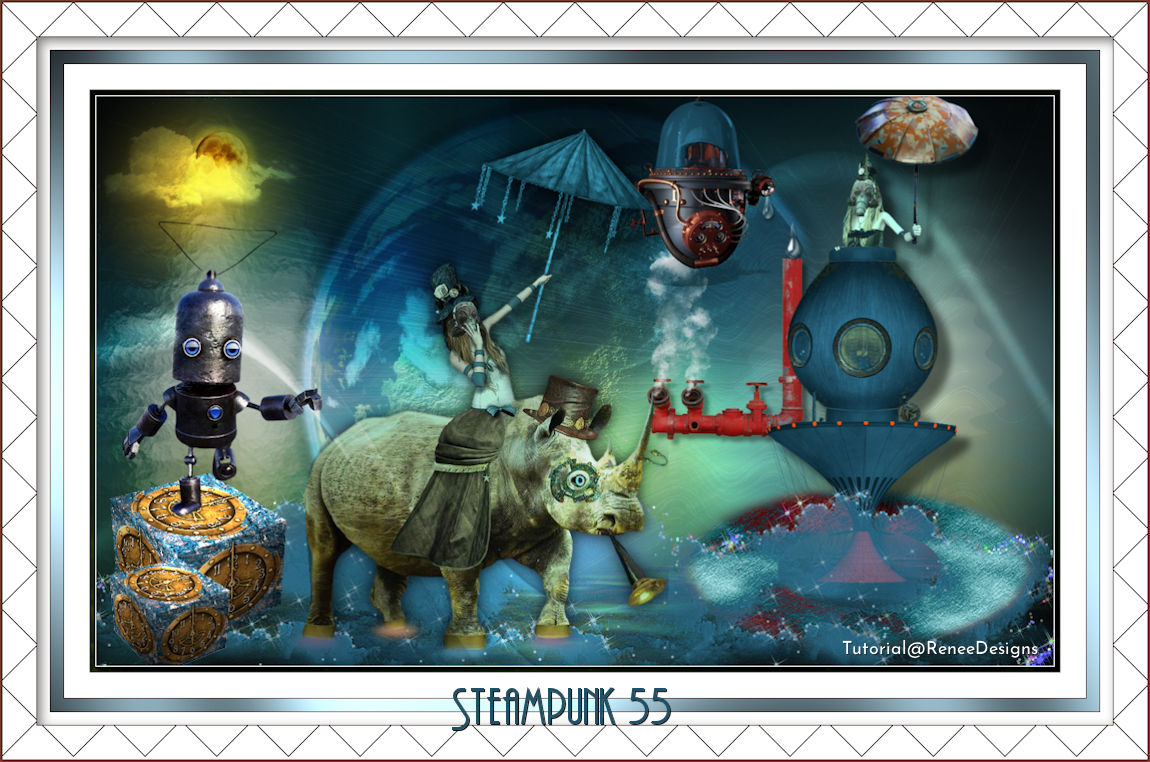
That's it - Thank you / I hope you enjoyed this lesson
Renée
This lesson was written by Renée 2021
Edited and Update
2021
*
Any resemblance with an existing lesson is a coincidence
* Do not forget to thank the people who work with us and for us -I have appointed the tubeurs and translators
Thanks
*
|

 Translations