|
Let's start the lesson.
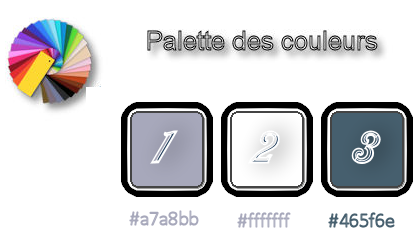
- Preparation/ - Color Palette: Set your foreground color to #a7a8bb - Set your background color to #ffffff
1. Open Image ‘’ Fond_Saison_hiver’’- Window - Duplicate (or shift+D) - Close the original and proceed on the copy -Promote Background Layer =Raster 1
2. Effects –Plugins – Simple – Blintz
3.
Effects – Plugins – Simple – Half
Wrap
4.
Effects – Plugins – Toadies – What are you 30/
0
5.
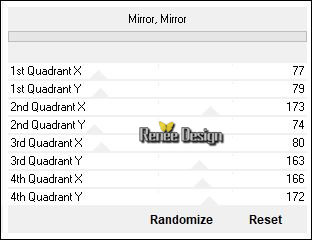
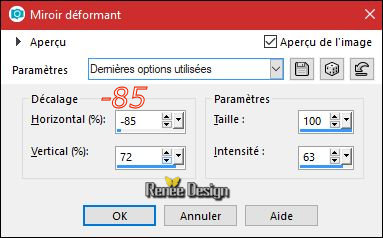
Effects –Plugins -Unlimited - Filter Factory Gallery A - Mirror,
Mirror
6.
Layers- Duplicate
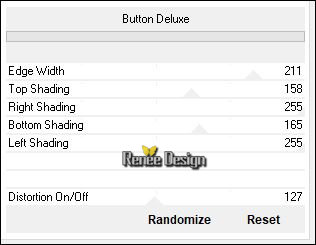
7.
Effects –Plugins- Unlimited - Filter Factory Gallery B - Button
Deluxe...
8. Activate the Magic Wand and select the white parts
DELETE
Selections- Deselect All
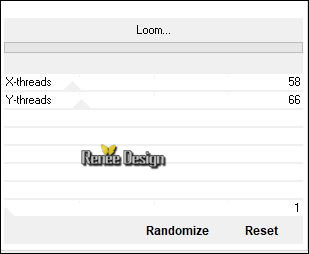
9.
Effects –Plugins- Unlimited – Funhouse ou Factory M –
Loom
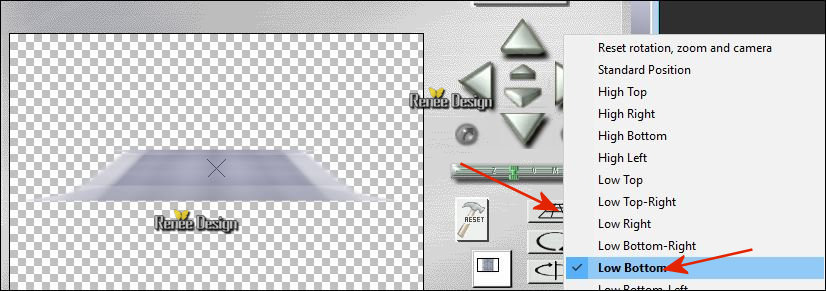
10. Effects
– Plugins – Andromeda-Perspective Full Canvas - Floors-Front
viewer
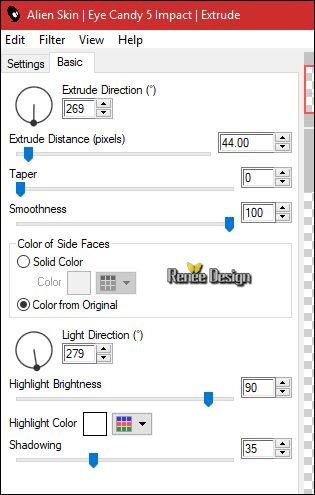
11. Effects
– Plugins – EyeCandy 5 Impact – Extrude use the settings below
12. Effects- Edge Effects- Enhance More
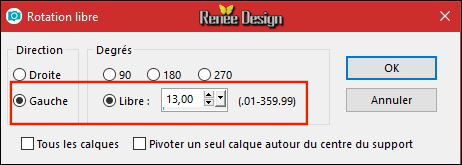
13. Image –Free
Rotate 13 to the left
14.
Selections –load/save selection –load selection from disc and select my selection: ‘’Hiver_1’’
15. Layers- New Raster Layer
16. Effects- 3 D Effects-Cutout use the settings below #ffffff

Keep Selected
-In the Layer-Palette-Make Copy of Raster 1 active
17.
Effects –Plugins -Unlimited – Toadies - Blast 'n Blur
53/147
18. Effects
– Edge Effects- Enhance More
Selections- Deselect All
To replace the top of the layers palette
19. Layers- New Raster Layer
20.
Selections –load/save selection –load selection from disc and select my selection: ‘’Hiver_2’’
21. Activate the Flood Fill Tool  and fill the selection with the background color #ffffff and fill the selection with the background color #ffffff
Selections- Deselect All
22. Effects – Edge Effects- Enhance
23. Effects
–3D Effects- Drop Shadow with these settings : 1/1/85 /6 black
- In the Layer-Palette: activate the layer underneath = (raster 2)
24. Layers- Duplicate
25.
Effects –Plugins Unlimited - Toadies – Weaver 255 /19/0
26. Effects- Distortion Effects- Warp use the settings below
27. Layers- Duplicate
28. Image - Mirror - Mirror vertical ( Image - Flip in older versions of PSP)
29. Layers- Merge- Merge Down
30. Layers- New Raster Layer
31.
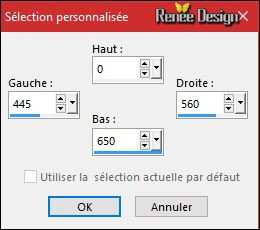
Activate Selection Tool -Custom Selection (S) -Rectangle with these settings
32. Activate the Flood Fill Tool and fill the selection with the background color #ffffff
33.
Selections- Modify-Contract with 2 pixels
DELETE
Selections- Deselect All
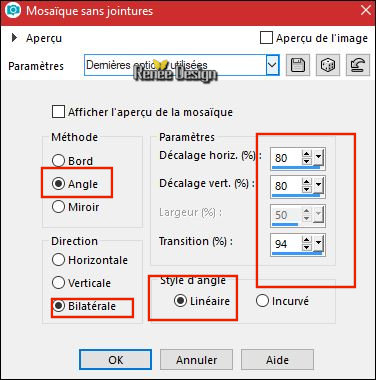
34. Effects- Image Effects- Seamless Tiling use the settings below
35. Layers- Duplicate
36.
Effects- Image Effects- Seamless Tiling with the same settings
37. Layers- Duplicate
38.
Effects- Image Effects- Seamless Tiling with the same settings
39. Layers- Merge- Merge Down and Repeat
40. Effects
–Plugins – Mura’s Meister – Perspective
Tiling with these settings

41. Image –
Free Rotate 13 ° left
42. Effects- Image Effects- Offset with these settings: H = 45 and V = - 31
43. Layers- Duplicate
44. Layers- Merge- Merge Down
- In the Layer-Palette-Make Copy of Raster 1 active
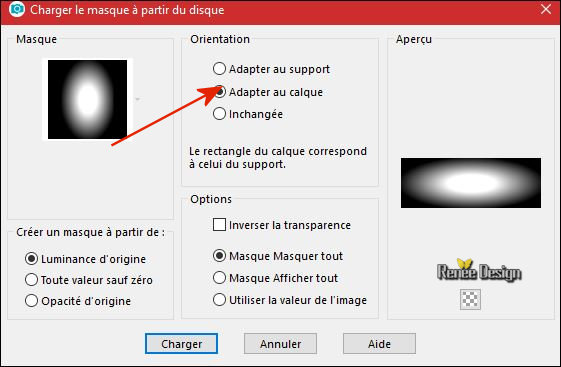
45. Layers- Load/Save Mask-Load Mask from Disk and select Mask ‘’20/20’’
- Layers- Merge- Merge Group
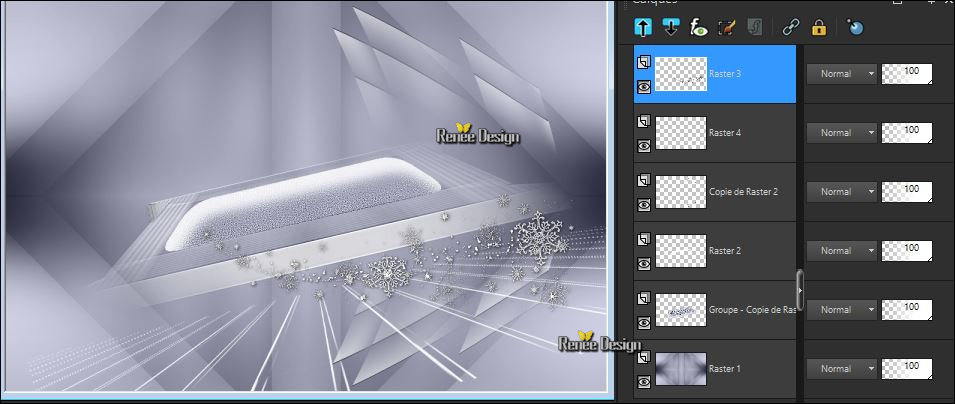
- To replace the top of the layers palette
Your work and Layer Palette look like this now-You should have this result
46. Open the tube ‘’ Renee_Saison_Hiver_neige_png’’
- Edit - Copy- Activate your work -Edit - Paste as a new layer
- Move Tool / place your tube at the bottom of your image
47.
Layers-Properties-Set the Blend Mode to" Lighten "
48. Open the tube ‘’ Renee_Saison_Hiver_Pas.png’’
- Edit - Copy- Activate your work -Edit - Paste as a new layer
- Move Tool / place your tube to the bottom right side of your image
49. Effects- Edge Effects- Enhance
50. Open the tube ‘’ Renee_Saison_Hiver_arbre.png’’
- Edit - Copy- Activate your work -Edit - Paste as a new layer
- Move tool / place your tube on the top left side of your image
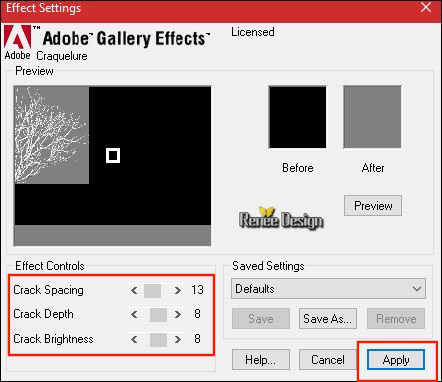
51.
Effects – Plugins – Gallery Effect Classic Art – GE
Craquelure
52. Layers- New Raster Layer
53.
Selections –load/save selection –load selection from disc and select my selection: ‘’Hiver_3’’
54. Activate the Flood Fill Tool and fill the selection with the background color #ffffff
Selections- Deselect All
55. Layers- Duplicate
56. Effects- Distortion Effects - Twirl- Degrees = -
395
57. Effects-Image Effects-Offset with these settings : H = 102 and V = - 40
58.
Layers-Properties-Set the Blend Mode to" Dissolve "-Set the Opacity of this layer to 48%
59.
Selections –load/save selection –load selection from disc and select my selection: ‘’Hiver_4’’
Do not add a New Layer
- In the Layer-Palette-Make Raster 1 active
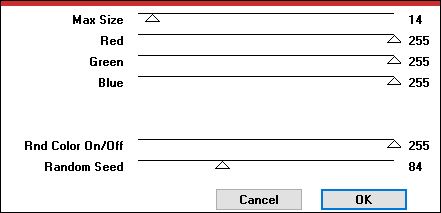
60. Effects
–Plugins – VM Natural – Sparkle
61. Adjust- Sharpness- Sharpen More
Selections- Deselect All
To replace the top of the layers palette
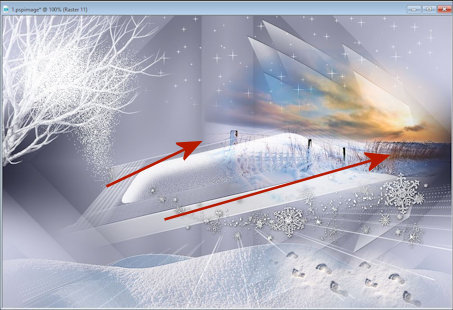
62. Open the tube ‘’ Renee_Saison_Hiver_paysage’’
- Edit - Copy- Activate your work -Edit - Paste as a new layer
- Move Tool (M) move it the right place as shown in the example below
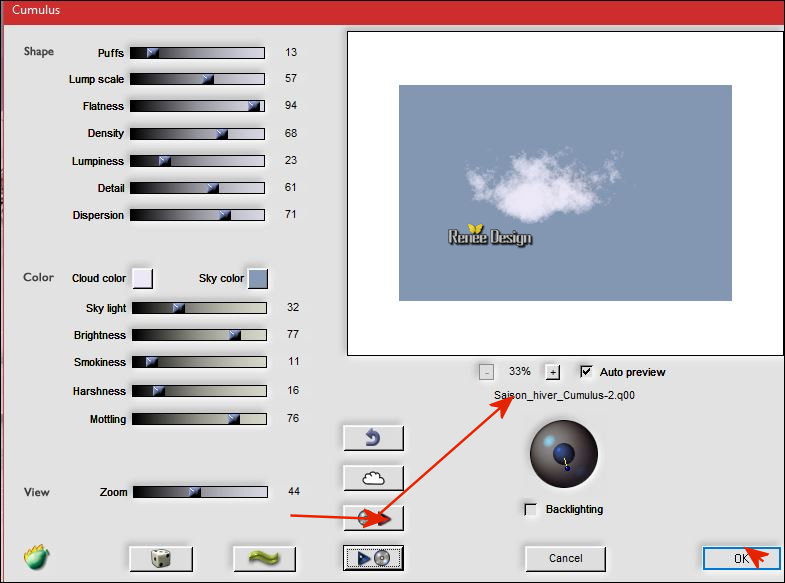
63. Effects
– Plugins – Flaming Pear – Cumulus-click the button with the red triangle and look for the preset
‘’Saison_Hiver_Cumulus_2’’
Presets for flaming pear you can access from any folder .Or manual settings as shown in the example below
64. Layers- Merge- Merge Visible
65. Open the tube’’ Renee_Saison_Hiver-texte’’
- Edit - Copy- Activate your work -Edit - Paste as a new layer
-
Move it in the right place ( see finished image )
66.
Layers-Properties-Set the Blend Mode to"Screen "
67. Layers- New Raster Layer
68.
Selections –load/save selection –load selection from disc and select my selection: ‘’Hiver_5’’
69. Activate the Flood Fill Tool and fill the selection with the background color #ffffff
Selections- Deselect All
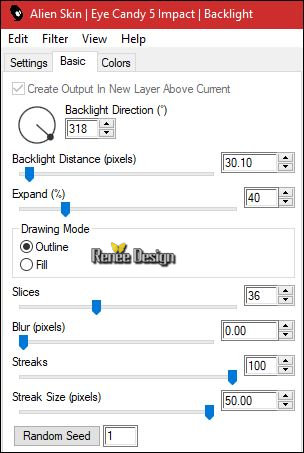
70.
Effects – Plugins – EyeCandy 5 Impact / Backlight
--tab SETTINGS/USER SETTINGS and choose my ’Preset’’ Saison_hiver_Blacklight.f1s’’
71. Layers- Duplicate
72.
Image - Mirror - Mirror Horizontal (Image - Mirror in older versions of PSP)
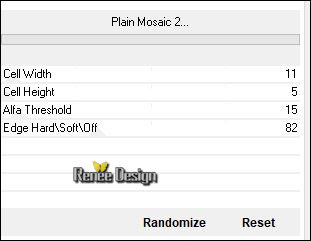
73.
Effects –Plugins- Unlimited - Toadies – Plan Mosaic
2
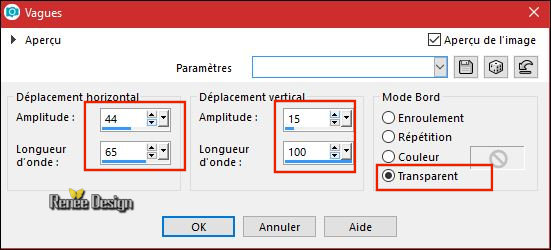
74. Effects-Distortion Effects- Wave use the settings below
75.
Layers-Properties-Set the Blend Mode to" Screen "-Set the Opacity of this layer to 77%
76. Open the tube ‘’Renee_TUBES_Hiver_nuageaspirateur.pspimage’’
- Image-
Resize to 44%
-
Image - Mirror - Mirror Horizontal (Image - Mirror in older versions of PSP)
- Edit - Copy- Activate your work -Edit - Paste as a new layer
77. Effects- Image Effects- Offset with these settings: H = - 150 and V = 68
78. Set the Opacity of this layer to 87%
79. Layers- Arrange- Move Down ( above raster 1 )
To replace the top of the layers palette
80. Open the tube ‘’Renee_TUBES_Envol’’
-
Image - Mirror - Mirror Horizontal (Image - Mirror in older versions of PSP)
- Image
Resize to 50 %
- Edit - Copy- Activate your work -Edit - Paste as a new layer
81. Image –Free
Rotate 38 ° left
82. Effects- Image Effects- Offset with these settings: H = 245 and V = - 149
83. Layers- New Raster Layer
84. Effects
– Plugins – Flaming Pear – Cumulus /Preset
‘’Saison_Hiver_Cumulus_2’’
click the button with the red triangle and look for the preset
‘’Saison_Hiver_Cumulus_2’’  presets for flaming pear you can access from any folder .Or manual settings as shown in the example below presets for flaming pear you can access from any folder .Or manual settings as shown in the example below
- Move Tool /Move to the bottom left side of your image
85. Layers- New Raster Layer
86. Activate Brush Tool and choose the brush ‘’ nuagestamer’’- use the settings below -Size 180

- Stamp with the background color #ffffff (see example) and repeat it twice on the same place

87.
Layers-Properties-Set the Blend Mode to" Screen "
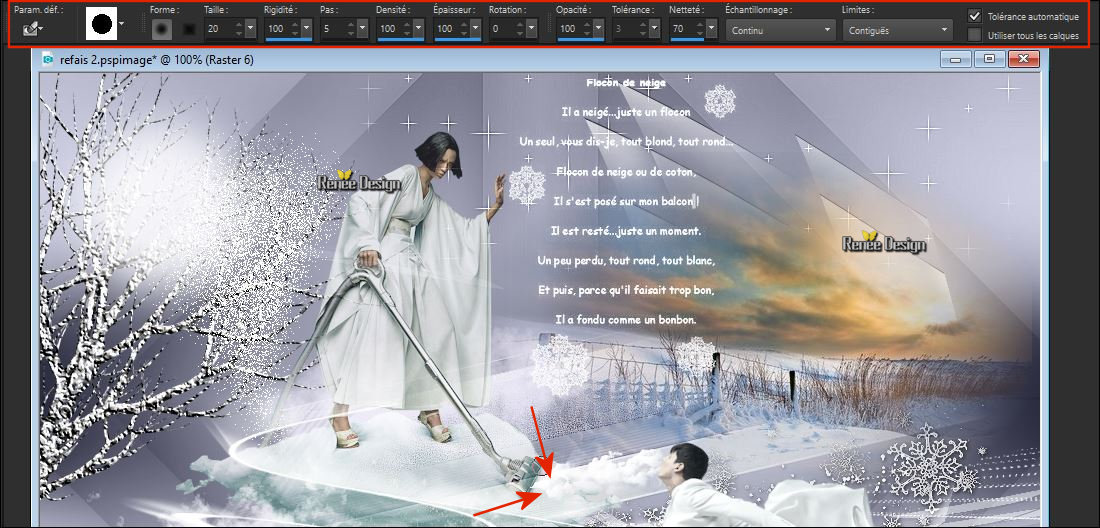
88. Activate Background Eraser use the settings below .Swipe off the cloud a little so it looks like the lady is sucking in the clouds with the vacuum cleaner
89. Layers- Duplicate
90.
Layers-Properties-Set the Blend Mode to" Dissolve "
91. Effects- Distortion Effects- Twirl -Degrees 95
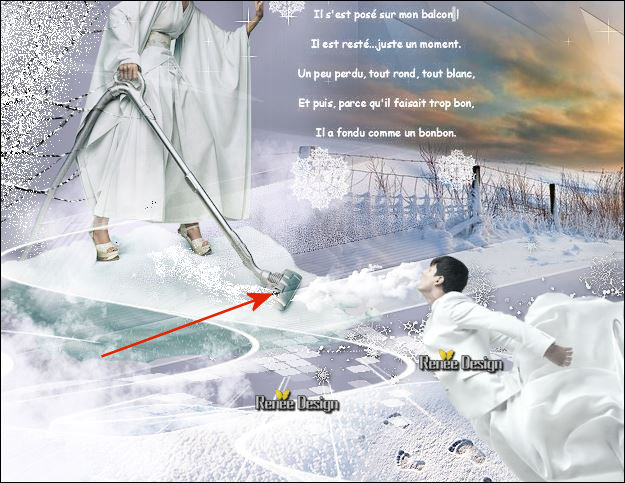
Replace if necessary to give the illusion that the dust comes out of the vacuum cleaner
92. Open the tube ‘’ Renee_TUBES-paysage-hiver.png’’
- Edit - Copy- Activate your work -Edit - Paste as a new layer
- Move Tool / place your tube to the bottom left side of your image
93. Open the tube ‘’ Renee_Saison_hiver_etoiles .png’’
- Edit - Copy- Activate your work -Edit - Paste as a new layer
- Move Tool / place your tube at the bottom of your image
Attention Toolbar: Script checked.
Image- Toolbars - Script (checked)
- Psp script: Put the script in your script folder –restricted script from PSP
- Activate tool bar script: select the file:" Saison _hiver_scripts reglement " and click the little blue arrow and let it run.If you want to use different colors? than you should replace toggle execution mode( if you receive an error message, please disregard it and click ok. )
-
or proceed manually following this
94.Image - Add borders-Symmetric checked 1 Pixel color 3
95.Image - Add borders-Symmetric checked 20 Pixels color 2
96.Image - Add borders-Symmetric checked 1 Pixel color 1
97.Image - Add borders-Symmetric checked 10 Pixels color 2
98.Image - Add borders-Symmetric checked 1 Pixel color 3
99.Image - Add borders-Symmetric checked 40 Pixels color 2
100. Activate Text Tool-Font " Milano" Included into the zipfile " write " ‘’Saison Hiver ‘’
101. Effects- 3 D Effects-Drop Shadow with these settings : 1/1/85/3 black
102. Open the tube ‘’Textes_final-Edit - Copy- Activate your work -Edit - Paste as a new layer
- Layers- Merge- Merge All( flatten)
Save as JPG
If you want to add the animation ... then continue
******* If necessary, resize your image-
You have 2 snow animations in the folder you can choose to use it to animate the work with animation shop
I hope you enjoyed this lesson
Renée
This lesson was written by Renée 07/11/2017
Edited and Update
2017
*
Any resemblance with an existing lesson is a coincidence
* Do not forget to thank the people who work with us and for us I have appointed the tubeurs and translators
Thanks
*
|  Saison
Hiver
Saison
Hiver
 Translations


 If a plugin supplied appears with this icon it must necessarily be imported into Unlimited *