|
Let's start the lesson.
-
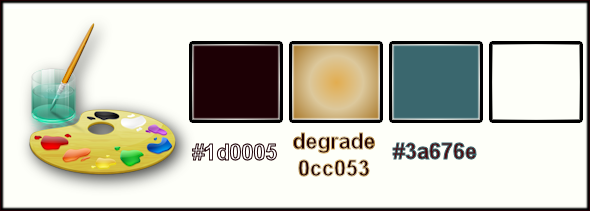
Color-Palette : Set your background color to color #1d0005
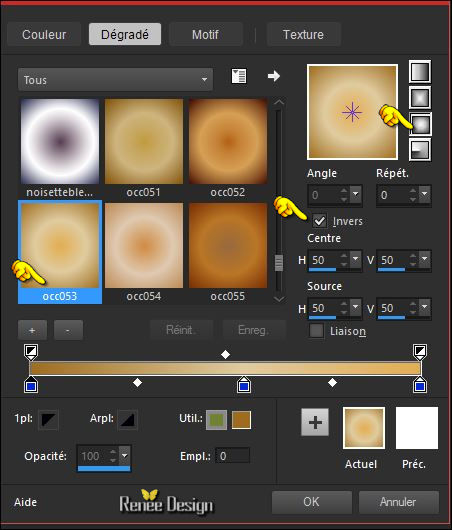
Color Palette: Set your Foregroundcolor to gradient and select : « 0cc053’’ -Prepare a sunburst gradient configured like this.
1.
Open the background image: ‘’fond_revelation ‘’ –Window - Duplicate (or shift+D) - Close the original and proceed on the copy -Promote Background Layer = Raster 1
2.
Layers- New Raster Layer
3.
Activate Flood Fill Tool and fill the layer with the gradient
4.
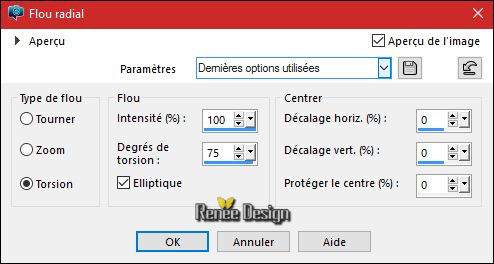
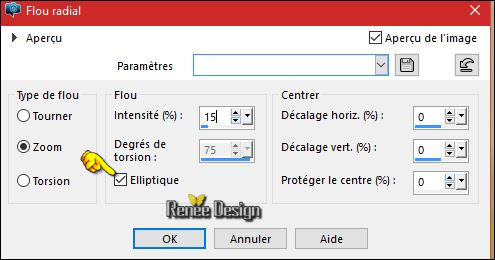
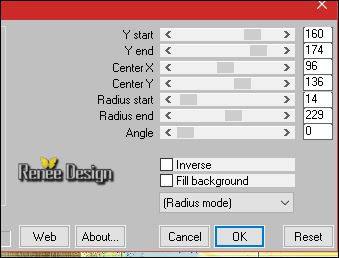
Adjust-Blur- Radial Blur use settings below
-
Set the Layer Opacity of this layer to 46%
5.
Layers- Merge- Merge Down
6.
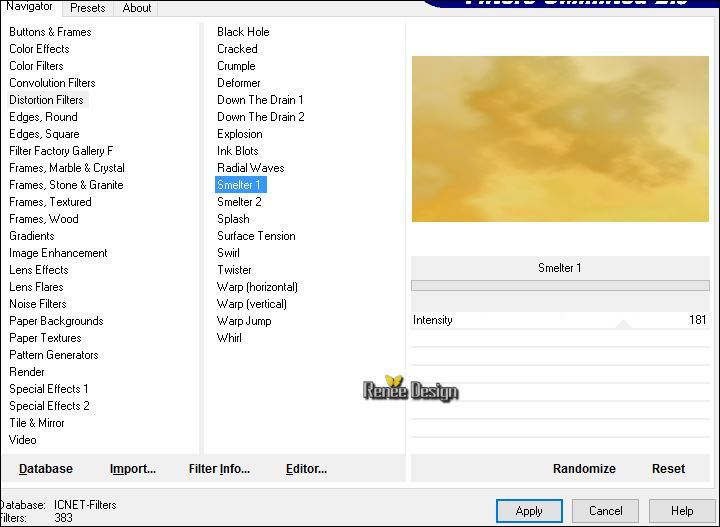
Effects –Plugins-Unlimited ICNET FILTERS - Distortion Filters-Smelter1
7.
Adjust-Blur- Radial Blur use settings below
-
Open the Mask ‘’Narah_Mask_1007.jpg’’ and minimize in your Psp
8.
Layers- New Raster Layer
-
Color-Palette :Set your foreground color to color #ffffff
9.
Activate Flood Fill Tool and fill the layer with the foreground color
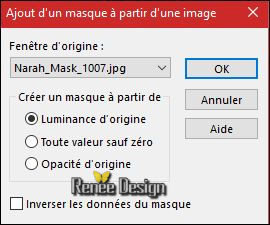
10.
Layers - New Mask Layer - From Image and choose my file :
’’Narah_Mask_1007.jpg’’
-
Layers- Merge- Merge Group
11.
Effects-Edge Effects Enhance
12.
Effects –3D Effects – Drop Shadow with these settings: 0/ -7/ 40 /10 black
13.
Effects –Plugins –Fotomatic- Sky Grad use settings below
-
Double click on this Layer and set the Blend Mode to " Hard Light "
14.
Open the tube ‘’
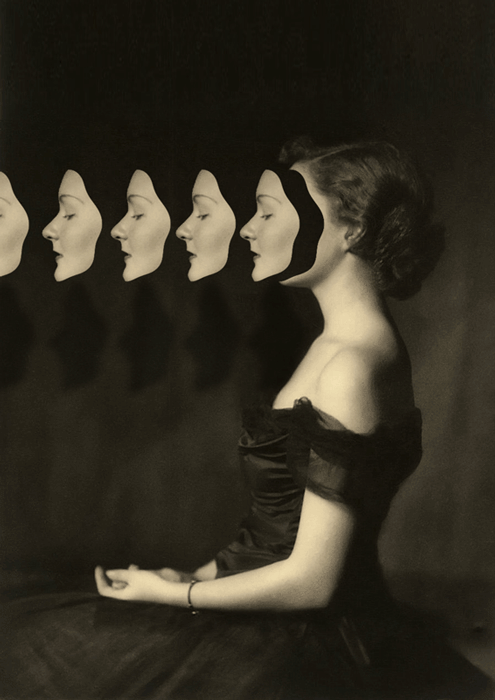
Renee_tube_revelation_image1 »
-
Edit/ Copy-Edit - Paste as new layer on your working image
-
Do not move, it is in the right place
15.
Double click on this Layer and set the Blend Mode to " Hard Light " Set the layer opacity of this layer to
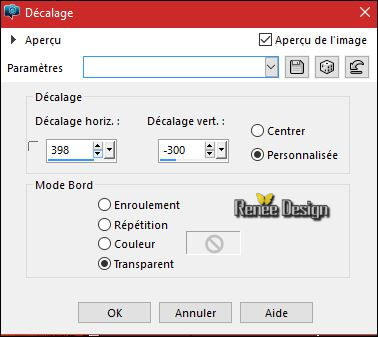
69%
-Layers- Arrange- Move Down
16.
Layers- Duplicate
-
Image -Flip (CTRL+I)
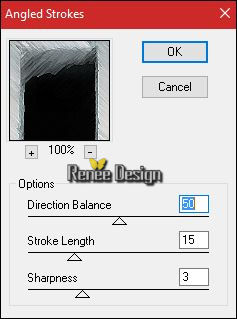
17.
Effects –Plugins– Brush Strokes – Angled
Strokes
18. Effects- Edge Effects- Enhance More
19. Effects- Image Effects- Offset with these settings: H = 0 and V = -
41
-
Layer palette – Make Raster 1 active
20. Effects
–Plugins– Photo Effex –scanlines use settings below

- Repeat this Filter 1x with the same settings
- To replace the top of the layers palette
21. Layers- New Raster Layer
- Color-Palette : Set your foreground color to color #1d0005 - Set your background color to color #ffffff
22.
Activate Flood Fill Tool and fill the layer with the foreground color
23.
Effects –Plugins – Richard Rosenman – Grid
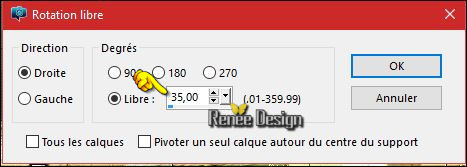
Generator use settings below
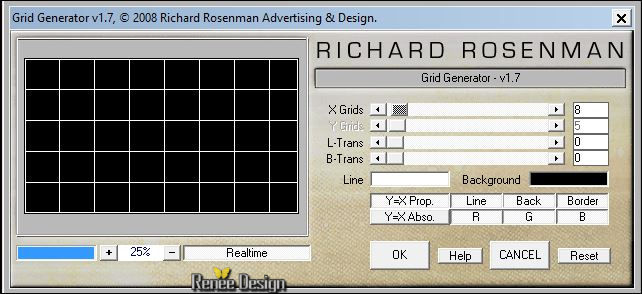
24.
Effects –Plugins – Transparency –Eliminate
black
25. Effects
–3D Effects –Drop Shadow with these settings:1/1/100/1 black
Layers- Arrange- Move Down-Above Raster 1
- To replace the top of the layers palette
26. Layers- New Raster Layer
27.
Selections –load/save selection –load selection from disc and select my selection: ‘’ Revelation’’
28. Activate Flood Fill Tool and fill the selection with the foreground color
Selections- Deselect All
- Layer Palette -double click on this layer and set the Blendmode to "Overlay"
29. Layers- Duplicate
- Image
Mirror CTRL+B)
30. Layers- Merge- Merge Down
- Layers- Duplicate
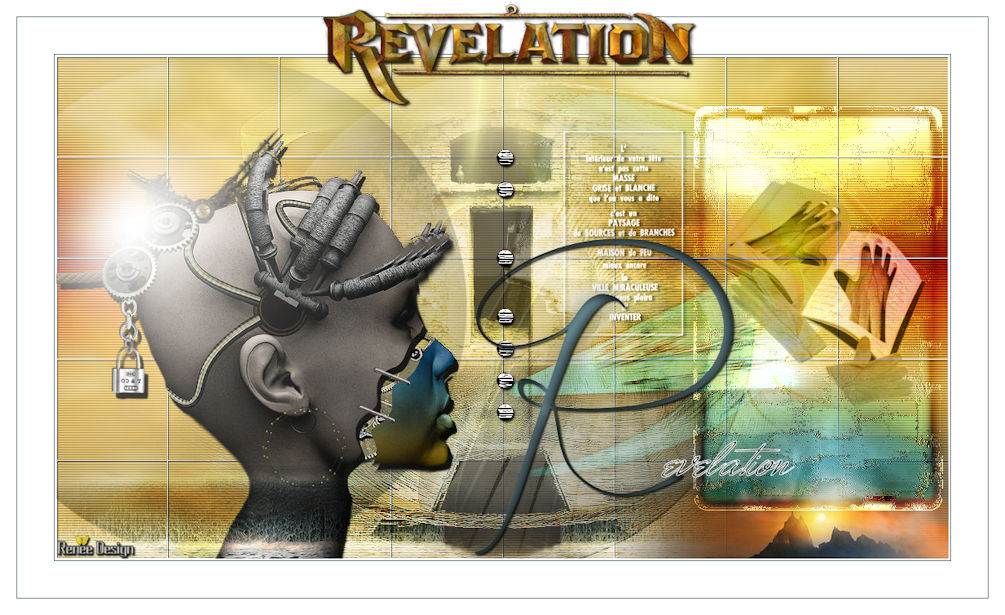
Your work and Layer Palette look like this now-You should have this result
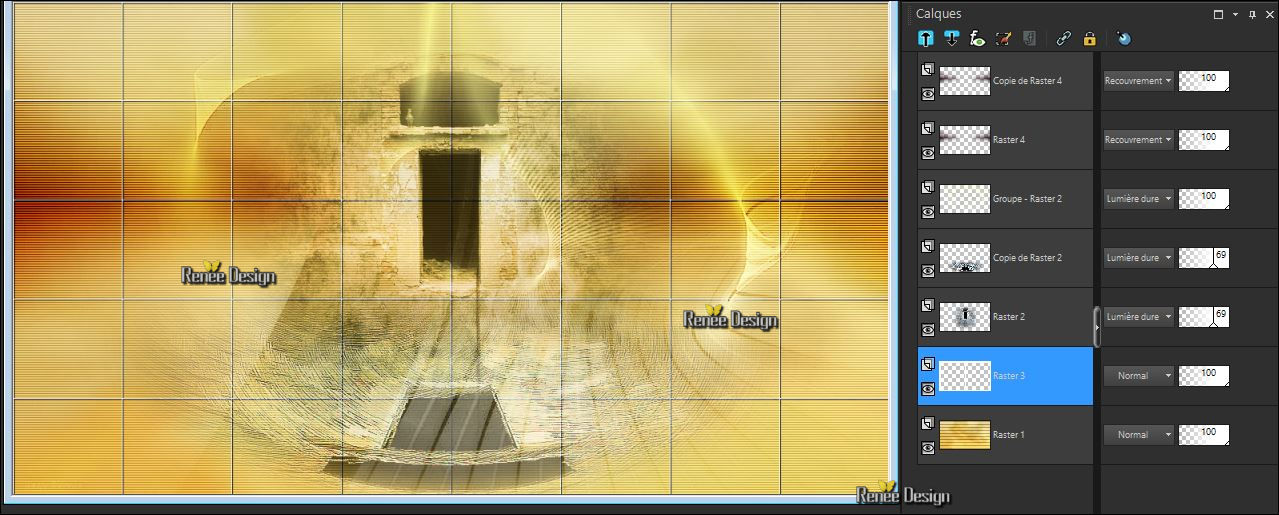
-
Layer palette – Make Raster 1 active
31.
Effects - Plugins-Unlimited ICNET FILTERS – Tile & Mirror- Mirrored
& Scaled
- To replace the top of the layers palette
32. Layers- New Raster Layer
33. Pot of Paint: Change the Opacity of the color at 30%-Activate Flood Fill Tool and fill the layer with the foreground color
34.
Effects-Plugins - Unlimited ICNET FILTERS -Buttons & Frames -
Rectangular Button
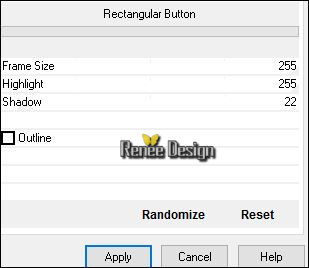
35.
Effects –Plugins – Toadies – What are you at
120/46
36. Effects
–Geometric Effects – Circle - Transparent
37. Effects
–User Defined Filter- Emboss 3 using the default settings
- Double click on this Layer and set the Blend Mode to " Hard Light " –Set the layer Opacity of this layer to 46%
38. Layers- New Raster Layer
39. Effects
–Artistic Effects- Balls and Bubbles and select my file - Preset « effet
_bulle_revelation’’( C:\Users\YourName\Documents\My PSP-files\extract into the folder preset
-Included into the zipfile )
Do you have problems with this? Png image ‘’revelation_effet_bulle ‘’ is into the zipfile and paste as a new layer on your working area (for replacing )
40. Effects
– Image Effects - Offset with these settings: H = - 350 and V = 0
41.
Open the tube ‘’
Renee_tube_she_dreams.pspimage’’(Minimize the tube we need it later)
- Activate the layer ‘’renee_tube_revelation’’of the tube
-
Edit/ Copy-Edit - Paste as new layer on your working image
42. Effects- Image Effects- Offset with these settings:

Back on the tube‘’
Renee_tube_she_dreams.pspimage’’-activate raster 1of the tube
- Edit/ Copy-Edit - Paste as new layer on your working image
- Move as shown in the example below
43.
Selections- Select All
Selections -Float
Selections-
Defloat
44.
Selections- Modify-Expand 8 pixels
- Activate the layer underneath ( tube face/visage )
DELETE
Selections- Deselect All
- Remove the layer above that shows the curve on the face (see screen shot)
- To replace the layer underneath (Face /visage)
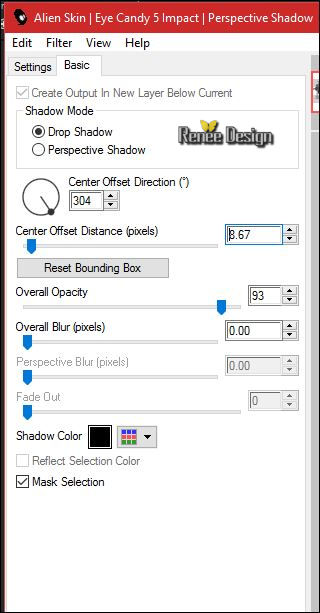
45. Effects
–Plugins – Eyecandy 5 Impact- Perspective
shadow use settings below
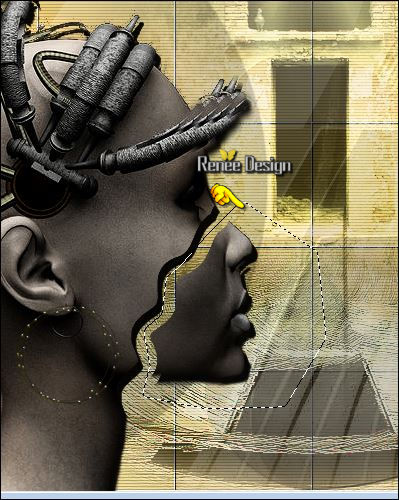
46. Activate Freehand Selection -Lasso – Mode Point to point with these settings

–
Select this part as shown in the example below
47.
Effects –Plugins– Nick Color Effex Pro3.0 – Bicolor
/ color set Cool warm 1
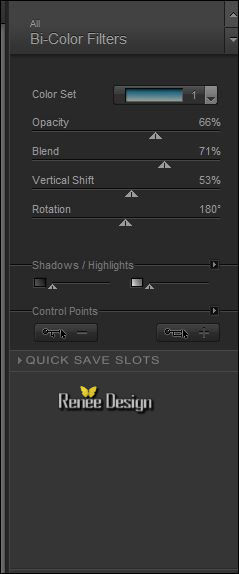
Selections- Deselect All
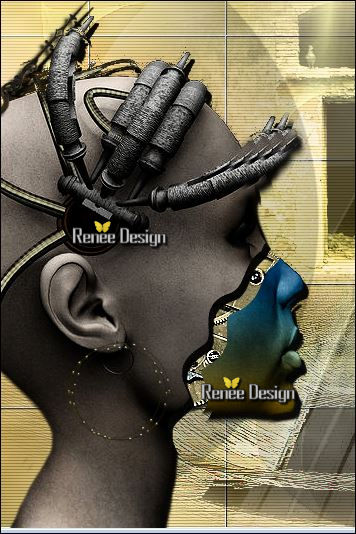
48. Open the tube ‘’ revelation_rouage’’
- Edit/ Copy-Edit - Paste as new layer on your working image
- Move the tube with the move tool in its place
- Layers- Arrange- Move Down
- Erase if necessary which exceeds the face
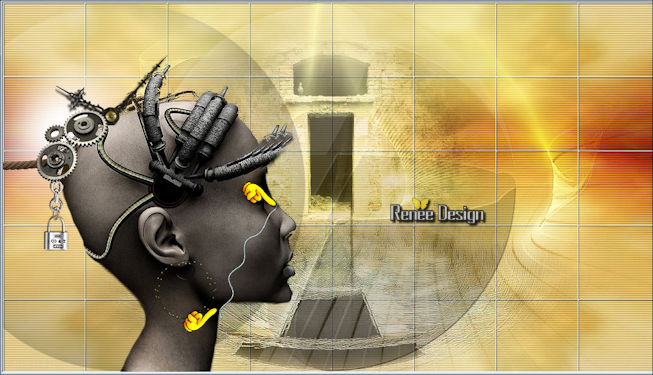
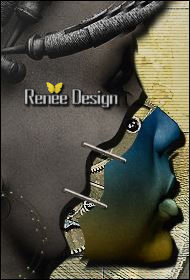
The Result
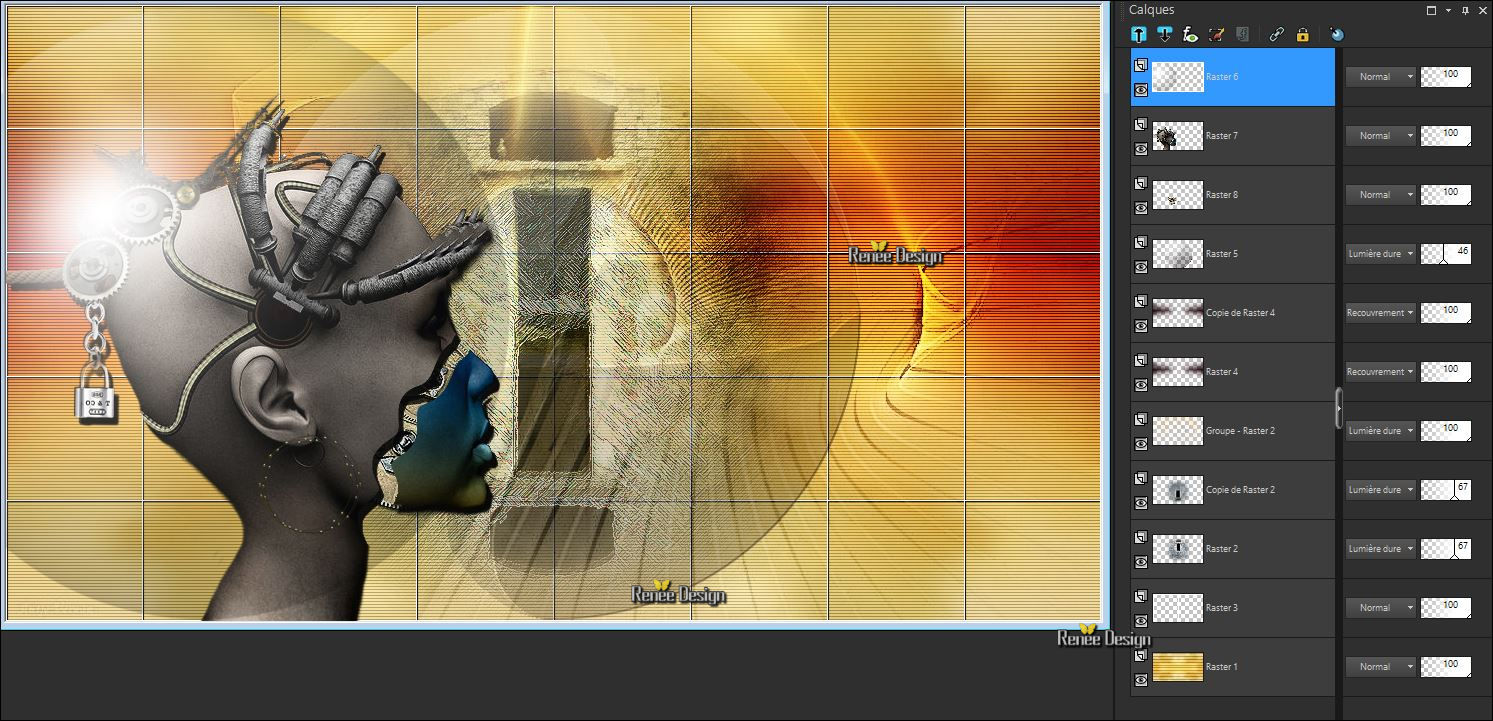
- Layer palette – Make Raster 6 active -Layers- Arrange- Bring to Top
Your work and Layer Palette look like this now-You should have this result
49. Open the tube ‘’agrafes.png’’
Choice your tube (If your choice is another type of attachment must also properly match) and paste as a new layer on your working image and move as shown in the example below
- Layers- Merge- Merge Down
50. Open the tube ‘’ Renee_tube_revelation_image2.pspimage’’
-Edit/ Copy-Edit - Paste as new layer on your working image
51. Effects- Image Effects- Offset with these settings: H = 6 and V = 25
Transparent
52. Open the tube ‘’ Renee_tube_revelation_image3.pspimage’’
- Edit/ Copy-Edit - Paste as new layer on your working image
- Move Tool / place your tube to the bottom of your image
- Color-Palette :Set your foreground color to color #3a676e - Set your background color to color #ffffff
- Activate Brush Image :’’ renee_pinceau _revelation’’ In your PSP
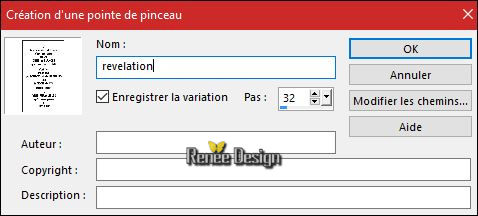
53. File- Export -Custom Brush
- Give it a name "revelation’’
54. Activate Brush Tool and select my file in the list: "revelation" with these settings – Size 250

55. Layers- New Raster Layer
-
Stamp your brush at the right place by using your background color #ffffff
- Double click on this Layer and set the Blend Mode to " Hard Light "
- And move in the right place
57. Layers- Merge- Merge- Visible
- Properties Forground; Set your Foregroundcolor to foreground-background linear gradient,configured like this.
58. Layers- New Raster Layer
59.
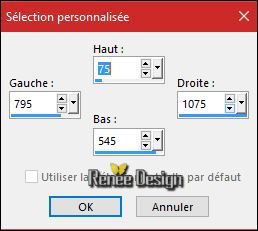
Activate Selection Tool -Custom Selection (S) -Rectangle with these settings
60. Pot of Paint: Change the Opacity of the color at 100 %- Activate Flood Fill Tool and fill the selection with the gradient
Selections- Deselect All
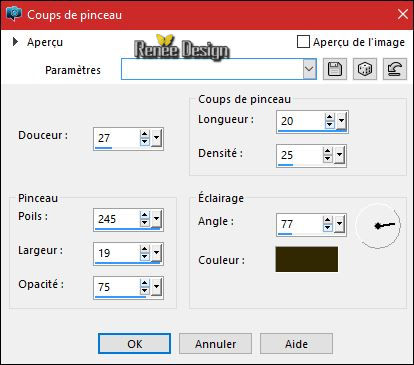
61. Effects- Art Media Effects- Brush Strokes use settings below-Color #3c3208
62. Effects- Edge Effects- Enhance
- Double click on this Layer and set the Blend Mode to " Hard Light "
63.
Layers- Duplicate
64.
Effects –Plugins-Unlimited – AlphaWorks- i-White
WhiteOut
- Layer Palette -Double click on this layer and set the Blendmode to "Overlay"
65. Layers- Merge- Merge Down
- Layer Palette -Double click on this layer and set the Blendmode to "Overlay"
66.
Selections –load/save selection –load selection from disc and select my selection: ‘’
Revelation_1’’
67.
Selections: Promote selection to Layer
Selections- Deselect All
68. Effects
–Plugins– Mura’s Meister – Pole Transformation
(Attention; Click "Reset" Settings to Default and change the settings and OK )
69. Layers- Merge- Merge Down
-Layer Palette -Double click on this layer and set the Blendmode to "Overlay"
70. Effects
–3D Effects – Drop Shadow with these settings: 0/2/35/42 black
71. Effects
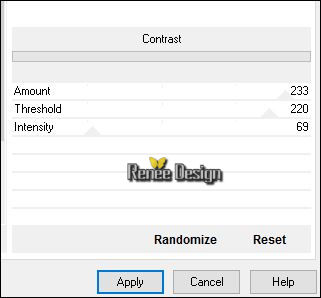
–Plugins- Unlimited - Graphics Plus – Contrast
72. Layers- Duplicate
73. Effects- Distortions Effects-Polar Coordinates-Rectangular to Polar -Transparent
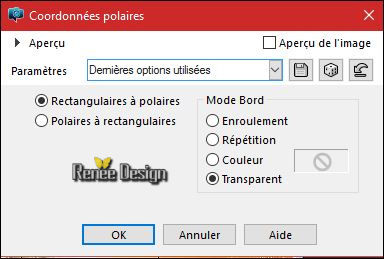
- Layer Palette - Double click on this Layer and set the Blend Mode to " Soft Light"
74. Open the tube ‘’ Renee_tube_Mains_revelation.pspimage’’
- Image
Resize to 50%
-
Edit/ Copy-Edit - Paste as new layer on your working image
75. Image
Free Rotate with these settings
- Move Tool (M)place your tube on the right side of your image
76. Double click on this Layer and set the Blend Mode to " Luminance Legacy" -Set the layer Opacity of this layer to 69%
- Layer- Palette- Activate the Merged Layer
77. Open the tube ‘’ Renee_tube_revelation_image4.pspimage’’
-
Edit/ Copy-Edit - Paste as new layer on your working image
78. Effects- Image Effects- Offset with these settings:
79. Open the tube ‘’ Image R’’
- Edit/ Copy-Edit - Paste as new layer on your working image and move
80. Activate Text Tool (T) -Font ‘’Monika’’ size 48
FG-Color#fffff-BG-Color black -Write:« evelation »
-Place the word against the letter R
81. Image - Add borders-Symmetric checked: 2 pixels #ffffff
82. Image - Add borders-Symmetric checked: 1 pixel #3a676e
83. Image - Add borders-Symmetric checked: 45 pixels #ffffff
84. Image - Add borders-Symmetric checked: 1 pixel #3a676e
85. Image - Add borders-Symmetric checked: 20 pixels #ffffff
86. Open the "titre" -Edit -Copy- Edit Paste as a new layer and move
87.
Layers- Merge- Merge All (flatten)
88. Image
Resize to 1005 pixels Width. Save as JPG
**************
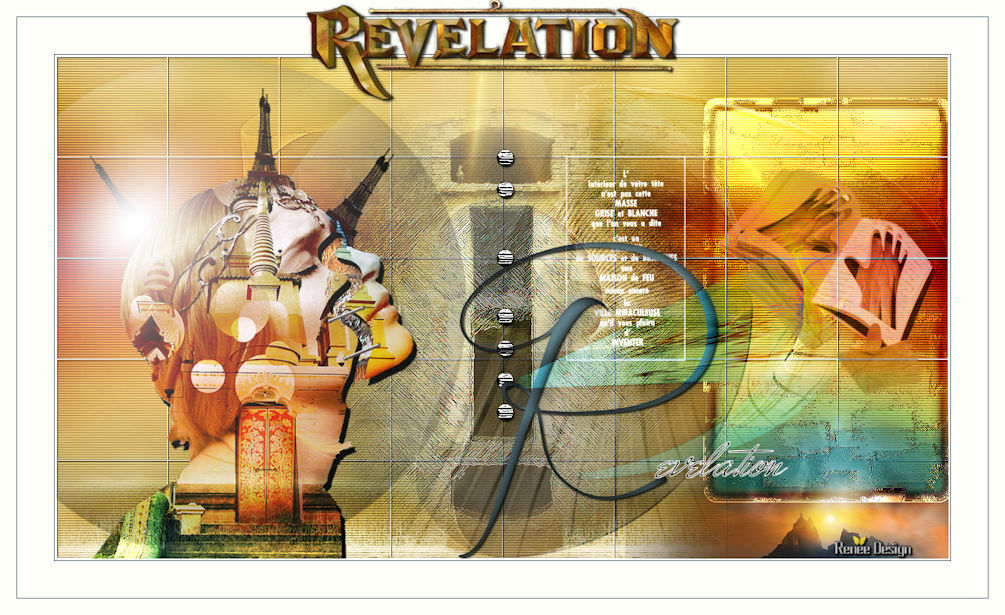
Second example for this realization
(Tube is into the zipfile )
I hope you enjoyed this lesson
Renée
This lesson was written by Renée
16/07/2016
Edited and Update
2016
*
Any resemblance with an existing lesson is a coincidence
* Do not forget to thank the people who work with us and for us I have appointed the tubeurs and translators
Thanks Renée
*
*
| 
 Translations


 When you see this logo the filter is imported in Unlimited

 All rights reserved