|
Enjoy the waves
Let's start the lesson.
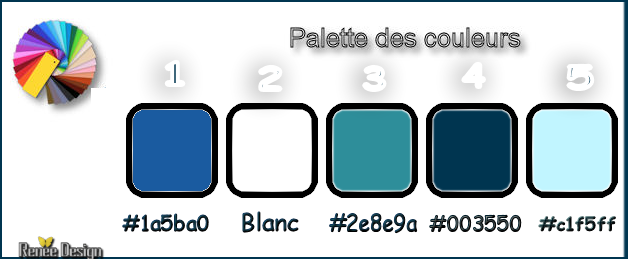
Used Colors
Preparation - Color Palette:Set your Foreground color to #ffffff -Set your Background color to
#1a5ba0
1. Open Image ‘’Fond_ Enjoy the waves’’ / Window - Duplicate (or shift+D) - Close the original and proceed on the copy -Promote Background Layer = Raster 1
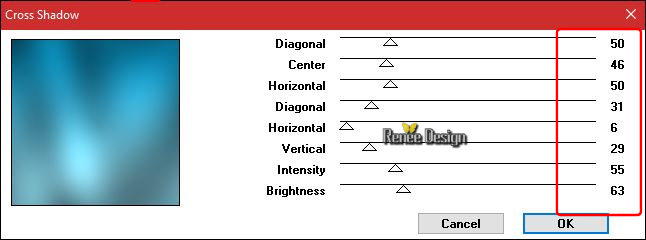
2. Effects –Plugins– Graphic plus – Cross Shadow use the settings below
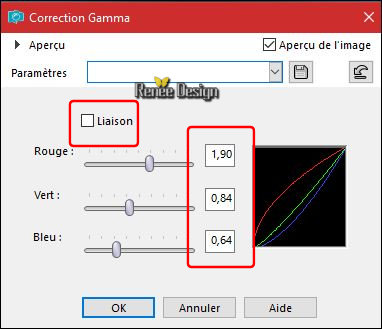
3. Adjust -
Gamma Correction use the settings below (
Shift + G )
-(Adapt here according to the colors of your tube if you do not take mine )
4. Effects –Plugins-Unlimited - &<Bkg Designer
sf10 I> Blur 'em!...
130/12
5. Effects –
Edge Effects- Enhance
6. Layers- New Raster Layer
7.
Selections –load/save selection –load selection from disc and select my selection: ‘’ Enjoy the
waves’’
8. Activate Flood Fill Tool  and fill the selection with the foreground color #ffffff and fill the selection with the foreground color #ffffff
Selections- Deselect All
9.
Layers-Properties-Set the Blend Mode to " Dodge "
10. Open your tube ‘’ Enjoy the waves_image_1’’
- Edit - Copy- Activate your work -Edit - Paste as a new layer
- Activate your Move Tool (M)-move to the bottom of your image
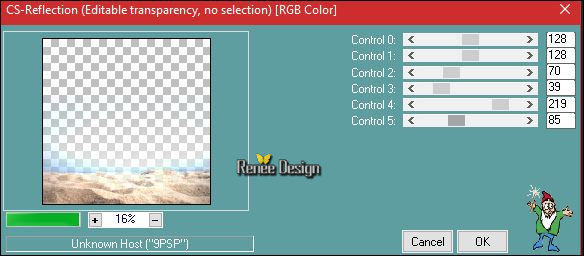
11. Effects
- Plugins – Carolaine et sensibility -
CSReflection use the settings below
12. Open the tube ‘’ Enjoy the waves_verre’’
- Edit - Copy- Activate your work -Edit - Paste as a new layer
13. Effects- Image Effects- Offset with these settings : H = - 92 and V = - 70
14.
Layers-Properties-Set the Blend Mode to " Luminance " -Set the Opacity of this layer to 73%
15. Open your tube ‘’ Enjoy the waves_image_2.png’’
- Edit - Copy- Activate your work -Edit - Paste as a new layer
-
Move it down against the water glass.
-
Set the Opacity of this layer to 77%
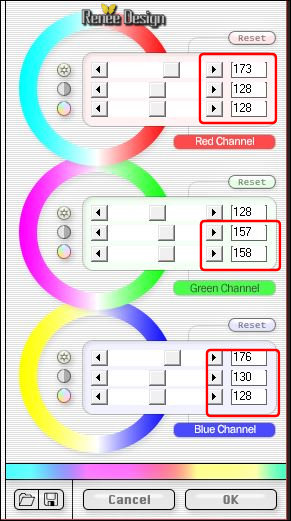
16. Effects
–Plugins - Final Impact – Vivida use the settings below
- Color Palette:Set your Background color to
#2e8e9a
17. Layers- New Raster Layer
18.
Selections –load/save selection –load selection from disc and select my selection: ‘’ Enjoy the
waves_1’’
19. Activate Flood Fill Tool  and fill the selection with the background color #2e8e9a (2
clicks) and fill the selection with the background color #2e8e9a (2
clicks)
20.
Adjust- Blur- Gaussian Blur: Radius 8
Selections- Deselect All
21.
Layers- Arrange- Move Down
22. Layers- New Raster Layer
23.
Selections –load/save selection –load selection from disc and select my selection: ‘’ Enjoy the
waves_2’’
24. Activate Flood Fill Tool  and fill the selection with the background color #2e8e9a(4
clicks) and fill the selection with the background color #2e8e9a(4
clicks)
Selections- Deselect All
25.
Layers-Properties-Set the Blend Mode to " Multiply " -Set the Opacity of this layer to
91%
-To replace the top of the layers palette
26. Layers- New Raster Layer
27.
Selections –load/save selection –load selection from disc and select my selection: ‘’ Enjoy the
waves_3’’
28. Activate Flood Fill Tool  and fill the selection with the foreground color #ffffff (2 clics) and fill the selection with the foreground color #ffffff (2 clics)
Selections- Deselect All
-
Layers-Properties-Set the Blend Mode to "Dodge"
29. Open the tube ‘’ Enjoy the waves_enfants and
parasol’’(The tube already has a shadow)
- Edit - Copy- Activate your work -Edit - Paste as a new layer
-
Move Tool / place your tube to the bottom of your image (see finished image)
30. Layers- New Raster Layer
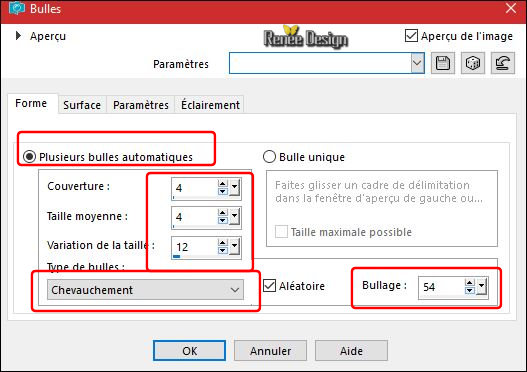
31. Effects
– Artistic Effects – Balles and Bubbles use the settings below(overlapping)
32. Image- Reisze to 25%
- Move in the glass
33. Open the tube ‘’ Enjoy the waves_plongeurs’’
- Edit - Copy- Activate your work -Edit - Paste as a new layer
- Move in the glass
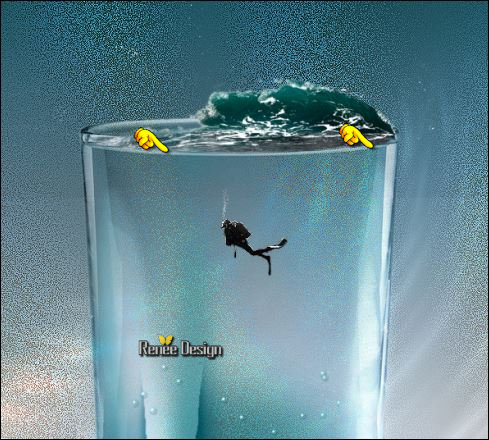
34. Open the tube ‘’ Enjoy the waves_grosse_vague’’
- Edit - Copy- Activate your work -Edit - Paste as a new layer
- Move it to the edge of the water glass
- Layers- New Raster Layer
35.
Selections –load/save selection –load selection from disc and select my selection: ‘’ Enjoy the
waves-9’’
36. Activate Flood Fill Tool  and fill the selection with the foreground color #ffffff and fill the selection with the foreground color #ffffff
Selections- Deselect All
-
Layers-Properties-Set the Blend Mode to "Hard Light "
37. Layers- New Raster Layer
38.
Selections –load/save selection –load selection from disc and select my selection: ‘’ Enjoy the
waves_4’’
Color Palette:Set your Background color to #003550
39. Activate Flood Fill Tool  and fill the selection with the background color #003550 and fill the selection with the background color #003550
40. Effects
–Plugins - Eyecandy 7 /Clouds –Weather use the settings below
(If your filter does not give the same result.Or you don't have this filter /The effect is included with the material / and paste into selection.)Color #003550 (4) and color #c1f5ff
(5)
Filter Eye Candy 7 is for sale
Do not know the price of this filter
On my website you can find the filter
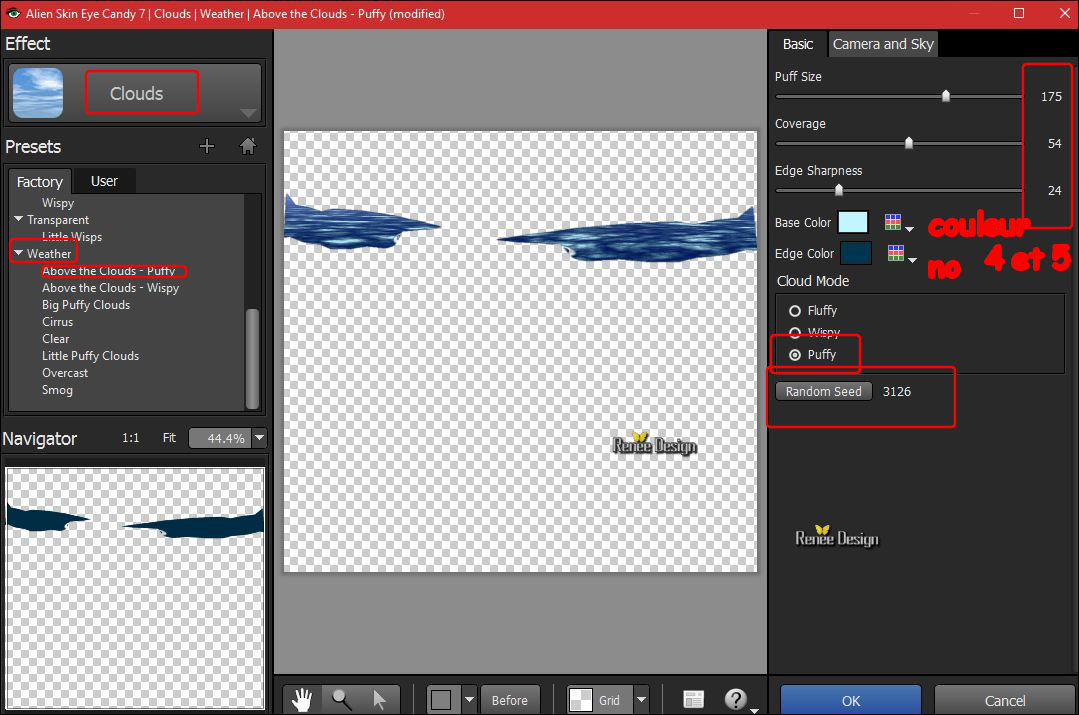
Selections- Deselect All
41. Effects
– Plugins – EyeCandy 5 Impact – Glass use the settings below
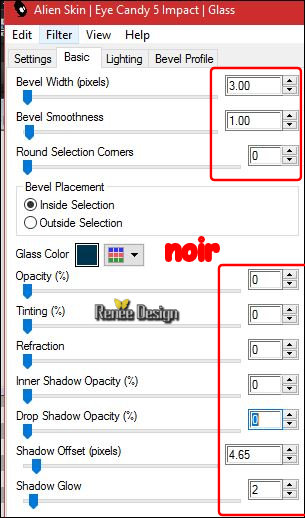
42. Layers- Arrange- Move 2x Down
- To replace the top of the layers palette
43. Layers- New Raster Layer
44.
Selections –load/save selection –load selection from disc and select my selection: ‘’ Enjoy the
waves_5’’
45. Activate Flood Fill Tool  and fill the selection with the foreground color #ffffff and fill the selection with the foreground color #ffffff
Selections- Deselect All
46. Effects
– Edge Effects- Enhance
- Color Palette:Set your foreground color to
#c1f5ff
- In the Layerpalette: Make Raster 4 active (Glass )
47. Layers- New Raster Layer
48.
Selections –load/save selection –load selection from disc and select my selection: ‘’ Enjoy the
waves_6’’
49. Activate Flood Fill Tool  and fill the selection with the foreground color #c1f5ff (2
clicks) and fill the selection with the foreground color #c1f5ff (2
clicks)
Selections- Deselect All
50.
Layers- Duplicate
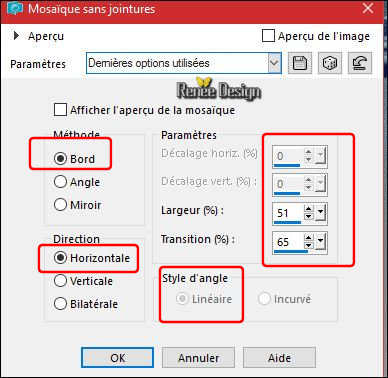
51. Effects- Image Effects- Seamless Tiling use the settings below
52.
Layers-Properties-Set the Blend Mode to "Overlay "
53. Layers- Merge- Merge Down
- To replace the top of the layers palette
54. Open the tube ‘’ Enjoy the waves_2 oiseaux’’
- Edit - Copy- Activate your work -Edit - Paste as a new layer
-
Activate your Move Tool (M) place it in the right place (see finished image)
55. Effects- 3 D Effects- Drop Shadow with these settings: 3/ -4/ 60 / 40 black
56. Open the tube ‘’ Enjoy the waves_surfeurs’’ and Open the tube "Enjoy the waves_Femme
_surfeurs’’
-
Edit - Copy- Activate your work -Edit - Paste as a new layer
- Be careful to place them on the waves.
57. Open the tube ‘’mouette’’ and ‘’
poissons’’
-
Edit - Copy- Activate your work -Edit - Paste as a new layer
-Activate your Move Tool (M) place it in the right place (see finished image)
58. Layers- Merge- Merge Visible
59. Layers- New Raster Layer
60.
Selections –load/save selection –load selection from disc and select my selection: ‘’ Enjoy the
waves_7’’
61.Color Palette:Set your foreground color to#ffffff
Activate Flood Fill Tool  and fill the selection with the the foreground color #ffffff (2 or 3
clicks) and fill the selection with the the foreground color #ffffff (2 or 3
clicks)
Selections- Deselect All
62. Layers- New Raster Layer
63.
Selections –load/save selection –load selection from disc and select my selection: ‘’ Enjoy the
waves_8’’
- Color Palette:Set your foreground color to #ffffff -Set your background color to
#003550
64. Effects
–Plugins – Mura’s Meister Clouds/ color #ffffff (2) / #ffffff (2)
and color #003550 (4 )
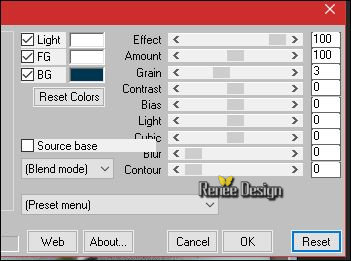
Selections- Deselect All
65. Effects
–Plugins – Final Impact –Hotshot use the settings below
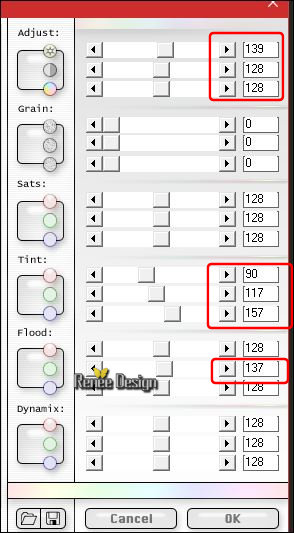
66. Attention!!!! Adjust- Blur- Gaussian Blur : Radius : 1,25
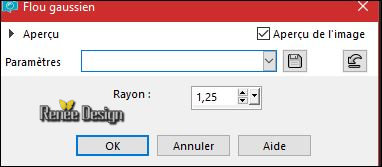
67. Effects
–Plugins –Eyecandy 5 Impact –Perspective
shadow use the settings below
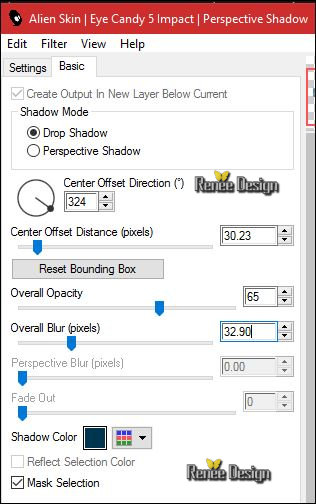
68. Image - Add borders-Symmetric checked 1pixel #003550 (4)
69. Image - Add borders-Symmetric checked 30 pixels #ffffff (2)
70. Image - Add borders-Symmetric checked 1 pixel #2e8e9a (3)
71. Image - Add borders-Symmetric checked 15 pixels #c1f5ff (5)
72. Image - Add borders-Symmetric checked 30 pixels #ffffff (2)
73.Open the tube "titre"and Open the tube ‘’Enjoy the waves_Grand_plongeur’’
- Edit - Copy- Activate your work -Edit - Paste as a new layer-Activate Move Tool (M) move it the right place at the bottom of your image (see finished image)
74. Layers- Merge- Merge All (flatten)
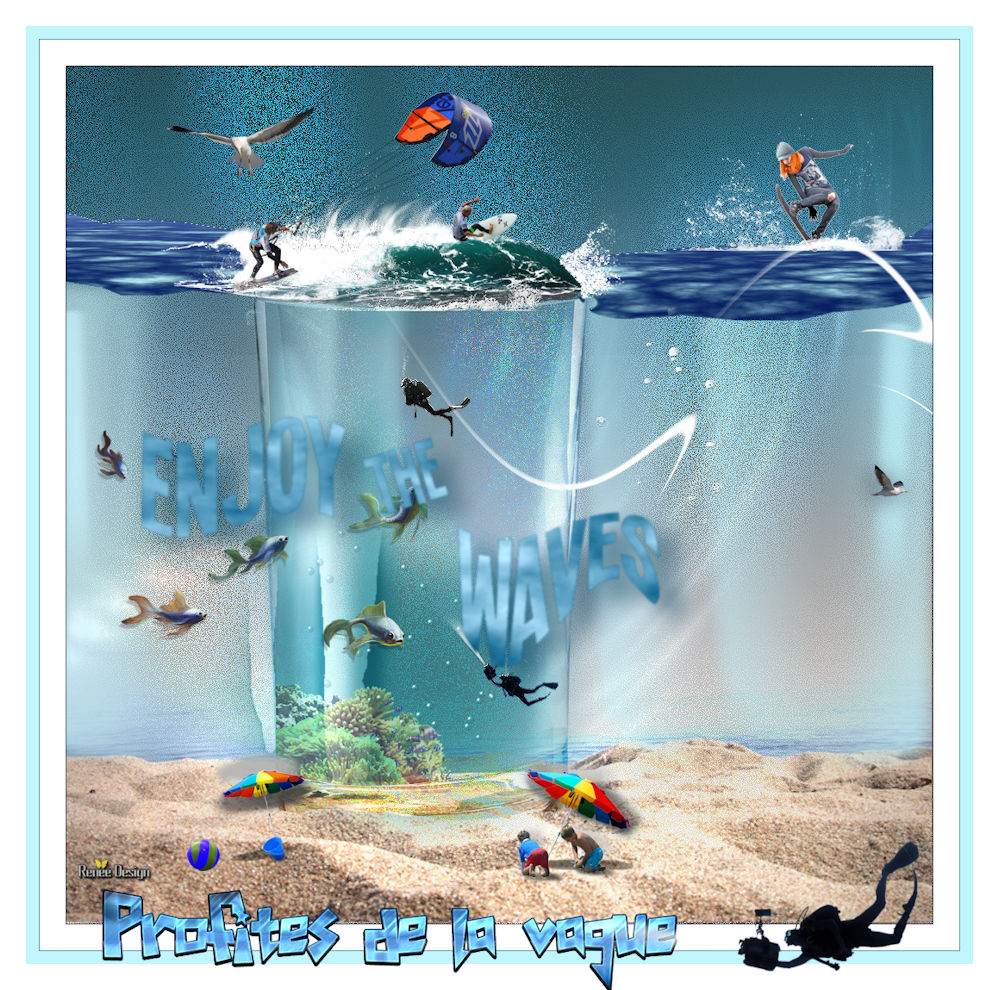
75. Image
Resize to 999 pixels Width
Save as JPG
I hope you enjoyed this lesson
Renée
This lesson was written by Renée 20/04/2017
Edited and Update
2017
*
Any resemblance with an existing lesson is a coincidence
* Do not forget to thank the people who work with us and for us I have appointed the tubeurs and translators
Thanks Renée
| 
 Translations



 If a plugin supplied appears with this icon it must necessarily be imported into Unlimited *


 All rights reserved
