|
New
OLIFRANNE...d.aillleurs Traducteur
-Let's start the lesson. 1. Color-palette:Set your foreground color to color #e5c616 -Set your background color to color #627929 2. File - New - New Transparent Image 980 x 600 pixels 3. Activate Flood Fill Tool and fill the layer with the foregroundcolor #e5c616 4. Layers- New Raster Layer 5. Selections- Select All 6. Open the tube « abstract003 » Edit/ Copy-Edit - Paste into selection 7. Effects- Plugins- /Transparency /eliminate black 8. Effects- Hue and Saturation- Colorize 107/58 9. Layers- Duplicate 10. Effects- Geometric Effects- Circle- transparent - Repeats: Effects- Geometric Effects- Circle- transparent 11. Effects- Image Effects- Offset with these settings: H = -300 and V = 0 12. Selections- Select All- Selections-Float- Defloat 13. Layers- New Raster Layer 14. Open the tube « gina tube 1667 » Edit/ Copy-Edit - Paste into selection 15. Selections- Deselect All 16. Layers- Merge- Merge Layers Down 17. Effects- Plugins - Eyecandy 5-Impact - Glass -tab Settings/User settings choose my Preset « vision future » - Activate the bottom of the layers palette =(raster1) 18. Layers- New Raster Layer 19. Selections- Select All- 20. Open the »tube 1780_room_with_a view_misted »/Edit/ Copy-Edit - Paste into selection 21.S elections- Deselect All 22. Effects- Plugins- Fm Tile tools / metallic emboss
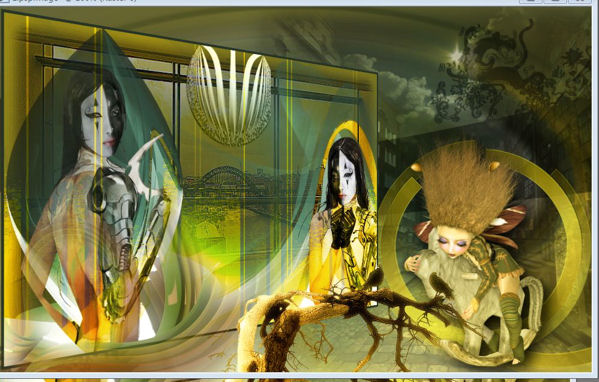
23. Effects- Edge Effects- Enhance More-Double click on this Layer and set the Blend Mode to "Hard Light " - Activate the top of the layer palette 24. Open the tube "gina tube femme 1666" /Image Resize to 80% 25. Edit/ Copy-Edit - Paste as new layer on your working image - Move tool / place your tube on the right side of your image (see completed) - - You should have this result as shown in the print screen below pour le moment
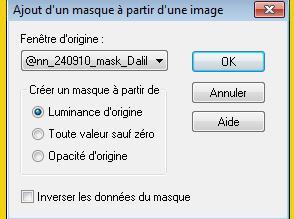
26. Layers- New Raster Layer /Activate Flood Fill Tool and fill the layer with #f0d213 27. Layers- New Mask layer from Image and choose Mask: " @ann_240910Mask dalila _001 »Layers- Merge- Merge Group -Double click on this Layer and set the Blend Mode "Overlay"
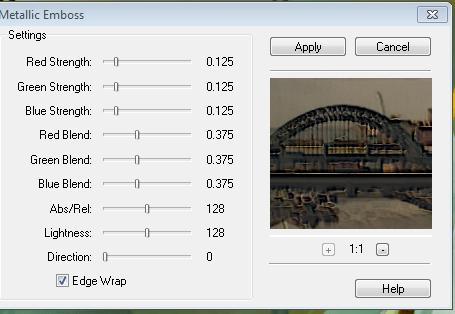
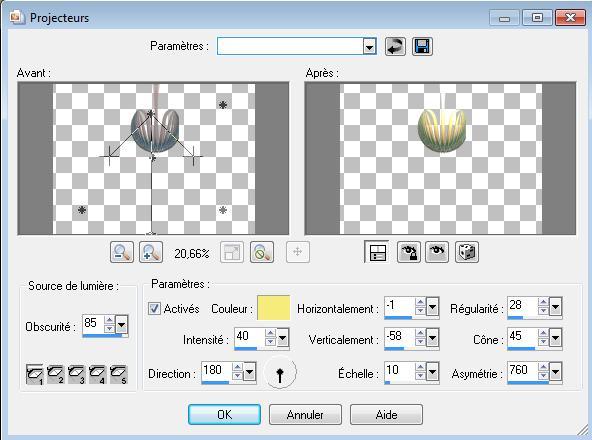
28. Open the tube'' image 9 ''/Edit/ Copy-Edit - Paste as new layer on your working image - Move tool / place your tube on the top of your image (see completed) Image Free Rotate 90° Repeat -Effects-Plugins -FMTile tools /metallic emboss with thes same settings 29.Effects- Illumination Effects-Lights with these settings -Color /#f6ec7b /Double click on this Layer and set the Blend Mode to "Luminance-Legacy "
- You should have this result as shown in the print screen below
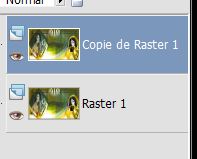
30. Layers-Merge- Merge Layers Visible 31.Image - Add borders-Symmetric checked: 5 pixels #293625 - Promote Background Layer =Raster 1 32. Layers- Duplicate - You should have this result as shown in the print screen below
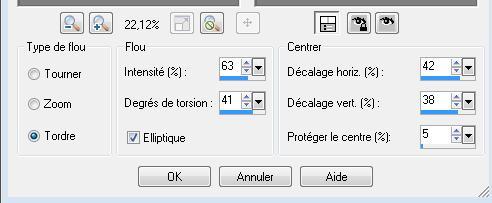
33. To replace the top of the layers palette =copy of raster1 34. Effects- Plugins - Andromeda perspective/side walls /Preset - it open 35. Activate the bottom layer in the Layer Palette =raster 1 36. Adjust- Blur- Radial Blur use settings below -and repeat 1x with the same settings
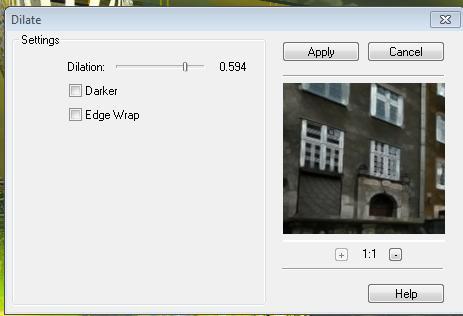
- Stay on the bottom layer in the Layer Palette =raster 1 37. Open the tube " streetlife1" /Edit/ Copy-Edit - Paste as new layer on your working image - Move tool / place your tube on the right side of your image - Layer Palette - Double click on this Layer and set the Blend Mode to "Hard Light " - Set the layer opacity of this layer to 51% 38. Effects-Plugins - FM Tiles Tools /Dilate
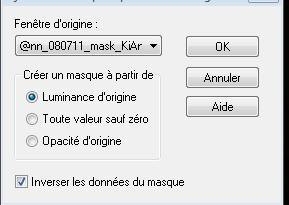
- To replace the top of the layers palette 39. Layers- New Raster Layer /Activate Flood Fill Tool and fill the layer with color black 40.Layers- New Mask layer from Image and choose Mask:« @ann_080711-mask kian « Layers- Merge- Merge Group
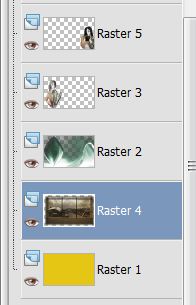
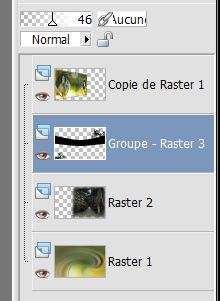
- Set the layer opacity of this layer to 48% 41. Layers- Arrange- Move Down Your Layer palette look like this now-You should have this result
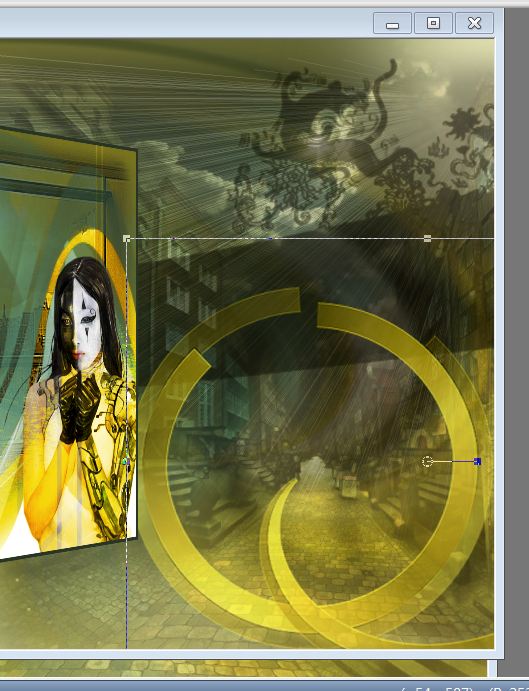
42. Open the « tube circle « Edit/ Copy-Edit - Paste as new layer on your working image - Move tool / place your tube as shown in the example below
43. Layers- Arrange- Move Down - Set the layer opacity of this layer to 65% 44. Effects- 3 D Effects- Drop Shadow with these settings
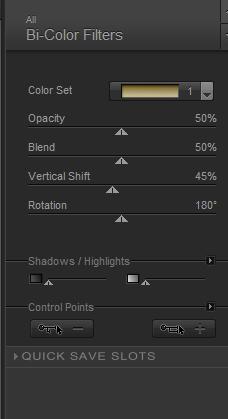
45. Open the tube « arbre oiseaux »Edit/ Copy-Edit - Paste as new layer on your working image - Move tool / place your tube on the right side of your image (see completed) 46. Effects- Plugins-Nick Color Effex - Bi color filters - choisir /cool warm no 1 47. Open the tube''Delicia-3 belles graphics'' Image Resize to 60% -Edit/ Copy-Edit - Paste as new layer on your working image 48. Layers- Arrange- Move Down 49. Effects- Plugins -Nick Color effex-Bicolor Filters - Brown 1
50. Open the tube « double circle « Edit/ Copy-Edit - Paste as new layer on your working image - Move tool / place your tube on the left side of your image (see completed) - You should have this result as shown in the print screen below
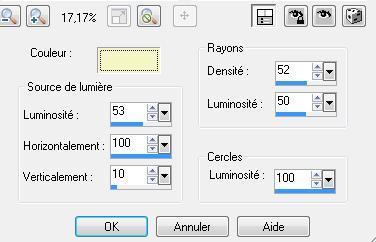
51. Activate the bottom layer in the Layer Palette = ( raster 1 ) 52. Effects- Illumination- Effects-Sunburst with these settings-Color #F5F5C7
- Repeat-Effects- Illumination- Effects-Sunburst with the same settings 53.Image - Add borders-Symmetric checked: 5 pixels black 54. Image - Add borders-Symmetric checked: 45 pixels white /Activate the Magic Wand and select the border of 45 pixels 55. Activate Flood Fill Tool and fill the selection with #e7d20d 56. Effects- Plugins - Alien skin Xenofex2 /puzzle/add an effect to your own choose 57. Image - Add borders-Symmetric checked: 10 pixels #627929
Save as JPEG I hope you enjoyed this lesson Renée This lesson was written by Renée 1/08/2009
Edited and Update
08/08/2009 **
My tutorials are registered regularly ReneeGraphisme_All rights reserved
* Any resemblance with an existing lesson is a coincidence * Do not forget to thank the people who work with us and for us I have appointed the tubeurs and translators Thanks Renée
|

 Translations